
BRACKETING
Bracketing scenes with high dynamic range
How to bracket exposures automatically and manually to capture full dynamic range in a scene.
Bracketing is the method of taking multiple exposures of a scene with high dynamic range to ensure all of the tonal range is captured in camera. A golden bright sunset or any scene with a wide range of brights and darks can present an issue.
This section explores how we carry out bracketed images and what to do with them afterwards.
BRACKETING AND HDR
Bracketing (AE BKT or Auto Exposure Bracketing) is in essence HDR (High Dynamic Range). We have all seen those images which look more like a surrealist painting. Horrible right? In fact Olympus even has two HDR modes that will produce an HDR in camera. What we are attempting to achieve is shooting images that are under and over exposed to capture all the information which are then merged together to give a natural looking image. We simply want to make sure highlights are not blown and shadows are not blocked in. If the final image looks like an HDR it’s a fail.
All cameras have a Dynamic Range they are capable of capturing, or the number of stops of light apart they can capture. The Olympus EM1 MK3 has just over 12 stops whilst the Nikon D850 / Z7 have around 14.5. Quite a difference. That doesn’t mean the Olympus isn’t capable, we just need to be a little more careful. I also use a Z7 and still have to bracket with that sometimes.
Another way to control the dynamic range is to use Graduated ND Filters, which bring down the brightness of skies. Using filters is very effective and does allow you to capture the scene in one frame giving considerable control. It is very rewarding capturing an image in one in-camera. Varying densities, angles, even using another upside down to push light where you want are all techniques worth exploring. However the two are not mutually exclusive, use filters, use Bracketing, or do both. I will often use a filter and bracket for just part of a scene. Knowing how to approach a scene with different techniques means you have choices, and choices mastered means full control.
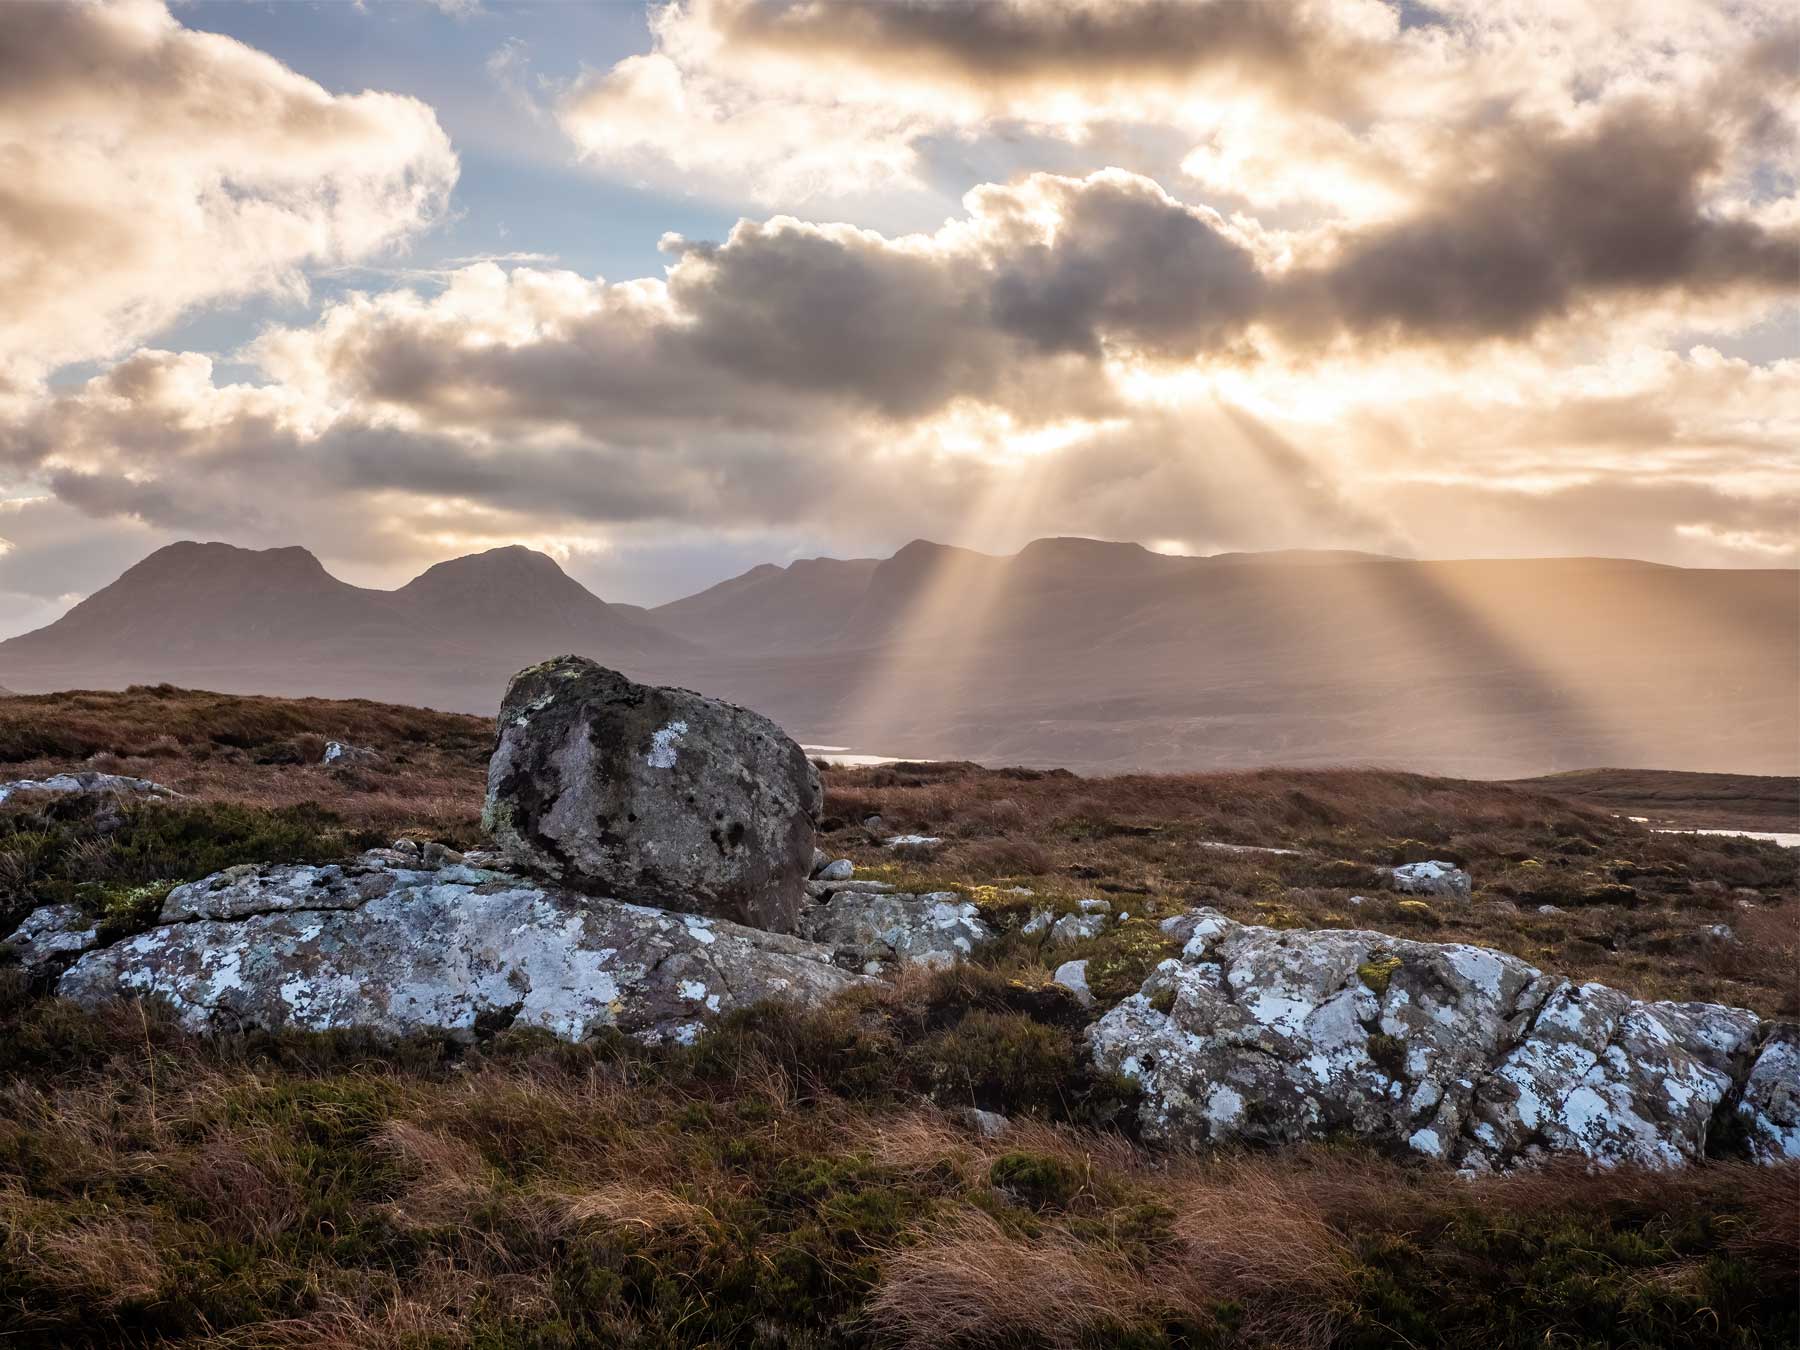
12-100mm Pro @ 18mm f8 5 images bracketed EV 1 Stop
This image taken in Inverpolly, Assynt had huge Dynamic Range as the God Rays broke through the clouds. I was actually concentrating on a different scene and had to run over with little time to prepare so I simply Bracketed it without a filter. There are numerous ways to Bracket, but which is best?
AE BRACKET OR HDR?
There are numerous ways to Bracket with your Olympus. We are simply taking usually 3 or 5 images ranging from 1 to 3 stops over and under exposed from the ‘correct’ metered exposure or 0 on the exposure scale. Which you use depends on the scene and the light. And of course by reading the Histogram.
Confusingly Olympus have two ways to Auto Bracket, located in two different menus and with different settings. It would make more sense for each to be amalgamated into one, why they are not is a puzzle. Bracketing allows images to be taken at 1/3rd, 2/3rds or 1 stop up to 5 frames (or 2/3rds up to 7 frames) whilst HDR allows 3 to 5 frames at 2-3 stops apart. Confusing. That being the way it is, we need easy ways to access both. If you followed the Olympus Set-up Sections you will have a Custom Mode set which has Bracketing mapped to the top right +/- button, and HRD saved to AEL. This is then saved as a Custom Mode. Please check the Buttons Section and Custom Mode Section.
Select your chosen settings in the Menu of if you mapped to a button press/hold the button and turn the front dial to reveal the options.
HDR1 / HDR2
Both produce an in-camera merged HDI image as a Raw and Jpeg (Jpeg is shown when you preview). HDR1 is a little more natural but both I think are a little too aggressive in how tones are mapped to produce the resulting image.
Raw does give the opportunity to process further, however I never use these, I much prefer to have individual images and merge them in post for more control over the final image. It is worth exploring though to determine if they suit your own tastes.
HDI 1 & 2 do not save individual frames, for that you must use the bracketed option and combine in post.
WHICH MODE TO USE?
This depends as you would expect on the light and the scene. It is rare I need to Bracket over two stops either side, and even more so needing 2 stops over-exposure. Exposure Compensation is available meaning you can always shift the bracketed sets along the Exposure Scale.
Bracketing 5 frames 1 stop apart is equal to 3 frames 2 stops apart with HDR. Having 5 frames with a narrower exposure range means you can choose which images to use, you do not have to use all 5. All things considered, I prefer to Bracket with HDR available just in case.
There are pros and cons to both methods, which is the reason why I suggest having fast access to both.
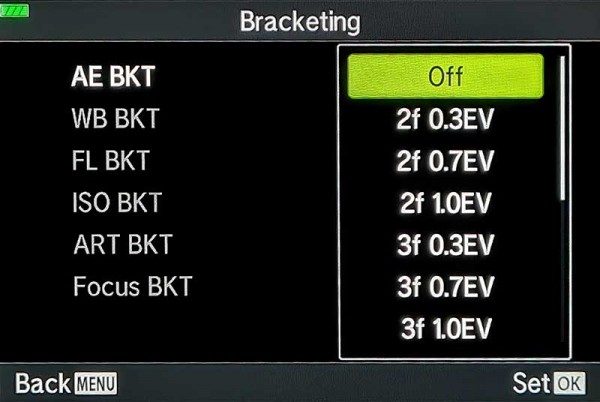
AE Exposure Bracketing options from the Menu
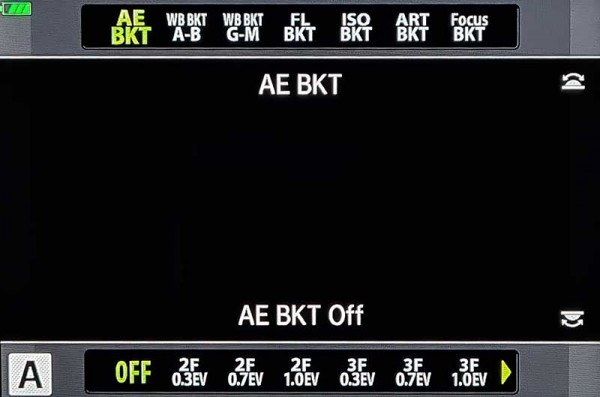
AE Exposure Bracketing options from a button
When selecting the Bracketing options from the menu or from a button (Press and hold button and turn front dial) the options are the same but presented in a different way. Turn the rear dial to select the frames/EV required. Note that when bracketing is applied to a button it also allows other options to be selected such as Focus Bracketing, but options such as the number of steps still have to be set from the menu.
Selecting HDR from a button works the same way by pressing and holding the button and turning the rear dial to select the number of frames and EV steps.
Bracketing allows: 3f or 5f at 1/3, 2/3 or 1EV or 7f at 1/3 or 2/3 EV.
HDR allows: 3f, 5f, or 7f at 2EV – 3f or 5f at 3EV.
BRACKETING IN A, M OR S
All references I make to Bracketing are in Aperture Priority (A) when Aperture is more important for Landscape photography than shutter speed. The Aperture remains constant and the shutter speed will be varied for each frame to produce the EV value set for each frame, therefore if the image is f6.3 and the normal exposure is 1/40th second, a bracketed image 1 stop either side would be 1/20th, 1/40th and 1/80th second. But what if you want to use a different Mode?
Manual – Bracketing and HDR works the same as in A, the shutter speed is varied and the Aperture is constant.
Shutter Priority – The shutter speed is constant and the Aperture will be varied one stop either side. This could present a problem because Depth of Field could be affected. If for example your image has an object close in the foreground and you have done your best to maximise DoF, it could end up being slightly out, especially if you are bracketing 2 or 3 stops. For this reason we tend to avoid Shutter Priority for Bracketing Landscapes.
USE THE HISTOGRAM
Remember in each case to use the Histogram. It will help you make judgements regarding how many frames you need to Bracket and how wide. Before enabling any settings move the exposure indicator on the Exposure Scale up or down, watch the Histogram and the feedback will guide you to how many stops EV you should consider. If a highlight is blown, move the exposure down and see how many stops EV is needed to bring the details back. Also having Shadows/Highlights warnings will also give an indication.
→ TIP It’s more convenient having Bracketing and HRD mapped to a button to alter settings. Press and hold the corresponding button and turn the front dial to select the number of frames and the EV setting.
AE BKT/HDR DIFFERENCES
The modus operandi of AE Bracketing and HRD is slightly different although they achieve the same thing. HDR has a wider range of frames and EV stops available, while Bracketing has a narrower range, both useful. There are other differences you should be aware of:
HDR will take your chosen number of frames with one press of the shutter using Sequential and Silent Shutter, and the screen has a small HRD indicator. There are no other indicators, it just does it without any fuss.

Bracketing indicated on the Exposure Scale
Bracketing (AE BKT) will take the chosen number of frames but the Drive Mode stays in single shot, which is a little awkward, it means you have to take each shot individually. It isn’t a huge deal but it would be great if it switched to continuous. Options are to accept it or change the drive mode to Continuous, or even save a Custom Mode with it enabled. I leave it at single and change the drive mode as I need to.
A ‘BKT’ indicator shows and the Exposure Scale illuminates with green markers to show the number of frames and the EV or number of stops apart. As frames are taken the indicator illuminates again to show which frame has been taken and the next will flash. The ‘flash’ is useful, it is easy to lose count and not take the final frame, if you see the indicator flashing it means you still have a frame to take.
If you enable Continuous Drive the shutter button has to be pressed and held for the full set. Keep it held and it will continue to another set of bracketed images, but you will hear a pause between sets. It does become easy to judge when the sequence is complete after a few attempts. This is the reason I prefer to avoid Silent Shutter, I can hear it so I have a good idea how many frames are taken.
→ TIP Just as you can alter exposure with Exposure Compensation (front dial) to move the exposure indicator up or down, you can do the same with Bracketing to move the whole set up or down, useful when you want to control the number of images over or under exposed. HDR will do the same but does not show the number of frame on the exposure indicator.
ISO BRACKETING
We have seen Bracketing in Shutter Priority will alter the Aperture, so it is not ideal for Landscapes. There could be a scene, such as a waterfall, where you have carefully worked out the shutter speed you prefer for the flow of water. Using A and Bracketing will alter the shutter speed. All very confusing. A way around this is to use ISO Bracketing. The Aperture and shutter speed will remain constant, preserving your carefully worked out DoF and the shutter speed, ISO is varied for each shot. Therefore if your correct exposure ISO was 200, bracketing three images 1 stop apart would give three images at ISO 100, 200 and 400. The obvious issue here is increased noise, but as long as you are not shooting at a high ISO it is normally acceptable. Normally if I do have to bracket for a waterfall it is because one particular area has blown highlights so it’s just one area I want to under expose a little and then blend in afterwards.
MANUAL BRACKETING
Auto Bracketing or HDR modes are not always needed. Bracketing manually is just as useful and is nothing more than using Exposure Compensation.
Manually Bracketing is simply using Exposure Compensation to take a frame which is under-exposed to protect highlights, or over-exposed to open darks and shadows. Differing from AE BKT / HDR, you have control over how many frames you shoot and what EV settings are used. Perhaps you just need one for highlights in a bright sky or on water.
It’s wise to use a tripod and a shutter release cable. Most bracketed images you would use a tripod to ensure the images align correctly, but with a reasonable shutter speed and with Olympus Stabilisation being so good shooting hand held can be very successful. Most apps for blending images will find any slight misalignment and correct it.
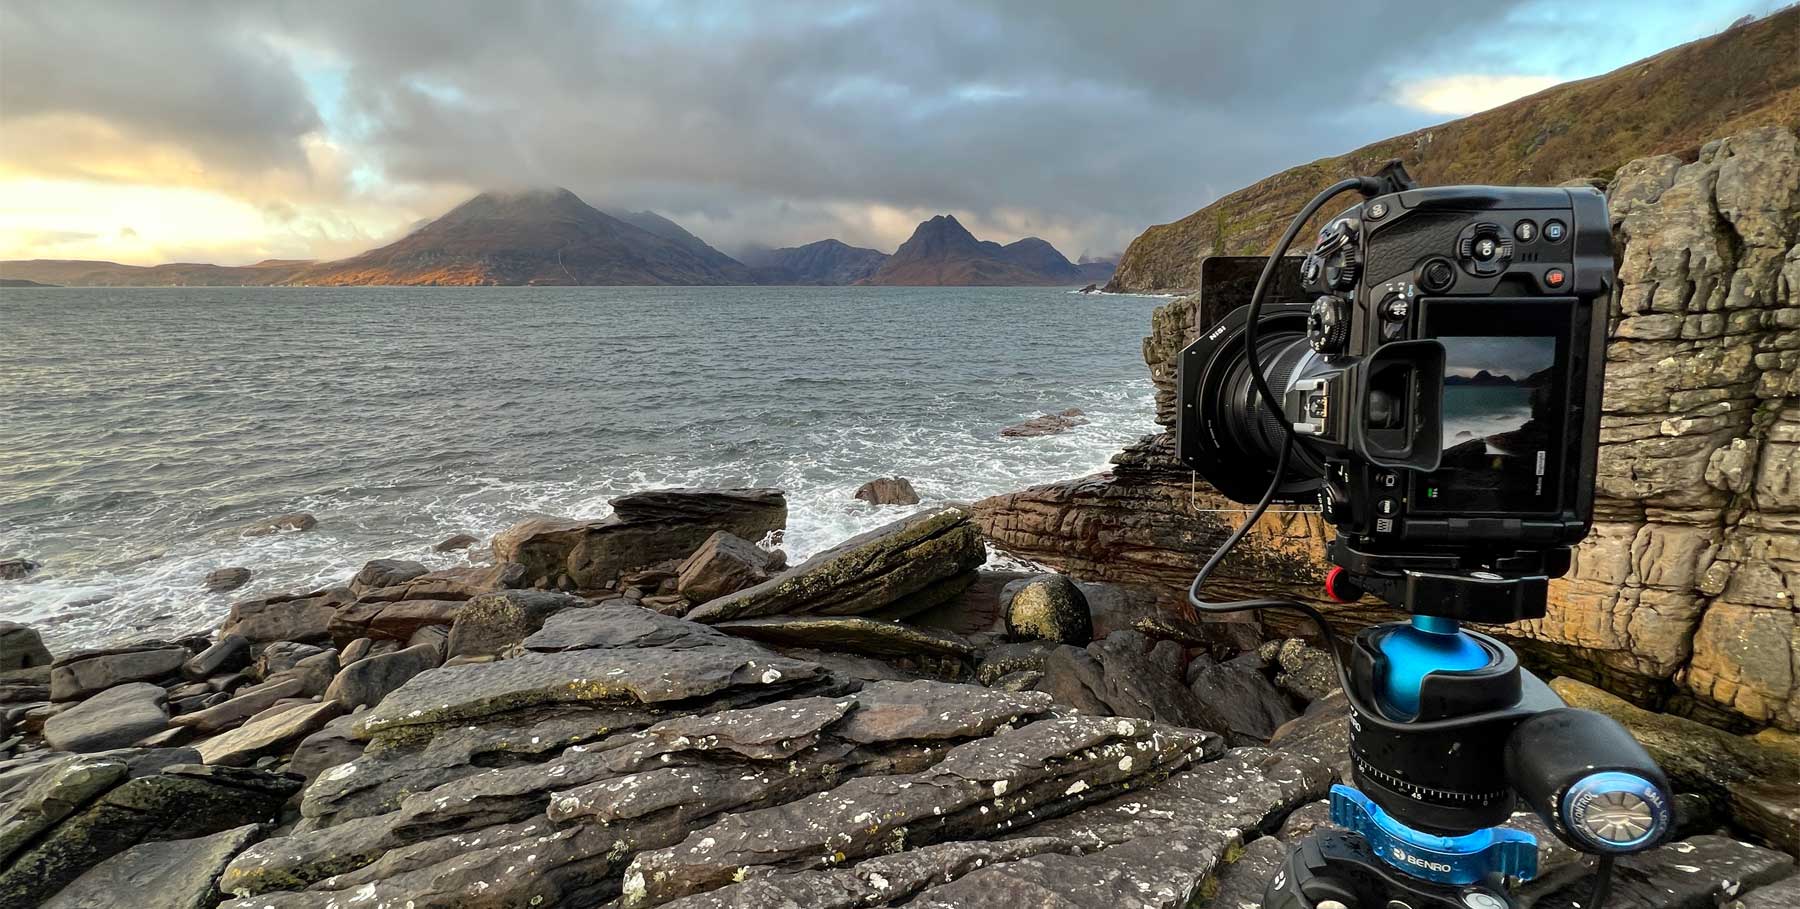
On location-Elgol, Isle of Skye with the EM1-MK3
EXPOSURE COMPENSATION
We have already visited Exposure Compensation (A Mode) in the Correct Metering section and saw how we can use it to control exposure. Bracketing by definition is simply taking two or more images of different exposures to combine. How you choose to approach it depends on what you are comfortable with; Aperture Priority and Exposure Compensation, or Manual and alter Shutter Speed. It is the same thing.
One point to bear in mind, I find that manually bracketing is a more leisurely approach allowing time to take a frame, inspect it, decide if another frame would be useful to blend or not. But, remember movement; clouds rushing overhead or moving water are less likely to merge successfully over a full set of images. It is more suited to manually merging parts of a scene together. It’s easy to merge a slightly under-exposed image of the sky manually into you main frame because it was a little too bright, and it will not show movement. Merge a set of images together taken over a few seconds and your’e more likely to see artefacts where merging isn’t quite right, even though auto merging apps have algorithms to reduce this.
MERGING IMAGES
There are two ways to merge your bracketed images together, either automatically from a set, or taking one main frame and merging sections of another by hand. The approach you take depends on the scene and the light. We will look at both techniques and explore what each is best suited for.
1 – LIGHTROOM HDR
We will stay with the image above of Inverpolly in Assynt for this because it had such a wide Dynamic Range, and we are going to use Lightroom. There are many apps that will merge images which are dedicated to the task such as Aurora, and many image processors too. We will look at some options in ‘Workflow’ but here will will stay with Lightroom and Photoshop. Do not process your images as it will be ignored in the new image created by LR.
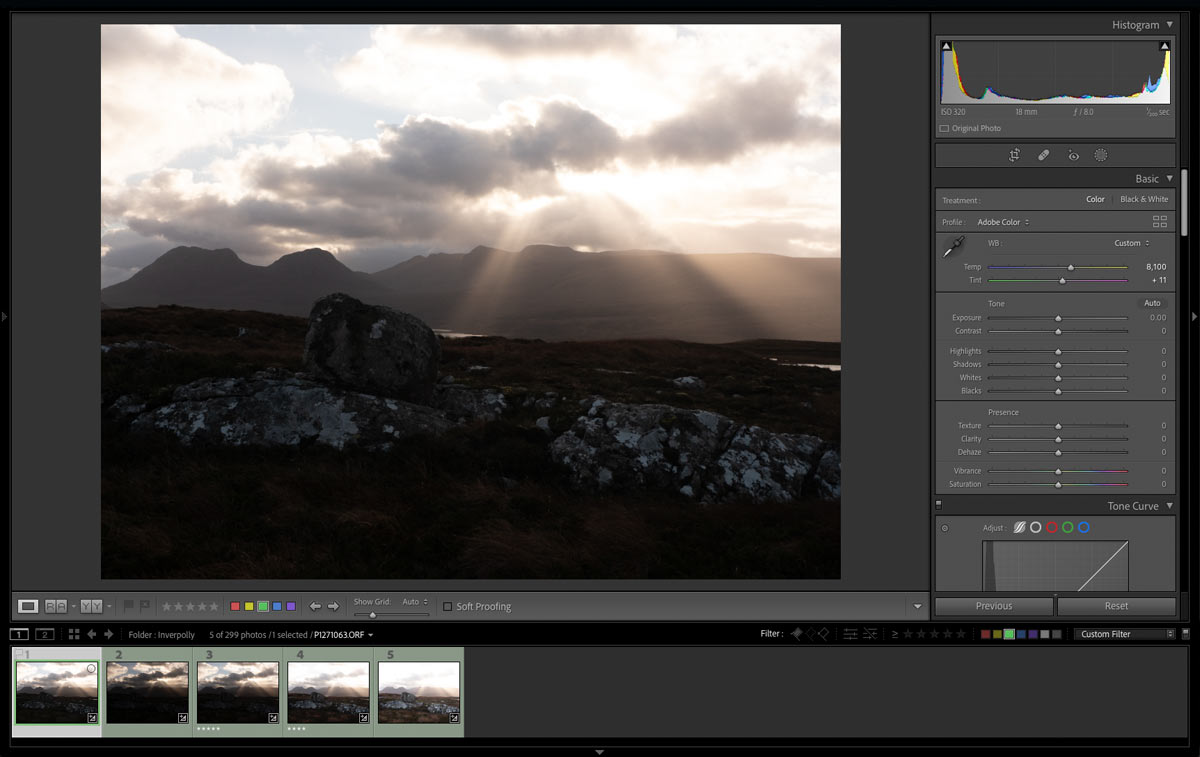
5 images each bracketed 1 stop EV
STEP 1
The 5 bracketed images shown in Lightroom Develop Module. The first image is the base exposure or ‘0’ EV. Notice the histogram, darks are to the left, brights to the right. They are both clipped and the mid tones are very flat, exactly as we can see in the image. The five frames contain all the information to create one image with better dynamic range.
Colour coding the frames helps to filter them from frames you don’t need, perhaps you created a Virtual Copy and played with settings, or you only want a selection of the frames. As frames cannot be selected individually for example 1, 3 and 5, colour code only the frames you want to sort them (Keyboard ‘8’ for Green), then select the colour filter shown bottom right.
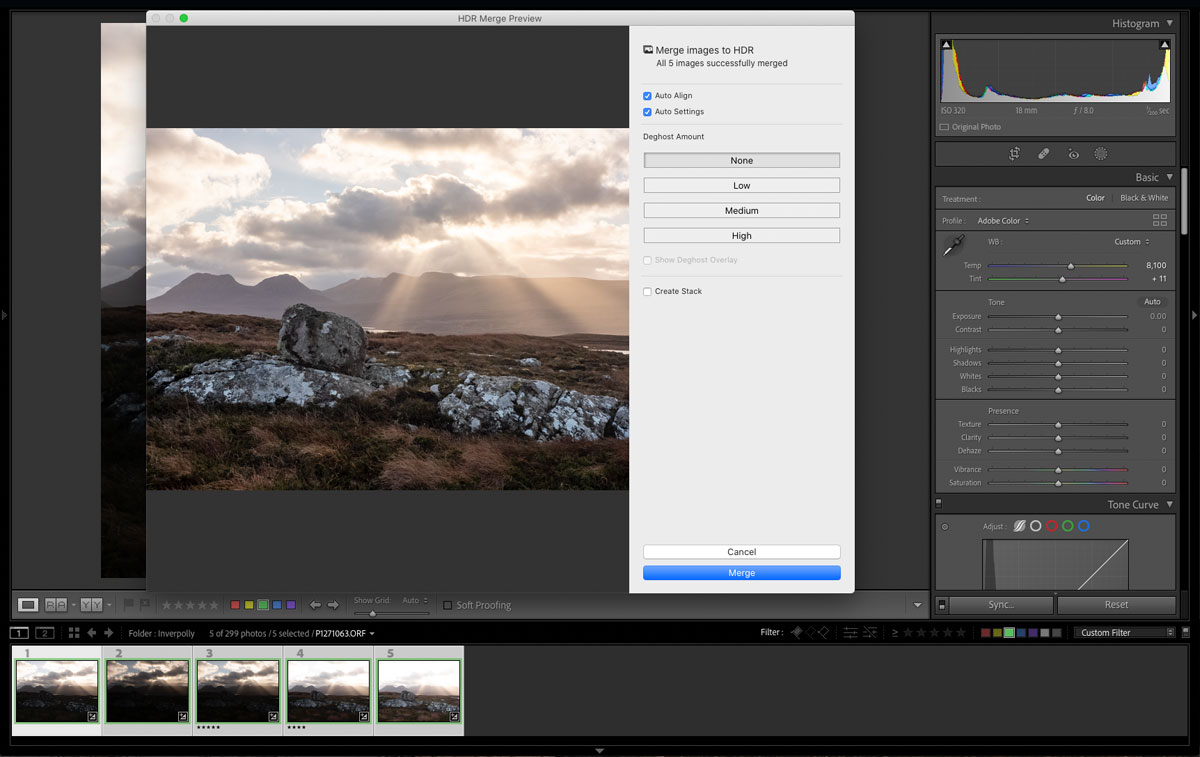
Merging the frames in Lightroom HDR Merge
Step 2
With your frames selected right click and select Photo Merge>HDR. A dialogue box will open with a few settings to select. Auto Align is best kept selected, Deghost will find any movement in clouds etc and try to reduce the ‘ghosting’ which can look like camera shake. If there is no movement leave Deghost off. Create Stack does as it says and creates a stack of the images.
Auto Settings needs a mention. It will apply auto processing just as in the normal Develop Module so I select it for a preview to see how well the images merge, but then deselect it. If selected the final merged image is brought into LR as a DNG (Raw) file with the auto develop settings applied and the sliders change accordingly. But it cannot be undone as it is a new image and there is no History state. If you bring it into LR without Auto selected and then hit Auto you will have a History state and you can undo it. It will give a little more flexibility being able to hit Auto to see what LR thinks needs applying and being able to undo it, I usually prefer to apply my own settings.
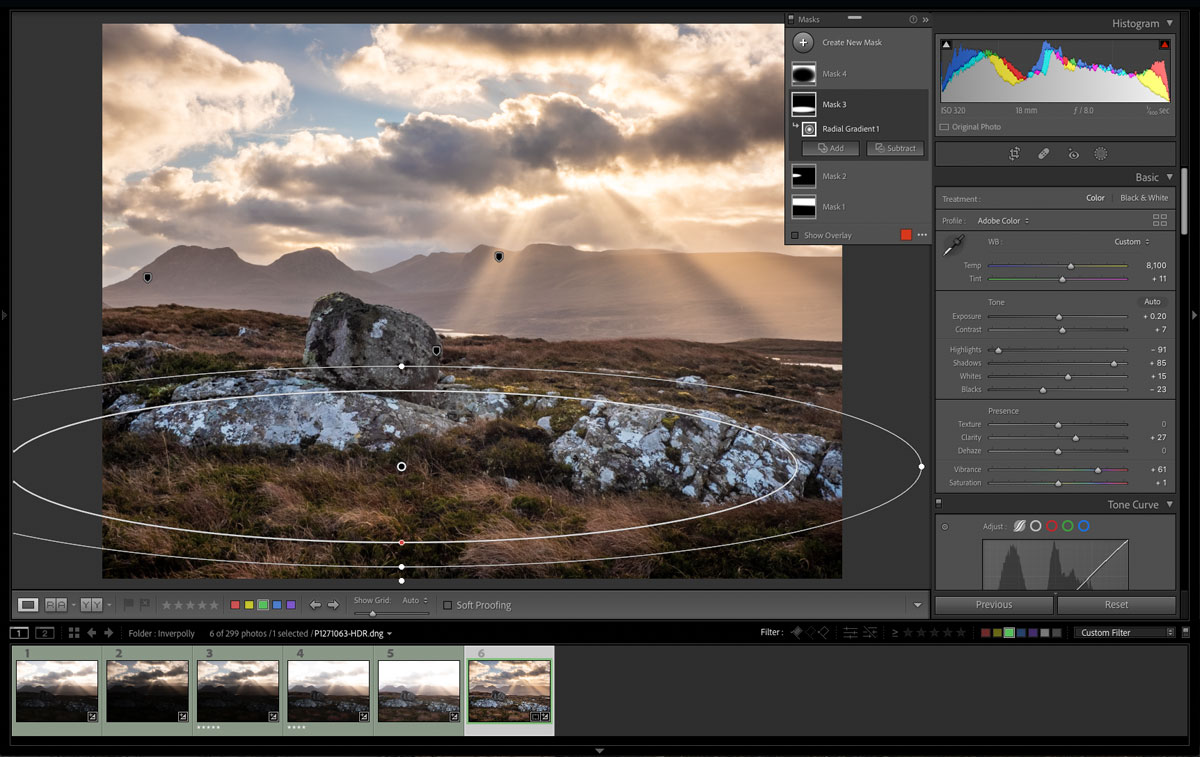
Merged image now in LR as a DNG.
STEP 3
The merged image will be brought into LR as a new file and as a DNG Raw format for you to carry out your processing. For this image Auto was pretty good with a few tweaks. I used a few Grads which are now located in LR’s Masks panel. A Graduated Mask was used on the sky to reduce clarity to reverse the clarity added in the main slider.
An inverted Radial Mask was used as a very slight vignette. Another small Radial Grad was used over the mountains on the left to warm the slight blue tone up. Finally another Radial Grad was added on the foreground which seemed a little dark; shadows, whites and clarity were adjusted to suit. I often use negative dehaze to brighten an area a little when I want it to stay soft.
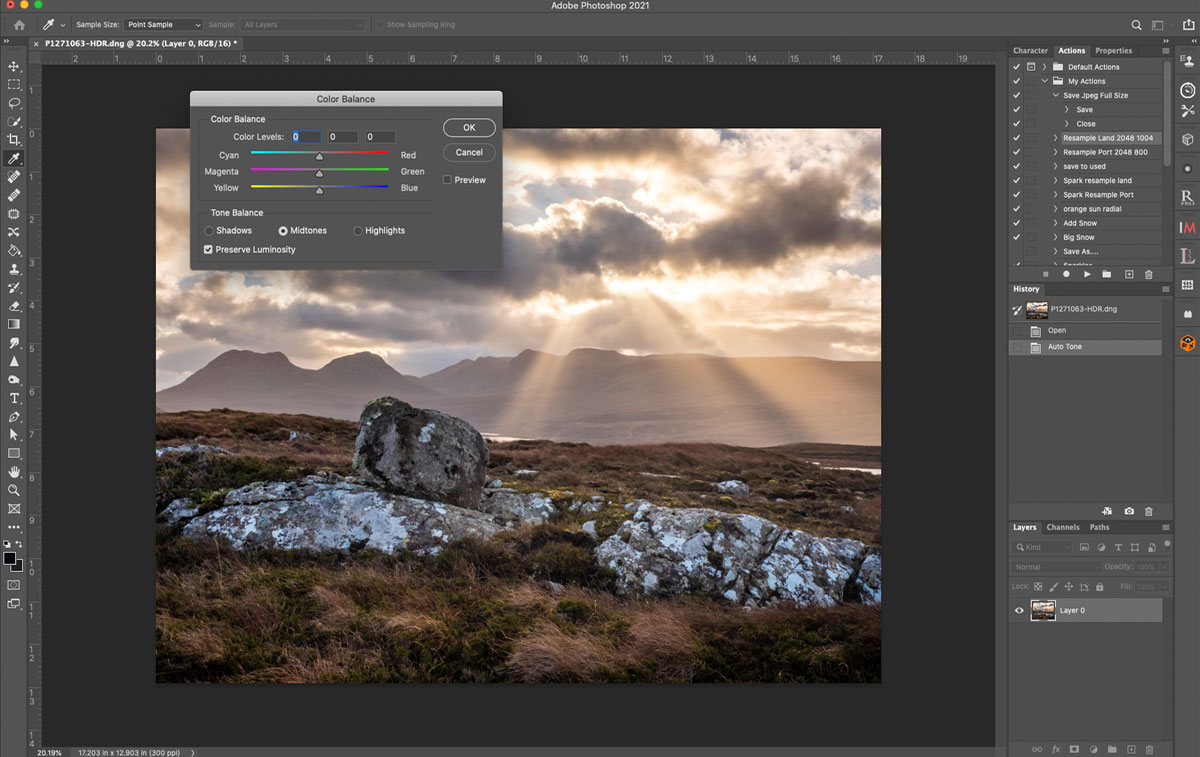
Finishing off in Photoshop.
STEP 4
The last step is optional, finishing off in Photoshop. I always finish off in Photoshop preferring some of the tools available such Colour Balance and Spot Removal to give a final tweak. An advantage of using PS is Layers which LR will never have, the ability to use layers gives so much more added power to your processing.
I will leave my sharpening till last and also noise reduction with Topaz De-Noise; when used as a plug-in and a new layer it gives the ability to mask and brush out any areas that lost detail using De-Noise. We will cover layers in more detail in ‘Workflow’ and in the Manual Blending below.
From here I can save the image back to LR if I want to apply further processing, or save to my hard drive with a title as a Tiff. I
MANUAL BLENDING
Using Photoshop Manual Blending is very easy making it a simple task with great flexibility. Using Photoshop and Layers means you can target specific areas of an image and use frames taken for that purpose. Rather than letting LR blend a set of images you have the power to decide yourself what areas need to be blended, a whole sky or just a small area.
2- PHOTOSHOP BLENDING
Blending images manually is taking two, or more images, placing them into one stacked document in Photoshop and using masks to blend them together. PS is not the only application you can use, Affinity is probably the best alternative right now (different Apps are explored and explained in ‘Workflow’). LR doesn’t have layers, so we use Photoshop. Photoshop also has tools to Auto Blend images, however the point of doing it manually is the control it gives.
Using layers to stack images and blend one part into another is probably the most powerful processing technique you can learn and it will give you much more freedom to get scenes with full dynamic range. But think about it, with the ability to show part of an image into another you can also use the same technique for focus stacking and removing people from your scene.
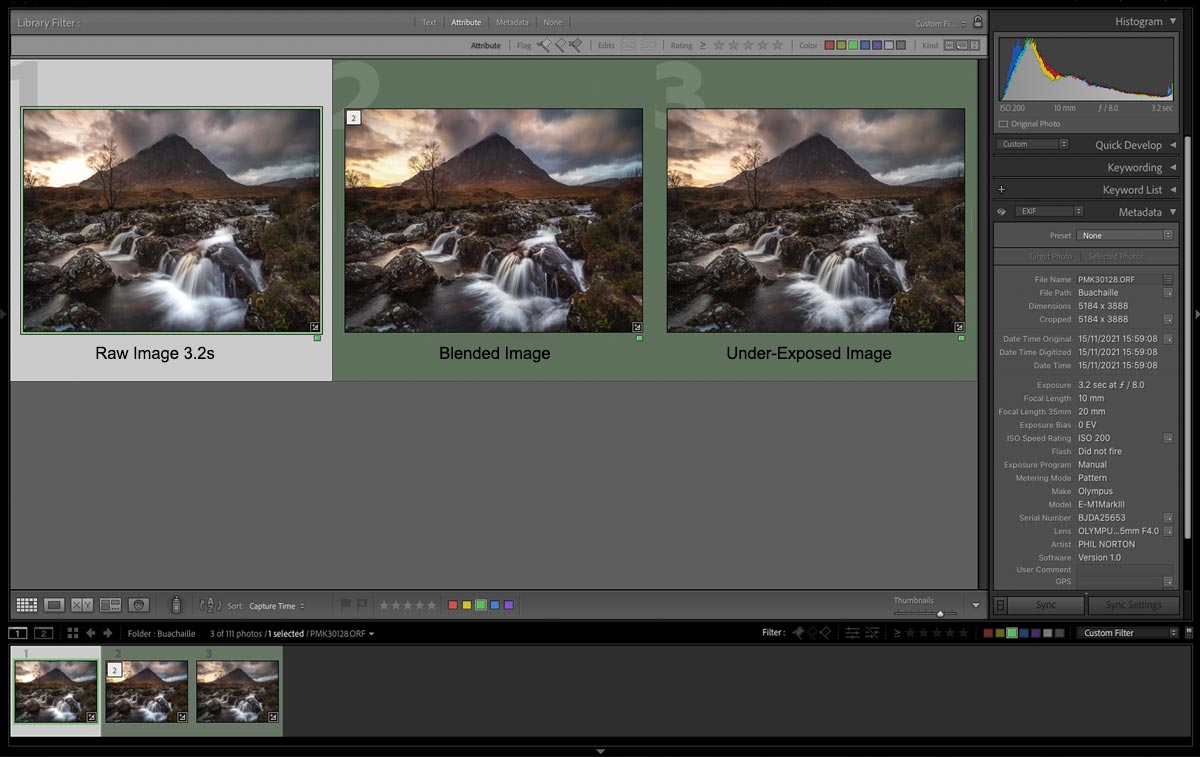
Two images prepared in LR for blending in PS, plus the final blended image.
STEP 1
This is not a full tutorial but will show you the basic steps which you can research and refine. I’m using the image of Buachaille Etive Mor which is a good example. The three frames shown above are the main Raw image, the blended Tiff brought back into LR and an under-exposed Raw. The main difference with this technique is you will apply your processing to the frames in LR before sending them to PS. Start with the first image, copy and paste to the other and adjust to suit.
I used a Soft Graduated filter on this scene but because the mountain dominates the sky care is needed. I used a 2 stop which helps to bring down the sky without darkening the mountain. All the tones are good and note the histogram, the tones are towards the darks but they are evenly spread. The original image is brighter, after making adjustments I want the tones to be darker. It was exposed a little more to the right because I can reduce tones to where I want, it is always better to reduce tones rather than brighten them. The brights on the sky and the water have ‘clipped’ meaning they have over exposed and they are still too bright after making adjustments. I was aware of that, hence the second frame.
On the second under-exposed frame there are two things of importance to note; it was actually darker so I have opened shadows more, frame 1 and 3 now look very similar, but frame 1 will have less noise because I have not opened shadows as much. And note how soft the water is on frame 1 at 3.2s shutter speed with blown highlights at the bottom. F8 is too much for the DoF needed, but it was giving me the softness I wanted on the water in the background. Frame 3 was under-exposed by a full stop, the highlights are recovered, and the water has more detail because the shutter speed was halved to 1.2s. Normally I would consider that still a little too slow but in the case I was happy with it. These two frames have all the information I want, I just have to combine them.
Now in LR, colour code the frames if you need to filter them as we did above, select both, right click and select Edit In> Open As layers In PS.
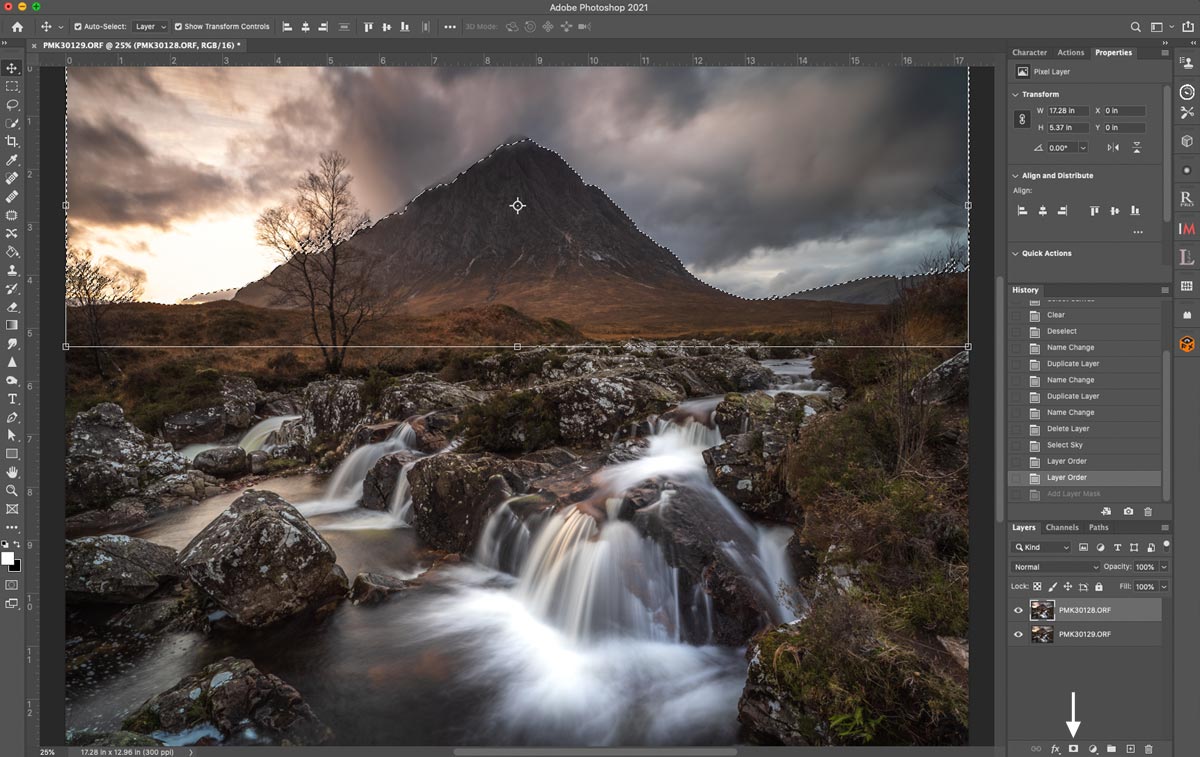
Masking the sky in PS.
STEP 2
Both your images will open in PS stacked into one document as Layers. Make sure you have the Layers Panel and History Panel visible (Window>Tick the panels you want to see and arrange them in the Dock on the right). Make sure the main image is the top layer and the image you want to show into it, the under-exposed image is below it. If not just click on the layer thumbnail and drag to re-order. If you find the bottom layer is locked just double click to unlock it.
There are quite a few ways to create masks which is one reason people are so confused by PS. Making selections or using Luminosity Mask plugins are all possible, we are going to keep it simple and loose flowing by just using the paint brush and a few simple tools. Click the thumbnail of the top image in the Layers Panel just to make sure it is the active layer then on the top Menu click Select>Sky. PS will analyse the scene and then show the sky selected.
The colour of the paint used when filling masks matters because white will show, or keep the top layer, black will hide and show the image on the layer underneath. The default for PS is to use white on the top layer and we want to reverse it by using the ALT key. We need it black so that the sky is hidden to show the sky from the image underneath. Press ALT then click the Mask icon at the bottom. A white mask is created and the top area of the sky is filled with black, hiding it and showing the under exposed image underneath.
→ TIP As Photoshop advances more and more we can also use the ‘Select Sky’ function and even use the new AI Tools too. ‘Select Sky’ is very useful in some situations and can be more accurate and faster, and in some situations it can be too accurate by attempting to mask out the tree in this example which I don’t need. Just adding a mask and using the paint brush is sometime all that is needed.
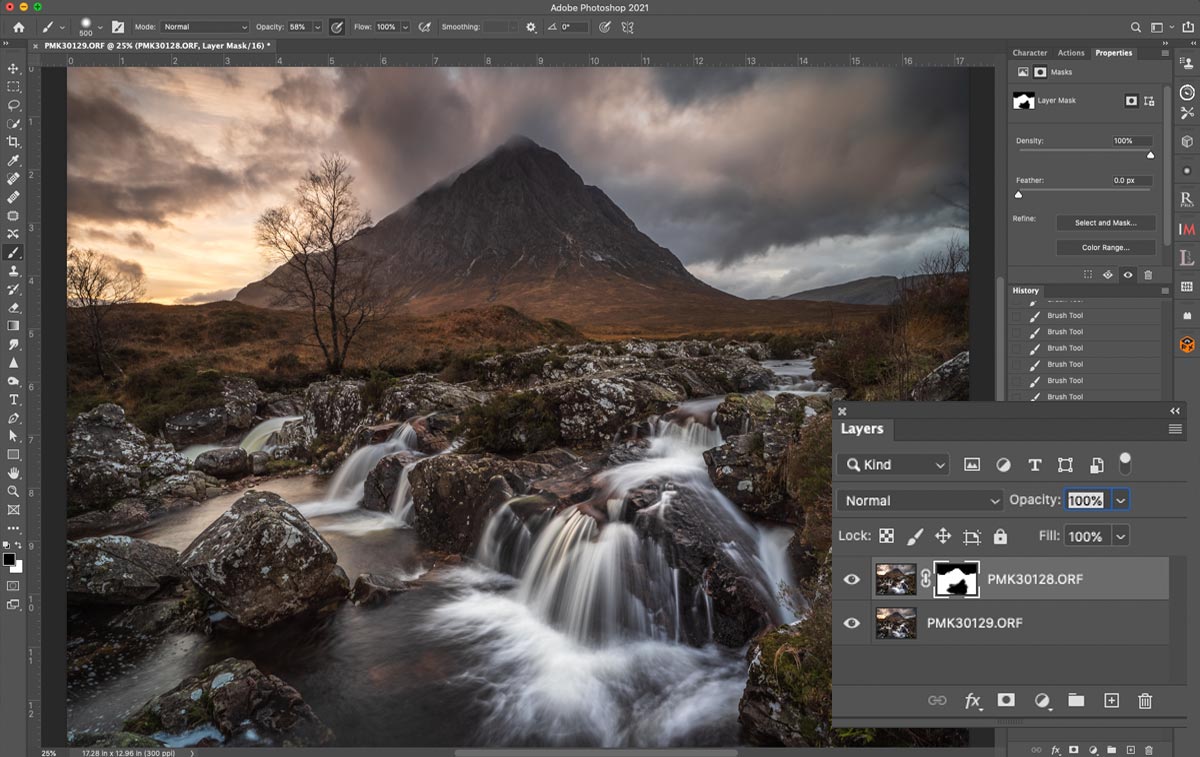
Painting in the waterfall from the bottom layer.
STEP 3
Now click the Paint Brush. Make sure the paint colour is set to black (two overlapping black and white squares bottom left, click the arrow to swap). The brush can be controlled, at the top you will see a Menu appear, make sure the brush is a soft brush, Hardness 0, with a low opacity of 40-50%. It is better to paint in stages rather than all at once. To adjust the size use the keyboard shortcut Bracket Keys ([-]). Now make sure the mask is selected by clicking it, and just paint. I painted over the waterfall to bring in the water from the image underneath effectively replacing it. Swapping between black and white (to paint back in) paint colour, adjusting edge softness and even adjusting the opacity of the of the layer mask gives you lots of control.
Check the sky, have a look at the image and see how good the mask is. If you need to refine in use the brush on the mask layer and refine it with white to bring the top layer back or black to hide it. Vary softness etc but do not try to be too accurate. Finally Flatten all the layers (Layer>Flatten) into one and Save for it to go back into LR or save it to your hard drive.
Some scenes may need more accurate masking using selections or luminosity masks, but for scenes like this where we are only concerned with parts of the image this is the fastest and probably most flexible way to achieve it. And after a few attempts you will soon wonder why you didn’t try it before.
TIP-LAYERS AND MASK ORDER
To show part of an image into another main image make sure the image you are showing part of is under the main image. Layer orders affect the mask you use and whether the mask is used to show or hide content. When a mask is added it is filled with white. White hides layers underneath, black shows layers underneath. Add a mask which is filled white by default, then select the Paint Brush and select black and paint ON THE MASK thumbnail, whatever you paint will hide the top image and show the image underneath. It is important to understand that to save more work it is always best to show an area into another. If your image is a sunset and you have another image of the sun under-exposed for the highlights you really don’t want this as the top layer and then have to paint everything else around it to hide it.
Remember that pressing Alt tells PS what to do depending on your layer order. It may be confusing at first but once you try it a few times you will find which order suits you most.
One last tip-Don’t replace skies with images from another scene even if PS does have a tool for this. It is cheating ;)
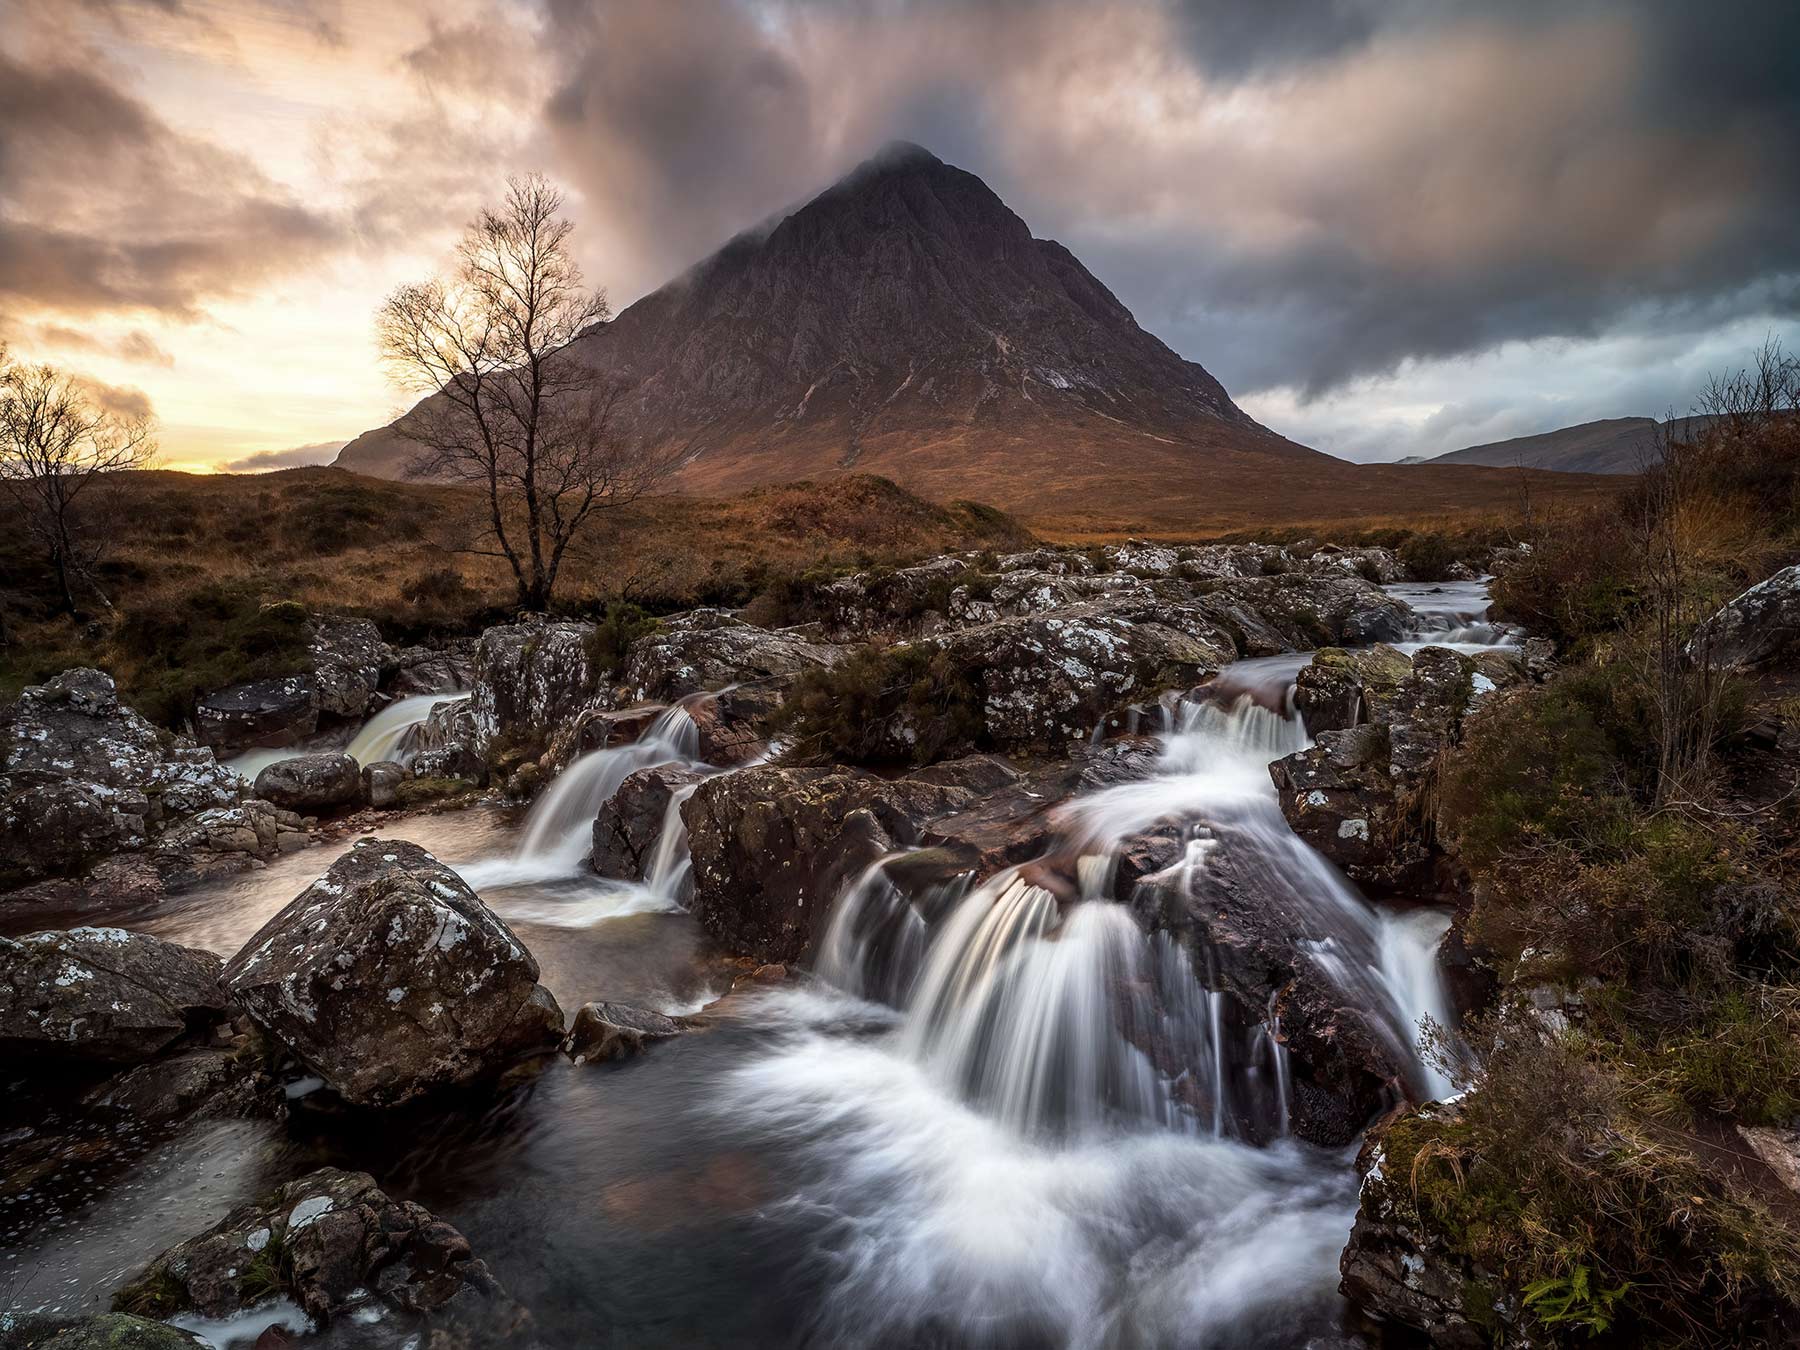
8-25 Pro @10mm f6.3 ISO200 Exp 1.3s
CONCLUSION
Blending images together is very powerful and not reserved just for frames with different exposures, it can also be used for Focus Bracketing.
