
WORKFLOW
How to develop a good workflow for processing your Raw images.
In this section we will explore workflow, or the steps needed and applications to use for processing your images once you have captured them.
This section is not a processing tutorial, for that I would need to write a whole book. Instead it will concentrate on how you get the images organised and which applications to use to process them. Processing images is a necessary function, and the function will run smoother when you have a step-by-step organised flow. The actually workflow will vary depending on your own preferences; but it should be organised and logical just like baking a cake.
The first step to consider is getting your files organised and having a good backup plan in case the worst happens. I am going to presume you are relatively new to processing and if not maybe you will find a few tips you hadn’t considered.
MY WORKFLOW
I use Lightroom and Photoshop and my own Workflow is based around that. I also use other Apps as plugins to Photoshop. It is worth noting you do not have to use Adobe, there are other options available and paths you can take, see below for suggestions. Workflow is a structure for processing images and most photographers will develop their own, some may be similar or very different.
Below is my own Workflow and I tend to follow these steps for every image. You may find a similar Workflow suits you, possibly using different applications. What matters is finding a structure and maintaining it which is the reason it is called a work flow.
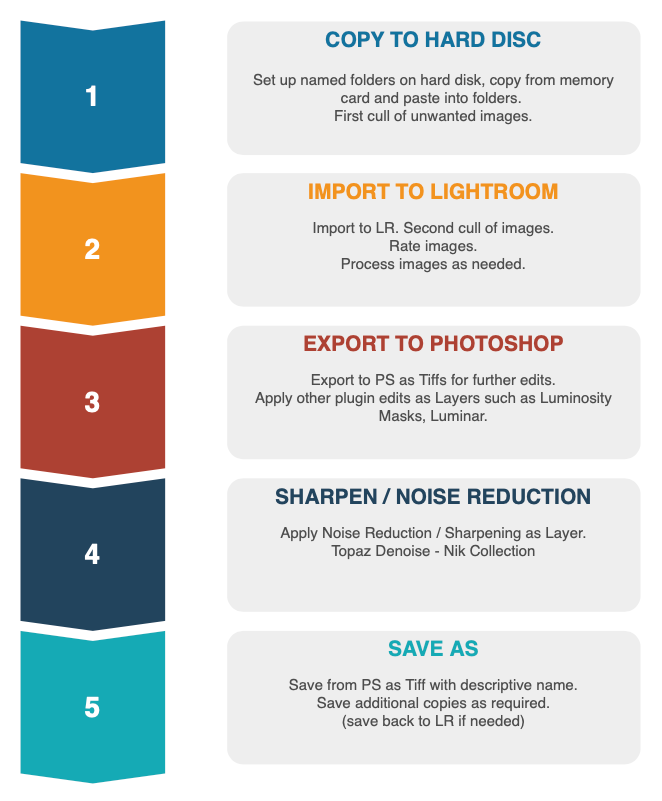
1 – Images are copied from the memory card to folders set up on my external hard disc drive, never imported directly into LR. See Folder Structure below. It allows me to be organised and find files without having to launch LR. A first cull of unwanted images is carried out.
2 – Import to Lightroom which maintains the folder structure I create. Additional folders can be created inside LR and images moved, the structure will be created on your hard drive. Never move images outside LR once imported, the location path will be lost. I inspect images, rate them and cull additional images, then process them as I see fit.
3 – I prefer to use Photoshop for additional processing if needed, even for just simple steps like Colour Balance, see below. Note in LR make sure images exported to other applications is set to Tiff (Lightroom>Preferences>External Editing>File Format>Tiff 16 Bit 300 Resolution. I also use sRGB Colour Space; although you will see a warning that colour spaces other than ProPhoto do not have the full range of colour you will not see it, sRGB offers the best compatibility for use online and most online printers. Using the wrong colour space (and not calibrating your monitor) are the main reasons why images shift colour when viewed on other devises, online, or in print. Some tools in PS are more advanced than LR, removing lens flare for example, and the real power is when Layers are used. Use layers for blending bracketed images, noise reduction and sharpening to specific areas. Using other Apps as Plugins in PS also allows them to be used as layers rather than just creating another copy. To export to PS select an image, right click and select Edit In>Photoshop. Occasionally I use Luminar which has a few very useful features.
4 – Sharpen and apply Noise Reduction if needed. I copy the image as a new layer and use Topaz Denoise (Nik Collection Dfine is also very good). Topaz Denoise will also sharpen if it is needed. The advantage of applying as a layer is a mask can be applied and any areas that lose detail through Denoise can be brought back into the top layer. The opacity of the layer can also be reduced.
5 – ‘Save As’ from Photoshop to the folder where completed images are stored. See Organisation below. Using Actions gives the option to also save additional copies of the image at lower resolution for use online. Using ‘Save’ instead of ‘Save As’ will return the image back to LR as a Tiff if you want to add further enhancements, and if you prefer to export finished files from LR. Occasionally when I do this I will delete the Tiff file from LR afterwards (I have already saved a finished Tiff anyway), they are very large files and I do not want them to bloat the LR Catalogue size.
→ NOTE Adobe Lightroom Classic v 12.4 With this release of Lightroom Adobe incorporated AI Denoise which to my eye seems to work very very well. It is fast and creates a new copy of the Raw file with the Denoise applied as a DNG which is still a Raw so other processing settings can still be applied. the down side is having another copy which isn’t a virtual copy and increases your catalogue size, but of course you do not have to keep the original raw. I include this note because it does mean I am using Topaz Denoise less and less.
GETTING ORGANISED
This is the boring bit, we all hate getting organised but it is crucial. A good plan of how you archive your images with some thought put into it will save time in the future. Remember at some point you will have thousands of images and the last thing you need is having to wade through them just to find one image. The same is true of all your finished processed images. Organise your images in a way that makes sense to you, including separating original Raw images from your processed Tiffs/Jpegs. Dumping them into one main folder or drive is just asking for trouble.
Think of your folder structure just as you would with an old paper based filing structure. How you actually organise it is your choice but it needs to make sense. Some photographers put all Raws into one folder and rely on keywording in Lightroom, then import directly into LR from a memory card, which never makes any sense to me. Others choose to organise folders by year and date.
FOLDER STRUCTURE
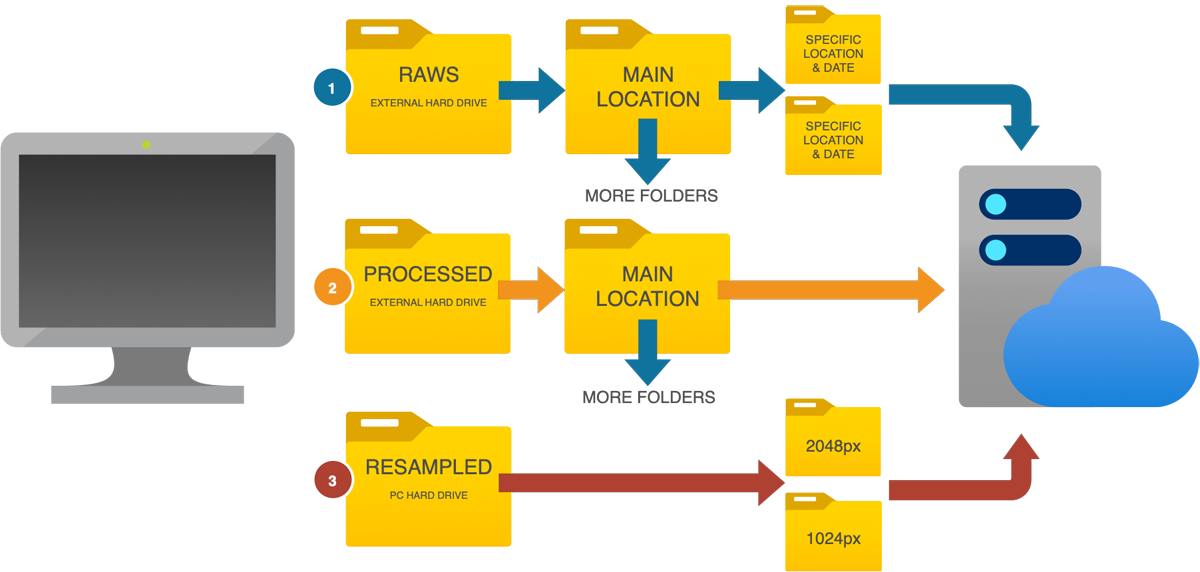
Personally I like to be a little more detailed in the way I organise folders. Organising Raw images means I can easily find an image without even having to use the Lightroom Catalogue, or whichever App you choose to use. Perhaps I want to load a specific image into DXO or another app instead of LR in which case knowing which folder to look in is a huge benefit. In Lightroom I add a few keywords to images but I keep them very short, sunset, sunrise, moody, coast etc.
1 RAWS – Raws are organised into folders by Main Location e.g ‘Lake District’. I then break them down into more specific locations with the date in sub-folders e.g Windermere 28.5.21, Derwentwater 28.5.21. Doing this means I have one location folder with more specific location sub-folders to help culling on a big trip. Selecting a top level folder allows all images to be shown and having sub-folders means I can drill-down to focus on a particular set. Another Example:
Raw Images > Scotland (Main Location) >Sub Folder > (Glencoe / Date) – (Isle of Skye / Date) – (Assynt / Date)
I often have sub folders inside sub-folders too for when I want to take my time culling images and when a particular trip has many locations. The Isle of Skye for example will have sub-folders for Elgol, Fairy Pools, Sligachan etc.
2 PROCESSED – Once an image is processed it is saved as a Tiff file for the highest quality, in a separate folder to the Raw images. Folders are organised into Main Locations just as with Raw images, however I tend not to use specific locations folders so that I can see what images I have gathered in that location over the years. I may then decide an image I have just taken which at the time I thought wonderful isn’t quite as good as one a took a few years earlier. And then get really deflated.
3 – RESAMPLED – Obviously we cannot use full resolution images online for social media or websites so when I save a completed Tiff image I also resample it to a smaller size and save a Web version. I actually save two versions, a 2048px version for social media and a 1024px for my website using Photoshop Actions (see below). These are saved into sub-folders named accordingly, and I tend not to organise these by location because they are just copies for online. I do have a copy of the 1024px images which are organised by location, however this is heavily culled and used for my website galleries. When I want to add an image I simply copy it and add to the relevant folder.
Images are always named with location and short description to help with searches if I cannot find an image, for instance ‘Windermere-boats-sunset-Lake-District’. Giving a descriptive name will also help jog your memory if you forget the location, and it helps Google index your images.
This may look like a lot of hard work but it really isn’t. Once you start setting up folders its very easy to add to them as you start building your catalogue.
BACK-UP BACK-UP BACK-UP
It can’t be said enough times, always back-up, as I learned the hard way. I have two external hard drives reserved for images, one with Raws and the other with Tiffs. Resampled images which are small file sizes are stored on my Mac, which is then backed up along with the attached external drives to an additional 12TB external drive. Tiffs are then backed up to the cloud on Drop-Box and Amazon. This way I can have my drives with me when I travel and I’m secure knowing I have copies in two additional places.
→ TIP
Photoshop Actions are a way of recording repetitive steps and saving them similar to a computer macro function. Once saved a click of the action will invoke the steps recorded. I have ‘Save’ actions created for Landscape and Portrait orientation, once I save a new image as a Tiff, I click the action and another copy is saved at the size and resolution I specified when I recorded the action (2048px @ 72dpi) and in the folder I specified. It then saves another copy because I recorded it to do so at 1024px @ 72dpi in a different folder. With one click I have another two versions at different pixel sizes which saves a ton of time. These are similar to creating Export Presets in LR which you should do if you don’t want to use PS. I use Actions because I always finish processing an image in PS (see below). When using an Action only one destination folder can be saved per action. The easy solution to this is to save to the main folder (eg ‘Online 2048’ and then move them at my leisure into subfolders). Search online for How To Set Up PS Actions.
EDITING APPLICATIONS
Once you have some structure and organisation in place you then have to decide what applications to use, and how much time, effort and money to invest in them. There is no single perfect application and personal opinions will come into play when you research them. Which direction you choose to go will depend on many factors.
There are two basic categories of applications to consider for photography, Raw Image Processors and Image Editors, and the line between them is becoming very blurred. I once saw a description of Raw Processors (such as Lightroom) for creating images, and Image Editors (Photoshop) for changing images. There’s some truth to that depending on how pessimistic you are. The list below is by no means fully comprehensive but includes the main Apps.
RAW PROCESSORS
Lightroom Classic, DXO Photolab 5, CaptureOne 2022, OM Workspace, Adobe Camera Raw, ON1 PhotoRaw.
Raw Processors do exactly as the name implies, processing with a variety of tools and features Raw files. It is best to think of Raw Processors as your Digital Darkroom. There are so many to choose from and each has it’s own pros and cons. Some have image catalogues allowing some level of image organisation and management, and some also come very close to being full image editors with features such as layers. Raw processors are Global editors where the whole image is edited, with some local adjustments possible using masks and brushes.
IMAGE EDITORS
Photoshop CC, Affinity, Corel Paintshop Pro
Image Editors differentiate from Raw Processors by allowing much more advance image manipulation and editing. That doesn’t mean changing images beyond what was actually real such as stretching mountains and swapping skies (which can also be done in some Processors now). Image Editors allow for more advanced processing. Using layers and masks images can be merged such as bracketed images and focus stacked images with greater control (see the sections Focus Bracketing and Exposure Bracketing). The real power with Image Editors is not just the flexibility and control of layers, it is also the greater power of local edit control when just a small part of an image needs to be corrected. The difference starts to become blurred because Image Editors can also be used for processing Raws, but do not have libraries for organising images.
WHICH APPLICATION TO CHOOSE?
This is the million dollar question and one that can only be answered by your particular needs, and budget. The chart below aims to make the Workflow Path of Applications easier to understand visually; Photoshop and Affinity are annotated with an Asterisk (*) because they are Imaged Editors, the other apps are Raw Processors. To the left and right are additional applications which can be useful and in some cases can be used as Plugins for additional flexibility. I use these Plugin Apps to some extent integrated with Photoshop.
Notice that the arrows on the outer applications do not point to PS but Affinity instead. As LR and PS are a bundled subscription if you do not use LR there is little point in considering PS as an image editor. Personally I would consider Affinity. In fact if I was really pressed to recommend applications for a processing path it would be Lightroom and Photoshop or DXO Photolab and Affinity.
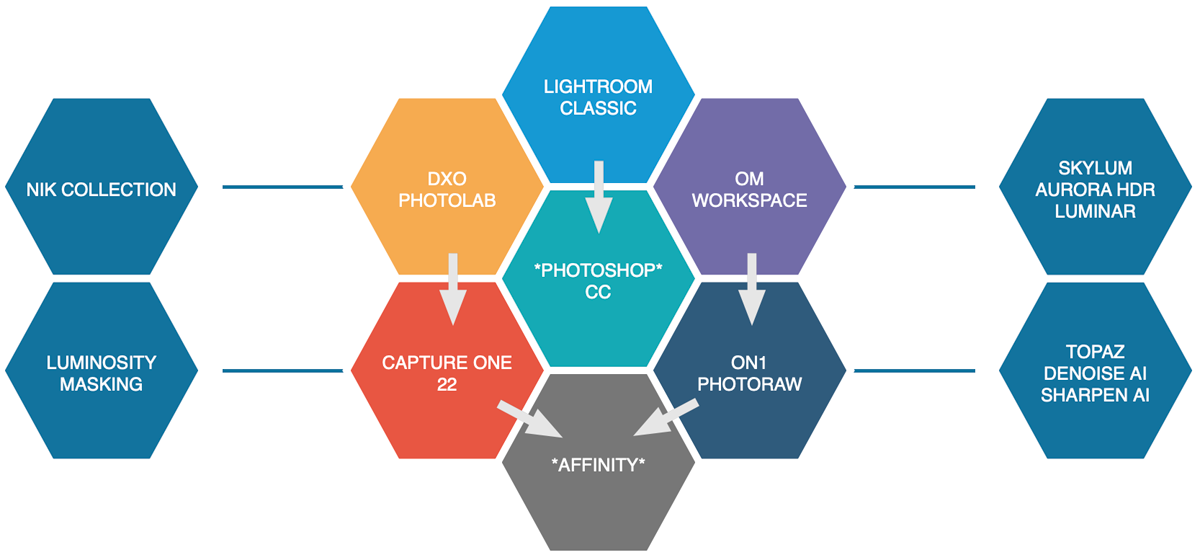
Editing Application Path
Personally I use the path of what I feel is least resistance, Lightroom and Photoshop. After years using Photoshop it was a no-brainer to use LR when it was released. Both together give me all the flexibility I need, there are huge amounts of tutorials available and a large number of Plugins available too (as shown). Complimenting a Raw Processor (LR) with an Image Editor (PS) does open up greater flexibility and power for processing images, but you do not have to use two applications. You may just want to use one and use the tools at your disposal. That is perfectly acceptable, it just depends on how advanced you wish to get with your processing, how much time you have to invest and of course how much you are willing to let it cost you.
Having said this I do sometimes use DXO Photolabs, although I don’t find it as flexible as LR the Noise Reduction and Smart Lighting are very very good. I will sometimes import images into LR, then check in DXO. If I find I like the result in DXO I will export it to LR as a DNG Raw format with the edits retained and then process it in LR. DXO also produce Pure Raw for exporting DNG files with their noise reduction applied but it doesn’t include Smart Lighting (balancing shadows and highlights), which I rather like.
COSTS
- Lightroom / Photoshop – Monthly £10
- DXO Photolabs – £199
- OM Workspace – Free
- Capture One 2022 – Monthly £24
- On1 PhotoRaw – £100
-
Affinity Photo – £48
- Capture One offers a one time licence for £209 but be aware as with all applications these days a monthly subscription includes future updates. One Off licences will include patches and fixes but new features will not be included. Upgrades for new releases are usually discounted to some extent.
- COMPATIBILITY NOTE – At time of writing (July 2023) most apps have been updated for all Olympus / OM System Cameras. Affinity Photo 2 has been released which includes the EM5-MK3 and should also be compatible with newer bodies. Used purely as an Image Editor (not a Raw Processor) for more flexibility it doesn’t matter as you would export Tiff files to it. As a Raw Processor any Apps you find issues with now or in the future the workaround is to convert files using Adobe DNG Convert first. DNG is a raw format independent of any brands and as such is a global Raw format. Check for updates first.
APP OVERVIEW
I don’t want to review each and every App, that is not what this section is about. Nonetheless, let’s take a look at what I consider the main contenders to use for all of the ‘grunt’ work, processing Raw files. These are Lightroom CC, DXO Photolab and as this is predominantly for Olympus users, OM Workspace.
FILE FORMATS
A quick reminder in case your missed it in the Techniques Section, file formats and what they are:
RAW – Think of these as your digital negative. They contain all the information the sensor can possibly capture in its raw state and ignore any in-camera settings you may have set and as such will usually look much flatter than what you see on the rear of your camera. Your camera preview is a Jpeg produced from the Raw even if you are shooting Raw only. Raw offer the best quality and gives much more latitude for processing. You have greater latitude for opening shadows and recovering highlights with a Raw than with Jpeg.
Jpeg – High Resolution Jpegs give a great quality of image but they are lossy, meaning each time you open and save a particular image it will lose a small amount of data, nothing you will see just over a couple of times, but edit a Jpeg many times and it will start to degrade. As such they have a much smaller attitude for processing after shooting. You should shoot Raw for best quality. Jpeg is fine for immediacy if you don’t intend to edit. A Jpeg is created by the camera with settings (colour, tone etc) as set by the manufacturer. You may see some people state they do not process and want the image as natural as it was on location, forgetting the camera has already processed it with settings an engineer somewhere decided were suitable.
Tiffs – Tiff files are huge, a 20mp file can easily result in a 100mb Tiff file compared to an 18mb Raw. But they give the best quality of image and they are not lossy. Storage is cheap so I archive all finished processed images as Tiffs always. I may have a folder full or Raw images but from that may only have a small number processed keepers. Many Raws are culled, some are retained as keepers(?) with the question mark. Rainey days and all.
LIGHTROOM CC
Lightroom is one of the most comprehensive Raw Processors available and without sounding like a ‘fan-boy’ it has it’s faults. It has a comprehensive Library feature, Develop Module for processing, plus other sections such as Map, Book, Slideshow and Print. These do exactly as they say, pin images to a map, create a book layout, slideshow, online gallery or proof prints. I’ve never used them being honest, other than slideshow.
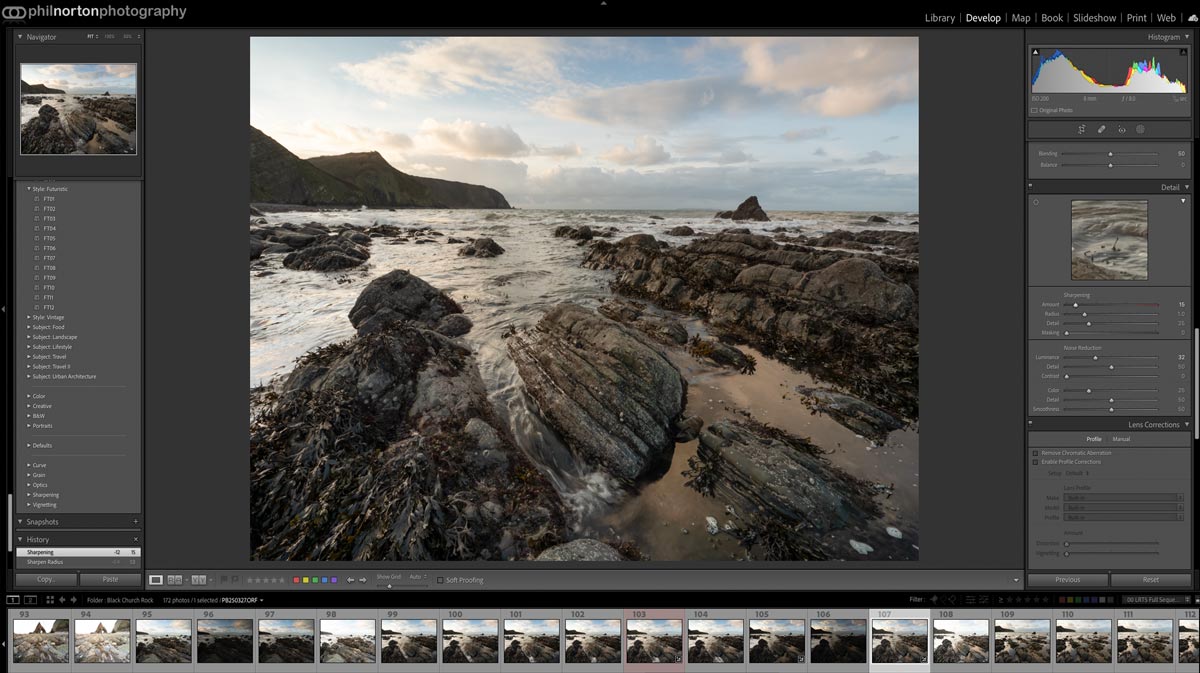
The main features are the Develop Tools which are fully featured, with plenty of options for global edits and local edit with brushes, graduated filters and selection masks. Pasting edits from one file to another is easy, ‘virtual’ copies can be created leaving the original intact for comparison, settings can be saved as Presets and there are thousands that can be downloaded if that interests you. There are various colour profiles that can be selected, excellent tools for correcting uneven horizons and verticals, bracketed images can be merged as can sets of images taken for panoramics too. It also has a very logical workflow working from the top down and is fairly easy to learn.
It has its faults. Being subscription based doesn’t suit everyone although you get Photoshop too, which locks you into the Adobe eco system. And it does not have great Noise Reduction or Sharpening which is the criticism always aimed at it. This is not something I find an issue because I use Topaz for both which I find the best available right now.
The reason I always come back to LR despite flirting with just about every other processor available is the flexibility it offers and the speed at which tools can be used.
DXO PHOTOLAB 5
DXO is probably one of the best all round contenders for Raw Processing should you not want to go down the Adobe route. A good Library feature allows for rating and keywording, although it relies on your Hard Drive folder structure. The Customise section where images are processed is pretty easy to learn with a panel on the right and tabs for different tools such as Light and Colour
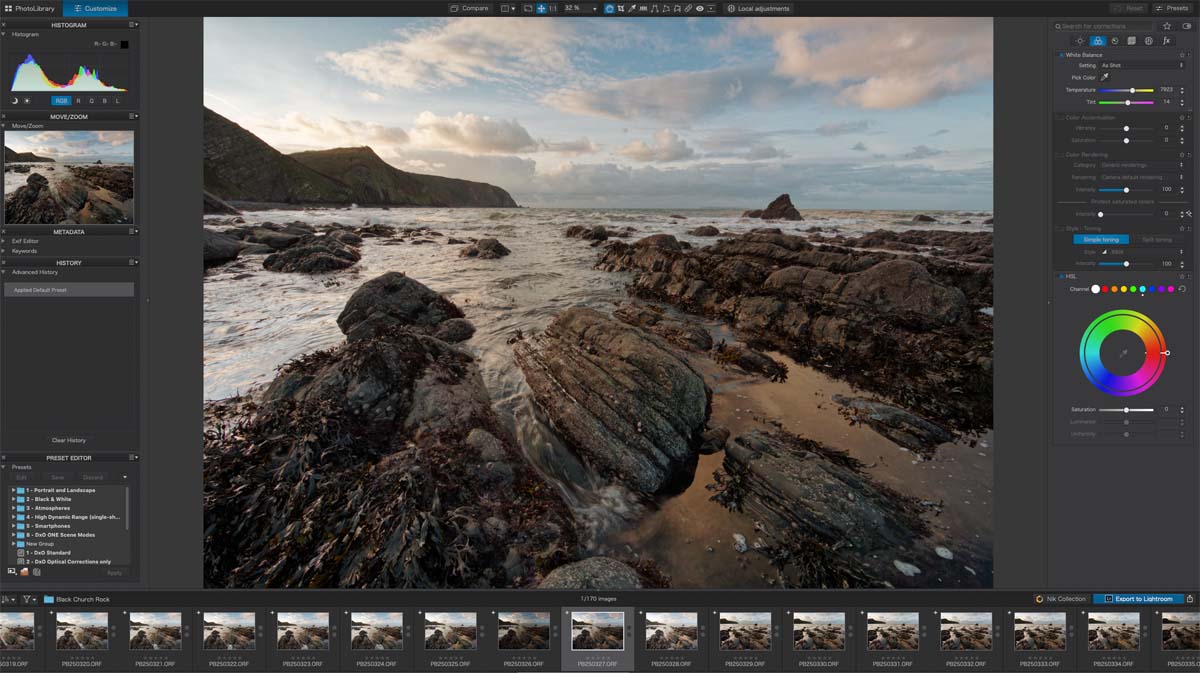
DXO can make Raw images appear better when first imported (see how richer colour is in these two screenshots) even when the import preset is set as standard. In both the LR and DXO screenshots only noise reduction and sharpening was applied. In LR a couple of clicks and they are just about the same. DXO has a very good toolset for local adjustments too, although trying to create a radial graduation is very convoluted (a tool I use often in LR). Lens correction is applied by DXO Modules which can actually be manipulated to reveal more of an image. In Geometry switch off Crop and part of the image which is hidden due to automatic lens corrections is revealed. Compare these two screenshots, in the DXO file there is a third rock on the right hand side horizon. The difference in size is 5184px native compared to 5375px revealed. Not much, but ruin a shot with something just cropped out and it could save it.
What sets DXO apart are the Smart Lighting and Clearview features, which is lacking in LR (LR has a similar feature to Clearview but it is not as good). Although possible to emulate in LR it does take me more work. What is outstanding in DXO is the DeepPrime Noise Reduction, something LR does lack. It is very good indeed, in fact some people use DXO just for DeepPrime to export images to PS or Affinity, which is made even easier with the release of DXO PureRaw, a free standing app designed for that purpose.
It has its faults. There is no way to merge bracketed images in DXO, nor stitch images taken for a Pano, so you’ll need another app for sure. Nor are there any Layers; creating multiple masks with different adjustments is possible as in LR, but no layers again just as in LR. I prefer Topaz Denoise although DXO DeepPrime is probably very close and I am willing to concede both should be on the pole position pedestal. Topaz suits my workflow better though. DXO although a very worthy app to use I find just is not quite as free-flowing and flexible as LR, but if your preference is to avoid subscriptions it is the one to use.
OM WORKSPACE
Most camera brands have their own software for processing Raw files and Olympus has Workspace. Updated with the release of the OM-1 it has some new features and being free it is worth having. Workspace was always clunky, and the update is still clunky. A new feature allowing the OM-1 to be tethered to utilise the camera processor for more power does help, if you want to have the camera connected just to use the app.
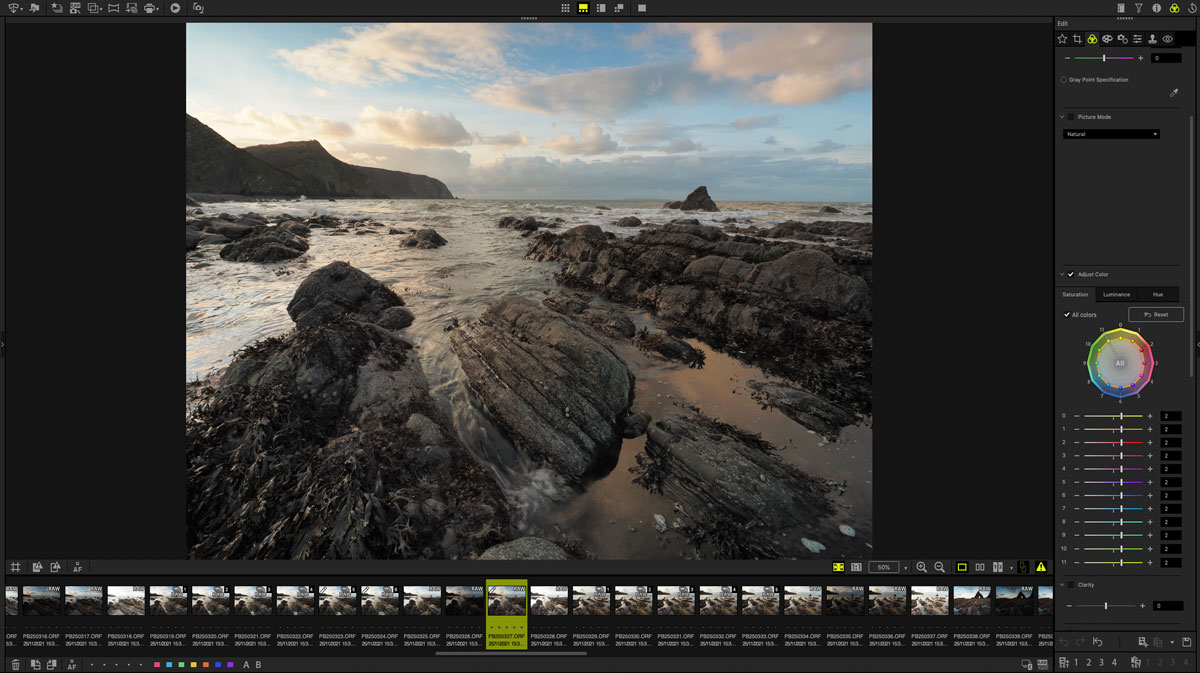
There are plenty of editing tools allowing for colour corrections, highlights and shadows and all the other tools you would expect. Panoramas can be stitched if taken in the panorama camera mode and focus stacked images can be merged if taken with a compatible lens. Any images taken with Art Filters can be edited with the filter preserved in Workspace, the only App that will do so. Raw images can have exactly the same settings applied as the Jpeg, if you are happy with the in-camera image and want better quality, again something you cannot achieve in other Apps.
Being an app produced by Olympus (now OM System) means colours are going to be exactly as they should be, no-one understands colour science as well as the manufacturer themselves. There are some benefits to Workspace, inspecting Exif information you cannot get from other applications for instance. Unfortunately Workspace is just too slow and clunky to use in a serious workflow.
What is exceptional is the new AI Noise Reduction intended for high ISO images. At standard ISO’s I personally see little difference, in fact with noise reduction applied I find a very slight loss in detail, but for high ISO it really does produce good results. Unfortunately you will need a high spec PC to run it. Workspace is needed for camera updates so it is worth exploring to see if it suits your needs. Many photographers are using it just to export files as Tiffs with the noise reduction applied to other apps that are more flexible in use.
It has its faults. The main being it is so slow and clunky to use. But it is free and worth trying.
PHOTOSHOP
As we saw in the Sections Exposure Bracketing and Focus Stacking Photoshop really is the powerhouse of editing apps, and despite the reputation (‘Is that real or is it ‘shopped?’) for over manipulating images, where it come into its own is for using the power of Layers and for finishing images.
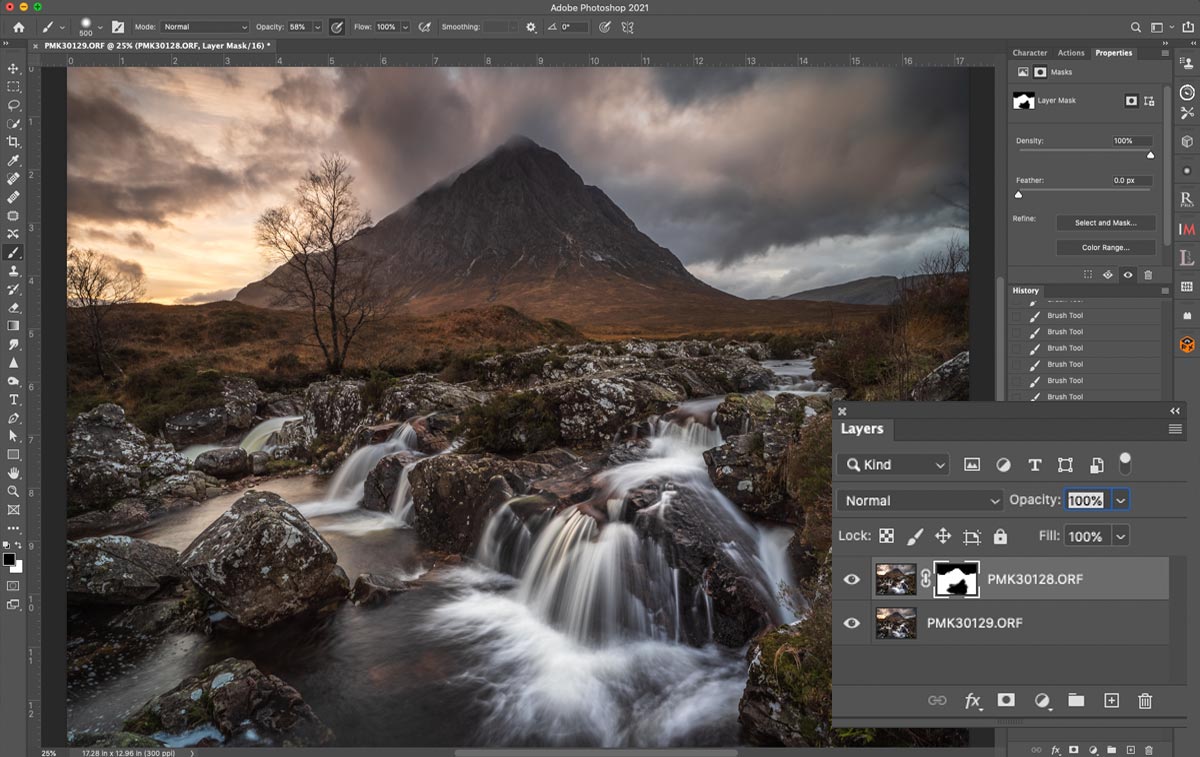
Layers are powerful. Blend bracketed images together, blend just a section of an image you took an additional under or over exposed image for, remove people (if a person is in frame but moving around, take a couple of shots, stack them together and blend the images together to hide the person), blend images with different ISO’s or shutter speeds, or focus points. Learning how to use Layers and blend images is one technique that is quite simple and gives so much flexibility.
Another use for layers is using Plugins such as Topaz Denoise. I denoise an image as the last step. This is contentious, you will often see noise reduction recommended as the first step; I disagree and prefer to see the noise throughout the editing process so I can control how much I may add, then deal with it at the end. Making a copy of the layer and running Topaz Denoise means it is applied to the layer, and if I need to I can remove some of the noise reduction by adding a mask and brushing it away to reveal the original layer underneath. The screenshot above was blending in an under-exposed frame (bottom) for the sky and water into the main image (top). It could just as well have been a Topaz Noise Reduction later, a sharpening layer, a Luminar Filter layer, or just about anything you can think of. It is old and passe now, but how do you think black and white images with one part of the image in full colour are produced? Layers.
Other tools such as the History Brush allow global edits to be made, then undo it and paint back in again, just where you want it. It’s one of the tools I use the most. There are plenty of tools available in Raw Processors which I find just easier and more accurate in PS. Colour Correction for example, I can play for hours in LR trying to get colour right, then send the image to PS and use Colour balance to get it just right with a click or two. Or if I want it just in one area undo it again and paint it back with the History Brush.
Also not to be overlooked are Selections. Selections can be created in multiple ways and are simply creating a ‘mask’ of a particular area to apply a local edit. LR has similar tools, however ‘Content Aware’ removal of unnoticed rubbish and tripod legs in PS is incredibly successful and so much better than trying to use Clone brushes.
There are also a vast selection of Plugins that can be used in PS to expand the flexibility; Topaz Denoise, Nik Collection, Luminar, and numerous options for Liminosity Masks. Most Plugins can be used as stand-alone Apps but there are huge advantages using as a plugin to an image editor; use filters such as available in Nik Collection and Luminar, or Topaz Denoise noise reduction as a layer in PS and areas you do not want the change to be applied to can be removed. Using as a plugin to LR and applying the change to a ‘virtual copy’ (a new copy to preserve your original) and the change is applied to the whole image, you cannot remove particular areas of it. It also saves time because it is faster using another App inside another.
It has its faults. Photoshop is not easy to learn. It has one of the most unfriendly user interfaces when first trying to learn with tools and menus all over the place, no clear workflow and no logic. Photoshop is not just for photographers, it is also a very capable artistic image creator and graphics creator so it can’t have a logical workflow.
BASIC TOOLS
Below is a list of the basic of tools and tasks to learn in Photoshop. Layers and blending are essential along with making selections. Using the Lasso and Content Aware Fill makes life so much easier for removing unwanted items like unseen rubbish. Levels, Curves, Hue/Saturation and Colour Balance are basic tools which are useful to tweak your edits in LR. History Brush is like a magic brush for making overall edits and then applying them locally after undoing the edit (make a global edit with levels perhaps to reduce brightness in one area, undo it in History, select History Brush and paint it back just where you want it without making selections. This is my preferred way of working because it is free flowing and gives me freedom, just like painting). Using Plugins like Topaz as a layer can really give more control. Learn these and you are well on the way to mastering Photoshop.
Note – Most Adjustments can be applied with an Adjustment Layer. This means that being a layer they can be switched on/off, the opacity can be changed, and masks can be applied to remove sections. When you get more confident you’ll probably just use the History Brush as I do. In Preferences check Keyboard Shortcuts and set up most frequently used tools as shortcuts to save time.
- Layers and Blending
- Selections – Magic Wand, Lasso, Sky, Subject
- Content Aware Fill
- Levels
- Spot Healing
- Curves
- Hue / Saturation
- Colour Balance
- History Brush
- Using Plugins
AFFINITY PHOTO
Affinity Photo is probably the best alternative to Photoshop available today, and at under £50 it is a bargain. Many people are turning away from Adobe because of the subscription model which seems to be the norm these days. To avoid the Adobe Ecosystem Affinity is the best route assuming you want to use a Raw Processor and an Image Processor.
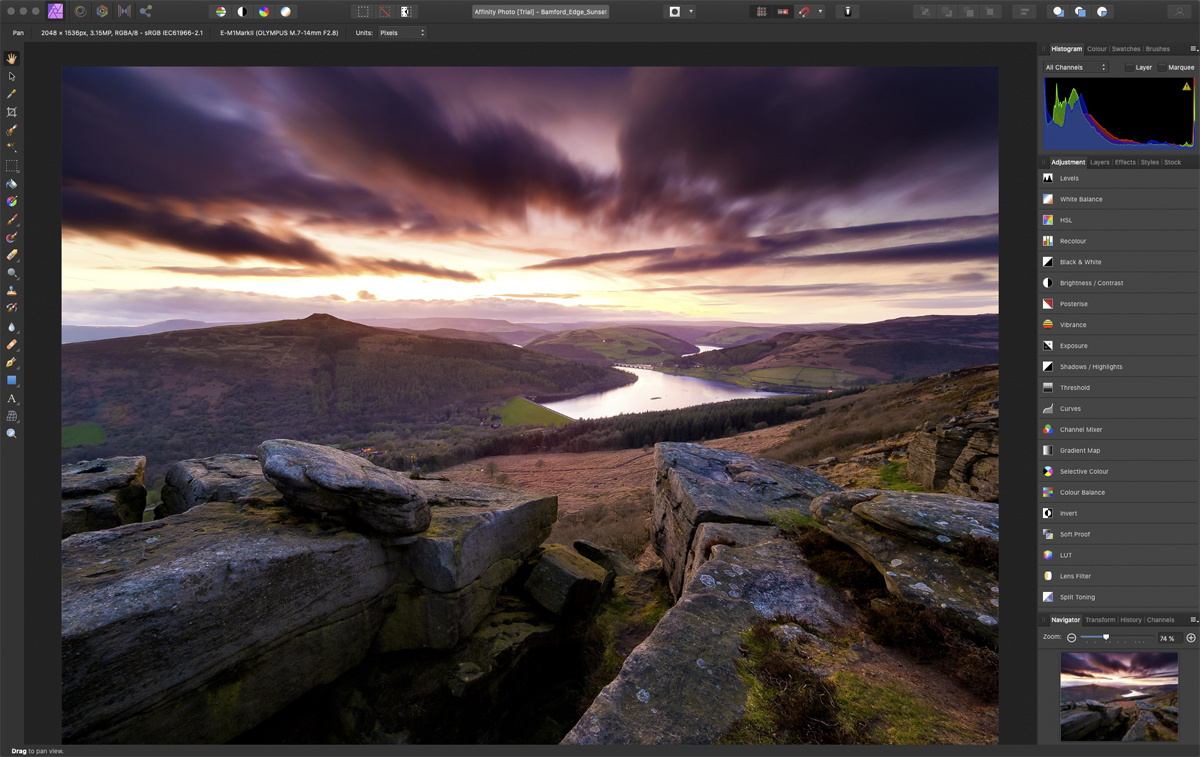
Remember you do not have to use a Raw Processor and Image Editor, I recommend this path as a workflow because of the additional flexibility you have particularly with Layers. Which Processor you use is personal choice but I would suggest DXO as one of the strongest contenders. It also depends on how active you are as a photographer considering Affinity will also process Raw images but you loose the ability to build and maintain a catalogue with searches, ratings, keywords and readily viewable Exif information.
Affinity has just about everything available in Photoshop. Full disclose I do not use it since I use PS. I did have the first release which I was very impressed with, and downloading the newest version I struggle to see anything really lacking in Affinity. It has layers, HDR, Panoramic and Focus Stack Merging, a great range of selection tool and editing tools and it even has one of my favourite tools in PS for editing, the History Brush (in Affinity ‘Undo Brush’). The layout is a little different, it is certainly better looking than PS and it is well arranged. There are also plenty of tutorials on Youtube. Affinity also allows other apps to be installed as Plugins, although you are best to check first. On1 is compatible, Nik Collection, and Topaz Denoise are compatible although they note Affinity must be downloaded direct and not from the Mac App Store for Mac users ( I have no idea why).
→ TIP At time of writing (early June 2022) Affinity has not yet been updated to be compatible with OM-1 Raw files although it seems it will at some point. When using Affinity as your only application the work around is to use Adobe DNG Converter (Free) and batch convert all your files to DNG, a global raw format that is compatible. Of course if you use another application for Raw Processing such as DXO you would then open the files in Affinity as a Tiff so the lack of compatibility is irrelevant.
PHOTOPEA
Photopea is another Photoshop clone and it actually isn’t bad. And it’s free! It is an online only application and is more limited in tools than PS but did I say it’s free? It’s surprising how many tools and features it does have including layers and it will also open a limited number of Raw formats, no Olympus Raws but convert them to DNG and it will open them. Photoshop and Affinity are better options, but to access something online with no cost its very good. It will also suite mobile as long as you have a data connection.
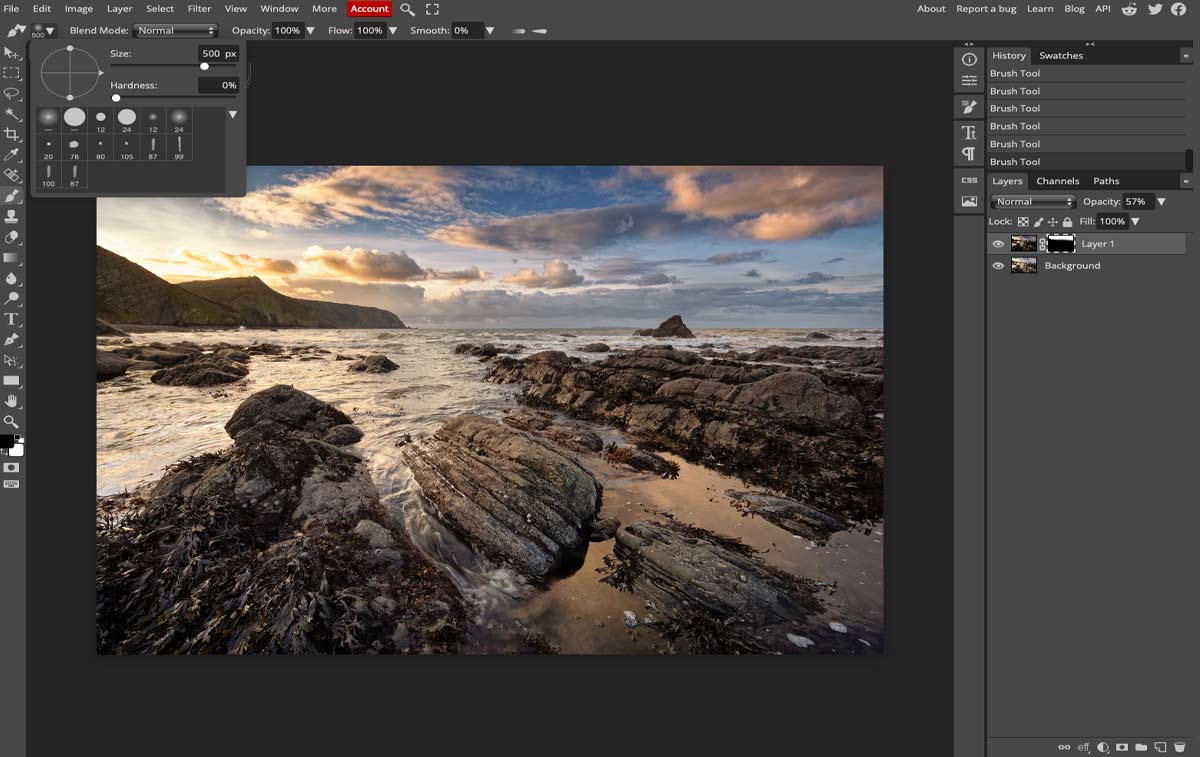
→ TASK
With Photopea being free I’m going to assume you have never used an image editor before, so try this to get an idea of what Layers can do as an example of how you can extend processing techniques. Let’s pretend you have two images for the same location and you under-exposed one image to reduce the brightness of the sky to mere together.
1- Open a landscape image, any image. We will pretend you have a bracketed image, click the image layer thumbnail in the right Layers pallet. Drag it down to the New Layer Icon on the bottom (to open a bracketed copy you would use File>Open & Place). Click the Top Layer thumbnail to activate it.
2- Now on the top Menu Select Image>Adjustment>Levels. Reduce brightness on the layer to make the sky darker, just enough to look good.
3- Make sure the top thumbnail is still selected, then click Magic Wand on the left toolbar. Click the sky, and notice a new toolbar opens at the top with circle icons, Replace, Unite, Subtract, Intersect. Click Unite to select more of the sky and alter Tolerance to suit. Use Subtract to remove areas that have gone too far. When your’e happy, at the bottom of the right Tool Bar make sure the active paint colour is black, then on the bottom of the Layers Palette click Add Raster Mask. A mask is added and the darkened sky is showing over the brighter image layer below.
4- Click the Paint Brush, select white paint, and brush over any areas on the top layer that should be removed. Alter the size of the brush, the opacity and the softness (low opacity and soft is better to build it up). Layer>Flatten to flatten the image and then save it.
You’ve just created your first manual blend of two images and for free. True you can do this in LR by selecting the whole sky in one step and then reduce the tone, but you cannot layer another image. You may want to blend in a patch of water that was too bright on a waterfall. An annoying person is in your frame but he is moving. Take two images with the figure in two positions, stack them as layers, add a mask and paint out the person to show the image underneath with no person in the way. Flare in your sunset? Take another with you finger over the sun and the flare vanishes. Stack them as layers and paint away your finger. Once you have done it a few times it gets very easy to do, and this is the power of Layers and Masks.
APPS WORTH A MENTION
A few Applications I do feel are worth a mention.
TOPAZ DENOISE
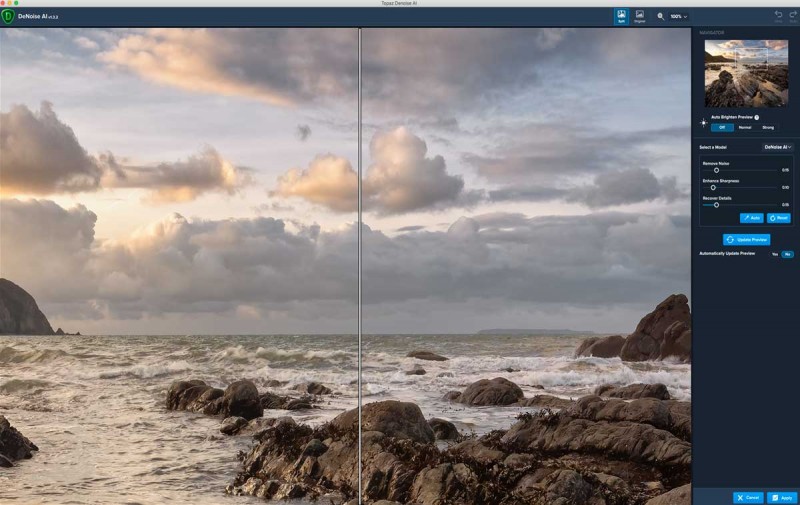
Topaz Denoise is one of the best Apps for removing noise I think. And it sharpens too. Adjust sliders to suit the image, and using it as a new layer means you have the flexibility to mask and remove areas if it has reduced detail.
NIK DEFINE2
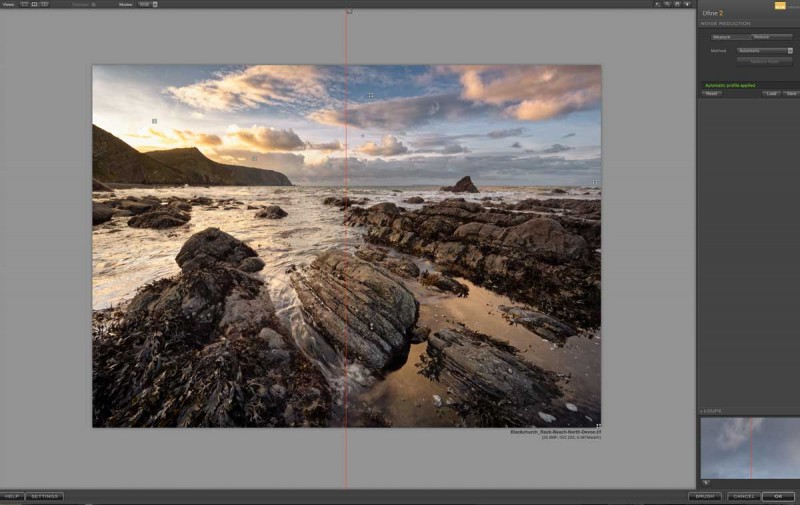
Define 2 is also exceptional for removing noise. In fact the whole Nik suite is worth having, including Sharpening. Now owned by DXO, they still offer the free version but it can be unstable and not compatible with recent operating systems and apps. The paid suite is more stable but of course there is a cost.
NIK COLOUR FX
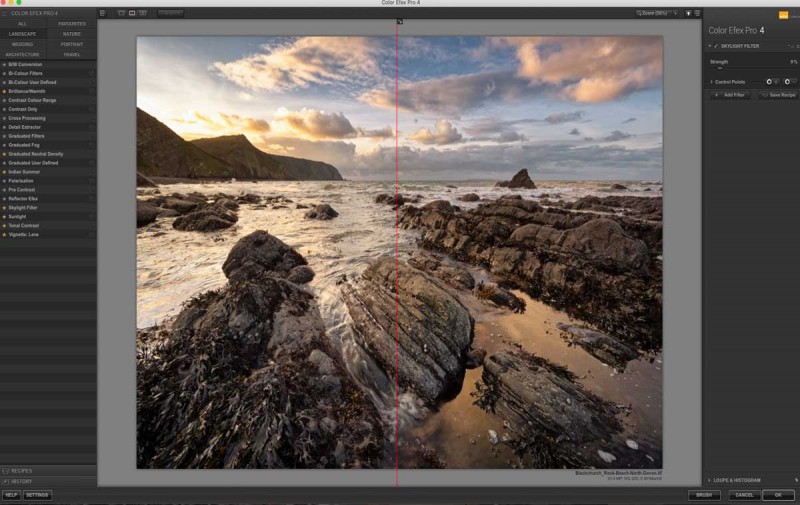
Also a part of Nik Collection, Colour FX offers a huge selection of filters for such things as colour and tones. Used carefully they can be helpful, and no doubt you guessed the next bit, use as a Layer for more control. There are so many filter suites available, personally I tend to find a few that can be useful and the majority a little too much.
LUMINAR
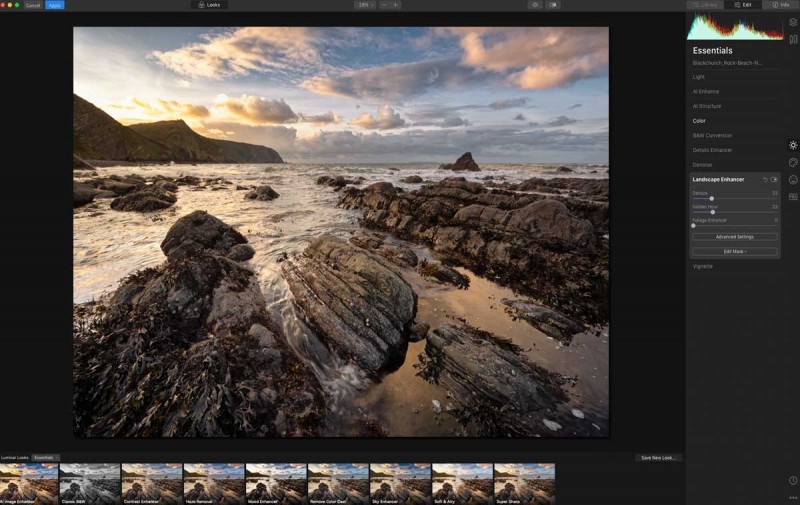
Luminar offers plenty of standard filters and sliders to apply your own settings which can be saved as templates. There are a few that actually work very very well; the sunset filter adds a golden tone and Dehaze gives a great ‘pop’ to images. But please don’t use the Sunrays filter or swap skies, it is always obvious and you are a photographer not a digital artist.
CONCLUSION
Hopefully this section will have helped you to understand what a workflow is and given you some thoughts on how to progress. Your workflow may depend solely on one application, DXO for example, or combined with Affinity. You may go the Adobe route and use Lightroom and Photoshop, and use plugins too. There is no right or wrong way, just your way. It is teh final image that matters.
