
THE EXPOSURE TRIANGLE
Explore correct exposure with the exposure triangle.
Exposure is a complicated thing with shutter speed, aperture and ISO to consider, all having an impact on the final result, and it is bewildering until you understand a few basics.
Once this was a really complicated business; loading your chosen ASA speed film and then having to use hand-held light meters to work out the rest. Thankfully today our cameras will work it out, even in Manual, leaving us to make creative decisions for the image we are capturing.
THE EXPOSURE TRIANGLE
Long held as the defacto way to explain exposure, the triangle is simply a graphic showing how aperture, shutter speed and ISO work together. They are so closely linked that one affects the other, all to achieve exactly the same result, a GOOD EXPOSURE.
Take a look at the diagram and see how shutter speed, aperture and ISO are all closely linked with each other.
→ TIP Turn your camera on, put it in ‘A’ and have a play. Alter the aperture and watch how the shutter speed changes to achieve exactly the same exposure. The Exposure Graph on the bottom screen will stay at ‘0’. Try in S, set the shutter speed and watch how aperture changes. Now try in M, alter the shutter speed and the aperture to keep the indicator on ‘0’. All of these changes give the same exposure and yet alter the sharpness, the depth of field or the amount of grain in the image. It is these factors that need to be considered when setting the exposure.
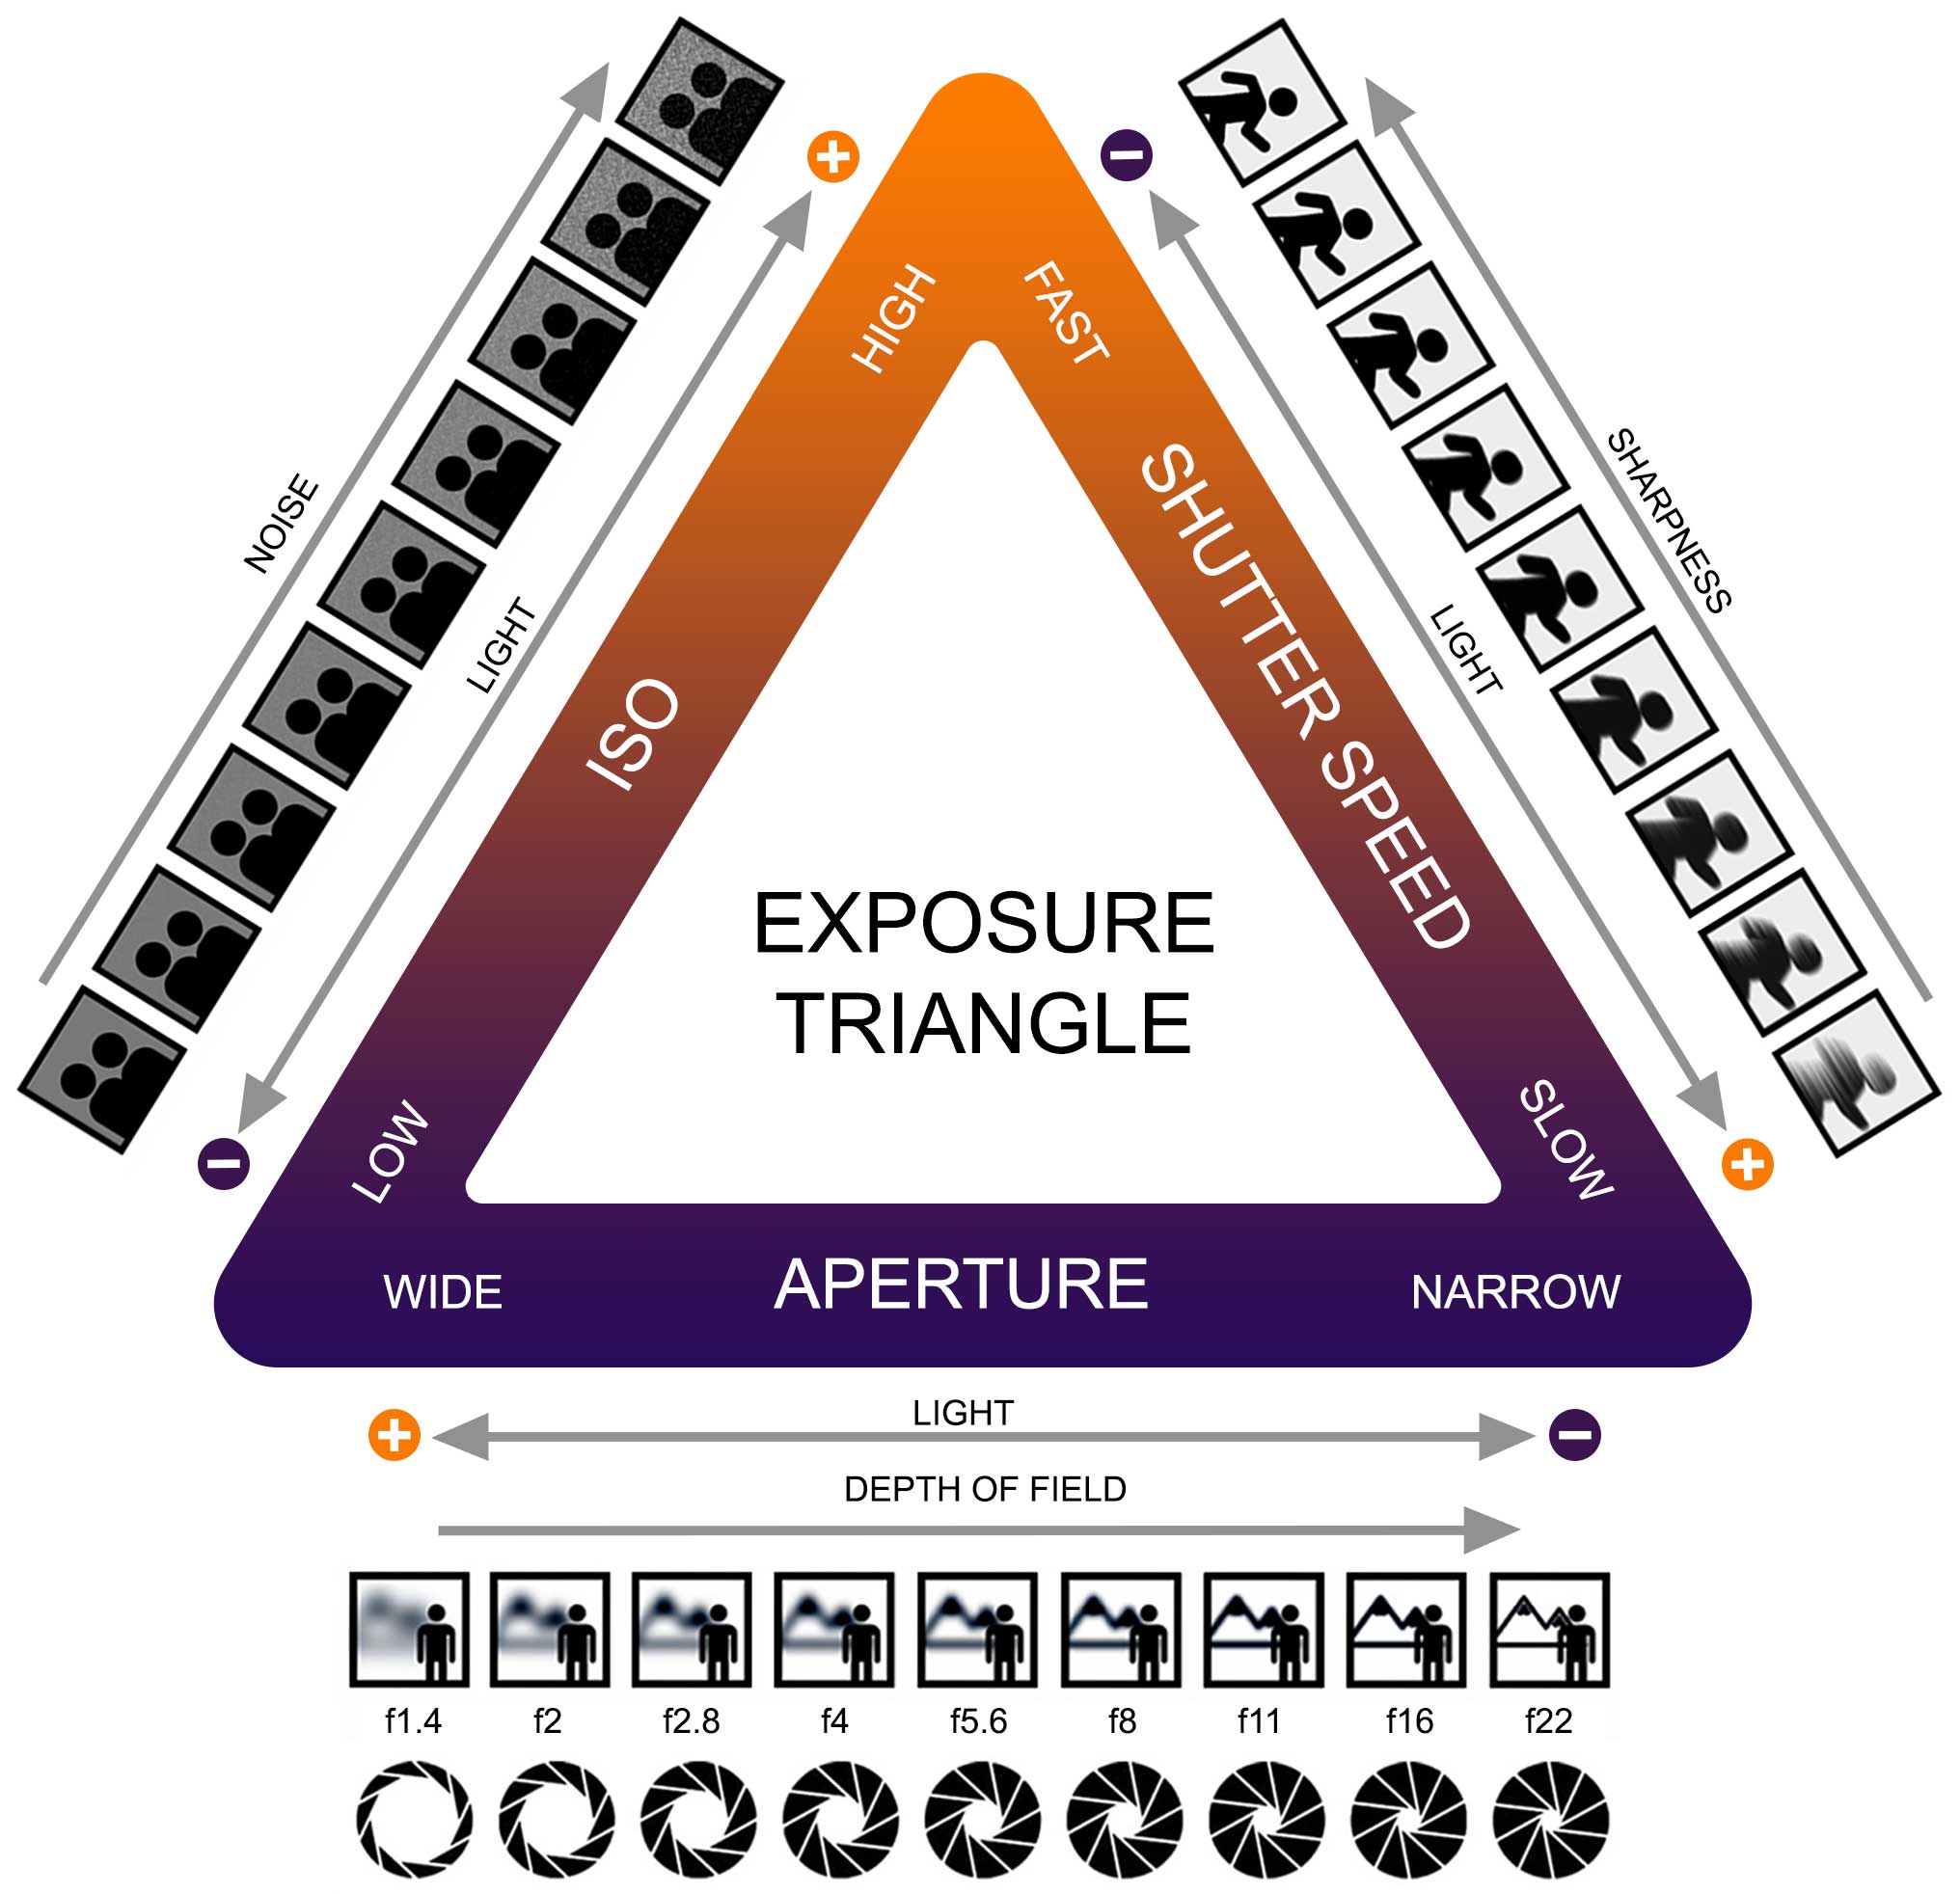
Light is how much light enters the camera, which can be confusing. Less light for a longer shutter speed means blurred movement. Less light for a shorter shutter speed and higher ISO means more grain. More light with a wider aperture means less depth of field.
Aperture not only affects how much light enters the lens by the size of the aperture (f-stop), but also depth of field. You may want a wide aperture to throw the background out of focus, or a narrow one for sharpness front to back, or to slow the shutter for blur. Usually in Landscape photography we are more concerned with depth of field so a narrow aperture is used
ISO changes the sensitivity of the sensor to light. Higher ISO reduces shutter speed and produces more noise, but making it more complicated, so can a poorly exposed image. Lower ISO gives longer shutter speeds. A badly under-exposed image will be ‘noisier’ when corrected in post because the information was not captured, known as the Signal To Noise Ratio. SNR is a scientific concept we need not get too deep into, suffice to say a low ratio (poor exposure) is less desirable than a high ratio. Long exposures produce more noise because of sensor heat.
Shutter Speed is exactly as it says, the speed at which the image is taken. A fast shutter speed may be needed if there is action in the scene you want to freeze, or a slow shutter if you want to blur movement, such as water.
The reason we refer to an Exposure Triangle is because when you alter one setting, it affects one or more of the other two in a constant triangle. You may set ISO first if light is low and you need a fast shutter, also altering the aperture to increase shutter speed, or set the aperture (A Mode), or the shutter first (S Mode). Doubling the ISO shortens shutter speed by half, or close the aperture a full stop (f5.6-f8) reduces light by half so the shutter speed (length) will double. Remember wider is a smaller number, slower is a larger number.
Examples:
1- f8 ISO200 s. speed 1/20
2- f11 ISO200 s. speed 1/10 (Aperture twice as narrow, shutter 1/2 speed).
3- f11 ISO400 s.speed 1/20 (ISO double, shutter back to 1/20)
4- f5.6 ISO400 s. speed 1/80 (Aperture 2 stops wider, shutter doubles twice)
All of these example result in the same thing, a good exposure. But altering one affects the other, and when you understand each side of the triangle you will be able to put the three together more successfully.
THE MAGIC BUCKET
As you can see the amount of light to get a good exposure depends on many variables, ambient light which is out of your control, and the camera settings which you do control. Setting one of the three variables will always affect one or two of the other settings in a triangular way. Understanding how changing the variables and what the impact is on your image is the key to your creative decisions. Change the aperture by a full stop and the shutter speed will change by half the speed because you let twice the light in, but both are the same exposure. Double the ISO and the shutter speed will change by half. In Manual if you set Auto ISO, then set the shutter speed and the aperture, the ISO will change accordingly.
Let’s have a look at a visual way to explain it using my Magic Bucket analogy with water filling a bucket to represent light.
EXPOSURE
Imagine a bucket full of water, with a line denoting full. A full bucket represents a correctly exposed image. Half full and it is under-exposed resulting in noise when you try to save it in post. Overflowing and it is over-exposed, your highlights are gone and you need a mop.
LIGHT
Light is the water flowing from the tap, it fills the bucket, or fills your sensor with exposure information. The flow of water or ambient light in the scene is controlled by the tap, in full flow on a bright sunny day or just a trickle on a dull day. In the UK it’s usually a trickle. You cannot touch the tap or alter the amount of ambient light.
APERTURE
The funnel is the aperture, it controls how much water (light) passes through to fill the bucket. A funnel with a narrow neck (f22) only lets a small amount of water through, filling slower. A very wide neck (f2.8) allows a lot of water through to fill the bucket, filling faster.
SHUTTER SPEED
Shutter speed is how fast the water passthrough the funnel . Will it fill quickly or slowly? The aperture and ISO you choose will influence it
ISO
ISO changes the sensor sensitivity to light. Increase or decrease ISO and the sensor is more or less sensitive. Double the ISO and the bucket shrinks by half because it needs less to be full. Half the ISO and the bucket size doubles because it needs twice the water to fill it.
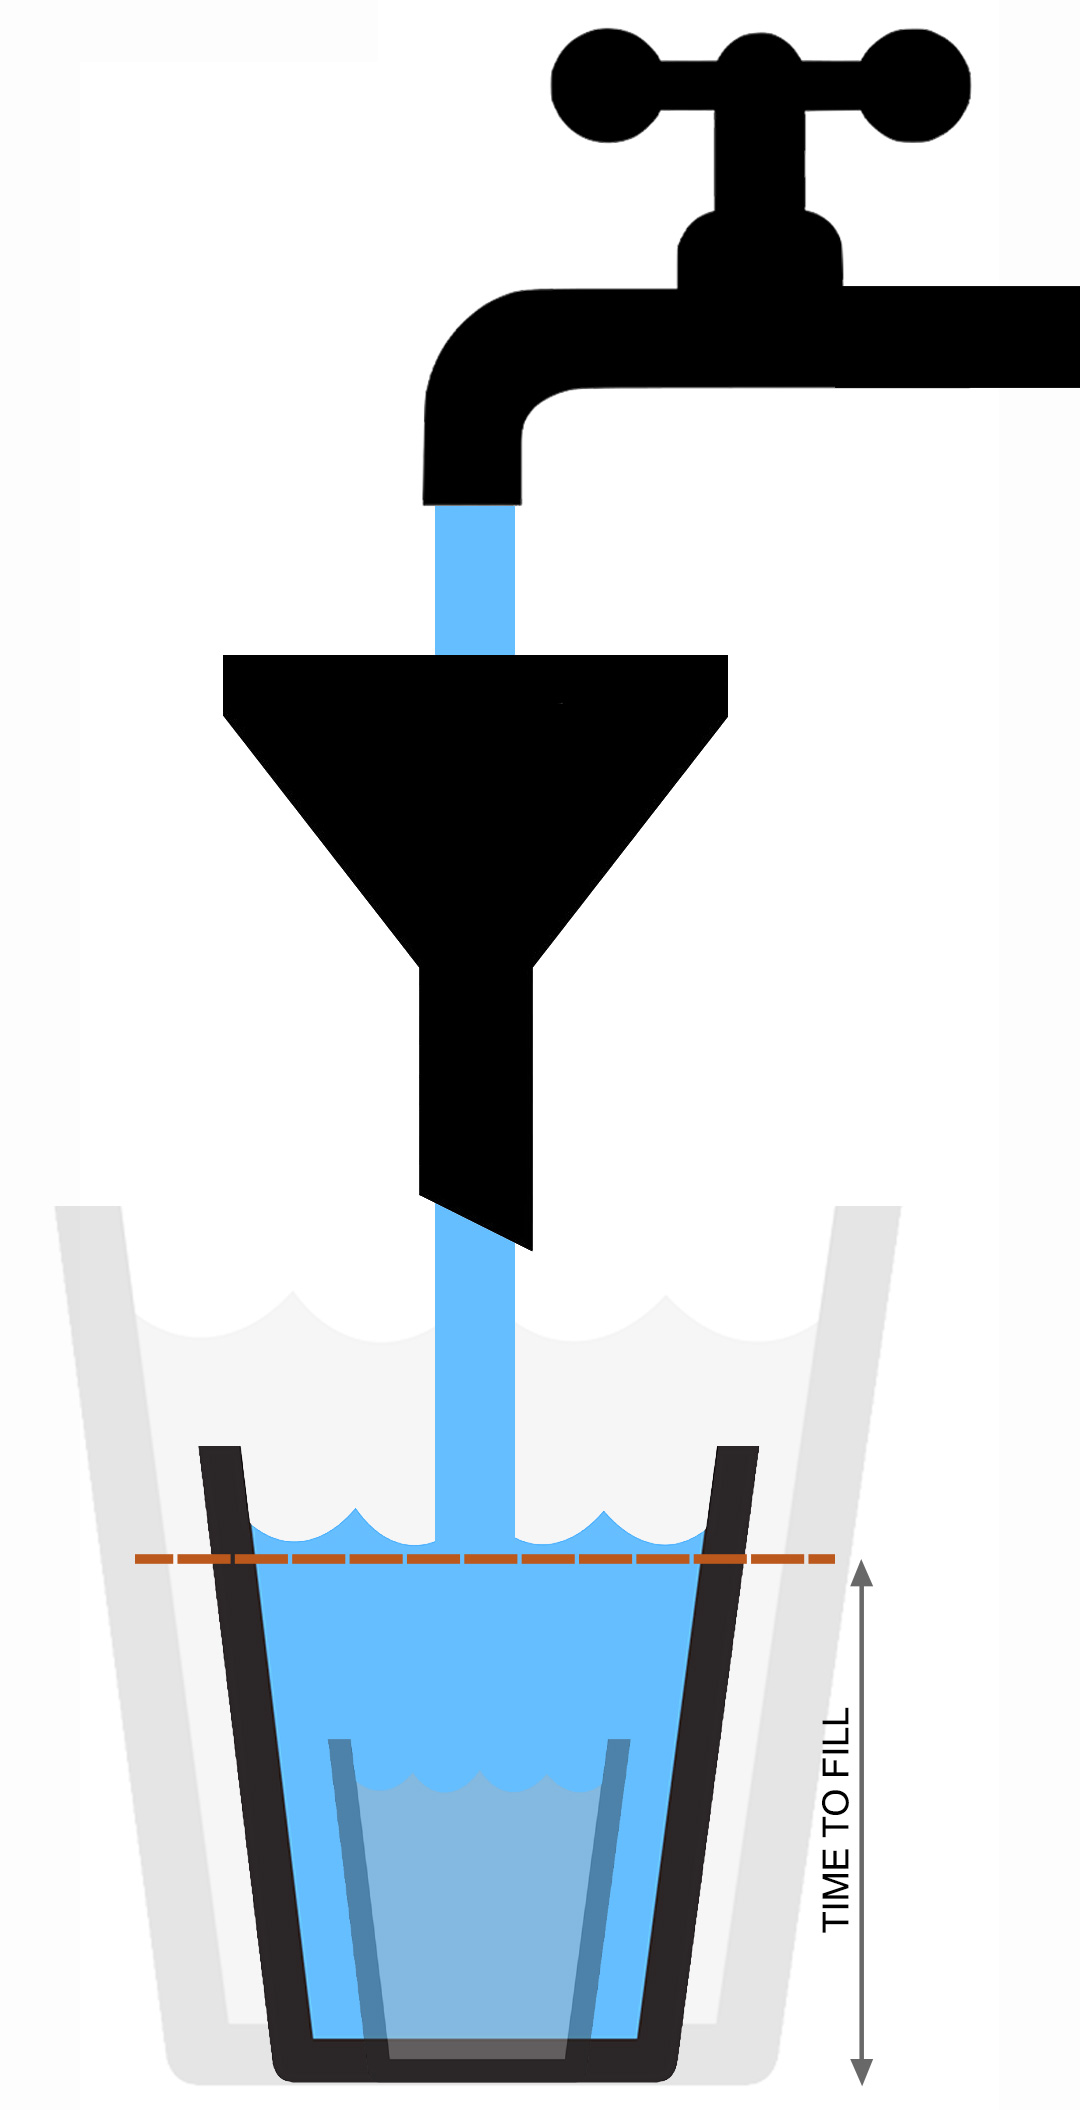
Taking this one step further imagine the bucket is 1 gallon ISO 200 and needs to be full to the top for a good exposure, or a good Signal to Noise Ratio. Lower the ISO to 100 and the bucket gets twice the size because the sensitivity of the ISO to light has halved and it needs more to fill it. Double the ISO to 400 and the bucket gets half the size because sensor is now twice as sensitive and needs less to fill it (it is a Magic Bucket remember). Altering the size of the funnel alters the speed of the water flowing though it to fill the bucket. You cannot alter the tap, that would be like turning the sun up or down.
The decisions you make regarding the size of the bucket (ISO) the size of the funnel (Aperture) and the speed of the water flowing through the funnel (Shutter Speed) should all achieve the same thing, filling the bucket. But these decisions affect the visual appearance of the image, and that is where your creative control comes in.
APERTURE
For Landscape Photography aperture is our primary concern. It dictates how much Depth of Field we have in an image and we will look at this in more detail in the next section. For now we need to address a term you probably hear, ‘stops’. Lenses are often quoted as being a full-stop faster than another, or change exposure by a full-stop. Apertures are expressed as f-numbers and there is a scale of what denotes a ‘full’ stop. But all cameras also have additional f-numbers, you can actually set whether to have 1/3rd or 1/2 stops, 1/3rd being the most useful.
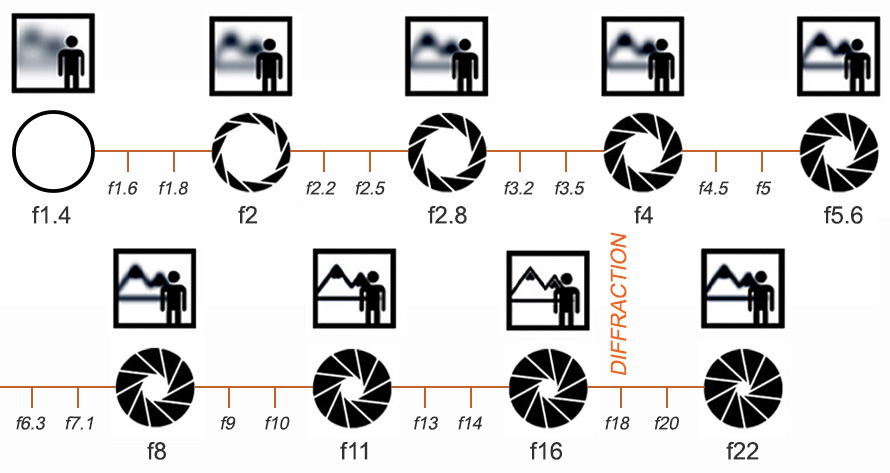
DIFFRACTION Don’t get overly concerned with which apertures will give the best depth of field from the diagram, it is a generic theory. The size of the sensor also affects depth of field just to make things more complicated, with smaller sensors having a greater amount. For a full frame sensor the most practical f-number is usually around f11-14, for an APSC camera it is less, around f9-f11, and for Olympus Micro 4/3 even less at anything from f5.6-f7.1. So Olympus Micro 4/3 actually has a greater depth of field than a full frame sensor which is great for Landscapes, not so great for photographers who want the maximum background blur or bokeh such as in portraits. But it doesn’t account for Diffraction which makes lenses softer the more they are ‘stopped down’ ie, a smaller aperture used like f22.
Diffraction is not a defined aperture, different lenses will have a different point when it becomes apparent and it is important you know your lenses. When diffraction affects the image it starts to get softer meaning your best efforts to get the maximum depth of field are defeated, instead of the background being sharp it starts to look soft again. This is why we always try to use the best aperture for the maximum depth of field and sharpness and avoid diffraction. The focal length of the lens also affects it with wide lenses having more depth of field and longer lenses having a shallow depth of field. If this is making your head hurt don’t worry, we all had to start at the beginning and it confused us all. See the next section “Depth Of Field” where we will look at this in more detail and discover how to approach it.
DOUBLE OR HALF?
It is important to understand how changing the aperture affects exposure, and for that matter ISO and Shutter Speed. Changing the aperture from for example f2 to f2.8 is one full stop. The amount of light entering the lens has been halved, so the shutter speed, or the time the shutter is open, will double. The exposure is the same, half the light entered the lens but for double the time so the total amount of light the sensor receives is the same. Changing from f2 when the shutter speed is 1/100th second, to f2.8 (half the light) means the shutter would be 1/50th second. The ability to vary settings and have the same exposure gives us control over how the final image looks in terms of movement being captured sharp or soft, and the sharpness or lack of it in the background.
Remember that the higher the number, the faster the shutter speed is, and the higher the f-number the narrower the opening, so the less light enters into the lens. 1/50th is half as fast as 1/100th. It doubles exponentially too, so 2 becomes 4, 8, 16, 32, 64, 128 etc. Shutter speeds and ISO do not follow this exactly and will be rounded up or down to a convention that has become standard.
The table below shows how aperture ISO and Shutter Speeds double or half and have 1/3rds in between. It is not representative of an exposure guide, it is simply to represent how the numbers change.
| 1/3rds | ||||||||||||||||||||||||
|---|---|---|---|---|---|---|---|---|---|---|---|---|---|---|---|---|---|---|---|---|---|---|---|---|
| f1.4 | f1.6 | f1.8 | f2 | f2.2 | f2.5 | f2.8 | f3.2 | f3.5 | f4 | f4.5 | f5 | f5.6 | f6.3 | f7.1 | f8 | f9 | f10 | f11 | f13 | f14 | f16 | f18 | f20 | f22 |
| LOW* | 80* | 100* | 200 | 250 | 320 | 400 | 500 | 640 | 800 | 1000 | 1250 | 1600 | 2000 | 2500 | 3200 | 4000 | 5000 | 6400 | 8000 | 10000 | 12800 | 16000 | 20000 | 25600 |
| 60″ | 50″ | 40″ | 30″ | 25″ | 20″ | 15″ | 13″ | 10″ | 8″ | 6″ | 5″ | 4″ | 3.2″ | 2.5″ | 2″ | 1.6″ | 1.3″ | 1″ | 1.3 | 1.6 | 1/2 | 1/2.5 | 1/3 | 1/4 |
| 1/5 | 1/6 | 1/8 | 1/10 | 1/13 | 1/15 | 1/20 | 1/25 | 1/30 | 1/40 | 1/50 | 1/60 | 1/80 | 1/100 | 1/125 | 1/160 | 1/200 | 1/250 | 1/320 | 1/400 | 1/500 | 1/640 | 1/800 | 1/1000 | 1/1250 |
Note-On mobile swipe to view.
Notice how aperture increases or decreases in steps of three with ‘full stops’ indicated in black. Whichever f-stop you use, the next full stop is the third one along. The same is true for ISO and shutter speeds. When selecting a setting, just remember that each 3rd one equals a full stop, so it will equate to double, or half the previous setting. All you need to take away from this is that Aperture, ISO and Shutter Speeds all have main ‘stops’ with 1/3rd increments between each one. Each full ‘stop’ equates to double or half, just as the Aperture doubles the amount of light that passes through the lens, or halves it, ISO doubles or halves the sensitivity to light. Shutter speed will be double the length, or half.
Note that the differences are exponential. Take a shutter speed of 1 second. Reduce the Aperture by 3 stops to slow the shutter speed down and the math does not equal 1″ x 3 = 3″. If only it were that easy. 1 second reduced by 3 stops becomes 8 seconds because they are exponential, 1, 2, 4, 8. It is easy enough to remember the principle, but don’t worry about the steps in between, the camera will do it for you.
→ TIP LOW* 80* 100*. Highlighted because these are computational low ISO on Olympus and vary by model. Anything under 200 is computational and has reduced dynamic range. Whilst they are acceptable to use when needed be aware that the DR can result in less latitude for highlights and shadows.
ISO AND NOISE
There will be times when the only option you have to achieve the result you want is to alter ISO. ISO affects the sensor sensitivity to light; increasing it means it needs less light and vice versa. Therefore you can reduce the shutter speed when needed by increasing ISO, and also, if you have the depth of field, by altering the aperture. The consequence is increased noise which is one thing I do my best to avoid (see Workflow for how I do this). Reducing ISO to the Low settings can reduce Dynamic Range, so again you have decisions to make.
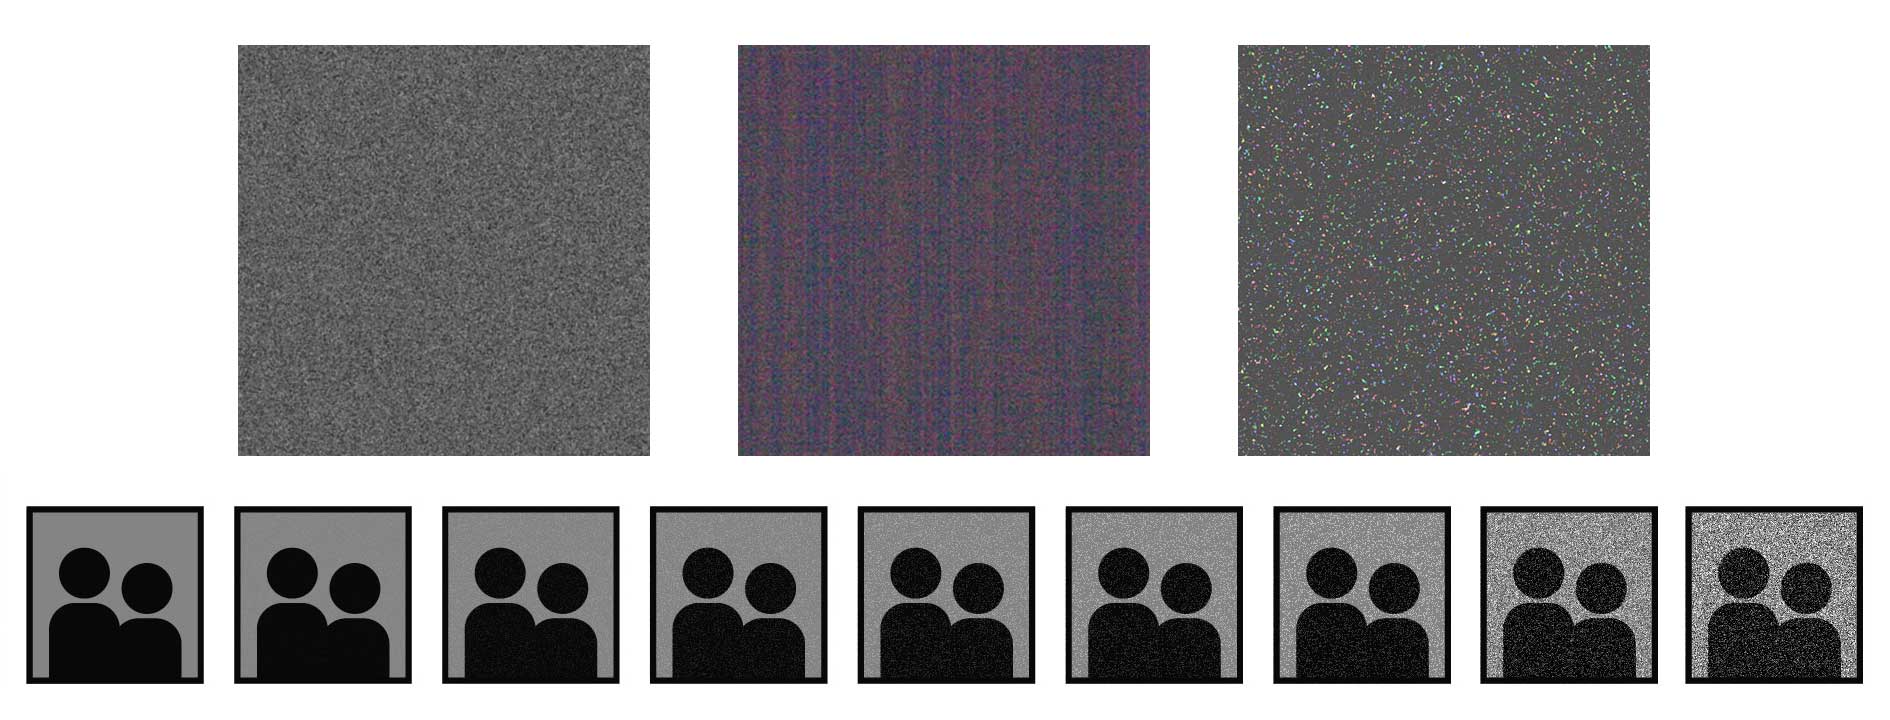
There are three types of noise; Random Noise, Banding and Fixed pattern Noise:
1-Random Noise – What we will see more often when using high ISO settings. The OM-1 has a new Jpeg engine which vastly reduces noise using the Noise Filter giving very good results but it is only Jpeg and does not affect Raw. For Raw images it is necessary to deal with it in post so keeping it to a minimum is best. It is referred to as random because the pattern changes from image to image even with the same exposure.
2- Banding Noise – Different cameras can be more or less susceptible to banding, mostly seen in shadows and due to poor exposures. Olympus do suffer from banding so again it is important to get exposure right and not open shadows too much.
3- Fixed Pattern Noise – Fixed Pattern, also called ‘Hot Pixel Noise’ is so called because it is generally a fixed pattern and mostly caused by very long exposures. Noise Reduction does help to minimise it even for Raw images, although sometimes it can be best to switch it off to save the time of the camera taking another dark frame of the same exposure time. There are ways to deal with it when processing although leaving it on does help. Heat is a major contributor, the harder the sensor is working during long exposure the more noise and ‘hot pixels’ will be generated.
High noise levels in an image gives more ‘grain’ and less detail so it is always best to use as low an ISO as you possibly can. Cameras these days including the OM-1 can deal with high ISO very well in good light because the shutter speed will be high and the sensor will not heat up. For wildlife shots using a higher ISO is never generally as much of an issue as in Landscape photography because we will usually use much longer shutter speeds.
SHUTTER SPEED
Shutter Speed determines how movement in the image is captured, whether frozen or blurred. For Landscape Photography is is not often we want to freeze movement. Perhaps there is some tall grass blowing in the wind, or a waterfall you want to shoot with sharp water detail. Generally movement is not such an issue and all we have to consider is being able to hand hold a camera or use a sturdy tripod.

A fast shutter speed will freeze movement whereas a slow shutter will blur it, and there is no fixed shutter speed, it obviously depends on the motion.
The only time fast shutter speeds are really necessary is for action, wildlife, sports, bird photography etc. In Landscape Photography we still consider shutter speeds usually to soften motion such as water. Experience will teach you the best settings to use, for instance with fast flowing water in a waterfall I like to keep the shutter speed to around 1/4 or 1/2 second, no more or less. Misty waves lapping over rocks could be many seconds, whilst streaking clouds moving over the sky could be minutes. We will look at this in detail in ‘Techniques’.
EXAMPLES
Both of these images have a common characteristic in that they need maximum depth of field so the foreground and the background is sharp, but both used different shutter speeds to convey movement a different way. Once you master the technique you then have the ability to make creative decisions about how you want the final image to look.
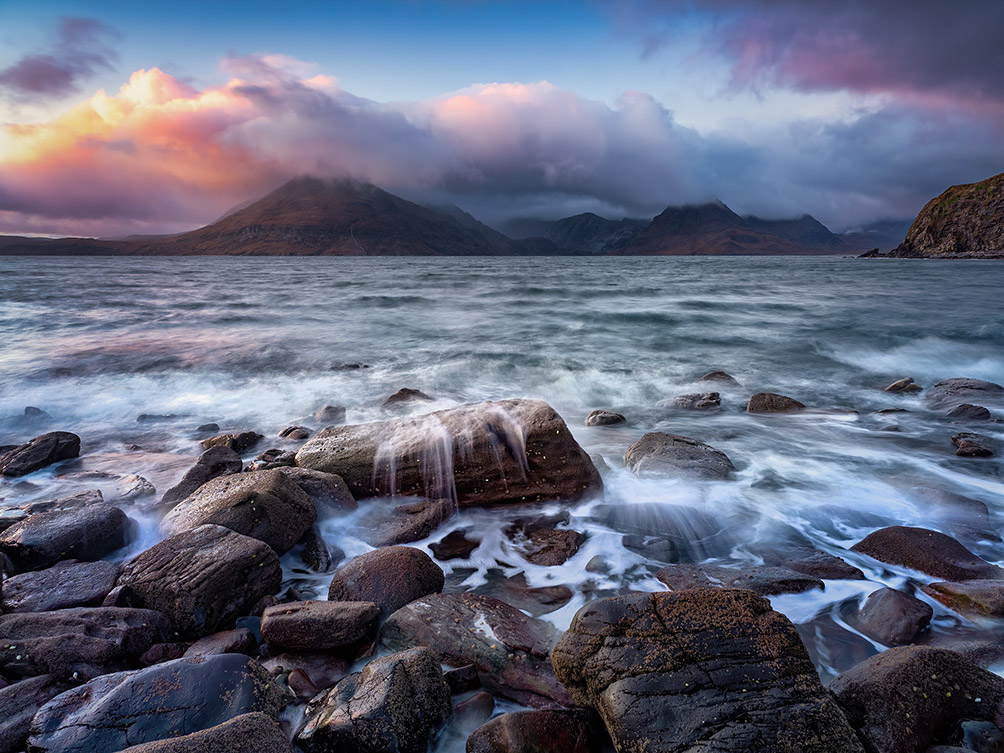
12-100 Pro @12mm ISO 200, f7.1 1/2s Exp
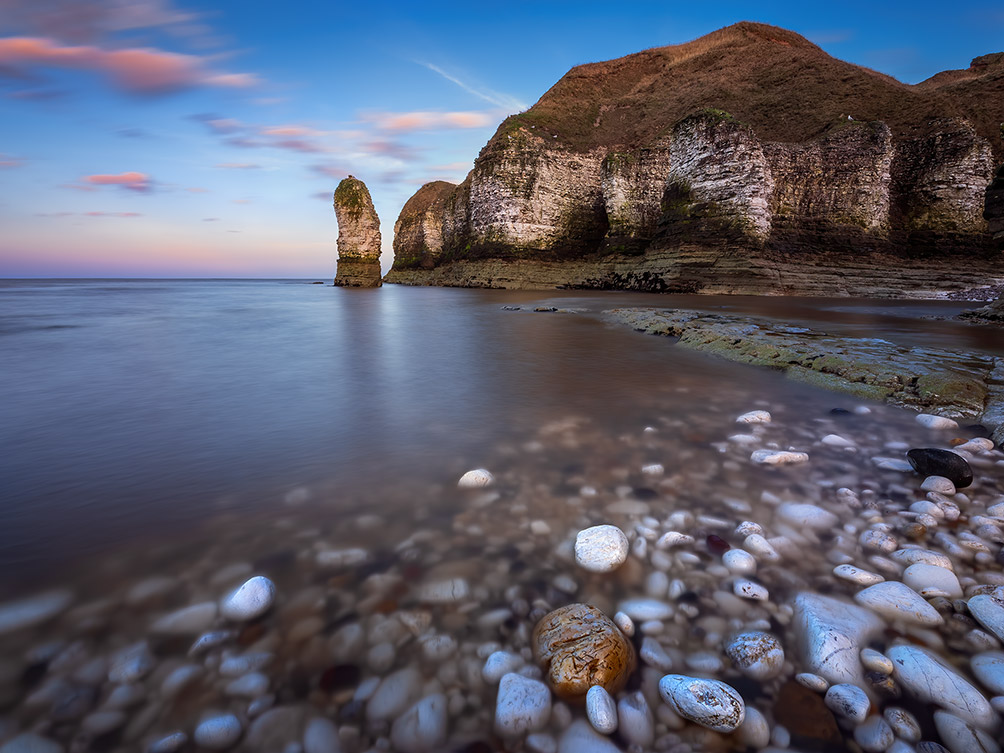
8-25mm Pro @8mm ISO 200, f8 30s Exp LiveND64 (6 Stop)
CONCLUSION
Now you understand a little more of the Exposure Triangle and how each side is so intimately connected together. Cameras today are so advanced that they will get a good exposure for us without having to resort to hand held meters and charts leaving us to be aware of the impact of, and make the creative decisions. We will look at these decisions in more detail. Next we will discover how the camera takes meter readings for exposures and how you can control it.
