
PLANNING
How to discover and plan for your amazing images.
In this section we will look at how to find locations, how to plan and make sure you are prepared to capture some great images.
Back in the day when I first started 30 years ago finding locations and inspiration was so much harder. There was no Internet, no Social Media, no Apps and very little connected community. The only way to expose yourself to inspiration was through books and monthly magazines and just getting out there.
Today thankfully it is so much easier to do, in fact the opposite is true, we now have to filter out some of the exposure and prioritise, but it is still a good thing.
Planning is more than just checking the weather, even this was hard to do once. We can break down the planning into two main categories, Discovery/Inspiration and Research/Planning. Let’s look at each one.
DISCOVERY AND INSPIRATION
I dislike the word ‘cliche’. DO NOT BE AFRAID of shooting a location that is deemed a cliche by some. They may have been shot a thousand times before for good reason, they are stunning scenes and you’ll generally find the photographer who calls it a cliche has already been and has it in his or her portfolio. It is unfair I feel on those that have not been to a location before, and it will always look different because light is never the same. Yes you have to try harder than ever to get that elusive stunning light, but don’t be afraid to try.
In this digital age it is so much easer to find inspiration and discover places you have never been; we have the internet, social media platforms like Facebook, Instagram and Flickr, we can connect with like minded people easier than ever, travel is so much easier and of course we have publications we can read online or search for and order for next day delivery. Even workshops are so much easier to find instead of having to look in the back of your monthly magazine (I run them too).
PUBLICATIONS
Let’s start with publications. There are still plenty of photography magazines around today, they just moved online. Do a search and spend some time looking them over or even subscribe, Digital Photographer, Digital Camera and Outdoor Photographer to name just a few. Search for photography books in your local area, areas you can access easily, or even general photography books. You will find plenty online.
Two Photography Location Books I feel are excellent and worth having are the Fotovue Guide Books and E. Bownes’ Photographer’s Guide Books. They are worth collecting for reference and I have them all. And bragging rights, I have an image in the E Bowness Photographer’s Guide to Iceland.

E Bownes’ Photographer’s Guides Available on Amazon.

Fotovue Photography Guides Available on Amazon.

E Bownes’ Photographer’s Guides Available on Amazon.
These books do tend to show most of the ‘classic’ locations, but they do give inspiration and location details. Once you get there you have plenty of scope for compositions of different scenes and viewpoints. And of course you can search online for other viewpoints.
SOCIAL MEDIA-WEBSITES
It seems pretty obvious to say Social Media when everyone’s online, but it does surprise me how many people I come across who do not use any social media at all, probably by choice. True they can start to take over if you let them, but for Inspiration and Discovery they are invaluable.
- Facebook has the advantage of many Groups to join, including 3 I run and probably most relevant is ‘Olympus OMD Landscapes’. Find some photography groups to join for inspiration, connect with people and learn about locations. Search on FB for images is not as good as it used to be, and many images will not be public unless it is within a group. View my Facebook Page.
- Instagram has a good search feature but in order to have exposure in your feed you need to follow like minded people and avoid all the ‘junk’ from so called ‘influencers’. View my Instagram.
- Flickr again has a great search feature being primarily a community for photographers. I do not find it quite as good for making connections with people or dialogue and use it only for an online gallery of images, but for searching images of a particular location it is very good. View my Flickr Gallery.
- Websites. Once you start to discover photographers you admire visit their website and check out their Galleries. And bookmark them for future reference.
Exploring various social media platforms is a great way to get inspiration for locations you may not have been aware of even in your own location. And you do not have to participate actively.

Flickr image search for Llandwyn Island
SAVING INFORMATION
Utilise the powerful computer in your pocket, you mobile phone. Whether it is iOS or Android you already have two powerful Apps to use, Google Maps and some form of Notes.
- Google Maps Maps has a powerful feature allowing you to drop Pins on locations. Create lists and save them and if you create a Google account you can also use your desktop computer and have the locations you pin sync to any other devices. The screen shot shows locations I visited recently in Assynt, Scotland.
- Notes Utilise the Notes app on your mobile whichever it may be. Take screenshots of interesting places you see online, maps, and add your own notes and links. The great thing about notes is you always have them with you and you can organise them to suit your needs.


PLANNING
You have discovered locations you want to visit through whatever means and now need to plan it a little better. Where will the sun set and rise, what is the weather going to be, what is the tide if it’s coastal, and where to park? It may involve a hike so what route should you take? There are so many things to consider and doing a little research can really help.
LOCATION
Maps are obviously essential and a search in your App Store will show there are so many to choose from. Choice is good I always say, but it is also bewildering. Which should you use? That largely depends on the location and how far it is off the beaten track, and how much you are willing to invest. There are plenty of apps that will provide a wealth of information but at a subscription, and some that are free or just a minor one time payment.
OS Maps is one the the most comprehensive which has a desktop and mobile version, allows searching detailed maps, plotting routes which show distance and elevation, downloading of a searchable database of hiking routes, 3d views and an incredible 3d flythough, offline map saving and even printing of maps up to A3 as a back-up. But it is an almost £30 yearly subscription. There is also a £5 monthly plan which may suit your needs. An obvious limitation is that it is UK only.
Viewranger was one of the most popular apps and is now Outdooractive with a £26 yearly subscription rising to £54. It has many similar features to OS Maps and allows routes to be planned and saved globally. There are many routes that can be downloaded and saved along with saving maps and routes offline to avoid having no data signals and it will connect with a smart watch to give directions too. Augmented reality allows peaks to be identified and there are a wealth of other features however it is really aimed at adventurers and hikers but there are useful features that can be used for free.
There are many such apps available, depending on where you are in the world you may find one that suits your needs. Most are aimed at hiking so if you plan on going up a mountain or somewhere remote they are very useful if not essential to have. Don’t for get to be properly prepared for the weather, ensure you have food and water, and have a paper map and a compass.
GOOGLE EARTH
It’s surprising how many people overlook just how useful and powerful Google Earth is. It has a few useful features for plotting a route, adding pins and an incredible 3d view. Since Google opened up Street View to public contributors there are more and more being added so you can often drill down into actual location views, and if not available it is invaluable for getting a good idea of the specific location you want to find. Even better it’s free and global.

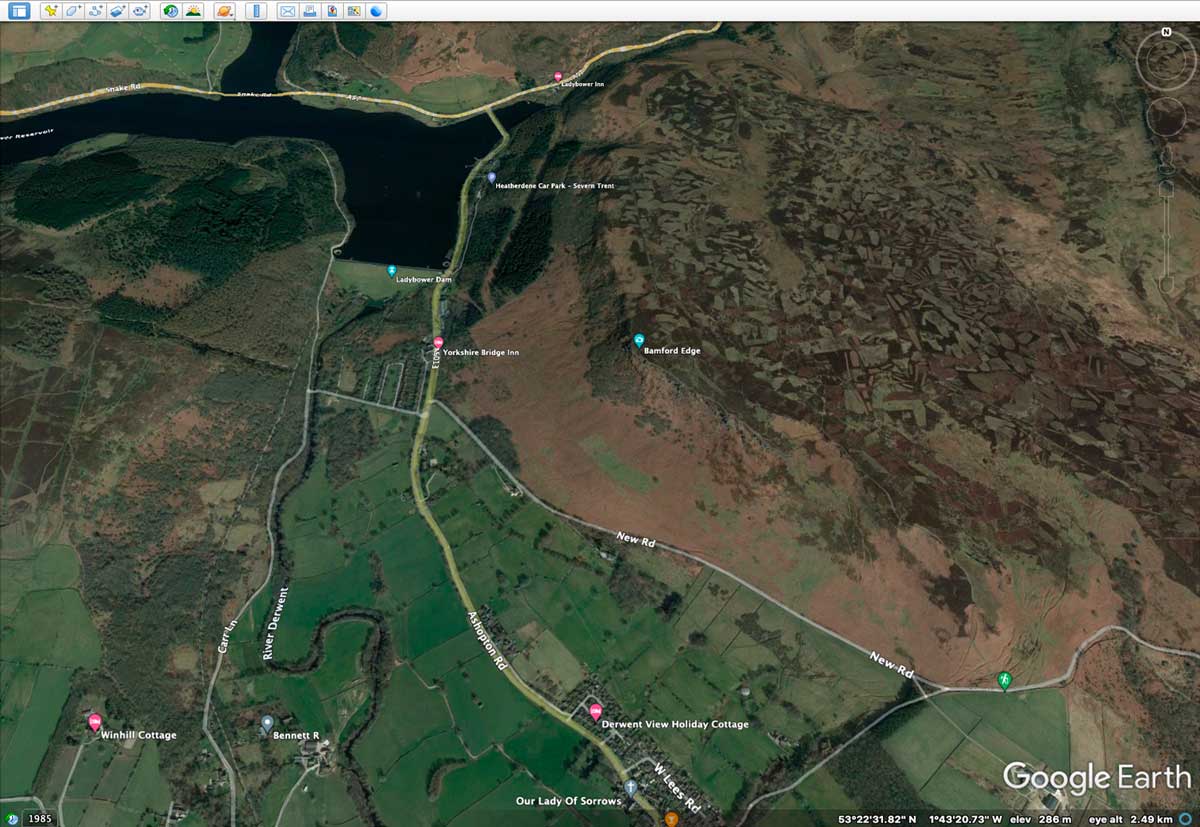
BAMFORD EDGE
Bamford Edge overlooks Ladybower Reservoir in the Peak District and is a stunning location made even better because of the distant viewpoint of water. It’s an easy hike to get to after a short but steep section, and it is included in the guide books above. This is a useful one to show how to find the location and plan your trip.
Google Earth main view. Click to expand
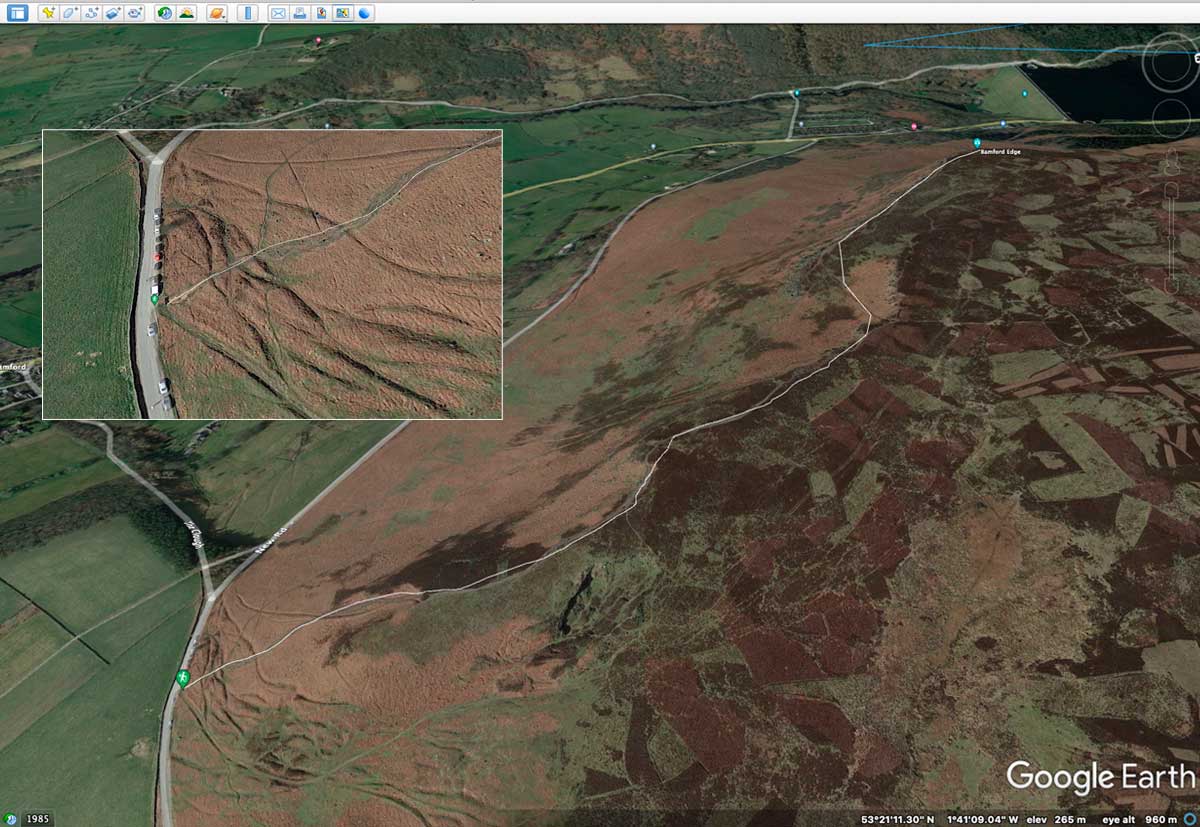
With Route plotted. Click to expand
Street view. Click to expand
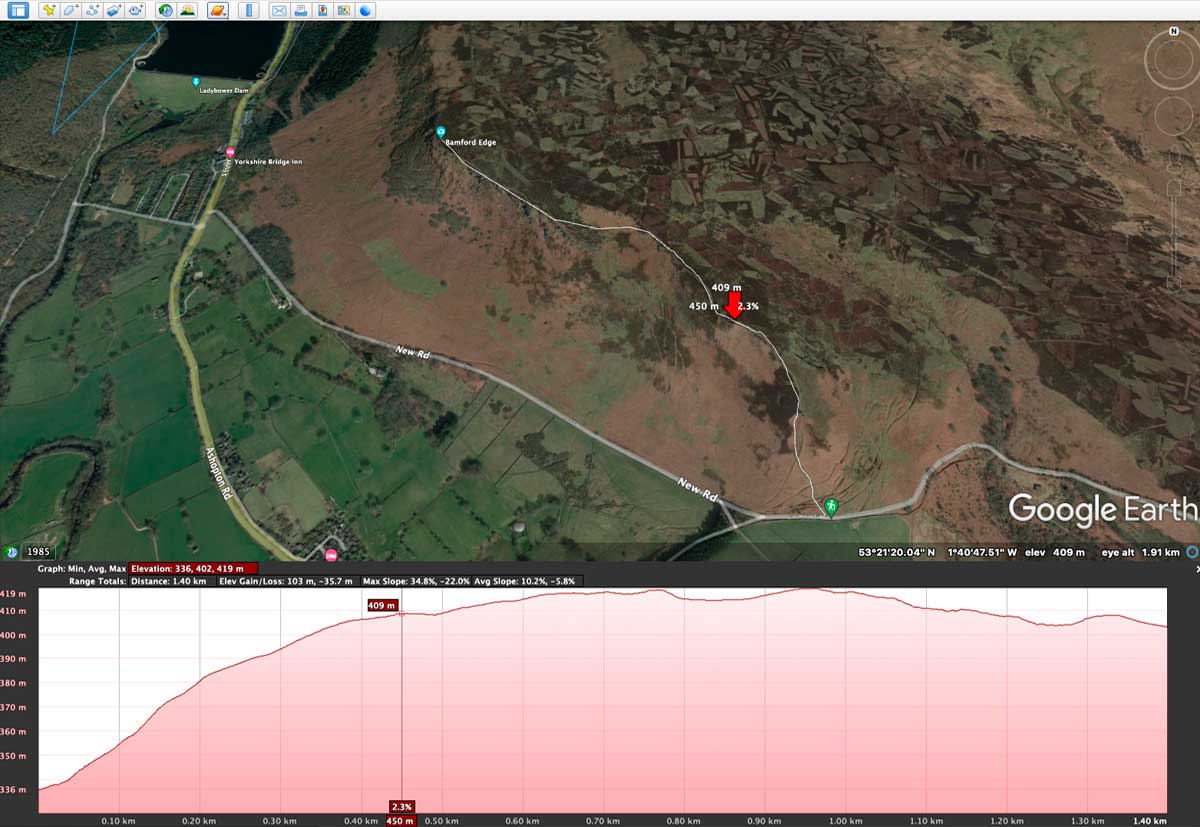
Elevation and distance. Click to expand
Google Earth has plenty of useful icons already pinned and after searching for Bamford Edge Peak District there’s already a pinned walking route. If there are icons just zoom in and look for paths, and in popular areas you might see where cars are parked, another useful clue. With the incredible 3d detail of Google Earth you can follow a path and drag the Street View icon onto the route if available to actually look around as in the screenshot above. On the top right toolbar open the sidebar to see all your places, then use the toolbar to ‘Add Path’. Right click on the path after you save it and click ‘Show Elevation Profile’ to see the actual elevation and distance of your route which will update as you move along it on screen.
Of course it isn’t always necessary to go into great detail, sometimes you can find a good vantage point just by using Google Maps or Google Earth from the comfort of your own home, like below. I knew there were some good locations for boats on Windermere in the Lake District and Google Maps found me a great spot.

Windermere at Sunrise

Windermere Maps Street View
There are two disadvantages to Google Earth:
1. Internet Connection – Obviously a necessity if you plan on using it on location and if like me you use O2 it is terrible (I’m dumping them and moving). Taking screen shots and transferring to your phone is simple enough and fool-proof unless your phone dies, I always have an external power bank which is compact and light.
2. No Mobile Synchronisation – You would think it would sync automatically like pins on Google Maps do but unfortunately it doesn’t, and it is a bit of a pain to do. Right click on your save route and select ‘Save Place As’, you will see the file is a .kmz file, give the route a name and save it. Where you save it is up to you but it needs to be sent to your mobile, so considering I use Dropbox I save it there. Use Google Drive, email or whatever suits. Open Google Earth on you mobile click ‘Projects>Open’ and import the file from your cloud service or open from Google Drive. It isn’t the most user friendly experience, but remember it is free.
OS MAPS
OS Maps Online does have distinct advantages over Google Earth if you are happy to pay a subscription. All your saved pins and locations are synced to the mobile App along with routes, maps can be printed and there is a 3d fly-through too. As stated above detailed maps are for UK only so outside the UK you would need something like Outdoor Active.
OS Maps Route plan. Click to expand.
OS Maps Fly-Through. Click to expand.
SUNRISE & SUNSET
One element you really do need to know is the position of the sun at sunrise and sunset. Even if you are not intending to shoot a Golden Hour image, knowing the transit of the sun at a particular location at a given time of year can help you determine the quality of the light and the shadows.
Two of the biggest names in applications for planning sunset and sunrise are Photo Ephemeris, and one you may already have if you were paying attention in the Hyperfocal Distances section, Photopills.
Photo Ephemeris has a desktop online app which is free to use and a mobile app for a small payment which is iOS only unfortunately. It does plan sunset and sunrise well with just the free version and will also show Nautical, Twilight and Moon. A great little feature is an additional pin which can be dropped from your start point to show the distance and elevation, or just drop one near the location if there is a steep drop and you want an idea of the height. Go Pro for £27pa and there are plenty of additional features such as 3d terrain modelling with shadows and Milky Way plotting.
PhotoPills also has a planner. In both apps set the date and they will show accurately the direction of the sun at sunrise, sunset and any time of the day allowing you to see exactly where the sun will be, and both also have an Augmented reality function. Hold your phone up with the camera active and see where the sun will be at any time, useful if you arrive early and want to know exactly where the sun will be in your scene, or the best composition with the sun just out of the shot so you can get a little side light. Photopills also has a function which will show the position of the Milky Way as shown by the dotted line.

Photo Ephemeris Desktop and Mobile App (iOS only)

PhotoPills App
MOVING SUN POSITION
Notice the dates on the Photo Ephemeris screenshots? On the Desktop I stepped backwards in the calendar to find the maximum transit of the sun South/West before it starts to return again. On the mobile the date is the date of writing, showing the maximum transit of the sun North/West. The transit doesn’t move a great deal further North from that date. Look how far the sunrise position changes between December and June! It shows the reason why knowing the position of the sun is important; it’s no good going to a location thinking the sun will be Due West at sunset and finding out it’s actually nowhere near your chosen viewpoint.
WEATHER
The one thing that ruins many a great image and something we are entirely at the mercy of, weather. My attitude to weather is to just ask two things, is it raining, and is it totally flat grey? If the answer is no then it’s game on. In the UK thankfully we have very changeable weather to make things interesting. Even though planning too far ahead is a foolish business it’s useful to be able to check it out and try to get an idea of what conditions will be.
Again there are so many apps available it is hard to know which to use. It may be that the default app on your mobile is fine, the iOS Weather App has improved in leaps and bounds, or you may need something more detailed and specialised, for instance to predict Aurora such as ‘AuroraWatch’ or clear skies for Milky Way like ‘Clear Outside’. In the UK the Met Office does a good overview however I prefer more data that is presented in easy to use ‘at a glance’ formats. ‘Dark Sky’ was one of the best however it was bought out by Apple and some of the data integrated into the native App. The Dark Sky App is being discontinued end 2022 which is a shame. For more detail two of my favroite apps are ‘Weather Pro’ and “Windy’.
Weather Pro – One of the most reliable Apps I have used for years albeit at a cost of £9.99 per year it does give lots of information. There are radar and satellite maps for cloud cover, temperature and rain which are useful, however the best feature for me is the general overview.
On one screen it has all the information I need at a quick glance on a per hour basis. Information presented includes total sunlight, amount of sunlight per hour, wind speed and precipitation. Most forecasts give expected rain as a percentage % which only means the chances of rain, Weather Pro also indicates the amount in mm. The screenshot shows between 7-8am there is a 35% chance of rain but the amount is 0.1mm, meaning if there is any rain it is a very light shower indeed.
Windy.com – Free with more information when subscribing I find the free version is enough and there is also a website too at windy.com. It has a great deal of information presented as animations overlaid on maps including cloud and rain, but the best feature is wind and direction. The longer the wind streaks obviously the stronger the wind. Click on a place name and a popup opens with more detail including actual wind speed, weather and amount of rain. In the menu you can even access webcams for some areas and tide forecasts although this is a little more limited. This is a very good app you really should have.
Clear Outside – Aimed at Night Sky photographers Clear Outside does what it says, it shows when the night sky is clear. Look in more detail and it gives good information for sunlight, rain, fog and moonlight but the best feature is the information it provides for clouds at different levels. In the screenshot we can see that in Hathersage in the Peak District on the day of writing at sunset there is 76-100% cloud cover, so no sunset again. Look at the detail though and there is only 6% low cloud and 73-100% high cloud. Therefore there is a good chance of a sunset after all, and just after sunset a very good change of a great twilight image with golden light reflected off high clouds.
Whichever Apps you decide to use it’s hard to find one that does everything and presents all the information in a clear way, so it is always a good idea to have more than one for cross referencing and for more detail when needed.

Weather Pro

Windy.com
Clear Outside
TIDES
For coastal photography two things you really have to know other than the general weather are the tides to plan your images and your escape routes in case of difficulties. Research your location and find out if it is better at a high or low tide, and then try to plan when the tide coincides with the best weather and light. Is it a sunset or sunrise location? If you plan to be on location for a few hours following a high tide out is always best for fresh clean sand and for safety. And always know in secluded locations how the tide behaves, can an incoming tide easily come behind you and cut you off? For instance walking to a far end of a bay could leave you exposed to having your exit blocked so plan and be safe.
Finding a good Tide App is not easy, there are plenty available but all with high subscriptions or with very short range information and tide stations missing, but the good news is there is a free website that has lots of information.
TIDES 4 FISHING
As the name suggests it is aimed at the fishing community so you will also find details specific to fishing. It does have very good information including a comparison to the highest and lowest known tides, and the tidal coefficient or the difference between high and low tides. It is limited to 3 months which is generally enough. The website is a little burdened with advertising but it is free, and as all we want to know is the time tides it does the job very well. There is a mobile app for iOS and Android which is a £16.99 subscription for a year and it is advertising free. It is a little steep considering the website is free but worth it if you use it often and you want to plan further than 3 months.


MOUNTAIN NAMES
If like me you are absolutely useless at remembering the names of mountains there are plenty of apps around that will use virtual reality and your mobile camera to identify them. Great when you are there, but what if you’re back home?
PEAK VISOR.COM
I can’t even remember the name of the next street where I live so what hope do I have of remembering the names of mountains? Zilch. I do like to know the names of the mountains in my images, it’s cool and makes me seem educated. Plenty of apps will help, enable the app and your mobile camera and an overlay will show you what the names are. Not much good when you forgot and you are back home searching the net trying to find out. Some apps will identify the location from the GPS data in your image, but without built in GPS (like the OM-1) its somewhat cumbersome to record it. Enter Peak Visor.
Peak Visor has a mobile App which has really great features but an almost £30 per year subscription. But the online website has a great feature allowing you to load an image, find the location on a map, and the names of mountains or hills will be displayed. It really is very useful. The map is quite basic, however a workaround is using Google Maps. Do your best to locate the place where you were standing and drop a pin. The co-ordinates will then show, copy these and on Peak Visor in ‘Adjustments > Location > Change’ enter the co-ordinates. You may have to pan around a little but you will be able to match up the outlines and then take a screen shot. Then when you share your image on Instagram you’ll look really clever knowing the names of the mountains.
The App is limited to one location per day, however using the image search online doesn’t seem to have this limitation.

CONCLUSION
Hopefully this section will have helped you to plan and prepare better for your next great image. Next we will explore the options for a good processing workflow.