
DEPTH OF FIELD
How to maximise depth in Landscape photography
Depth Of Field simply means having your image in focus front to back, from the foreground interest all the way to the background. This section deals with the theory and the technique to maximise it.
The theory behind Depth of Field is simple enough to understand but achieving it is somewhat harder until you understand what it is, what actually impacts it, and how to put it into practice. The Aperture you select will determine how much Depth of Field (DoF) you have, as will your camera sensor and the field of view of your lens.
As we saw in the last section, our Olympus Micro 4/3 sensors have more Depth Of Field than an APCS or Full Frame sensor, although we still have to consider the Aperture, and we have to be aware of Diffraction.
UNDERSTANDING DEPTH OF FIELD
Depth of Field dictates that wherever you focus there will be an amount that will be in focus from the focus point towards infinity and also an amount from the focus point towards you, but to a lesser extent. It varies by lens field of view, with long lenses having much less than wide lenses.
The technique to maximising Depth of Field is by understanding Aperture, Hyperfocal Distance, and Diffraction. Hyperfocal Distance allows us to focus further into a scene than the foreground interest we need to be sharp.
→ TIP Try this exercise in your garden or somewhere where you can get some distance. Use a wide lens and a telephoto lens, shooting various scenes and various apertures. Have a main object of interest, a pot plant, garden chair, street light etc, and vary your distance from it. Using different apertures check how the background sharpness looks. You will see how the background looks sharper and softer. You can use the Depth Of Field Preview and also use Peaking if you set the camera up as in the previous sections. Peaking is not entirely accurate for DoF but it gives a general idea.
APERTURE
The diagram below shows how as the aperture gets smaller DoF increases. It is a generic visualisation so don’t take it literally, different lenses perform differently. An ultra wide lens such as the 7-14 or 8-25 has inherently greater DoF and I will normally shoot at between f5.6 to f7.1 knowing I have DoF extending all the way to infinity, depending where I focus of course. A longer lens such as the 40-150mm has much narrower DoF making it ideal when subject and background separation is desired. For landscape work using longer lenses means Focus Stacking may need to be used because of the shallow DoF. The Aperture you choose will influence the DoF, and as we saw in the Exposure Triangle the shutter speed.

Confusingly it is different for Full Frame, APSC and Micro 4/3 sensors. Smaller sensors have greater DoF and M4/3 has approx double that of a Full Frame camera, great for us landscapers. At around f5.6-f7.1 with a wide angle lens we would have great DoF as shown, but a Full Frame would look similar to as shown at f11. Full Frame cameras need around double the f-stop and an APSC around x 1.5, so if you use other systems it is something to consider carefully. Using a Full Frame I would tend to shoot at around f13-f16, around double that of M4/3.
There is a point when Diffraction affects all lenses. Diffraction is simply when an Aperture is so small the light entering it has to pass on an angle to cover the sensor resulting in a softer image. The consequence is it prevents us from running around just using f22-f32 all day; the gains in DoF are eliminated and more to the point reduced by diffraction. Most lenses have a ‘sweet-spot’, the point at where it is at its sharpest and is usually a ‘stop’ down from wide open. When considering DoF also consider at what aperture is the lens sharpest, what loss if any is there to maximise the DoF, and where does diffraction start to have a negative effect.
DEPTH OF FIELD
The diagrams below show the Depth Of Field theory. We have you the photographer with your very round floating head, and a Landscape scene with a Main Subject, a trusty Lone Tree (everyone loves a Lone Tree), the Background, and Foreground Interest. In this example to show the theory with more clarity the main subject or object of interest is shown in the mid-ground. We will always have ‘zones’, foreground, mid-ground and background, and your main subject of interest, or the area you want the viewer to be drawn to first may be the in the foreground or the mid-ground. We will look at Composition in another section.

WIDE APERTURE
The Main Subject is used as the focus point with little consideration to Hyperfocal Distances, and with a wide aperture set. As you can see the tree will be in focus but the background and the rocks in the foreground are out of focus. They are rocks, trust me. The actual DoF shown for the tree depends on your distance from it, and the lens used. A wide lens (7-14mm, 8-25mm) which has inherently large DoF would have enough to render the tree and background in focus but may not extend towards the foreground, whereas a longer focal length would probably not extend even to the background. Get to within a few meters of the tree and the DoF would change, there would not be enough even for just the tree front to back.

MEDIUM APERTURE
The same scene with the aperture closed down a little more. The actual f-number isn’t specific because we will look in more detail at this. We haven’t changed the focus point, and the DoF has increased. The foreground and background are still out of focus although the background is somewhat sharper, so further changes are needed. Remember distance from the main subject also affects the DoF.

OPTIMUM APERTURE
We have closed the aperture down more to the optimum f-stop which depends on the lens being used. We now have enough DoF to get the whole scene from the foreground to the background in focus. Two things to note here, I say ‘in-focus’ and avoid the term sharp because this depends on a number of factors (see below). The focus point has been placed further forwards to increase DoF, instead of focusing on the main subject we focus before it which increases DoF to include the foreground. There are situations when to extend DoF it is best to focus in front of your main subject. When considering foregrounds it’s also acceptable to decide what needs to be sharp and focus a little behind this instead of the main subject.
REAL WORLD EXAMPLE
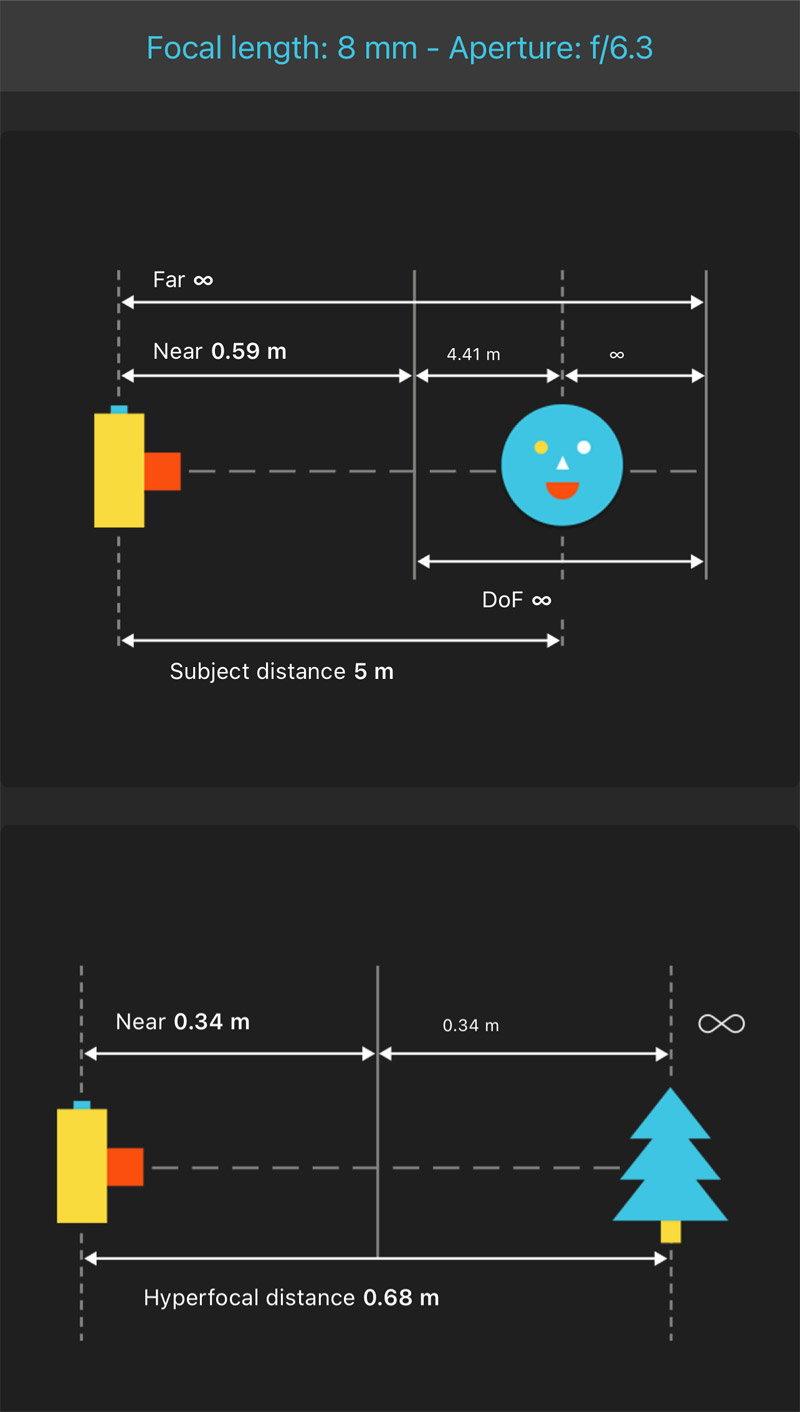
Let’s look at a real world example and see exactly how Depth of Field changes depending on lens and aperture. The table below is generated using PhotoPills DoF Table, an app I recommend and more on that below. Enter the camera (use EM1-MKIII) focal length, then simply tap on the grid where the subject distance and aperture align. Tapping ‘Visual’ will reveal the visual aid as shown.
As said before using wide angle lenses gives greater depth of field, and even more so with M4/3. The Table shows how with a subject distance of 5m and using the 8-25mm lens the closest focus towards us is 0.88m extending to infinity. Remember this is focusing on our subject 5m away, so the area of what will be in focus extends significantly in front of the focus point (we can capitalise on this using Hyperfocal focus points).
At 12mm the closest focus is 1.62m, extending as the aperture is closed down, and using a long lens like the 40-150mm at 40mm the closest focus is 4.21m. DoF is less than 2m which highlights how much awareness needs to be given to the focal length of the lens used, the aperture, and where you focus.
| Focal length | Aperture | Near Focus | Far Focus |
|---|---|---|---|
| 8mm | f4 | 0.88m | Infinity |
| f6.3 | 0.59m | Infinity | |
| 12mm | f4 | 1.62m | Infinity |
| f6.3 | 1.16m | Infinity | |
| 40mm | f4 | 4.21m | 6.15m |
| f6.3 | 3.86m | 7.11m |
SUBJECT DISTANCE 5m
The screen shot of PhotoPills shows the DoF using the 8-25mm at 8mm. It shows the Subject Distance, Near and Far Focus, or what would be acceptably sharp.
Notice underneath there is another visual ‘Hyperfocal Distance’. As shown above on the ‘Optimum Aperture’ Visual we can move our focus point forwards instead of on the main subject. PhotoPills has suggested here instead of focusing on the main subject 5m away if we focus on the Hyperfocal 0.68m away the near focus or what will be sharp will be brought closer to us to 0.34m. That’s a big difference!
1/3 IN METHOD
If this sounds like it is all getting complicated don’t worry. Before we look at Hyperfocal Distances there is another way that is tried and tested before the days of Apps, using the ‘1/3rd In Rule’.
As it suggests you are deciding on a point in your scene which you estimate to be approximately one third into the scene. It does work and allows some freedom from the technical side of working out distances, with the down side of not being very accurate. Thought needs to be applied, a third into the scene may be a problem if your’e standing on the edge of a cliff (see below) so think about what one third in actually means when applied to the scene in front of you.
In our Lone Tree diagram above the distance from the foreground to the mountains in the background could be miles and setting your focus 1/3rd in could be too far. Try it, preview your image to check it and adjust where your focus point is if needed, and just your aperture. The advantage with using this method is it’s easy becomes almost instinctive.
HYPERFOCAL DISTANCES
Using Hyperfocal Distances is the method for selecting the best place to focus in a scene and maximising the Depth of Field . It is actually quite simple when used with an App such as PhotoPills and it is worth being familiar with.
Hyperfocal Distances is by definition the closest focus point that allows for subjects at infinity to be acceptably sharp. By determining where the Hyperfocal Point is, that is the point on where to actually focus rather than the main subject or the immediate foreground we want sharp, we can get the foreground and the background in focus. Very loosely you have half the distance from your focus point back towards you and to infinity (or your background) acceptably sharp. The problem is how do we find that point? And how do we decide what is acceptably sharp?
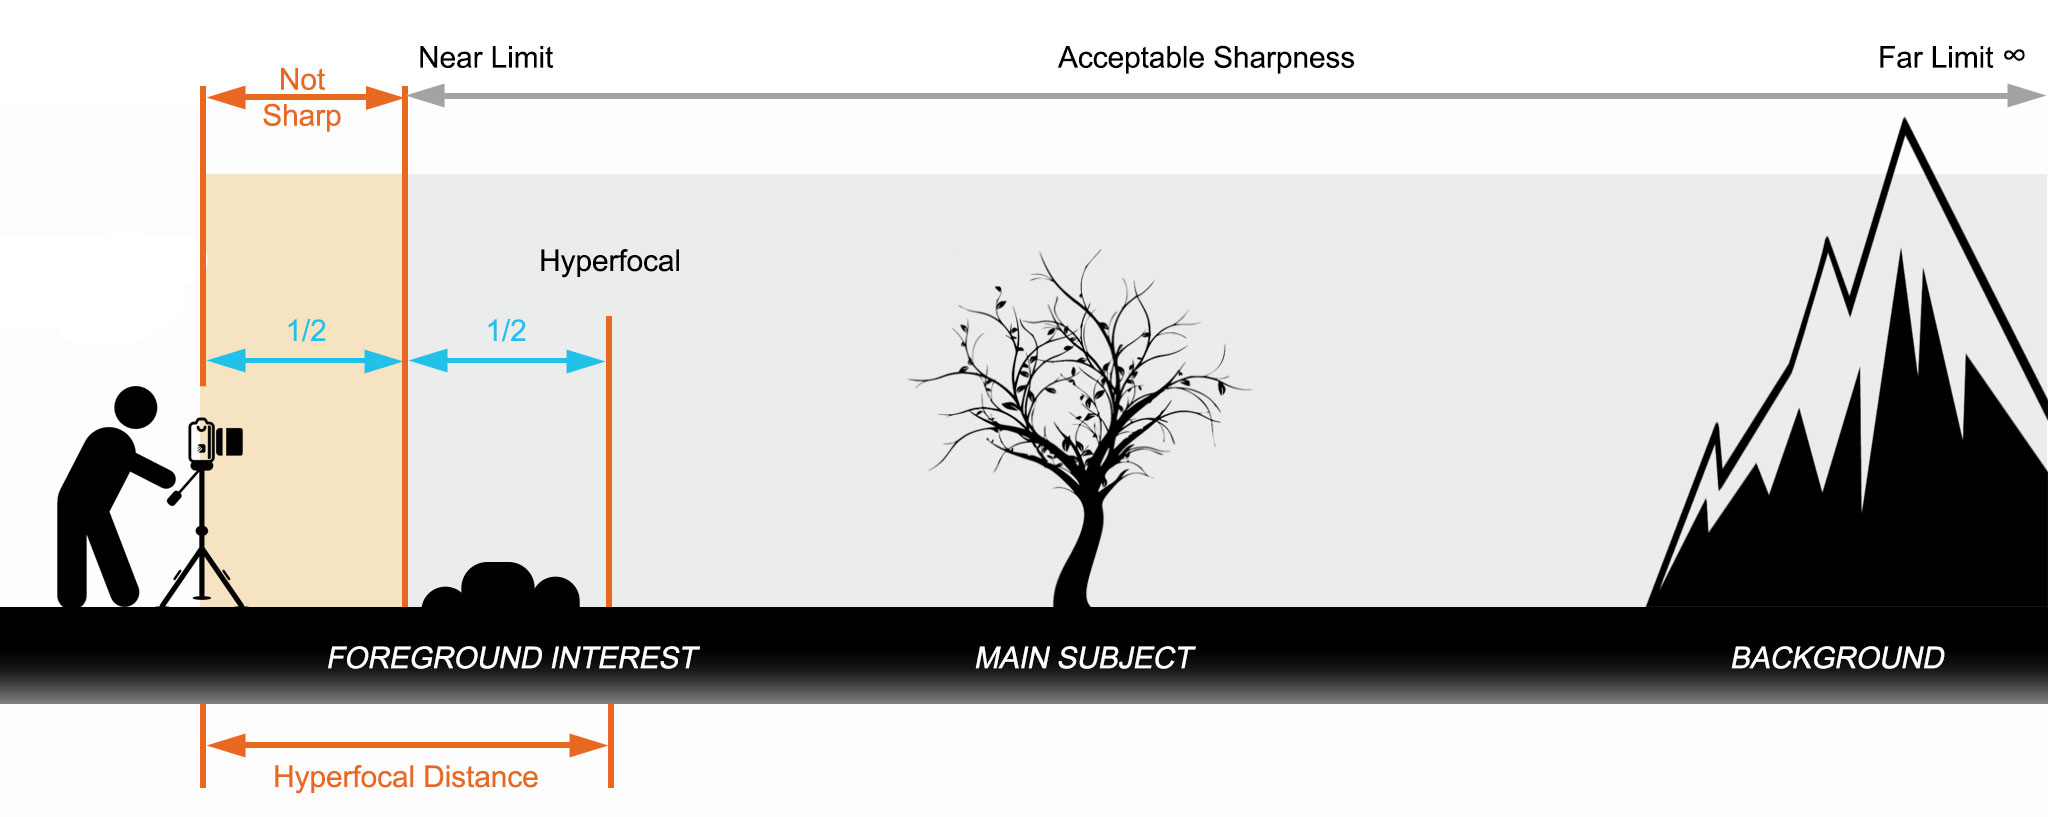
Our Lone Tree scene again. We now see that using the aperture we think is optimum for the scene where we place the focus will determine how much DoF we have. The Hyperfocal varies with aperture and the lens used, and we will see how we can determine that. We are using the optimum aperture which for the sake of argument is f6.3 with the Olympus 8-25mm.
ACCEPTABLE SHARPNESS – The area that can be defined as in focus or with acceptable sharpness. Note that this extends from the Near Limit which is half the Hyperfocal Distance, back to the Far Limit which we want to be infinity. Acceptable Sharpness is partly determined by the scene. Perhaps the background is very soft because of mist or haze in which you would not expect a great deal of sharpness, but it still needs to be in focus. There are situations when being in focus and being sharp can mean two different things. It is also determined by your lens which may not be as sharp as others. See the example images below.
HYPERFOCAL DISTANCE – Distance from the camera to the Hyperfocal focus point. Notice how it is split exactly in half.
NEAR AND FAR LIMIT – Near limit is the amount from the Hyperfocal where you would place your focus point (or slightly past it, never before it). Notice that it is half the distance from you. This is the area where you would try to capitalise on accepted sharpness extending backwards to include your foreground interest. By judging where the Hyperfocal can be you are able to determine how much foreground interest will be in focus. In our lone tree example you would not want the hyperfocal to be on the tree because the distance extending back would not be enough to include the foreground. And judging the hyperfocal to be on the foreground means the area in front is probably so close to you that it is not even in the frame, and you compromise how far the far limit is. It will make sense when you look at the App. The Far limit is how far the area of acceptable sharpness is. In most cases we want the this be infinity.
NOT SHARP – The Hyperfocal can be divided into half, with the first half being acceptably sharp. The second half will not be in focus.
SUBJECT DISTANCE – Notice the subject distance? There isn’t one. When using Hyperfocal Distances the distance to the subject is not used.
USE AN APP
The easiest way to determine Hyperfocals is just to use an App. There are so many available, my absolute favourite is Photopills (no affiliation), available on iOS and Android for a small cost of around £10. Photopills is packed with other features you will find useful and is worth the cost, we will see some of the other features in ‘Planning”.
IMPORTANT- One thing to bear in mind when using Hyperfocal Distances for focus, it is better to set your focus a little beyond the distance given, never before it. If you struggle to focus at the correct distance falling short of it will move your distant ‘acceptable sharpness’ away from infinity which could impact your background. It may not be so critical if your background is not at infinity (see examples below) but for astro stars would not be sharp. So err on the side of caution placing focus further in, rather than not far enough. Photopills has a nifty Augmented Reality trick to help with this.
Set camera to E-M1 MKIII
Focal Length set to 8mm for 8-25mm
Aperture set to f6.3
Top DoF (Subject Distance) 0.68m
Bottom Hyperfocal Distance 0.68
Acceptable Sharpness 0.34m to Infinity
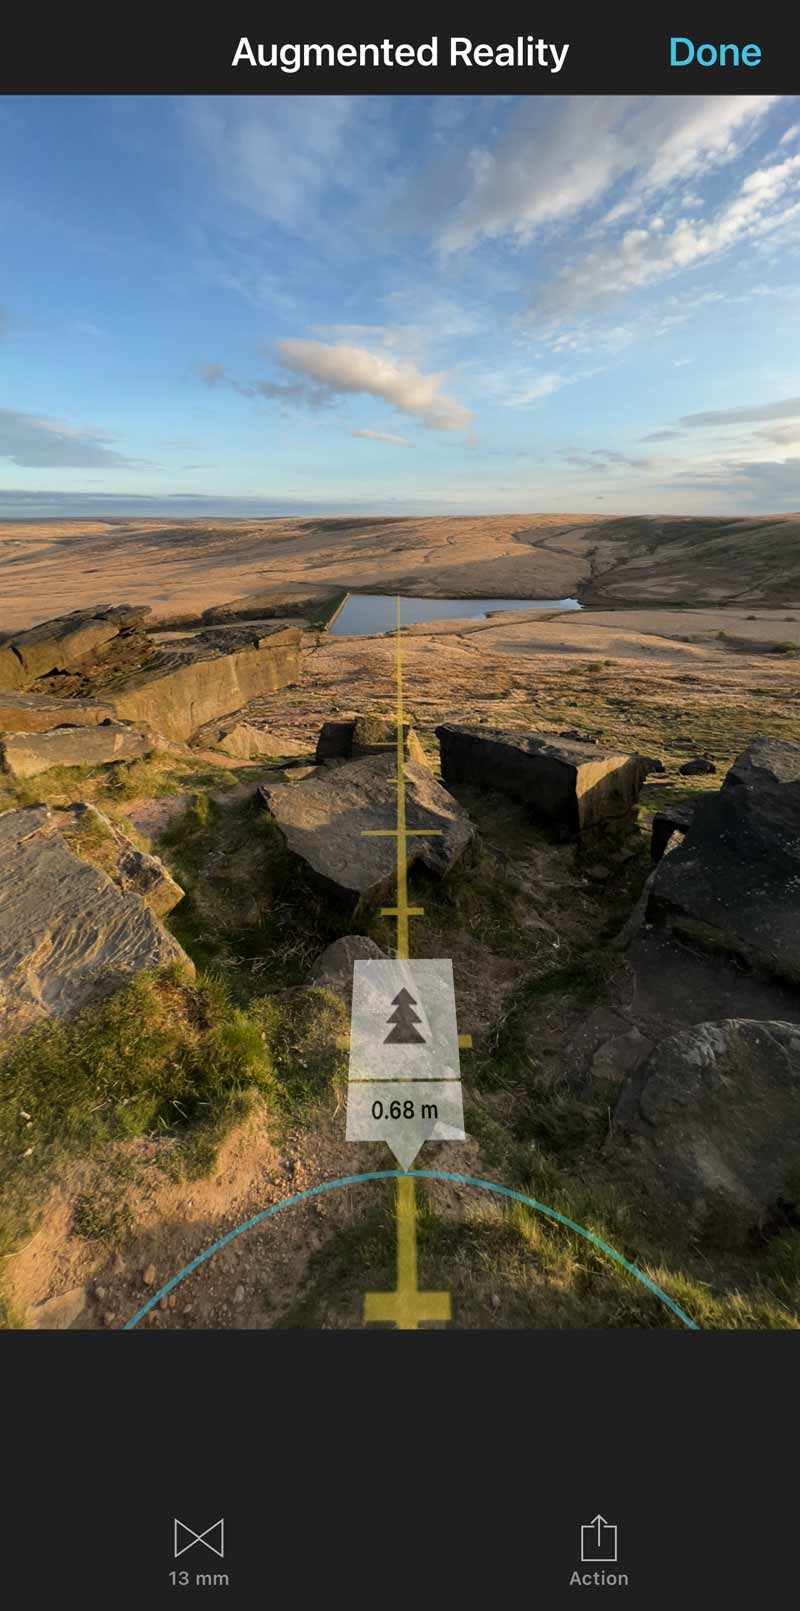
Augmented Reality Screen
’13mm’ indicated you mobile field of view
Set Focus outside the Blue line

Set camera to E-M1 MKIII
Focal Length set to 8mm for 8-25mm
Aperture set to f6.
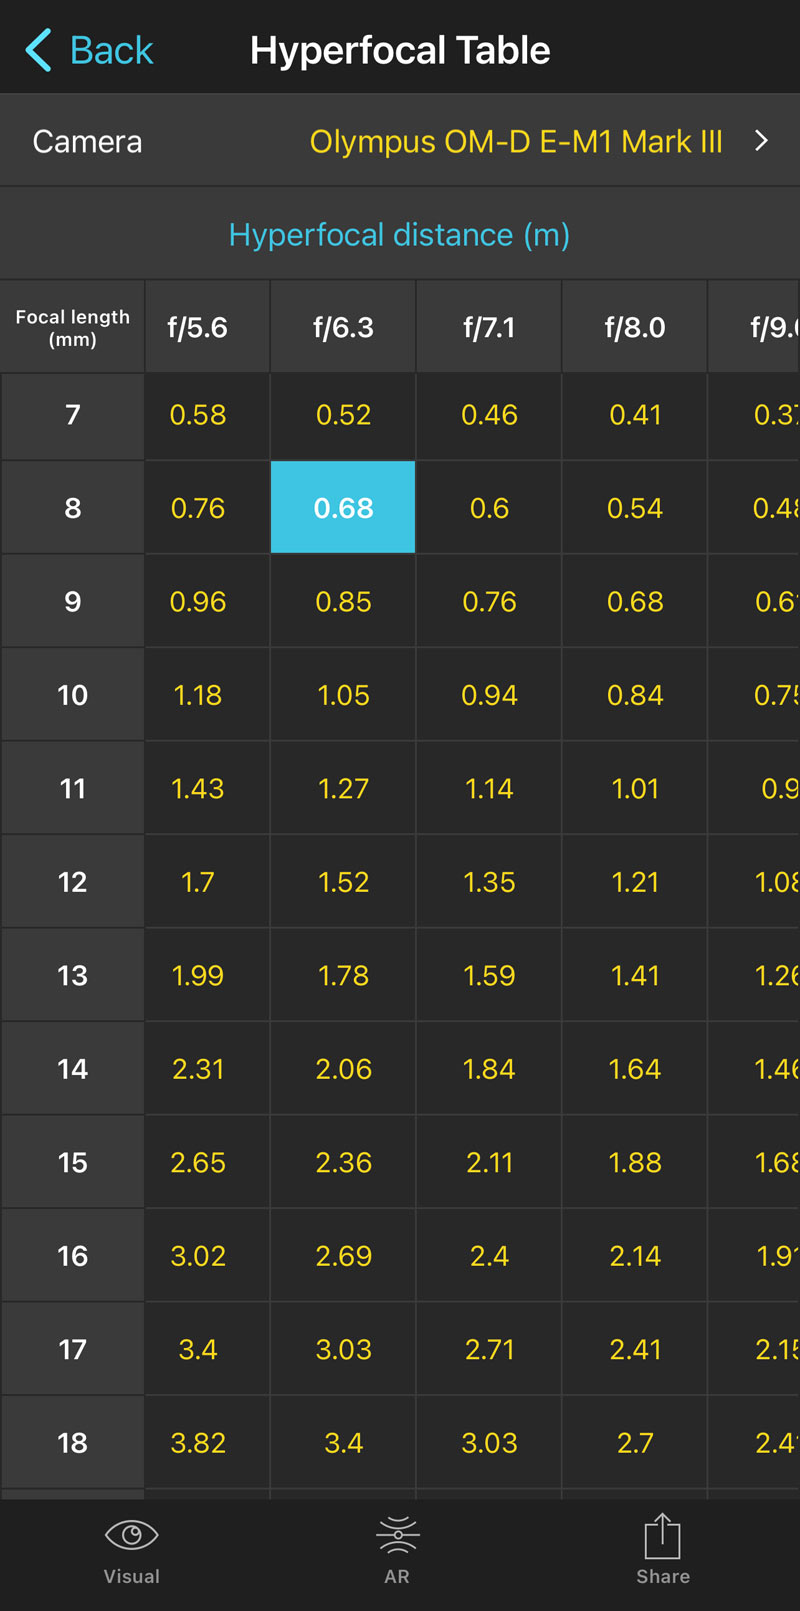
HYPERFOCAL TABLE – First set the camera to Olympus E-M1 MKIII. As the OM-1 is not yet listed technically the specifications for the sensor are the same. Select ‘Hyperfocal Table’ and simply drag it with your finger selecting the Focal Length and Aperture. Once you tap the cell tap ‘Visual’ to see the graphs. You don’t know which is the best aperture to use yet, so try a few and compare the stats to see which will suit. You will see on the table that the Hyperfocal Distance decreases (gets closer to you) as the aperture f number rises (opening gets smaller), meaning Depth of Field is increasing.

Top DoF (Subject Distance) 0.68m
Bottom Hyperfocal Distance 0.68
Acceptable Sharpness 0.34m to Infinity
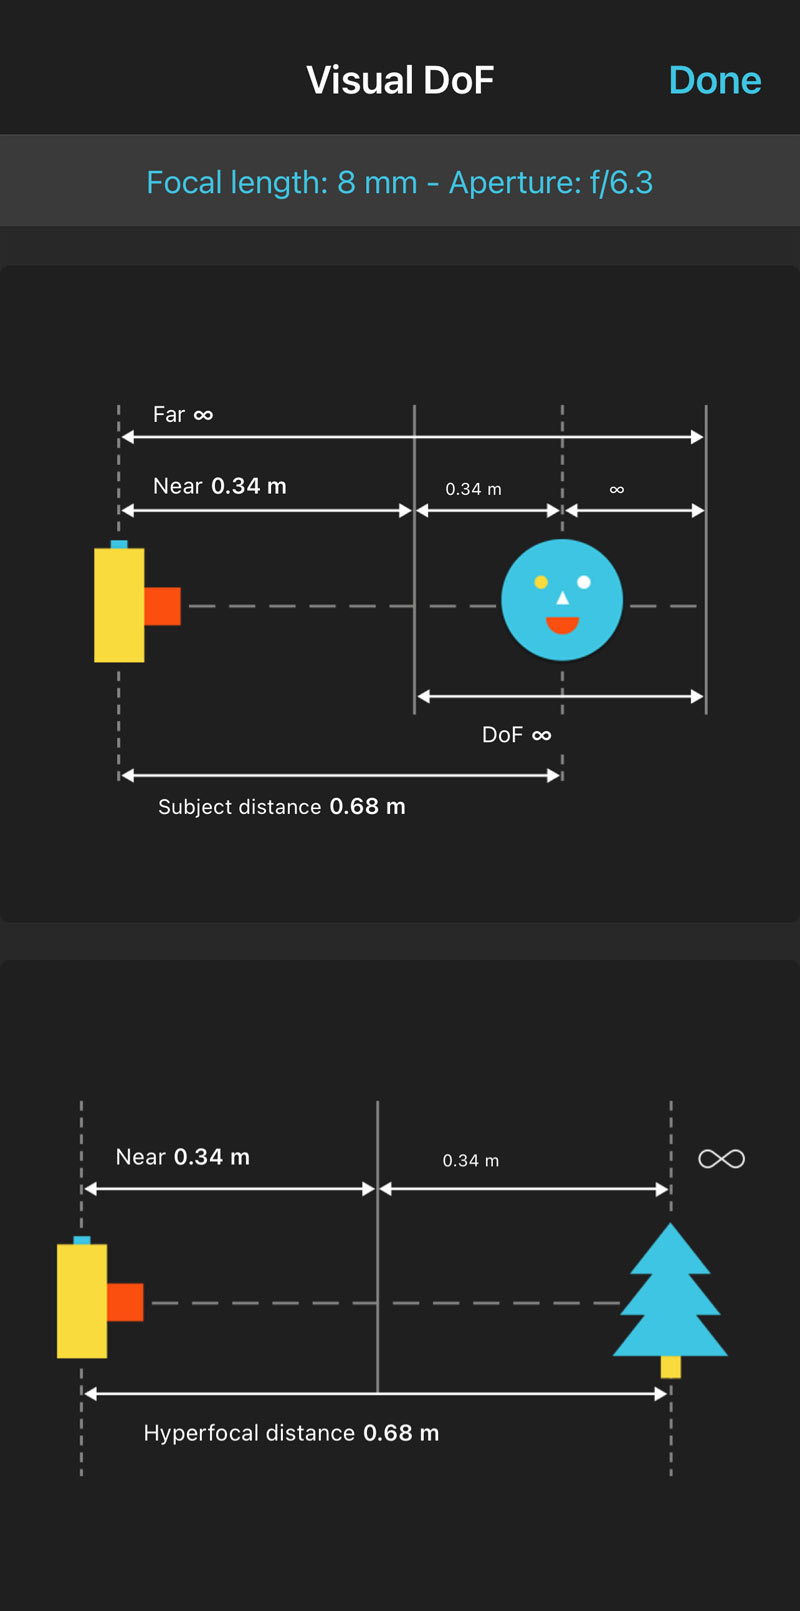
VISUAL DOF – Tap Visual to see the diagrams. In this example using 8mm at f6.3 and a Hyperfocal Distance of 0.68m the area of acceptable sharpness is 0.34m from the Hyperfocal extending near to you. Near, or the nearest point that will be in focus is 0.34m from the focal plane. They are both the same. Put simply divide the Hyperfocal in two and that is what will be in focus back from that point. All you have to do is decide what elements in the foreground need to be in focus and select the appropriate settings. Look down the chart and see how much it changes for longer focal lengths and wider apertures. It changes hugely.
The top graphic represents the DoF in your scene from the chosen settings. It shows the same information as the chart below and shows the DoF, which is actually the distance from the Near 0.34m Acceptable Sharpness to Infinity. It also shows a Smiley as the Subject Distance, don’t confuse this as the point where your subject actually is, it is where your focus point should be. Your main subject may be further into the scene but you choose this point because of the foreground.

Augmented Reality Screen
’13mm’ indicated you mobile field of view
Set Focus outside the Blue line
AUGMENTED REALITY – This screen is really neat. How do you figure out the distance to set your focus? Guessing is fine but if you are short it will affect the acceptable sharpness to infinity, so guessing long is fine. Photopills helps with the ‘Augmented Reality’ function. Enable it and you will actually see a depth indicator on the scene in front of you so just focus on the blue indicator, or just outside it. And if it’s dark use a torch.
HYPERFOCAL TABLE – First set the camera to Olympus E-M1 MKIII. Select ‘Hyperfocal Table’ and simply drag it with your finger selecting the Focal Length and Aperture. Once you tap the cell tap ‘Visual’ to see the graphs. You don’t know which is the best aperture to use yet, so try a few and compare the stats to see which will suit. You will see on the table that the Hyperfocal Distance decreases (gets closer to you) as the aperture f number rises (opening gets smaller), meaning Depth of Field is increasing.
VISUAL DOF – Tap Visual to see the diagrams. In this example using 8mm at f6.3 and a Hyperfocal Distance of 0.68m the area of acceptable sharpness is 0.34m from the Hyperfocal extending near to you. Near, or the nearest point that will be in focus is 0.34m from the focal plane. They are both the same. Put simply divide the Hyperfocal in two and that is what will be in focus back from that point. All you have to do is decide what elements in the foreground need to be in focus and select the appropriate settings. Look down the chart and see how much it changes for longer focal lengths and wider apertures. It changes hugely.
The top graphic represents the DoF in your scene from the chosen settings. It shows the same information as the chart below and shows the DoF, which is actually the distance from the Near 0.34m Acceptable Sharpness to Infinity. It also shows a Smiley as the Subject Distance, don’t confuse this as the point where your subject actually is, it is where your focus point should be. Your main subject may be further into the scene but you choose this point because of the foreground.
AUGMENTED REALITY – This screen is really neat. How do you figure out the distance to set your focus? Guessing is fine but if you are short it will affect the acceptable sharpness to infinity, so guessing long is fine. Photopills helps with the ‘Augmented Reality’ function. Enable it and you will actually see a depth indicator on the scene in front of you so just focus on the blue indicator, or just outside it. And if it’s dark use a torch.
DOF FUNCTION – Another function is the DoF within Photopills, shown in the ‘real World’ example above. Whether you use the Hyperfocal Table or the DoF calculators doesn’t really matter given the ‘Visual’ function will provide results based on both. The difference is using DoF you need to enter a Subject Distance, with Hyperfocal Distance it isn’t required.
→ TIP This is very useful to use out on location but don’t obsess over it too much, try to study it at home. Set a few examples and try to remember them, you’ll soon find you can judge it from memory and experience and then you can concentrate on composition. Just remembering a few will help, for instance you know already using 8mm you can set .68m away at f6.8 and your DoF is good all day long. And check your images, is the background in focus? If not, make adjustments. When previewing don’t zoom right in, although the screens are high resolution they are not high enough so at x14 the jpeg image starts to pixelate and you’ll think it isn’t sharp. x5 or x7 is enough to tell if everything is in focus. Understanding Hyperfocal Distance is important and you will be able to judge it yourself with some experience, and there are times especially when using a longer lens if you struggle to get the DoF try the App; it will tell you where you are going wrong, or if it is even possible.
DOING HYPERFOCAL MANUALLY
Your mobile died, as it does just when you want it. Or you just can’t be bothered to get it out. Work out the Hyperfocal manually; guess the distance to the closest point you want to be sharp, double it, and this will be your Hyperfocal Distance. If the point is 1m away your Hyperfocal and where you should focus is 2m. Remember that the nearest acceptable sharpness is 1/2 the Hyperfocal so this is a simple way of doing it and it does work. The downsides, it isn’t accurate so focus on the long side of error, and it doesn’t help with aperture. For that you will have to set the one you think best and check the images for sharpness. After some experience it does work and it is the way I usually set focus.
→ TIP How good are you at judging distance? There is a feature in the EM1-MK3 that will tell you. On the Top Left AF or Super Control panel AF Mode scroll to Pre-MF, and press Info. Focus on the point in question and a reading on the screen will tell you the distance. Pre-MF is used to set a predetermined focus distance so remember to switch AF back to the previous setting.
DIFFRACTION
Most lenses will stop down to f22 or f32 giving the maximum Depth of Field, so why not just use that and not have all the worry? Diffraction. Lenses reach a point at which although the DoF is maximum the sharpness is destroyed by diffraction, eliminating or even reversing any gains in DoF.
Diffraction in its simplest form occurs when light waves entering the lens are forced through a small hole then spread out more and interfere with each other. The actual physics are that the opening and the light wavelength are the same as each other and cause disturbance, but all we need to know is the interference causes the image to get softer especially with small detail. A wider aperture causes less disturbance and hence a sharper image. Most lenses are at their sharpest one or two stops down from wide open (look at the aperture chart above to see what one or two full stops actually is). In most cases this is why we try to use the optimum aperture for DoF and avoid diffraction.
PhotoPills has an online Diffraction Calculator which shows diffraction will start to become evident at f11 with Olympus because of the sensor size and pixel pitch. There is a mathematical calculation which I don’t understand either (p = (1.22 λ A) / 2) so let’s move on. Cambridge In Colour, another trusted source shows diffraction to be f8. Personally I find diffraction to not be an issue at f8 and not too problematic at f11 (Topaz does a great job of sharpening), but over this I know I am fighting a losing battle for sure.
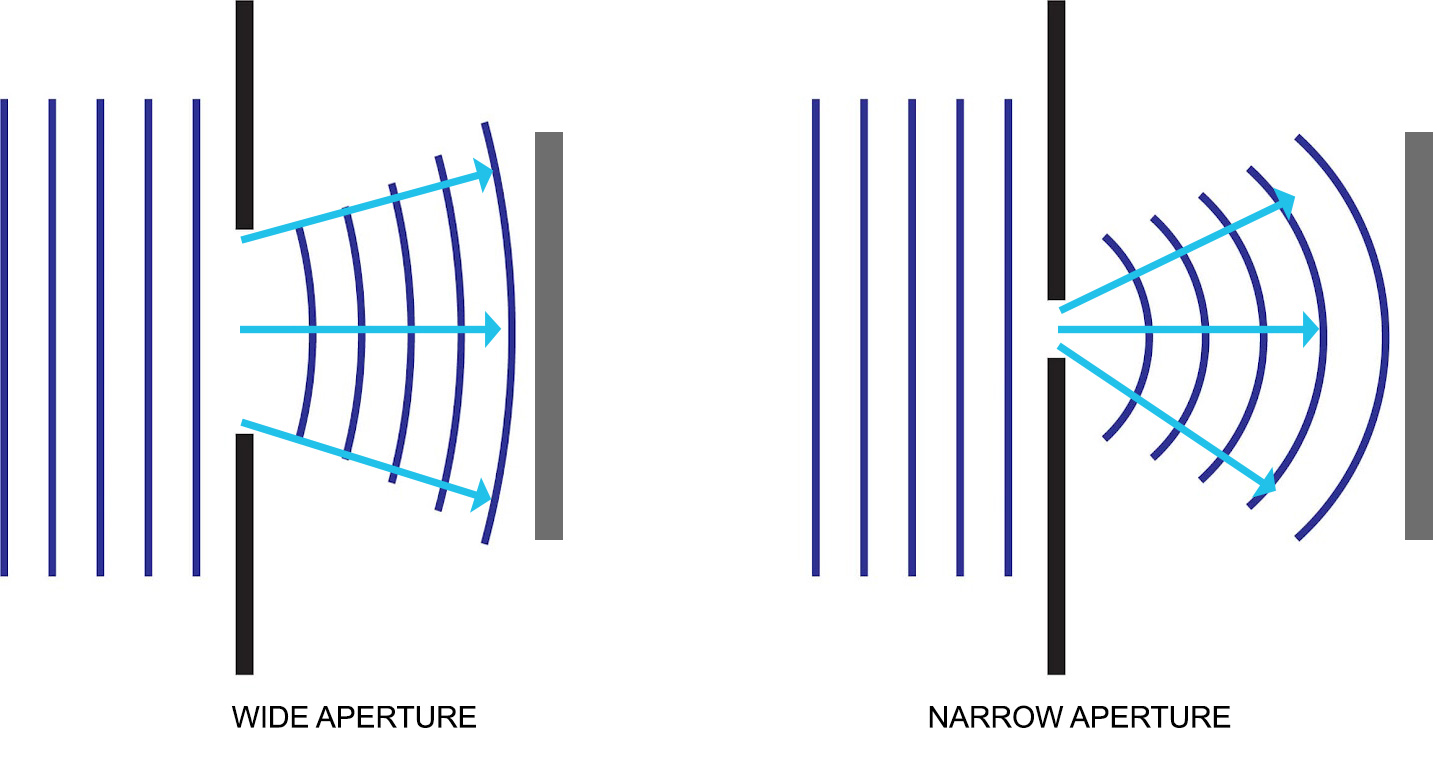
Another fun fact or consequence is called the Airy Disc, I love this name.
Light travels in waves, with the central region being the brightest; light spreads out it ripples, just like a pebble in a pond with each ripple representing an Airy Disc.
As everything you can see is created by multiple points of light each one hitting your sensor creates an Airy Disc and causes diffraction. Without diffraction we would be able to shut the aperture down to the maximum and not worry about DoF, but sadly life isn’t as simple as that.
→ TIP It is easy to get overly concerned about diffraction. Using an aperture a little smaller than the optimum is unlikely to create any great impact on your image but it is a fact. And it has to be considered in context too. Just how much detail can you actually see in the background? Is it hazy, in which case the background is soft anyway. Perhaps your ideal shutter speed dictates a smaller aperture. Go for it as long as your main subject is sharp, but remember diffraction affects the whole image. I would not be overly concerned using f8-f11 if I had to, but f22 is never used.
WHEN HYPERFOCAL FALLS OFF A CLIFF…LITERALLY
A situation you will come across, what if your hyperfocal distance means your focal point is off a cliff? Or using the rule of focusing a third into the scene also means it is off a cliff? I was fortunate here because the outcrop on the left was deep enough to focus on, but what if it wasn’t?

7-14 Pro @ 7mm ISO200 f7.1 2.5s Exp.
Using an ultra wide lens like the 7-14Pro or the 8-25Pro gives us huge DoF and the rock on the right was enough for me to use for focus. In fact all of this foreground absolutely had to be sharp. If not for the rocks on the left and had I used 1/3 IN or the Hyperfocal from the centre of the scene the focus point would have been on the water below, much much further away, a simple error but one you need to watch out for. Using a narrower field of view such as 12mm would have made it more complicated with less DoF and less foreground.
Let’s assume you have a similar scene with just a small amount of cliff edge in the shot. Given a situation where you cannot use the foreground to focus how would we then approach it?
There are two ways to deal with it. Many lenses have a Distance Scale allowing you to set you set manual focus and set the distance. We know (from the Photopills screenshots) using the 8-25mm and .68m as a Hyperfocal would give acceptable sharpness from .34m to infinity. Since the days of Auto Focus the distance scales have become less important, and less accurate. Look at the 8-25mm scale, it is hardly comprehensive. The 12-100 is similar going to 2m, but after this distance between and up to infinity is hard to judge. Use it with care, over estimate and do not under estimate.
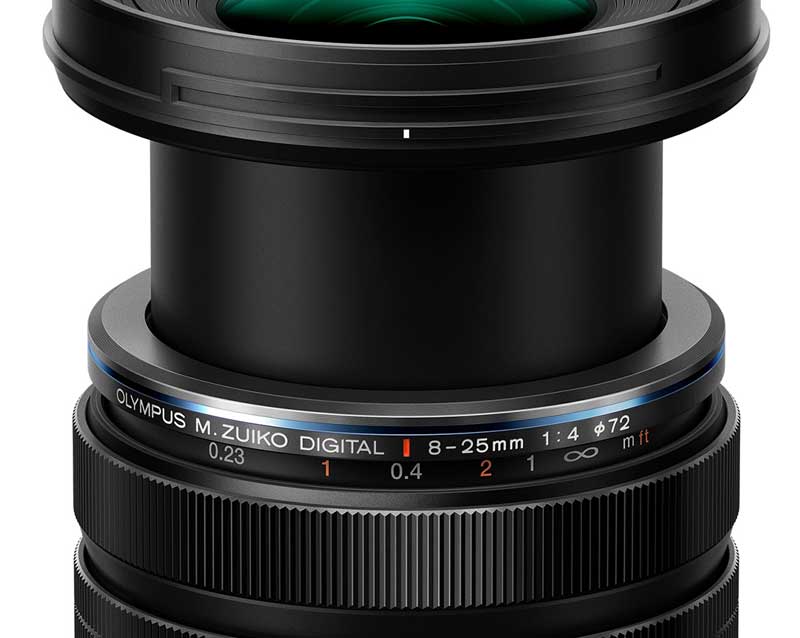
But what if you have a lens without a distance scale? You have no way to set Hyperfocal or use 1/3 IN. The old trick is to change your composition to include ground to the side or even behind you, focus on something that is within the distance and then recompose. Remember to do this in manual focus or if you auto focus lock it to manual afterwards. Hopefully you put MF onto a button, or use back button focus.
Another way is Focus Stacking. Take two shots, one for the foreground and one for the background or more if you feel it needs it, and then blend them together. It is easy to blend images in Photoshop or other image editing apps. It is additional work, but stacking and blending is surprisingly easy once you progress a little with processing skill.
ACCEPTABLE SHARPNESS
Here’s that term again ‘Acceptable Sharpness’. You will also come across ‘sharp front to back’ when considering DoF. I prefer to use ‘in focus’ when describing DoF although Acceptably Sharp is technically correct.
The term recognises that what is acceptable should also consider the gear you are using. Some lenses are not so sharp, though with Olympus Pro lenses that is not an issue, but the Non-Pro 9-18mm for example whilst being a great little lens does suffer from poor corner and edge sharpness. While background detail may not be as sharp as a better quality lens, it is acceptable for that lens, and it has performed to the best it can. Remember that being in focus and sharpness can be two different things.
Another way to look at what is acceptable is to consider the scene itself. Both of these images are in focus from front to back and have acceptable sharpness, and yet there is little detail in the distant background because of haze.

12-100 Pro @15mm ISO200 f7.1 1/50s Ex
The image above was taken on a sunny day from Bamford Edge in the Peak District. There was a lot of haze, the middle distance has detail but the far distance is just shapes of tone and colour. It is in focus but there is little in detail so I would be wasting my time previewing images, zooming in and wondering what I’m doing wrong because the far background is not sharp. It is in focus and it is acceptably sharp.
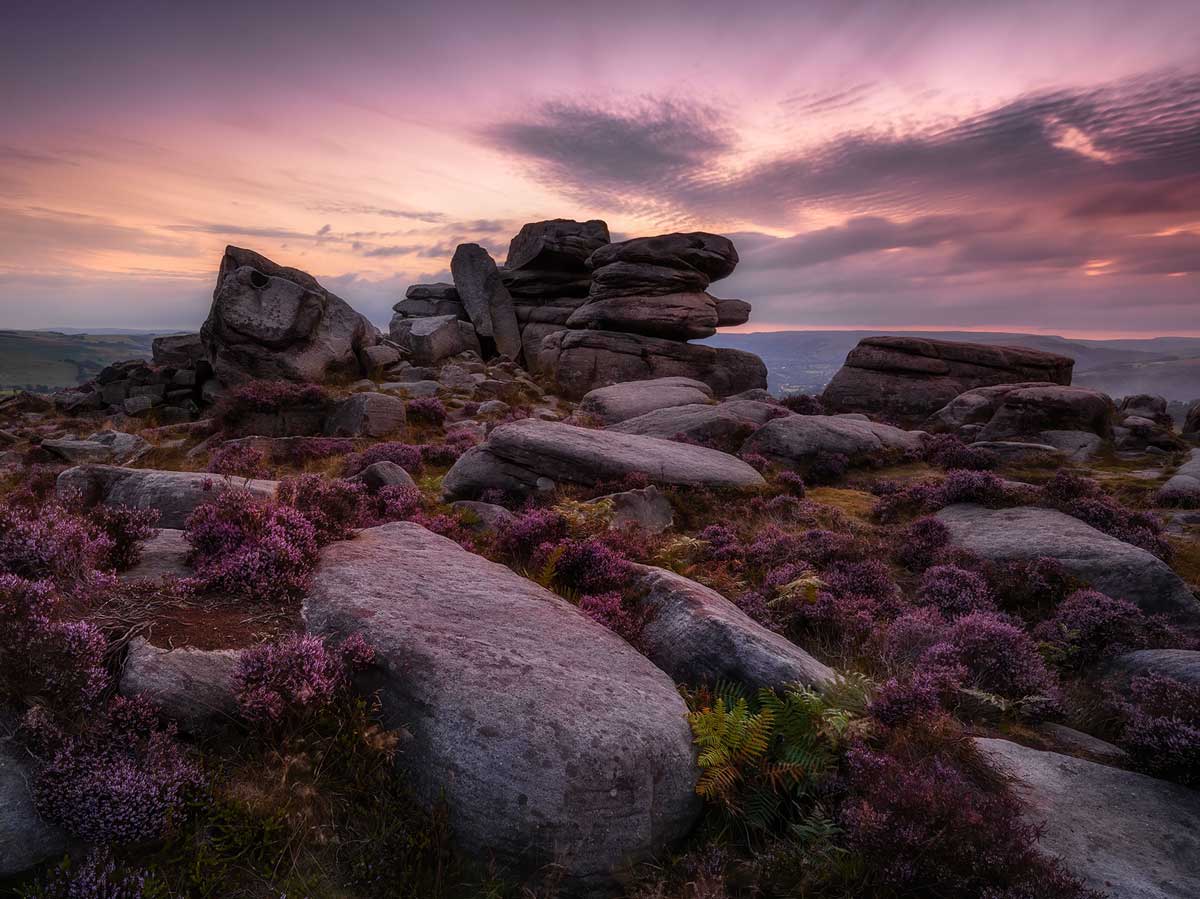
7-14 Pro @7mm ISO200 f6.3 1/4s Exp.
Another image taken in the Peak District on Over Owler Tor. Again there is a lot of haze as you can see in the very far distance, so I would be getting nowhere fast being overly concerned with how sharp it is. My DoF only needs to cover the very close foreground and the immediate background of the rising Tor itself. The distant background is in focus but I need not concern myself with how sharp it is.
SHALLOW DEPTH OF FIELD

12-100 Pro @21mm ISO200 f8 1/15s Exp x2 shots
This scene had an overall DoF less than infinity, with the mountain in the background (Ben Nevis) is closer, so we do not always need DoF to infinity. Using infinity means we know everything will be in focus and trying to determine how far the background is can be hard. How far are the mountains here? I haven’t a clue that’s for sure.
This image was quite a challenge. There is no detail in the background and the light was flat, but the way Ben Nevis was partly obscured by mist was appealing. I decided a tight image would suit the scene.
Using a longer focal length brought the boat forwards to balance with the close rocks in the foreground. It’s a simple composition with a strong foreground allowing the boat to be the hero of the image as it should be.
The DoF was very shallow, too shallow to get acceptable sharpness. Test shots for the water showed 1/15th was the best for the detail I wanted in the water, but to get acceptable sharpness would have needed a very narrow aperture which would have compromised sharpness with diffraction. The other option to maintain shutter speed is increase ISO which I absolutely did not want.
The best solution was manual focus stacking. Taking one shot for the foreground all I needed to do was make sure my DoF and acceptable sharpness extended half way into the scene across the pebbles. Then another shot of the boat ensuring enough DoF to include all the boat, the buildings in the background and enough to overlap the pebbles in the mid ground.
Blending the two shots was easy to do in Photoshop manually, the mid ground is so busy with pebbles they are easy to blend, and the background has no detail so it doesn’t have to be sharp. If the background was not shrouded in mist another shot would have ensured I covered the full DoF.
NO FOREGROUND
An image in the Lake District taken on a beautiful misty morning. The DoF or this was straight forward enough with the lack of foreground, or was it so simple?

12-100 Pro @30mm ISO 200 f7.1 1/6s Exp.
With an image like this the boat is the obvious place to focus. Consider the mast which comes right towards us, the log floating in the mid-ground and the background. I needed good DoF from the boat to the background including the log. Although the background is shrouded in mist there is still detail from the boats and the masts which need to be ‘acceptably sharp’. There was little movement, but still some movement meaning shutter speed had to be considered. The element I was least concerned with was the foreground mast reflection, it needed to avoid any motion blur but I was less concerned how sharp it was at the bottom edge. As it turned out 1/6th second shutter speed was fast enough to prevent any motion blur and f7.1 gave good DoF.
CONCLUSION
You should by now have a good understanding of how to get good DoF and what is meant by ‘acceptable sharpness’. You should also understand the various techniques to determine where you should actually focus in a scene.
The next section will deal with metering, how the camera decides what is a good exposure and how you can control it to get better exposure.
