
CUSTOMISING BUTTONS
Setting up your first set of buttons on the Olympus EM1-MK3.
In the previous section we went through the main menu and set it up accordingly. Now we will look at how to set up the various buttons on the-OM-1, the options available, and how to change them. They will form the defaults for the standard PASM modes and the base for your Custom Modes.
FAMILIARISE YOURSELF
First get to know which buttons can be changed and how to do it, it is actually very easy.
→(Gear) Custom Menu B1. Button Functions.
From here you will see buttons we can change. Note the Lens Fn button can be changed and also the additional battery grip if you use one.
Also important to note are buttons and functions which are not available. Some would make little sense to change and others would be dangerous, imagine changing “Menu” and then not being able to access it?
⊗ ITEMS NOT AVAILABLE TO CHANGE
Menu
OK
Info
Trash
Playback
Top Mode Drive/Timer/Flash
Top Mode AF/Metering
Top Shooting Mode Dial
Direction Pad Up
Direction Pad Left
FIRST BUTTON SET
Set your buttons up as below. Although you can change some of these suggestions to your own preferences, it’s important to keep a logical rationale. Don’t make them too complicated because we will change some of these further in Custom Modes. Read the section “Custom Modes” to get a sense of how this button set works and fits in with the overall scheme. You may want to make a plan of your own, planning is key.
View this first set as a starting point and remember that they are the buttons that will be active in standard modes such as A and S. Also see the Notes below. Set the dial mode to A, S or M and starting going through the button menu.
CUSTOM MODES APPLIED TO BUTTONS
It is also entirely possible to apply Custom Modes to buttons for easy access. An advantage is not having to look at the Mode Dial, applying them to buttons you can select quickly without looking just using muscle memory. The downside is buttons are then not available for other functions, many of which have options that are called by holding the button and turning the front dial. So my approach is to avoid applying CM’s to buttons; if you are a dedicated wildlife photographer you may prefer this to access your CM’s via button. We will set up a CM for Wildlife in the Custom Modes.
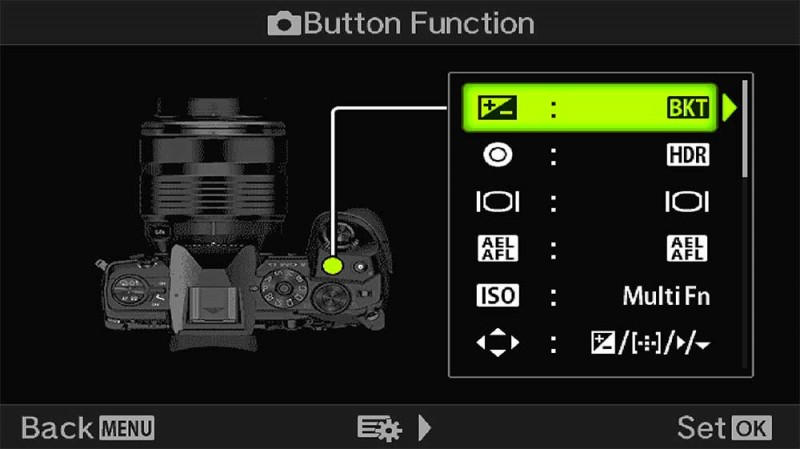
(Gear) Custom Menu>B1.Button Functions. Make a note of the default button settings just in case you want to reinstate them without doing a reset.
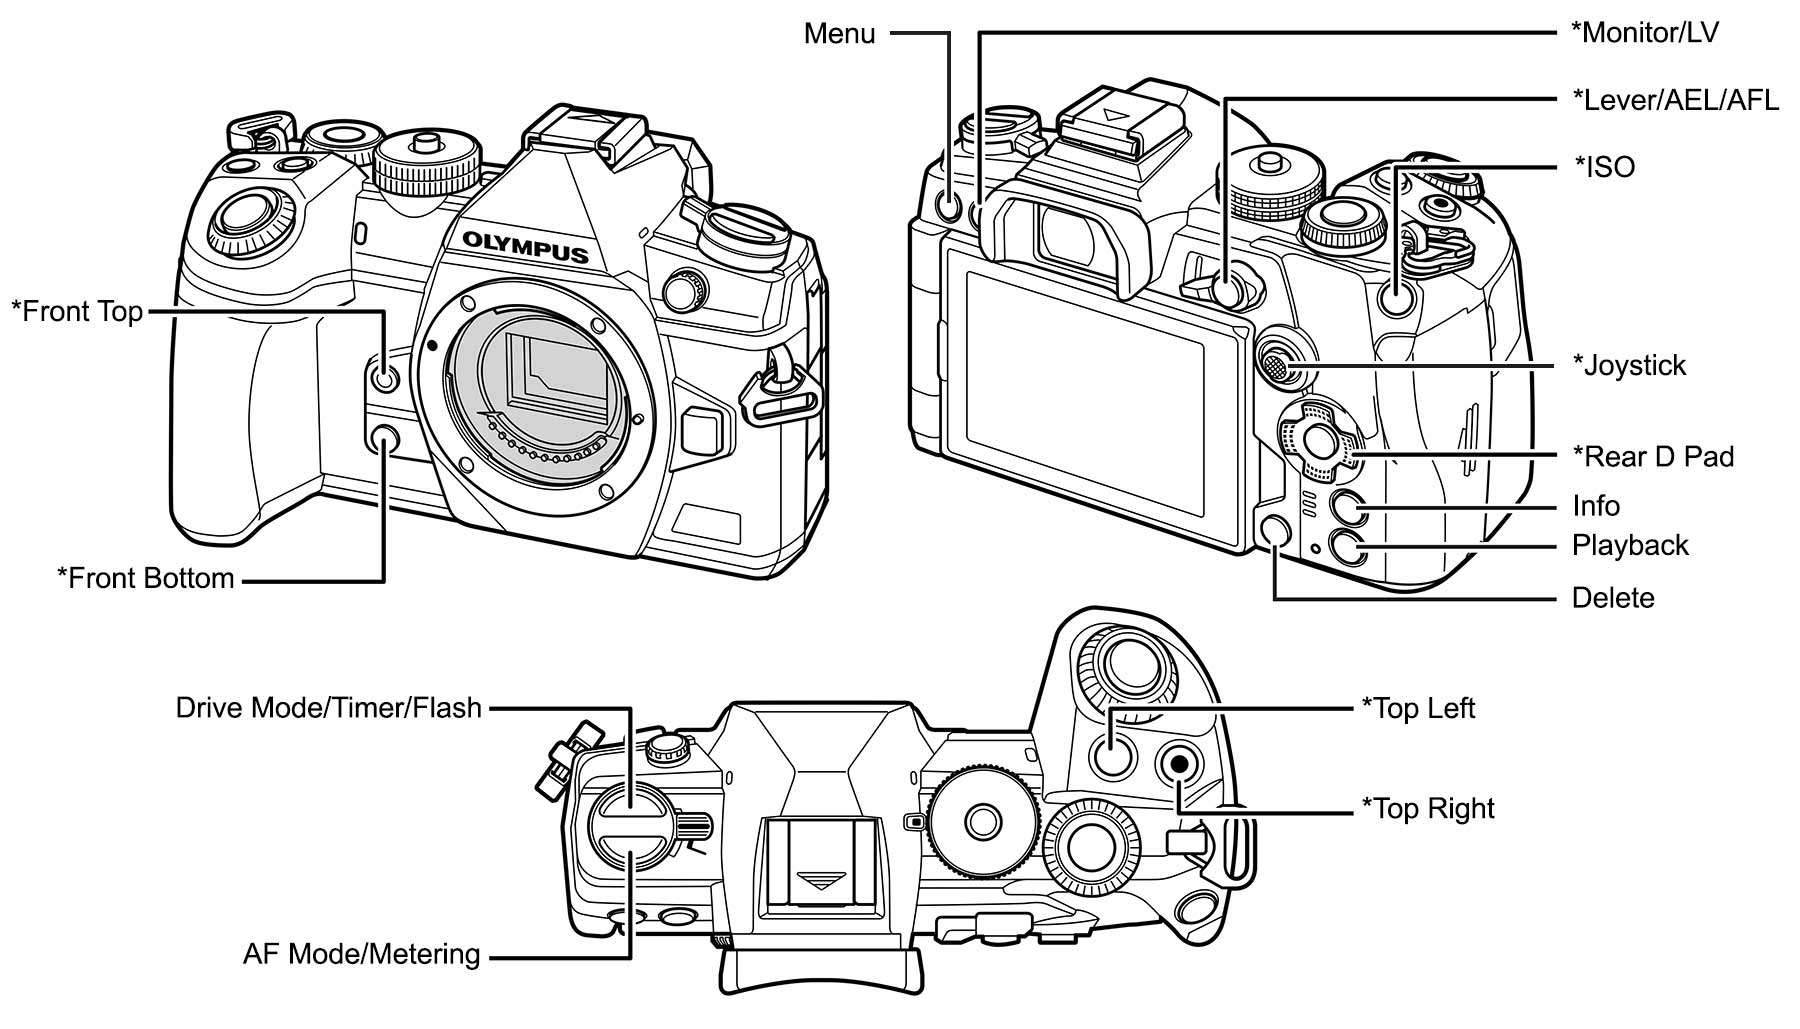
Only buttons shown with * will be changed. The others will stay as default.
| BUTTON | FUNCTION |
|---|---|
| TOP-LEFT | AE-BKT/Focus BKT (Bracket) |
| RECORD | HDR |
| ISO | ISO (Multi Function) |
| MONITOR | Monitor (Default) |
| AEL | AEL (Default) |
| LEVER 1 | S-AF/MF |
| LEVER 2 | MF |
| D PAD RIGHT > | WB (White Balance) |
| D PAD DOWN∨ | Drive Mode |
| FRONT BOTTOM | Peaking |
| FRONT TOP | LV Boost |
| LENS Fn | DIGITAL ZOOM |
NOTES
TOP LEFT, TOP RIGHT (RECORD)
Set to AE BKT (Bracketing), and HDR.
As already mentioned HDR has further bracketing options available which are not included in the BKT menu for some strange reason, hence why I save both. Press/Hold and turning the rear wheel allows access to the various frame/exposure value options. Auto Exposure Lock is disabled which I rarely use. If I need to lock exposure for a number of frames for panoramics for example I use Manual.
See the Section ‘Technique-Exposure Bracketing‘ for a detailed explanation. You may feel Bracketing is not important to you or you are happy to do it manually by taking additional shots over and under-exposed, in which case you can select other items for these buttons. Personally I would retain at least one, AE-BKT would be my choice, map it to the top left button and choose another function for the Record button but please read on first. Hi Res would be a great option but it is not possible to add to a button on the EM1-MK3.
What is very handy when mapping AE Bracketing to a button is the access it also gives to other functions. Press/Hold and a menu will appear at the top; turn the front dial to change options. Some are pretty redundant, I have never used White Balance, Art or Flash Bracketing but having access to Focus Bracketing is very useful.
A disadvantage to bracketing is the drive mode remains in single shot so the shutter has to be pressed for the number of shots required. HDR auto switches to Continuous Drive, and in the OM1 bracketing also engages Continuous Drive. An option is to set a Custom Mode with Continuous enabled which I used to do, but changing the drive mode is so easy I found it a waste of a CM.
ISO
Set to Multi-Function.
ISO is a function that is very useful to have quick access to so there is little point changing it. However there is an improvement we can make. Change it to the Multi-Function button which enables other options too. Press/Hold the button and then set ISO, so the button now performs as it did. You will see other features that can be access which you may find useful such as Magnify, Image Aspect and S-OVF which tries to emulate an optical viewfinder (in truth SOVF doesn’t have a great use). Other options such as Highlights & Shadows and Colour Creator allow quite some customisation but only affect Jpeg images, not Raw, so have limited use. Nonetheless, using Multi Function for ISO rather than just ISO has a few perks.
MONITOR
Leave Default.
Monitor switches the rear screen from Live View to the Super Control Panel. The ‘OK’ button does the same but allows Live Super Control Panel, basically a semi transparent panel in the Live View. It has a use for instance when you want to see settings but don’t want Live View to save battery life. I suggest leaving at default but we will change it to access Live ND in a Custom Mode (Live ND is only available in M or S Modes which is best dealt with in a CM).
AEL/AFL
Leave Default.
Leave AEL/AFL (Auto Exposure/Focus Lock) at default. It’s actually one of those buttons that has always existed which is rarely used but would cause an outcry if it was eliminated, we are funny in wanting change but not wanting change. Both functions can be achieved by half pressing and holding the shutter button, but it has an important function to set up Back Button Focus, see below. If locking exposure is critical you are probably best to use M.
LEVER 1 & 2
Set Focus Options.
You will have already set this in the Main Menu Section. We will use the Lever to set a single auto focus point on position one, and on position 2 set up Back Button Focus. There are multiple advantages to this by having two modes we can quickly switch between, please read the section below for more details on BBF. We can now quickly switch between Auto Focus and Manual Focus which is handy when we need the options.
Further, it stands to reason it is not limited to just these focus modes, we can also use it for Continuous AF, and Tracking, and we can even change the size of the focus target point to any of the available options. For now read the section below for the first button set, and then we will change it for a Custom Mode to utilise Continuous AF with other settings for when it is really needed.
REAR DIRECTION PAD
Set to White Balance and Drive Mode.
When setting options to the 4 way Direction Pad on the rear of the camera first select ‘Direct Function’ to access other options. Do note that as default the D Pad controls the focus point position by pressing any direction button. When setting the D Pad to ‘Direct Function’ you do not lose the ability to move the focus point (the joy stick is just above and serves this purpose too). Press the Left Direction and focus point position is activated again, returning each of the Direction buttons back to the original function temporarily. In other words the D Pad can be set to multi-purposes other than the default. It does have some limitations, only the right and down buttons can be changed, however there are still more useful options than the default.
Assigning White Balance to the Right button is useful for quick access, even though when shooting Raw we rely on Auto White Balance, but there are times when it is fooled such as Twilight and it is preferable to change it for something looking more pleasing in camera.
Applying Drive Mode to the Down arrow gives quick access when hand holding and more often than not your left hand is preoccupied supporting your lens. In fact I rarely use my left hand at all, preferring functions to be accessible with my right hand.
FRONT BOTTOM
Set to Peaking for showing high contrast edges in Manual Focus.
We previously enabled Peaking and Magnify in the Main Menu Section, and as I said both can be useful and also annoying. Having Peaking set to a button can get around this. As the AF mode is set to S-AF+MF, turn the focus ring and the view will magnify and show peaking at the same time allowing you to focus accurately, but you cannot see the whole scene. With Peaking set to the front bottom button where is is easy to press with a finger, press and hold it whilst focusing with the lens ring and peaking highlights will show but the view will not magnify, allowing you to see the whole scene. Release and press it again to return to the normal behaviour.
Enabling Peaking with the button effectively disables Magnify until you press it again. When using AF, pressing Peaking can also be used to show what parts of a scene will be in focus similar to Depth Of Field Preview. Keep in mind that as peaking shows high contrast edges it is not entirely accurate for DOF, but it is a good guide. The default DoF Preview is less than accurate, as with most modern mirrorless cameras so it is no sacrifice changing it.
FRONT TOP
Set to LV Boost, now called Night on the OM1.
Live Boost is another of those functions that can be very useful but without quick access you will forget you even have. It brightens dark scenes enough to be able to see into dark areas without actually altering the brightness settings of the screen. What’s more, it doesn’t alter the exposure settings or impact meter readings, so it can be useful on occasion. Press/Hold and turn the front dial to show two selectable levels of Boost but note that Boost2 introduces more lag.
LENS Fn
Set to Digital Zoom.
I set x2 Digital Zoom to the Lens L-fn button. Although it will crop the image it can be useful when in a situation that I do not have the focal length. Note that the Raw image will still be the full image with a frame showing the zoom level. Non-Pro lenses (and more being introduced) do not have the L-fn button so it’s important to not set anything here you need constantly. For wildlife and long lenses you may prefer to set another function to the L-fn button such as Focus Limiter.
BACK BUTTON FOCUS (BBF)
WHAT IS BBF AND WHY USE IT?
Back Button Focus is nothing more than removing the half-press Auto Focus from the front shutter button and using a different button, usually on the back of the camera, hence the name, whilst retaining the full press shutter release on the front shutter button. In other words you press one button to Auto Focus, and the other to take the shot. The shutter button then acts as though the lens is in Manual Focus, except you still have access to Auto Focus for speed. There are advantages to this and also disadvantages.
ADVANTAGES
1 – Pre-Focus. Historically BBF was used by many wildlife and sports photographers who preferred to pre-focus on a given point and take the shot when the subject is in the right position, without the shutter button when pressed then trying to refocus again. Some still use this technique despite the advances in AF Tracking.
2 – Shooting Long Exposures with an external ND filter. Focus has to be set before inserting the filter and then locked to manual, otherwise the lens will try to focus again when the shutter is pressed. Many times it will be too dark and the lens will hunt being unable to achieve focus through the filter. By using BBF the rear button can be used to Auto Focus, the filter installed, and the shutter pressed without disturbing focus. Obviously a cable release is used instead of pressing the shutter, which will just trigger the shutter when BBF is used.
3 – Shooting Panoramic Images. When shooting panoramics is is preferable not to auto focus each shot because there is a chance the focal plane will move meaning images do align correctly. Normally setting the focus point for one frame and then shooting the rest in manual focus will give the same depth of field. Obviously the same applies to setting the same Exposure and White Balance, so using Manual Mode is best, but the principle regarding focus still remains the same.
4 – Bracketing. The same can be said for exposure bracketing images and ensuring the focal plane doesn’t change for each shot, although in my experience it is far less an issue.
DISADVANTAGES
The disadvantage is immediately apparent, using two buttons to achieve the same thing as one button is slower, and this is where using the rear lever comes in handy. We can set whatever AF mode we like to Lever Position 1, Single AF, Continuous AF, and set MF to position 2 to achieve BBF, meaning there is a fast and flexible way to swap between the two. This way BBF is not full time and we get the best of both worlds.
Another disadvantage is it loses the ability to set for example S-AF to Lever1 and C-AF, or even C-AF+Tracking to Lever2, but we will deal with that in a Custom Setting for when it is really needed.
The obvious alternative is to just use manual focus which many do, but what if you prefer like me to auto focus? I rarely focus manually, I find AF faster, more convenient especially if like me you use reading glasses, more accurate, and despite what you may see online it does not mean I’m not a ‘proper’ photographer. Alternating between AF/MF with the lens clutch is erratic and best avoided, if you use auto focus and then pull the clutch to manual the focus is often disturbed. And what if using a lens without the clutch? For this reason I always avoid using the lens clutch and set BBF instead.
SETTING BBF
You should have already done this in the Basic Menu Section, but I we will visit it again just in case. You may find your EM1-MK3 is already set for BBF, some including mine shipped with it set by default, whereas for some odd reason some didn’t.
Setting up BBF is very easy. There are three steps:
First check in the Buttons Menu (Gear>Custom Menu>B1>Buttons) that AEL is set to the default AEL. Then do the three steps below:
1 – In (Gear)Custom Menu>B1 set the Lever Function to Mode 2. This tells the camera to switch the AF Mode and Target (focus point) between settings saved on each position.
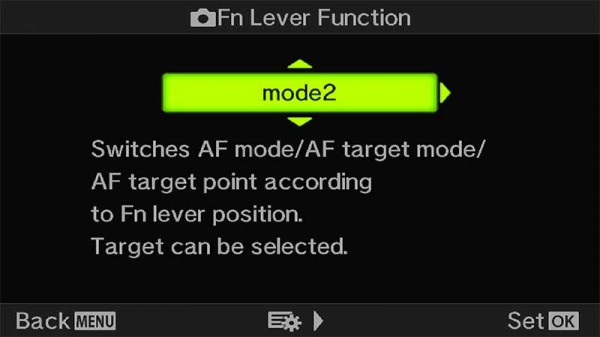
Set the Lever (Gear) Custom Menu>B1. Fn Lever Function
2 – With the Lever in position 1, press ‘OK’ to bring up the Super Control Panel and set the Focus Mode to S-AF+MF. Nudge the Joystick to activate the Focus Target Point (it will show on the screen in Green), turn the front dial and set the size you prefer, I always set the smallest focus point. Flick the Lever to position 2, and again in the Super Control Panel set the Focus Mode to MF. That’s it, they are now stored.
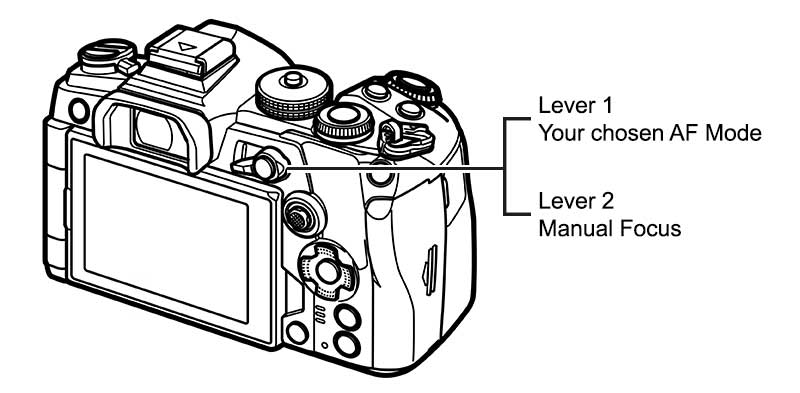
Set the Lever options. Chosen options will be saved automatically.
→ TIP Setting S-AF+MF. Using +MF allows Manual Focus to be performed with the lens focus ring as well as AF, but when you manually focus and then press the shutter it will engage AF again, overriding any changes you made with MF. So doesn’t this make it pointless? Well yes, but half press the shutter to engage AF and hold it, then use the lens ring to manually focus and it will override the AF. It is handy to see peaking highlights and a zoomed in view which will have been set in the Main Menu Section.
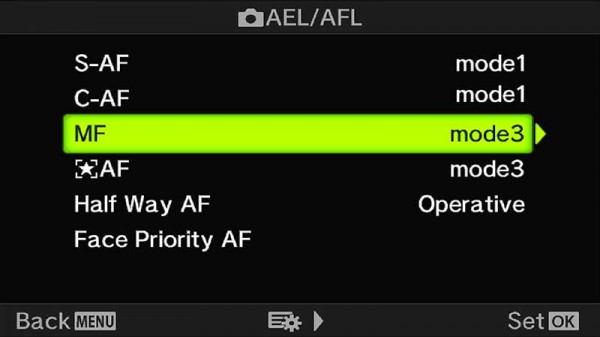
(Gear) Custom Mode>A1>AEL/AFL>MF Screen.
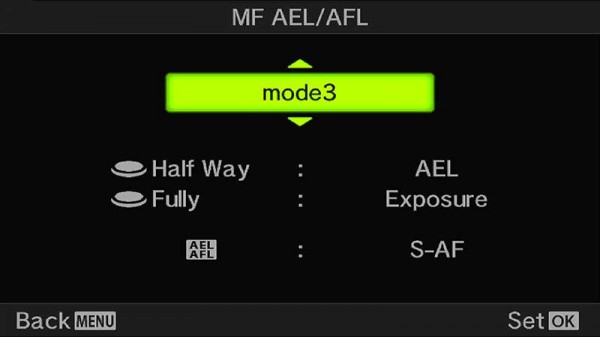
Change Mode to 3. Notice S-AF is applied to AEL.
3- The last step is to change the operation of the AEL/AFL button (Auto Exposure/Auto Focus Lock). In (Gear) Custom Mode>A1>AEL/AFL select MF and change the setting to Mode 3. This disengages AF from the shutter half press.
There’s lots of confusion over these settings and I’m often asked what these modes actually do. For each Focus Mode, S-AF, C-AF etc, you can dictate what happens when the AEL button is pressed and also the behaviour of the shutter button. In the second screen we see Mode3 is set and when the shutter button is half pressed it will lock the exposure settings, fully pressed and it will take the shot. Note that when the AEL button is pressed S-AF is operated, exactly what we need. This behaviour of removing AF from the shutter button only applied to M because it is manual focus. For any other AF modes other than M, ensure Half Way AF is set to Inoperative. See below and the Wildlife section for ways to use BBF with focus modes other than M.
→ TIP These ‘Modes’ vary according to the AF mode selected. For instance Mode 1 retains Auto Exposure Lock on the AEL button, mode 3 changes it to start AF. When setting up BBF you may prefer to set Mode 3 to S-AF and C-AF so AF is activated on the AEL buttons too, which might help muscle memory. AEL is lost but it is still activated with a shutter button half press if you do need to lock exposure. AF will still be active on the shutter button too for S-AF and C-AF when the lever is in Lever1 position.
If it seems confusing remember all we are doing is putting Manual on Lever2, in this position the camera is technically in manual focus, but we have cheated by adding S-Auto Focus to the AEL button.
OTHER OPTIONS FOR BBF
The settings above implement Part Time BBF, meaning you can easily switch between Auto Focus on the shutter button and BBF using the lever. One issue is that only S-AF is available. Whilst you can change S-AF when in Lever1 on the fly to C-AF, if you then flick the lever to Lever2 BBF is still engaged but it will default to S-AF. It is not possible to get around this with Part Time BBF as set up above with the EM5-MK3, OM-5 or the EM1-MK3, although it was changed with the 1X and OM-1.
Supposing we want Continuous AF set up as Back Button Focus? Doing this is handy for wildlife because the AEL button can be pressed continuously to keep C-AF active and the shutter button pressed only when a shot is required. With C-AF on the shutter continuous AF is engaged when the shutter is half pressed but stops when the shutter is fully pressed to take the shot. It means focus needs to be engaged again with a half press.
FULL TIME BBF
We can set up Continuous AF for back button but it means making it Full Time, and the AF function is removed from the shutter button. One advantage is the rear lever no longer has to have M (full Manual Focus can be used with the lens clutch on Pro lenses) assigned to Lever2 so both positions are available for different options. S-AF can be assigned, C-AF, or C-AF+ Tracking. Remember each AF Mode also allows S-AF+M or C-AF+M when in Menu (Gear) Custom Menu>A1>AF+MF is enabled which is handy. When using C-AF+M focus can be fine tuned if required by using the lens focus ring (ensure Peaking is enabled) which also effectively locks the focus too.
To set up Full Time Back Button Focus first set Half Way AF to Inoperative to remove AF from the shutter button:
Menu (Gear) Custom Menu>A1>AEL/AFL>Half Way AF>Inoperative.
Set your chosen AF Modes to Mode 3 in the same menu, and then set each one to the Lever Positions just as we did before by putting the lever in each position and simply using the Super Control Panel to set the desired AF.
For Wildlife if you prefer this method I would set C-AF+M to Lever1 with a small target and C-AF+M+Tracking with a larger target grid.
This now enables Full Time Back Button Focus, which can be saved as a Custom Mode if you wish.
COMPLETE
That’s your first set of customised buttons applied and saved. Now it’s time to look at Custom Modes, what these are, how you can define them and how to further customise the camera button settings.
