4 – PHOTOSHOP INTERFACE
Exploring the main interface in Photoshop and changing settings to make it easier to use.
MAIN WORKSPACE
Photoshop is scary. It has so much in it, and there is no logical layout and no place to start which is why so many people are intimidated by it. Because it is used for so many different things, photography, digital art, graphic design, it cannot have a logical workflow like Lightroom. The good news is we do not need to use every tool or function at all. It is important to start by setting up some basics first to make it easier to use.
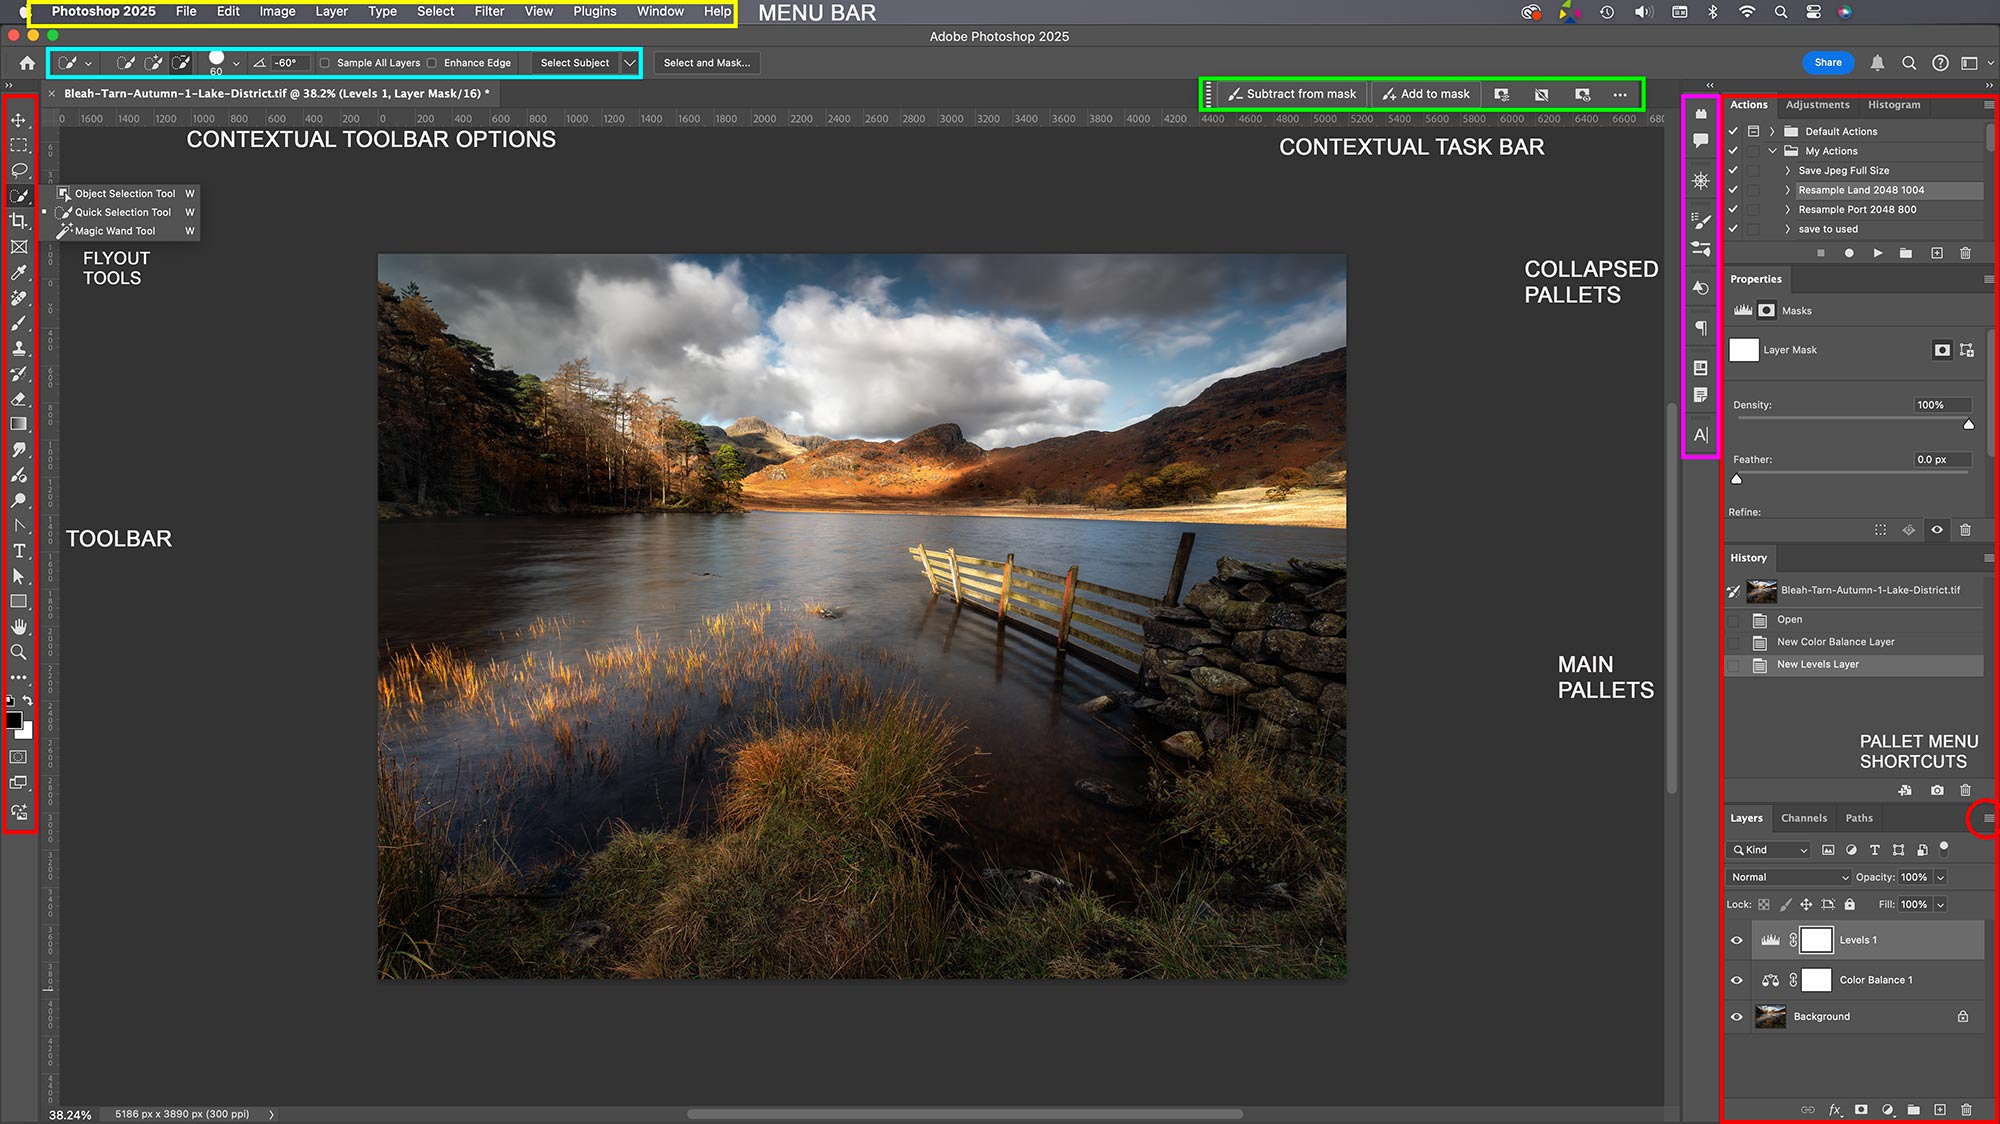
Photoshop Interface or ‘Workspace’
The Photoshop Interface, or Workspace as it is called, can look daunting at first but becomes quite logical once you are familiar with it. Arranged with a Toolbar and Pallets for various functions, the workspace can be customised to suit your needs and saved. There are a number of workspaces available, however we will create one very easily, and create some keyboard shortcuts to save clicking for tools constantly. Photoshop is also very clever, there are two bars that are ‘contextual’ meaning the options displayed change depending on the task or the tool being used, or the context of what you are actually doing.
Menu Bar – As with all applications the top Menu contains all the tools and functions in PS. It will be unfamiliar at first but you soon get used to it, it is arranged logically considering how much is actually in there. There are so many items, many you will never use; ‘Puppet Warp’??
Toolbar – Fairly obviously, all of the tools we need and plenty you will probably never use are contained here, all in ‘stacked’ toolboxes. If an icon has an arrow on the corner it means a group of tools are stacked into it, accessed by long clicking the icon to reveal the full set.
Note at the side of many tools is a keyboard shortcut. These are incredibly useful so learn them and save a ton of time. Why are they the same on many groups of tools? It would be far too complicated having different shortcuts; press/hold Shift plus the shortcut to quickly cycle through each one.
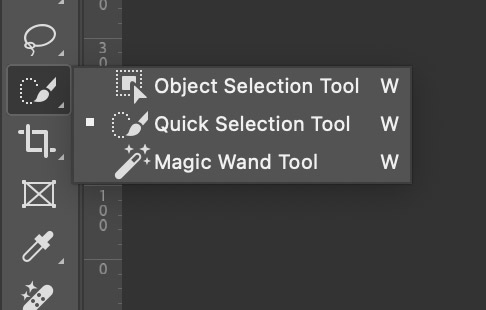
→ TIP The toolbar can be positioned left or right, or changed from a single row to a double (click the >> icon at the top). The Toolbar can be completely customised; change shortcut, rearrange groups, or remove tools from groups. Click the 3 Dot icon at the bottom of the Toolbar. Personally I would not change any groups or remove tools until you are very familiar with them, although changing letters is fine.
Contextual Toolbar Options – This is an important Toolbar. It is context sensitive and is incredibly useful. In some instances it may not even be visible if there are no options. In the screenshot the Quick Selection Brush Tool is selected and the Contextual Toolbar has updated to show various options. I can quickly change many options here, the size, softness, spacing, whether to add to the selection or remove from the selection. Select the standard Brush Tool and it will change again to allow other options, size, softness, flow, opacity etc. It is very clever and useful. Note all brushes can be altered in size with the keyboard shortcuts ‘[ or ]’.
Contextual Task Bar – Another Contextual bar which is aimed more at the ‘task’ being performed. Confusingly it does sometimes show similar options as the Contextual Toolbar and the Properties panel, depending on the tool being used. Where it really becomes useful is making selections. Selections are selecting a part of an image to edit so that only the area selected is affected. The Contextual Task Bar will update showing available options, whether to fill the area, remove it, invert it, refine it by expanding or feathering it, or use AI Generative Fill. Note many of these can also be accessed by right clicking inside a selected area. AI Generative Fill is fairly new in PS and will try to fill an area with pixels it thinks should be there based on machine learning, useful for removing items. It is similar to Content Aware Fill but more powerful. To use it do not type a prompt in the box. Or type a prompt with a description of what you want, although I have to say it is still early days for this and moves too far away from photography, I really do not want to replace a sky with an AI generated sky.
Enable the bar in Window>Contextual Task Bar. It is a floating bar and can be dragged and pinned in any position from the 3 Dot icon.
Pallets – Pallets are the heart of Photoshop and they are simply panels which serve different purposes. Pallets are enabled in the ‘Window’ menu.
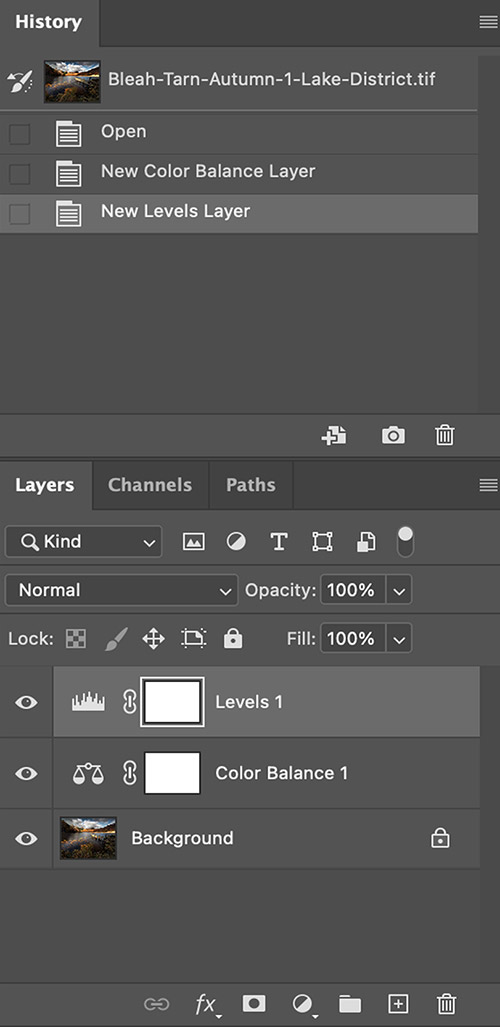
Pallets can be positioned anywhere, drag and drop where you like, dock in any order in the right hand window, even stacked together in tabs. Each Pallet will have its own range of tools available. In the screen shot the History and Layers Pallets are shown. History shows icons to create a new document from the current state, create a snapshot, or delete a state.
Note the Layers Pallet which will also include Channels and Paths by default. At the bottom of this panel are important shortcuts, linking layers, adding effects, adding Masks and Adjustment Layers, creating groups, adding a new layer and deleting layers.
These two Pallets are two of the most important and will serve the basis for much of your editing. Layers do not exist in Lightroom, and whilst it does have a History it can be used much more powerfully in PS with the History Brush.
Power of Layers – Think of Layers as another item over your image, like pages in a book stacked up. These layers can be another image or an Adjustment Layer as shown (Levels and Colour Balance). A Mask at the side means a layer can be added or removed to just certain areas, or made visible or invisible on the main image. Adjustment Layers can be altered at any time or removed because they are a Layer, and non-destructive.
White always shows and black always hides, or makes transparent. Always.
Therefore if I add a Levels adjustment, alter it and then want to remove it in parts I can paint on the mask with the Brush tool and black paint to hide or remove it. This is the heart and soul of Layers and Masks in PS. If I wanted it in just a small area I do not have to paint out all the areas I do not want, that would be silly. Instead I would make the adjustment, then Invert the mask to black (Cmd/Windows+I) to hide it all and then just paint onto the mask in white.
Selections can be made to isolate just one part of an image and then an Adjustment Layer added which will auto mask the area, or make selections afterwards. The opacity of the layer can be altered, as can the Brush when you paint, making it incredibly versatile, powerful and fluid, more so than LR.
New to PS in 2024 are Adjustment Brushes. These do the same job of Adjustment Layers and can be used in the same way, except a mask is added and the adjustment is only made where you paint. They are a new way of doing the same thing and they are worth exploring.
→ TIP The History Pallet in PS is much the same as in LR. It shows every step in the session and allows you to move backwards and forwards, undoing and redoing steps. Crucially it is not saved with the document and is lost the next time it is opened. Only Layers are saved if you save it as a Photoshop document. However History gives us another way of making adjustments which is incredibly powerful.
Note the small boxes next to each step in history and an icon above for the History Brush. Suppose I want to alter the colour in a small part of an image, I could use Colour Balance or Hue/Saturation and make the changes globally to the whole image. I can then click the box next to that step to enable the History Brush state, then step back in history, undoing as many steps as I want. Now when I select the History Brush I can paint back all those steps just where I want, altering the brush size, opacity, softness on the fly. The problem with this is that it is destructive, you are working on the actual image and you cannot go back and alter it. More on this in the Processing section.
Collapsed Panels – These are another Toolbar as such containing Pallets for items used less frequently. Instead of cutting up the main side bar items can be enabled, dragged out, reduced to the minimum and then docked at the side. A good use for this is any Plugins that you may have in the future, or detailed Text properties.
SETTING UP PHOTOSHOP
PALLETS LAYOUT
It will be useful to make some changes to the PS Workspace before doing anything, getting the right Pallets enabled, creating some keyboard shortcuts and saving it as a workspace.
First in ‘Window’ enable the important Pallets as below. These are the Pallets I find the most important and useful to have accessible.
- Actions
- Adjustments
- Histogram
(‘Dock’ Actions, Adjustments & Histogram into one panel with tabs by dragging out and over the top.)
- Properties
- History
- Layers (Channels & Paths)
(Layers, Channels and Paths will be ‘Docked’ by default.)
KEYBOARD SHORTCUTS
Using the keyboard can be such a time saver and really speed up your work, and you do not need too many of them. For instance I can easily just hit Ctrl/Cmd+W to zoom straight to 100% and Cmd+W to fit to window. There are two groups that need to be set and they are distinctively different, functions or adjustments, and tools. Tools can have one key applied whereas functions need two or more. Below are the shortcuts I use and you will see there are not that many, but it saves a great deal of time.
For Windows keyboards replace Cmd with the Windows key. My Mac keyboard has Option and Alt indicated. If yours does not then replace Alt with Option.
| FUNCTIONS | |||
|---|---|---|---|
| Save | Cmd+S | Brightness/Contrast | Ctrl/Cmd+B |
| Zoom | Z with mouse scroll or
trackpad gestures |
Curves | Cmd+C |
| Fit to Window | Cmd+W | Hue/Saturation | Ctrl/Cmd+H |
| View 100% | Ctrl/Cmd+W | Colour Balance | Cmd+B |
| Flatten Image | Ctrl/Cmd+F | Shadows/Highlights | Ctrl/Cmd+S |
| Undo/Redo | Cmd+Z or Shift/Cmd+Z | Auto Tone | Ctrl/Cmd+T |
| Levels | Ctrl/Cmd+L | Auto Colour | Shift/Cmd+T |
| Stamp Layers | Shift/Alt/Cmd+E or
Layer>Merge Visible+Alt |
Deselect | Cmd+D |
| Invert Mask | Cmd+I | Disable Mask | Shift+Click |
| TOOLS | |||
|---|---|---|---|
| Move | M | Adjustment Brush | A |
| Quick Selection Brush | W | Dodge Tool | O |
| Lasso Tool | L | Burn Tool | O |
| Spot Healing Brush | J | Brush | B |
| Remove Tool | J | Brush Size | [ and ] |
| Clone Stamp Tool | C | History Brush | H |
| Gradient Tool | G | Eyedropper | I |
Where the same key is shown press Shift to cycle through tools.
A Printable version of the Keyboard Shortcuts is available here.
Setting up Keyboard Shortcuts for Functions / Tasks takes a little time. In Edit>Keyboard Shortcuts just go through each section, highlight the field and type your new shortcut, remembering a function key such as Cmd has to be included.
If a message appears saying it is already in use decide if you want to accept the change or not.
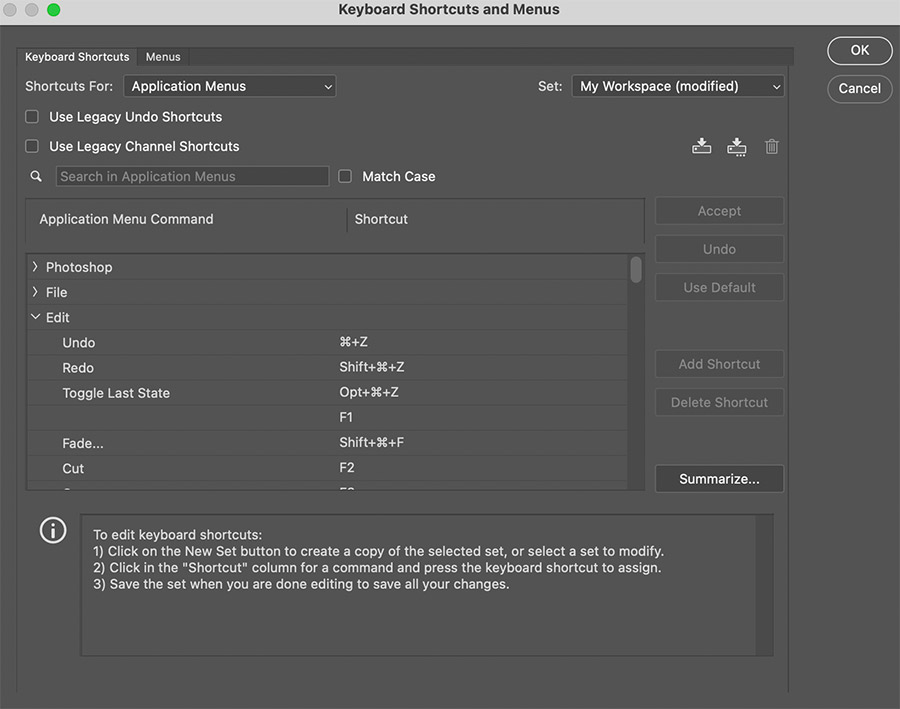
Keyboard Shortcuts Dialogue
Setting up Keyboard Shortcuts for Tools is easy. In Edit>Toolbar or the 3 dots at the bottom of the toolbar select each tool and type the key you want. Only one key is needed, although you may find some letters you choose are in use and cannot be changed.
As said before some tools are grouped and have the same shortcut letter which can be cycled through by press/holding Shift. You can simplify it by removing the key from some. For Instance as shown I sometimes use the Rectangular Marquee, but never the other options so I removed the M from them. The same for Selections, I remove the key from tools I use less often.
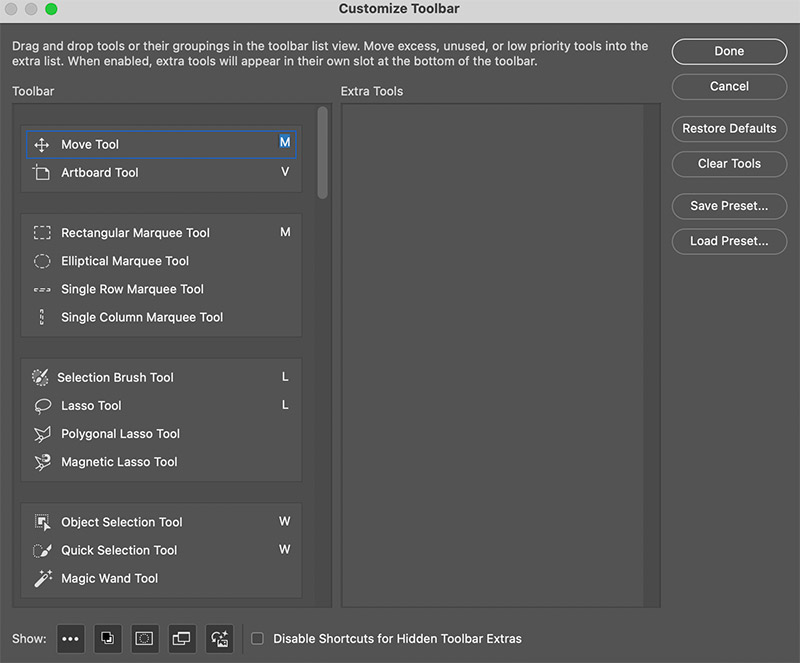
Toolbar Customisation
PREFERENCES
Most of the settings in Preferences can be left at default, browse and change any if you require. One setting which can be useful and then annoying are the Rich Tool Tips, small animated videos that appear over toolbars. Disable them in Tools>Show Rich Tool Tips.
Under Edit>Color Settings make sure the RGB value set is the same as in Lightroom to avoid mismatching warnings. Select Custom and then change it to sRGB, or select Adobe RGB if you set it in LR.
Other settings do not matter for us, they are for commercial print labs and commercial documents which are usually printed in CMYK.
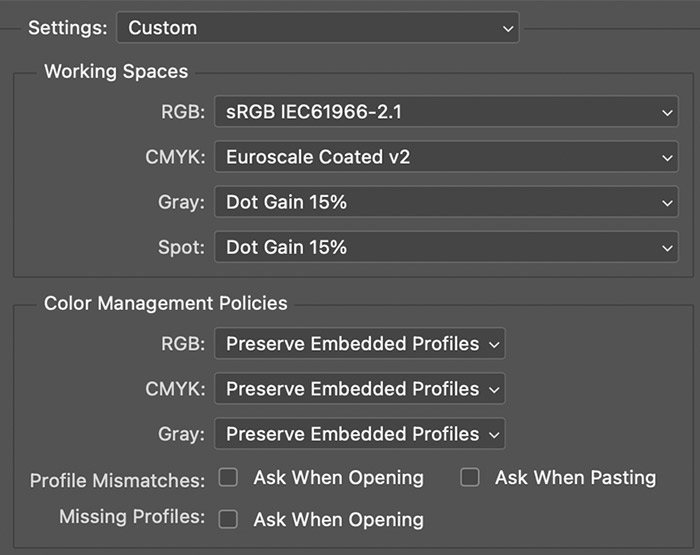
Colour Working Space
SAVE WORKSPACE
Last but not least save your Workspace. In Window>Workspace>New Workspace select all the boxes and give it a name that means something to you, ‘My Workspace’ works for me. Your settings will be preserved as the default each session.
NEXT – 5 GETTING ORGANISED
Getting your Library organised and having a good file structure inside and outside of Lightroom.
