3 – LIGHTROOM INTERFACE
A quick look at the LR Interface, the panels and what each section is used for.
LIBRARY MODULE
Lightroom is easier to master than PS because it has a Library to import, sort, cull and rate images, and a Develop module for Processing. All the processing tools in Develop are logical and organised in a panel on the right.

Lightroom Classic Library Module
The Library Module is fairly easy to understand with a main viewing area and panels serving different purposes. This is where you will import all of your images, then rate them by colour or star according to your own system, and cull what you do not want to keep. I do not use stars so often, all I need is to rate by ‘Keepers’ (Red), ‘Maybe’ (Green), and ‘Useful’ (Yellow). I know red and green should be the other way around, old habits die hard. Keywords can also be applied to further refine searches. What is really import here is the Library and the folder structure. We will explore that in more detail later.
Navigator – Useful to show your position in an image when zooming in, great for you pixel peepers. More useful is that it will show a thumbnail of the first image in a folder when hovering over it as a reminder, and it will update live for some editing functions in Develop, such as White Balance Eyedropper.
Imported Library – Your folder structure shown where you can easily browse your images. Note there are many ways to organise your images. If you just insert a memory card and import, Lightroom by default will import and organise by date. It is far better to have a structure you understand and control allowing you to find images without using LR. More on this in the Getting Organised section.
Viewing Options / Rating – A toolbar allowing the view to be switched from thumbnails to one image. ‘Compare’ view allows two images to be compared side by side, whilst Survey view allows multiple images, useful if you have a few images very similar and need to narrow selections down. Rating allows images to be rated with stars or colour. Note this changes to show colour ratings when in grid view. Keyboard shortcuts can be used from 1-5 for stars and 6-9 for colours.
Image Filmstrip – Obviously thumbnails of your images, just like a strip of film.
Filtering – Click a filter option to show only the images with that rating.
Module Selector – Select the module to work in. For this guide we are only concerned with Library and Develop. The other modules are self evident and you may find them useful. Map for instance allows you to drop an image onto a map for reference, or create a layout for a book, slideshow, print or a web gallery.
Quick Develop – As the name implies, apply quick adjustments such as a saved preset, white balance or tone. This is not really something you will use often. Notice the Histogram at the top which is very useful for checking your image exposure levels.
Info / Exif Panels – All the information you need to browse Exif and Metadata. Check on the lens used, aperture, shutter speed etc. Note that pressing ‘I’ on the keyboard will display limited information too as an overlay in the main window which can be customised in View>View Options.
→ TIP Note the small grey triangles at the edges of the interface; click to allow each panel to auto hide and show when your mouse hovers over the area. Also note the sections in the main side bar can be set to auto show and collapse in Solo Mode. Right click on the header bar of any panel (except the top histogram) and select Solo Mode. The last used panel will stay open and collapse when another is selected. I prefer manual even if it is more scrolling.
DEVELOP MODULE
The Develop Module is where all the magic happens, taking your raw image and applying your chosen settings from the right hand Develop Panels. The layout is fairly similar to Library with the lower Viewing Options/Ratings being the same as is the Filtering. The sidebars have changed for items more suitable to this module.

Lightroom Classic Develop Module
Presets – Presets are a set of develop adjustments that are saved and can then be applied to another image as a one click adjustment. You may have seen packs of such presets are promoted all over social media and I would say be cautious. Such settings are used as a one size fits all, and that is never the way with raw images, there are just too many variables. The light is always different, therefore the white balance, tone, colour and contrast will be different and you will find huge variance when using a preset. That being said, they can be a good starting point. You are better off learning how to create you own, just by editing an image and saving it as a Preset. LR ships with quite a few built in. Another way is to copy and paste settings from one to another. Images taken in one session will be more successful having similar settings applied. Edit one image and select other images and the bottom button ‘Previous’ will change to ‘Sync..’ allowing settings to be applied to multiple images.
Snapshots – Allows thumbnails to be captured at any point in your editing progress for reference.
History – The all important History panel saves all edits made to an image. Step backwards and forwards to check progress, and if you want to try a different edit right click on a thumb and create a Virtual Copy. This is as the name says a virtual copy, not a duplicate. All images in LR will not exist until you export them with your edits. Virtual copies are quite handy because you can compare different edits to the same image. History is preserved in LR indefinitely.
Develop Panels – Develop Panels are the important panels where you will make all of your processing changes. They are arranged in a logical flow and allow us to work from the top to the bottom. In most cases you will start at the Basic panel, then make adjustments in other panels as needed. You will not need to use every panel and you will find you will not always use them in any particular order once you familiar with them. The beauty of LR is how they are arranged, allowing a quick workflow and ease of learning. Most times you would start by selecting the Colour Profile you want at the top (Adobe Colour is my default), then hit Auto and see what happens, adjusting as needed. Fine tuning is possible by tweaking the settings, learning not to overdo any one. There are many tricks in LR we will discover; one such is setting white and black point so exposure is correct. Hold down Shift and double click White and then Black and the correct points are automatically set.
The top toolbar under Histogram contains useful tools such as Crop, Remove and Mask, with options that expand. Masks are incredibly useful and allow parts of an image to be edited selectively. They are not as powerful as in PS, though they are very useful and you will find yourself using these a great deal, I do.
QUICK WORKFLOW
• Import, sort and select images to keep, and cull others.
• Set White Balance and Colour Profile. Use a predefined WB or use the eyedropper and select a Colour Profile of your choice. I use Adobe Colour by default.
• Adjust Exposure and set White and Black Point. Try Auto too, you never know, it may work out well with a few tweaks.
• Adjust Shadows and Highlights. Open shadows and recover Highlights. Shadows are important so keep it real with just enough detail visible.
• Apply Masks as required. Enhance skies, pick out areas of light or objects to enhance.
• Adjust Presence (Texture/Clarity/Dehaze). Use sparingly, too much looks dreadful.
• Adjust Colour and Calibration. Use Colour Mixer to enhance Hue, Saturation and Luminance of specific colours. Check Calibration.
• Adjust Sharpening and Noise. Between 25-40% (default) is usually fine. Do not over sharpen. Use a mask for selective sharpening. Use AI Denoise.
• Lens Corrections and Horizons. Most lenses are auto corrected with built-in profiles. Check to make sure. Correct horizons.
• Export your final image or send to PS for further work.
COLOUR SPACE
Colour Space is very confusing and a headache because there are quite a few, and each have their own pros and cons. The two main spaces are sRGB and aRGB (Adobe RGB). We can ignore Pro Photo RGB because we simply do not need it. Colour Space matters because it influences the range of colours you have when processing, and it matters crucially for the intended output too. I will try to keep this simple.
AdobeRGB has around 30% more colour available that sRGB, so you should process in this. In truth you will probably only notice a slight difference in deep reds and greens. Output matters because an image in aRGB used online will get converted to sRGB (usually badly) because the defined colour space for the web is sRGB. Most online printing services will only use sRGB and supplying a file in aRGB will result in flat dull colours. But you can print at home with a colour managed screen and printer with aRGB.
ADOBE RGB
✓ PROS
✘ CONS
SRGB
✓ PROS
Suitable for all printers
✘ CONS
Cannot convert to aRGB
Narrower range of colours
→ TIP CORRECTING WORKFLOW FOR ADOBE RGB
You do not have to use AdobeRGB. If you rarely print, and mostly just use images for online such as websites and social media just use sRGB. Remember if you use online printers you would be fine with sRGB anyway. If you want the best of both worlds using AdobeRGB for wider colour spaces you must remember to convert images for the intended use, online and most print services. It sounds like a headache and it is unless you get a good workflow set up. The best ways to do this is with:
1 – Lightroom Export Presets. Set up Presets allowing images to be saved at any size, different locations and colour spaces. See below.
2 – Photoshop Actions. Similar to above, an Action can be set to save as many different image sizes, file types and colour spaces as needed with one click. See the Getting Organised Section
PREFERENCES
There are many items that can be changed although most are fine just as default. Set up an Identity Plate if you want you name to appear on the top interface bar, and alter the background colour if desired.
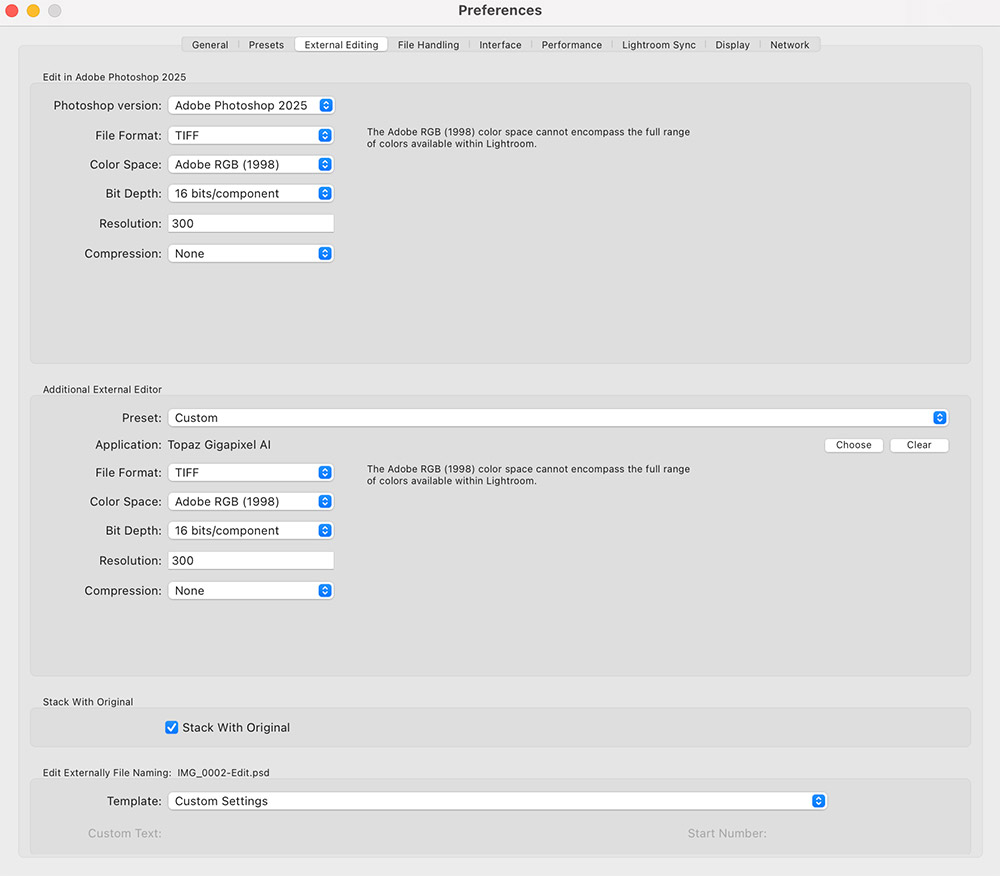
What we must check is where an image is sent when we want to edit in PS. In External Editing make sure your version of Photoshop is selected and set it to Tiff for the best quality.
Another editor can be set if you wish, as I have for Gigapixel, although again if I need to use Gigapixel I will use in in PS which handles other apps as plugins much better and as layers.
Note colour space. Set it to Adobe RGB and 16bit. If you prefer to keep things simple use sRGB.

Lightroom External Editing
EXPORTING
Remember your edited images do not exist outside of LR until they are exported, they are a kind of carbon copy with changes that do not become a real copy until you export, or save it to your computer.
There are actually many options for this. My advice is to export to one folder, as the highest quality image (I use Tiff but you could use Jpeg) separate from your raw images. Give them a meaningful name, not just a file number. That beautiful image you took in a location a year ago you cannot remember will jog your memory if the file name has it included.
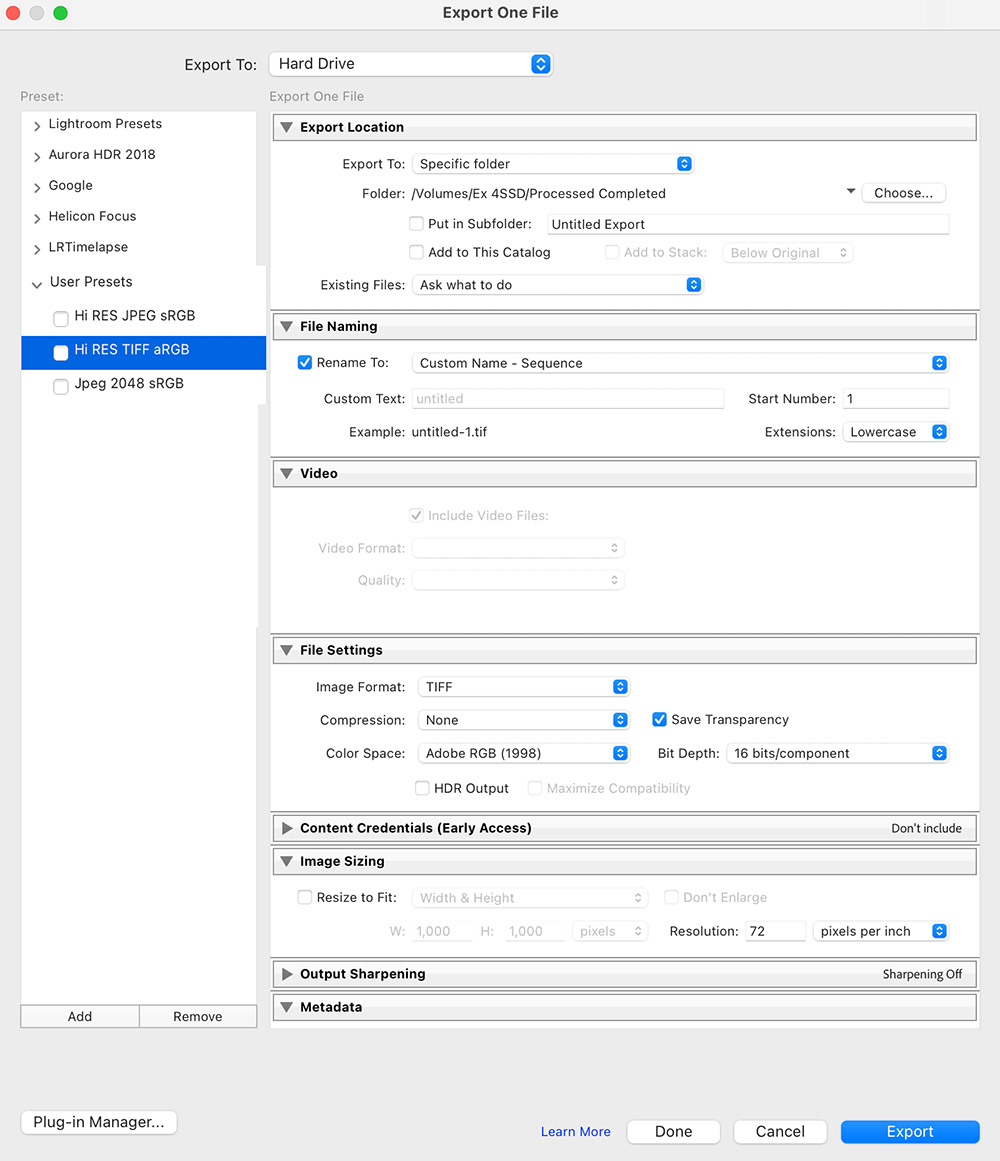
Create Export Presets. To Export my finished image I set it as a Tiff, 16bits, AdobeRGB and set the folder I where save all my Processed images (See Getting Organised). I enable Renaming so I can give it a name, along with Start Number. If I have more than one image from the same place to export, each will have a sequential number added.
Change settings required, click Add and give the Preset a meaning full name.

Lightroom Exporting Options
To overcome the issue of converting aRGB to sRGB (if you’ve decided to use aRGB) set up additional Presets. Here is my ‘Jpeg 2048 sRGB’. I set the folder I want it saving in, enable Rename, then in File Settings set the parameters I need. In this case I set Jpeg, sRGB, and image size to 2048 at 72dpi.
When exporting, multiple presets can be enabled at the same time, and before export you’ll be prompted to name each one.

Lightroom Exporting Options
This does give us an easy way, after setting it up, to export and overcome the challenge of remembering to convert images from aRGB to sRGB. Having said all this, I never export from LR. I always save an image from PS because I always finish an image in PS. It would be remiss of me not to mention exporting though.
NEXT – 4 PHOTOSHOP INTERFACE
Next we will explore the PS interface, discuss the layout and make some changes to make it easier to use.
