7 – PROCESSING IN PHOTOSHOP
The final steps in Photoshop. Strictly speaking we are now editing, not processing. In the next few sections we will discover how powerful PS is compared to LR and how useful it is for your workflow.
In the next few steps I am going to make further adjustments in PS, check the tones and brightness, adjust colour a little more to enhance some areas and importantly blend in the blown sky area which you cannot do in LR. Most of the steps are very simple and they are processes you should learn to apply to any image when needed. The key when processing and editing is having a clear idea of what you want to achieve, which is a little like putting the cart before the horse because you may not know what you want to do until you know what you can do.
In this section and the next few sections we will learn how to:
Use Selections and Masks.
Use Layers for Adjustments.
Use Adjustment Brush and History Brush.
Blend two images together.
Make targeted Adjustments such as colour and brightness.
Check colour and brightness with Auto tools.
Use High Pass for detail.
Transform sections.
Remove edge halos.
Blend exposure bracketed images.
Blend focus stacked images.
Stitch panoramic images.
IMAGE PREPERATION
We processed the main image in LR in the last section. Now we will blend it with another image, to demonstrate how it is done. Many times you will open an image in PS just to carry out some basic edits, cloning away debris or checking tones.
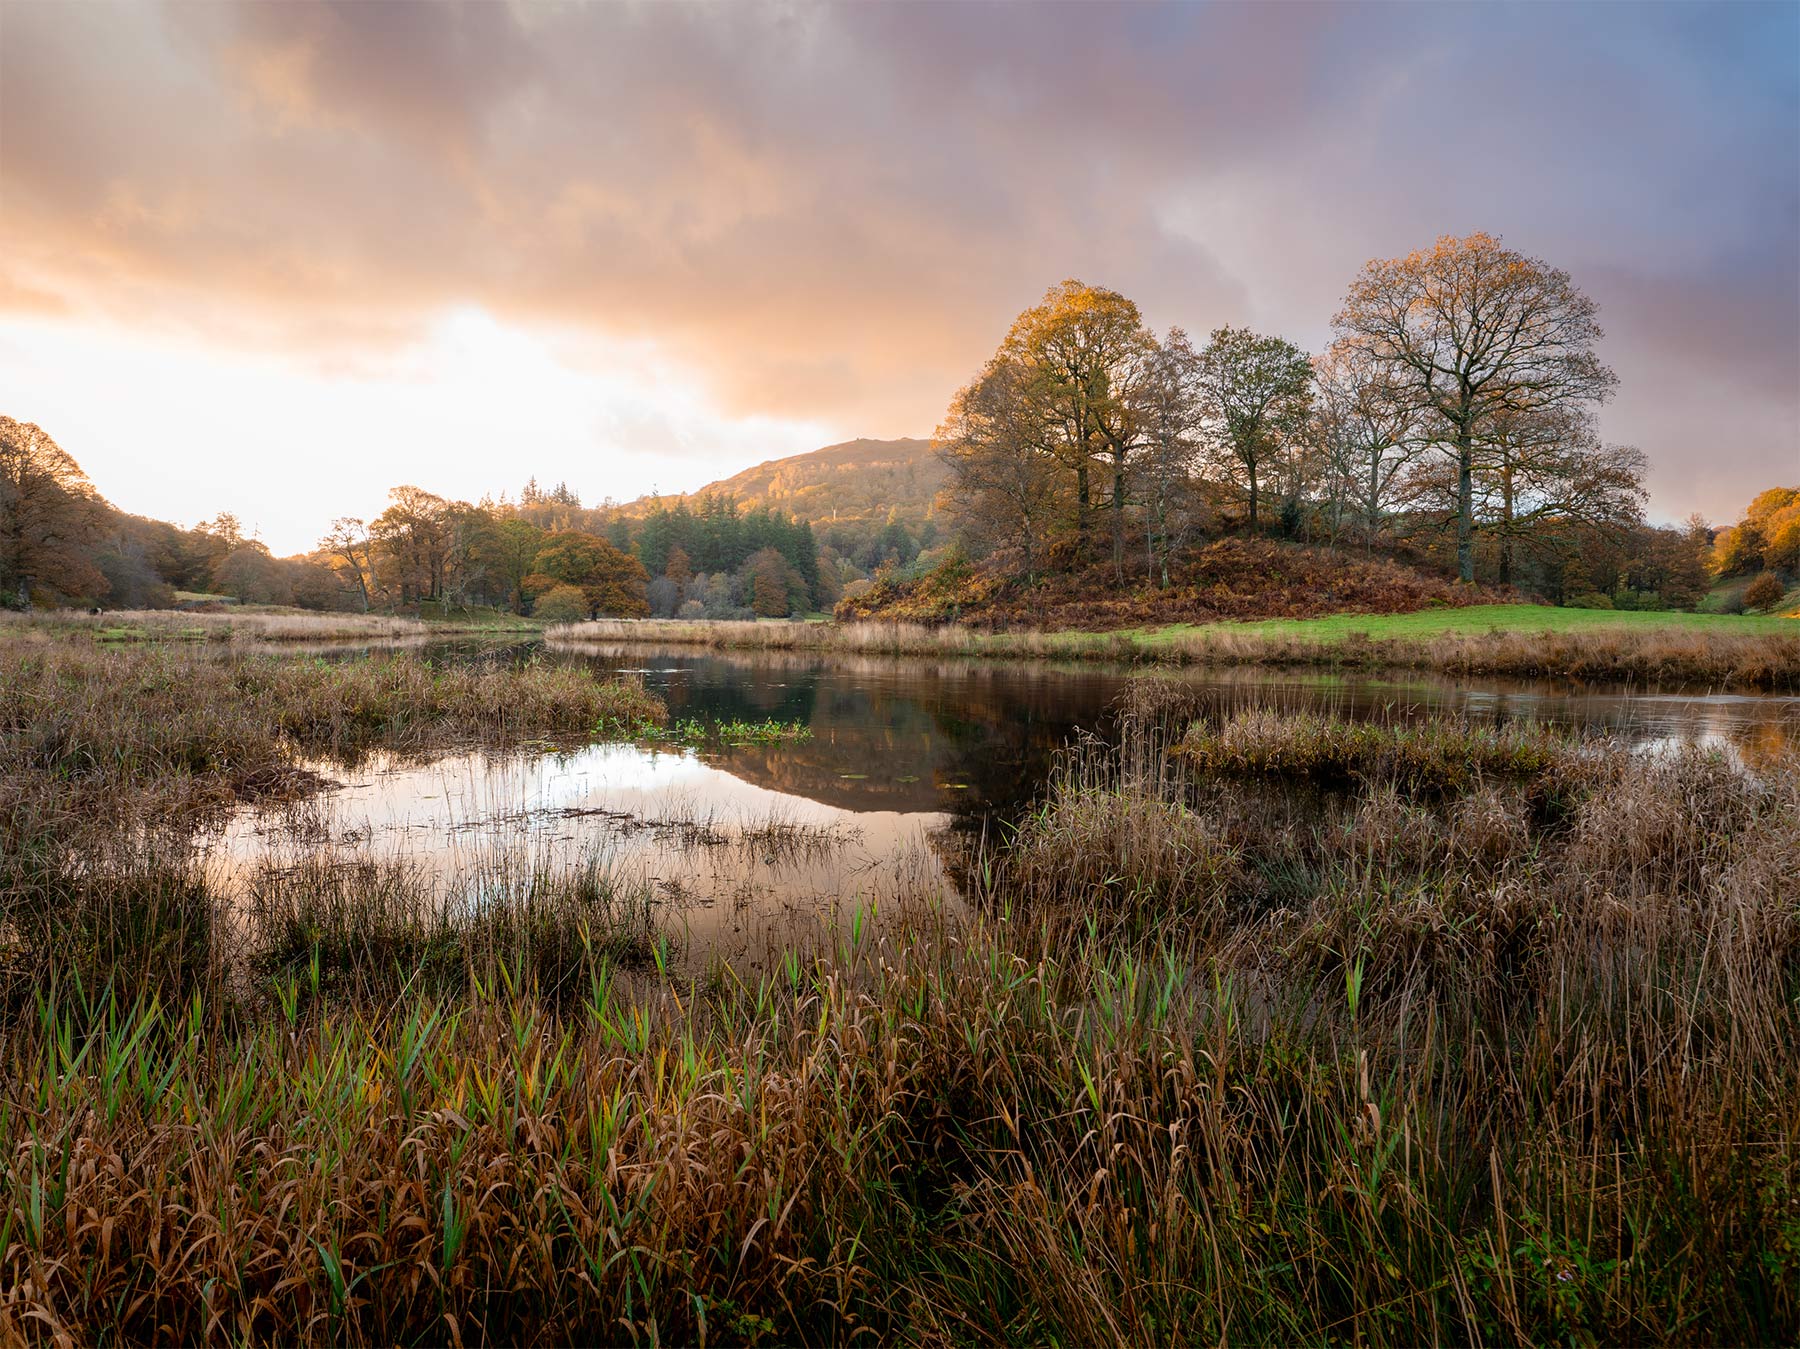
Processed Image
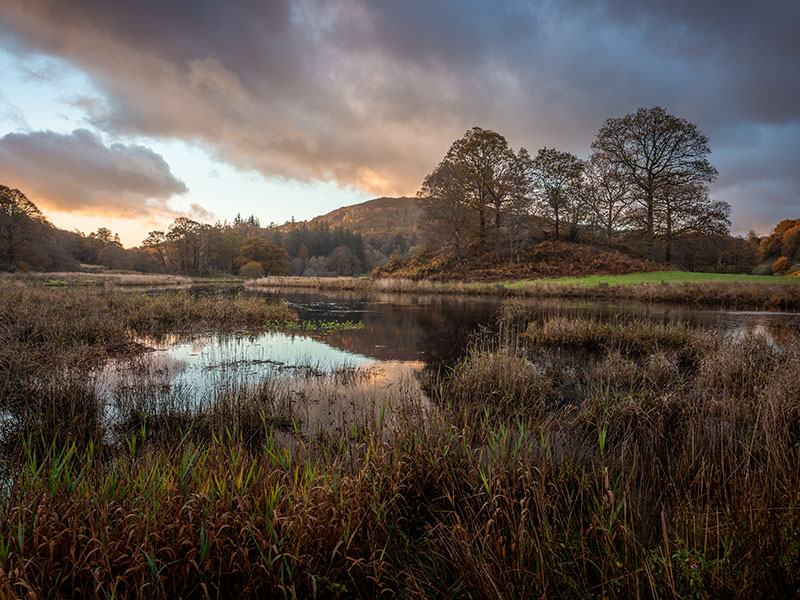
Alternative Image
The first image is the raw file processed in LR in the previous section. The sky was blown out on the left which was not an issue because I had another under-exposed frame to protect the highlights. I could process that frame and then merge them together, either using LR HDR, PS HRD / Photo Merge, or Manual Blending. We touched on LR HDR and will look at the PS options later, however I decided to manually blend because it does give more flexibility, and it is a useful technique to learn for many situations.
I also decided to use another image to blend in the sky. Why? The shape of the clouds gives a very good lead-in line into the frame which adds another dimension to the image. The first fame has more interesting highlights in the background so I can use these to blend together. It is manipulating an image but is it cheating? Not for me because the other frame was taken just minutes before, and there are many times I want to blend a part of another image in, especially with skies and water when it can be hard to control highlights. My standpoint is it is acceptable as long as you took it, it is the same scene taken at the same time, and it is not swapped out for a completely different image.
The second frame was prepared by simply copying the processing from the first image and pasting it. It is a little dark which I am not concerned with because all I’m interested in is the sky and the water which I will edit more to fit. One of the filters, the Sunset Sky made the sky far too warm so I switched it off so I can warm it up to suite the rest of the sky myself. I also need to blend in the water on the left to make sure the reflected clouds match.
PREPARING LAYERS
OPEN AS LAYERS
First we need the two images open in PS as Layers, so launch PS.
Filter the images in LR with a colour if needed so that only the two images are selected and Shift/Click to select, or Cmd/Click the required images.
Right Click and select ‘Open as layers in Photoshop’. You will see both images open in one document layered one over the other which you can confirm in the Layers Pallet. Switch the top eye icon off to view the lower layer to inspect. Layer order can be altered by simply dragging layers. The base layer will be locked which can be unlocked by double clicking.
Another way to layer images into one document if you have them open separately in PS is simply to copy and paste one into the other.
IMPORTANT- Remember to save your work. Perhaps until you are confident save it as a PSD so you can refer back to it later. Save it at various stages as you work. In PS Preferences make sure File handling>Automatically Save Recovery is enabled just in case you have a crash. I set 10 minutes.
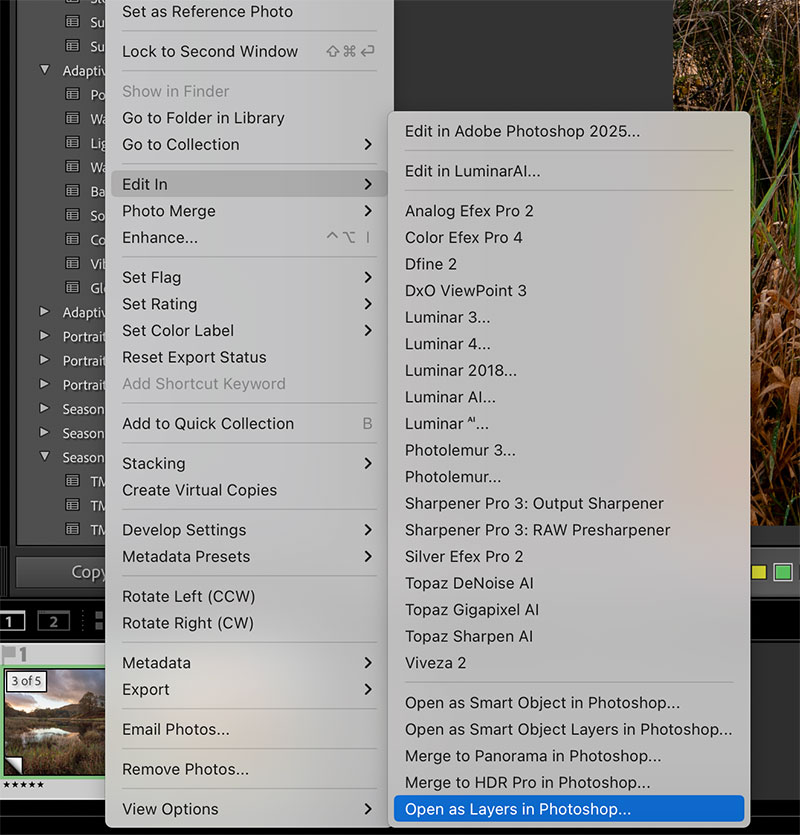
LR Open as Layers
AUTO-ALIGN
Both images should be perfectly aligned if you used a tripod. If not, make sure both layers are actively selected with Shift/Click and use Edit>Auto-Align Layers. Select Auto, Lens Correction is not needed because it was done in LR.
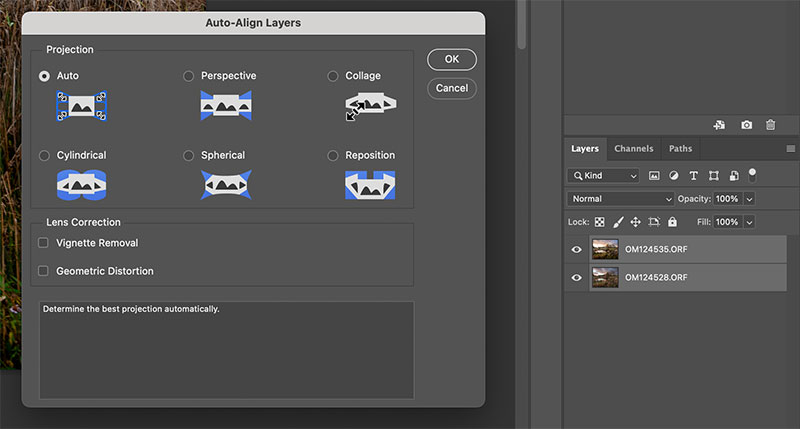
Auto-Align layers.
CROP OR STRETCH
You might sometimes find a crop is then needed. If it is very slight I prefer to stretch the image to maintain the original size which will not impact resolution or sharpness.
With both layers still selected click the Move tool (4 way arrow), make sure Show Transform Tools is selected and drag the handle out slightly. Repositioning can be done by Nudging with the arrow keys for pixel moves, or Shift/Arrow for larger steps.
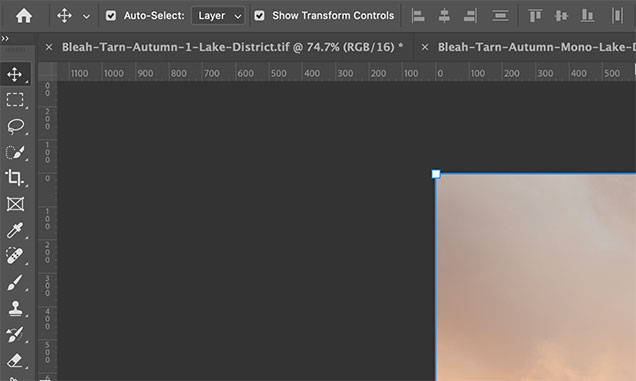
Stretch instead of crop.
BLEND THE SKY USING SELECTIONS AND MASKS
Selections form the basis of how we tell PS to choose specific areas to edit or merge with another image . There are many ways to make selections with various degrees of accuracy and complexity. We can use Quick Selections, Lasso Selections, Polygon Selections, Object Selections, Colour Range, Luminosity and even Sky. Selections can be refined by adding, subtracting, merging, feathering, expanding, contracting, inverting and even by combining selection tools. For instance a loose section can be made with the Quick Selection and added to or subtracted from with the Polygon Selection if there are straight lines. What’s more, selections can also be saved and recalled later should you need to reuse it. They are far more powerful in PS than LR.
Selections are simply an area we tell PS we want to work with. We then progress with using it to create a mask, or to make edits. If a selection is made and you then use Curves for example to brighten, it will affect the area selected on the image. This is therefore destructive because it is editing the image layer. We can do the same thing using and Adjustment Layer or Brush over the image therefore being non-destruction. More on this below.
SELECTION TOOLS
There are 3 main toolboxes with 11 tools in them making it possible to make just about any type of selection, and more under the Select Menu. Some you will find very useful such as those shown here and others you will rarely use. It shows how powerful PS is.

Selection Tools
SELECTION MODIFICATION
The screenshot here shows the Quick Selection Tool active. Note that the Context Sensitive Bar has updated based on the tool being used. Add, Subtract, Create a new selection, modify the brush etc. Keep an eye on the Context Bar because it is very useful, and clever.
You will also have available from the Context Bar ‘Select Subject’, a quick way to select a prominent object in the image, and ‘Select and Mask’. This is another mode available for selections which you may prefer.
Selections can be saved under Select>Save Selection. Recall a selection under Select>Load Selection. It’s worth saving a selection that has taken time to create. Inverting a selection is useful too; you’ve selected the sky, modified it and then want to select the ground, just reload the selection and Invert it to flip it the other way.
Under Select>Modify you can smooth, expand, contract and feather selections too.

Modifying a selection
→ TIP An area selected will stay active until you dismiss it. Active will be shown by dotted lines around the area called ‘Marching Ants’. It can be annoying until you understand you’ve told PS to make that area active and therefor only work on that area. To get rid of the marching ants and dismiss the selection just hit Cmd/D or menu Select>Deselect. If you cannot dismiss then you probably have a different tool active, make sure one of the selection tools is active.
SELECT SKY AND ADD A MASK
Select the sky with Select>Sky. The marching ants show the area selected and it has done a very good job. The spaces between the tree branches could be a problem for some images, however in this case I can ignore that area, it is the left side I am working on. It may be too hard edged, or have areas missing. For this I am happy, and I will add a mask to hide this sky and show the sky underneath into this image.

Sky selected.
Remember in PS white always shows, or reveals and black always hides. I want the original sky to be hidden and the sky underneath from the second image to show into this image therefore I want a black mask added to the selected area. White is always the default so to tell PS I want black I just press/hold Alt and then click the mask icon. If you get it wrong just click the mask layer icon and use Cmd/I to Invert it.
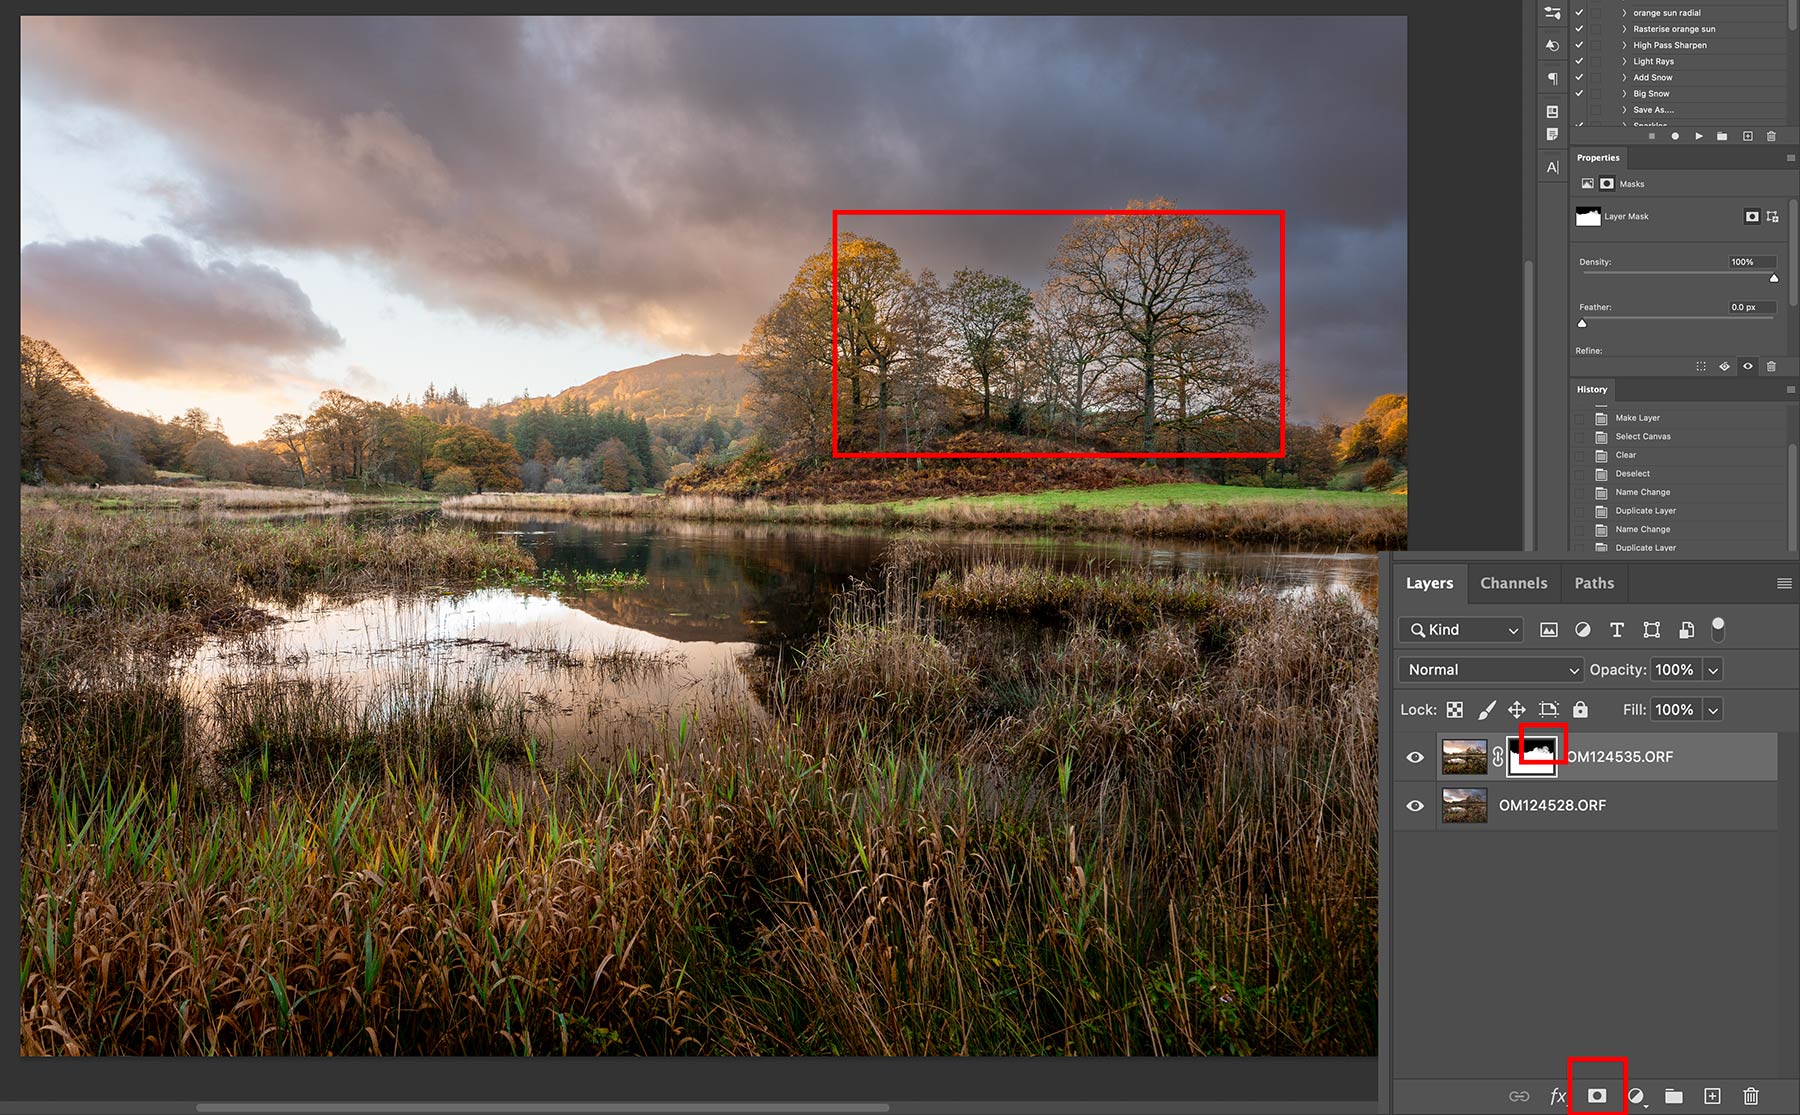
Mask Added
Click/hold Alt and click the Mask icon. Alt has told PS to add black and now the a mask is shown next to the layer thumbnail with black at the top and white on the ground meaning the sky is hidden, showing the sky underneath, and the ground is retained. The mask was added using the selection made.
I can see inside the trees it is a little bright. This is a very complicated mask and I could spend hours trying to do a better job than the auto sky selection. I can see on the mask where it is a little grey because the density of what is masked is less than what is not masked. Trying to mask areas like this would be incredibly difficult and sometimes the best approach is to be loose and fluid, do not try to be too accurate and instead think like an artist with a brush, not a technician.
Layer order and mask colour matters. This will sound really confusing so try it out until it makes sense. I have two images and one has just a very tiny highlight I under-exposed to blend in and it is the top layer in my stack:
- Add a default white mask, all the image with the highlight is still shown. I really do not want to paint all the redundant part of the image with black, around that small detail I want to keep, to hide what I do not want!
- Add a black mask (press Alt). Now I can use black to reveal just the small part of the image I want over the main image.
- OR, I could reverse the order of the layers, add a white mask to the main image now at the top, and paint with black to hide the part I don’t want and reveal the image underneath.
START BLENDING
Now the artistic bit. I want to start blending together the original sky and the new sky from the image underneath. Once a mask is added the marching ants disappeared so I can paint on the mask freely.
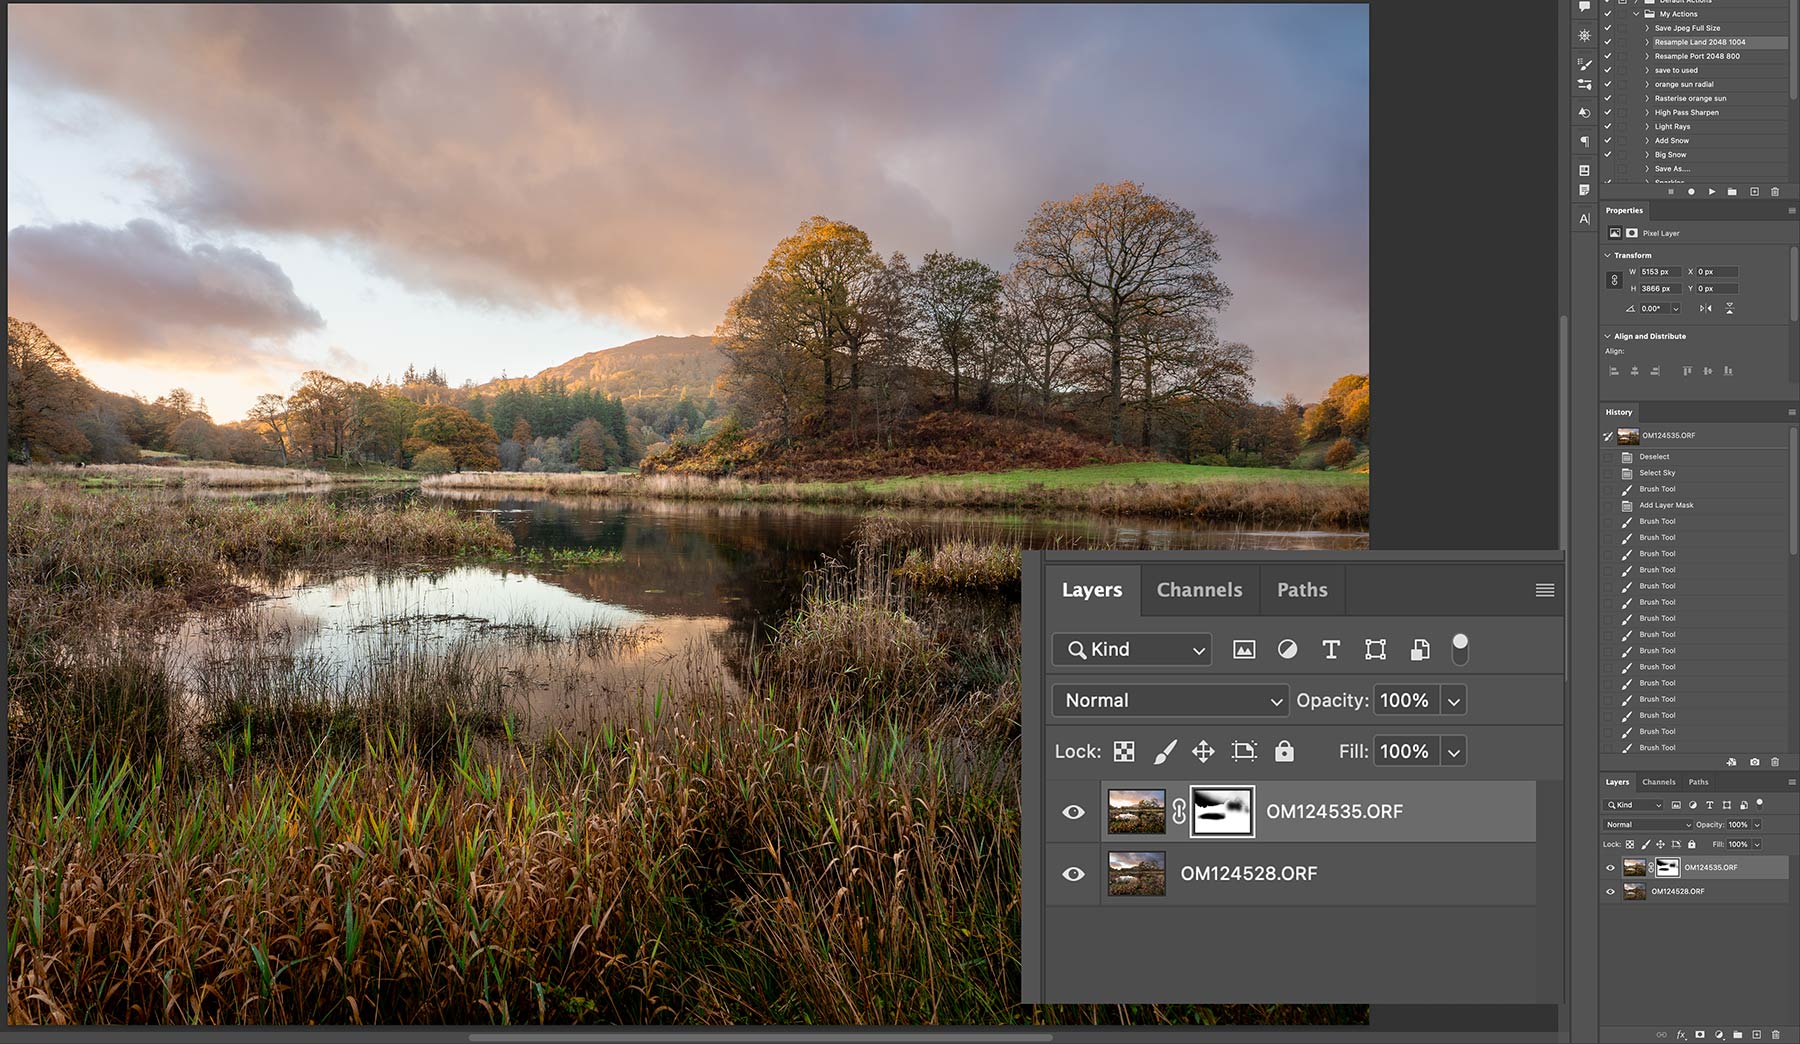
Painting on the mask.
The layers are enlarged so you can see the mask. Making sure the Mask is selected (click the thumbnail) I select the Paint Brush tool. Then with white paint I paint a little over the sky on the top right to bring back some of the original sky. On the top toolbar the options appear for brush softness, flow and opacity. Keep the brush soft, reduce opacity to around 40% and just brush over the area. The keyboard [ and ] keys allow quick size adjustments.
I swapped to black and painted over the trees very lightly to show part of the darker image underneath and remove some of that brightness. Then I again used black and painted over the water to show the image underneath, so the water reflection matches the clouds. Sometimes you’ll find areas where wind means detail such as tall rushes or grass doesn’t align. This is a problem inherent with exposure blending and all you can do is try to use the best parts of an image.
Go slowly, gently, softly, and use the History panel to go back if you are not happy with a brush mark. Adjust size and opacity as you go, and swap from black to white as needed. It is quick, although it make take you time as you get used to it. I pay particular attention to hard edges; there was a slight black edge in the hill in the background caused by the mask overlapping onto the darker hill on the bottom layer. All I had to do was zoom in and use a small brush to blend the top layer and brighter hill back.
See how much my mask has changed? I’ve removed a great deal of the black to bring back the original sky.
Once you are happy we can go to the next step. There are some choices with layers now, normally I would just flatten them into one. However keep layers for now, to retain the layers you can Stamp them into one. Click Shift+Alt+Cmd+E to combine visible layers into one at the top, but retain the layers underneath. Oddly there is no direct tool for this in PS, so if you forget the shortcut as I always do you can select Layer>Merge Visible while holding Alt.
SAVE
Remember to keep saving as you go.
MAKING ADJUSTMENTS
We can start making adjustments to the image, brightening, altering colour, softening etc. As you would expect with PS there are many ways which is why it can be confusing and why people have their own way of doing things. There are Adjustment Layers, Adjustment Brushes, and my way the History Brush. We need to understand each one and it will seem painful but bear with me, you will get used to them.
ADJUSTMENT LAYERS
The traditional method is using Adjustment Layers. At the bottom of the Layers Pallet click the Adjustment Layer icon and select the adjustment you need. A new layer is added with an icon indicating the type of adjustment with a linked mask. The mask will be white indicating it is all seen, it will affect the whole image so it is a global adjustment. Make adjustments as needed in the properties panel (dragged out for the screenshot), dragging the sliders where needed. I never use presets.
The eyedroppers are handy; black will set black point when clicked on the blackest part of the image, white the white point, whilst the centre eyedropper will set the colour tone.
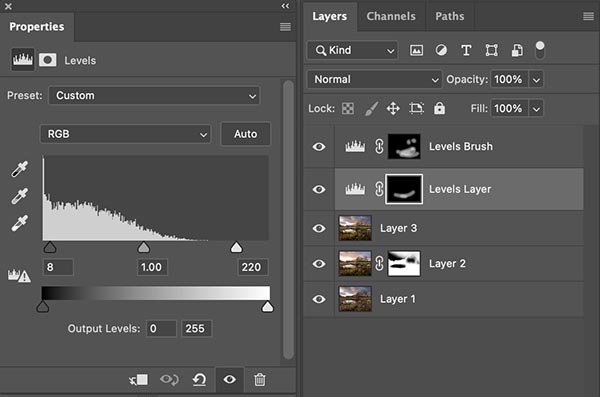
Adjustment Layers
It is a global adjustment and affects the whole image. To make it a local adjustment we need it black, so invert the mask to black with Cmd/I, then paint onto the mask with a brush and white paint reveal the adjustment back just where you want. Remember selections? If you want to be super accurate make a selection on the image layer and then on the mask paint to show the adjustment within the selection. The problem is that now the mask is black you cannot see what you adjusted over the whole image, it’s hidden. To solve it temporarily you could invert it back to white Cmd/I, or Shift/Click the mask icon and Disable it, click to enable again. Clicking the adjustment type icon will allow you to re-edit the changes you made. I find Adjustment Layers cumbersome to use when just a small change is wanted, but in some instances they are needed.
→ Pros and Cons Using Adjustment Layers gives compete control and they are non-destructive meaning the image itself is not being altered. You can go back and alter it at any time too. Varying the intensity of an adjustment is possible by altering the opacity of the brush on the mask, AND altering the opacity of the layer itself. Many layers can be built up, but so many layers can get confusing and out of hand, and it can be less intuitive being restricted to one adjustment type per layer.
Non Destructive-Can be Re-Edited
Masks are flexible and can be altered
Layer Opacity, Blend Mode can be altered
Layers can be built up gradually
Can be over complicated and slow to use
Only one Adjustment type per layer
Too many layers
ADJUSTMENT BRUSHES
The new way of using adjustments as layers is using Adjustment Brushes. They are in essence exactly the same thing as Adjustment Layers. The difference is that a black mask is automatically added and wherever you paint on the image the adjustment is immediately converted on the mask to show on the image.
All the same adjustments are available to use and they do save a little time. Click the brush and the Context Sensitive Bar updates allowing you to choose the adjustment type. They are again a global adjustment albeit with a mask to hide the adjustment already made, making the local.
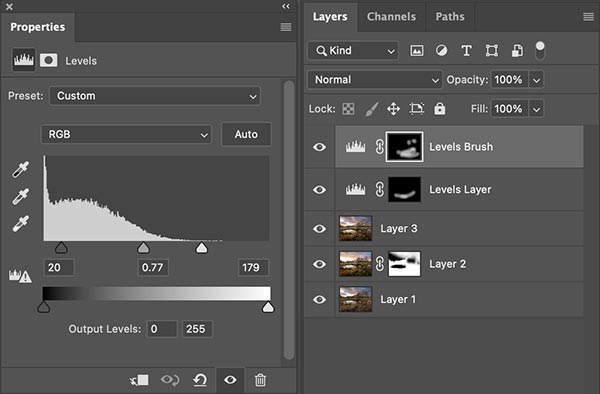
Adjustment Brushes
→ Pros and Cons Same as with Adjustment Layers, personally I see little difference, it is a different way to do the same thing. The good thing is having more ways to achieve the same result is always good and some may find it more intuitive. The one negative is because a black mask is automatically added you cannot see the adjustment until you use the brush. If you want to use Level to brighten you’ll have to apply a stroke, then adjust it to the level you want. To view it globally you’ll still have to temporarily disable the the mask. What is different is the same layer can be changed from say a Levels to a Curves, but only one.
All as per Adjustment Layers
A little more intuitive to use.
All as per Adjustment Layers
Cannot see adjustment until brush is used
HISTORY BRUSH
A different way to work is using the History Brush. Basically you make a global adjustment, undo it, and then paint it back just where you want it. It is fast, flexible, as accurate as you want or as loose as need, and you can swap between different adjustments on the fly. But it is destructive.
Here I launched a direct Levels, no layers, just from Image>Adjustments>Levels (shortcut Shift/Cmd/L) and make an adjustment on the image. In the History panel I step back to undo it, then click the box at the side of the state I just undid. After selecting the History Brush in the Toolbar I can paint it back adjusting the brush size, opacity and edge softness quickly and easily. I can make selections too if needed to be more accurate.
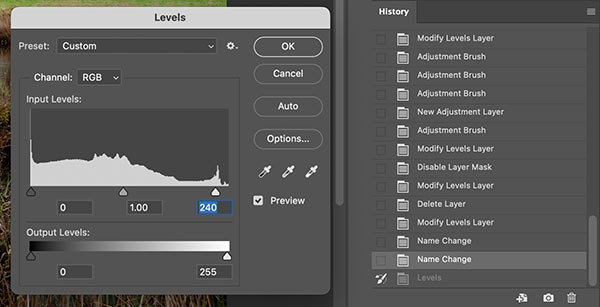
History Brush
→ Pros and Cons The History Brush is very flexible, I can paint back one adjustment or combine them, be freehand or use selections, adjust tone, then colour, then tone again just as an artist uses a brush. The big drawback is it is destructive, you are working on the image and you cannot go back and re-adjust like a layer.
Made an area too saturated? You can go back and adjust it with the history brush, but if you made other adjustments you will also be affecting those too. The only way to make it less destructive is to duplicate your layers as you work. I am a huge fan of how flexible it is, especially for making a simple small adjustment, but it takes confidence in what you are doing. You cannot just switch off an adjustment.
Very flexible and fast to use
Intuitive working like an artist with a brush
Loose and flexible or combine with selections
Destructive working directly on the image
Hard to go back and correct mistakes
Which is best?
As you’d expect there isn’t a ‘best’. Each have advantages; Adjustment Layers and Brushes are very similar, just a little different in approach and have the advantage of being able to go back and change again, or even remove. The History Brush is really fast and fluid and good for lots of changes on the fly, but it is harder to undo. the best approach is to recognise which is best at the time and use both.
ADJUSTING COLOUR
Back to the image and I am going to edit colour a little more using the History Brush. Until you are confident with it I would use an Adjustment Brush.
When using adjustments directly on the image layer they are all in the Image>Adjustments menu. Take a note of keyboard shortcuts and try to them to get familiar.
I make quite a few adjustments to colour, making the image warmer, giving a little more saturation to the sky, making the foreground grass more luminous and making the orange leaves on the trees more luminous.
With each of these adjustments I concentrate on the areas I want, ignoring the areas I don’t want. Then undo it, and paint it back with the History Brush in targeted areas.
Try it out. Remember this is working directly on the image. Or use and Adjustment Brush if you would rather have Layers.
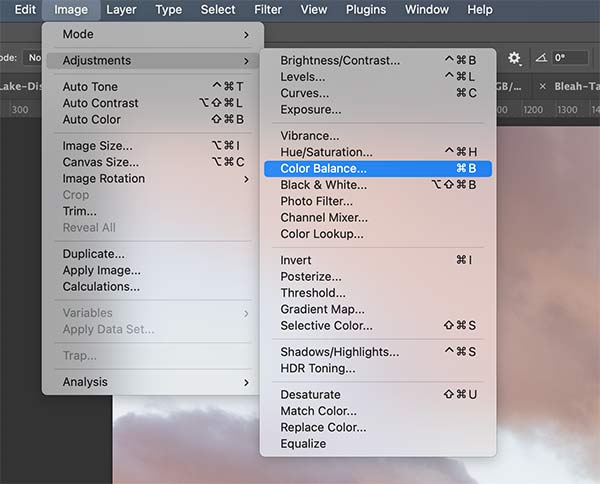
Adjustments Menu
COLOUR BALANCE
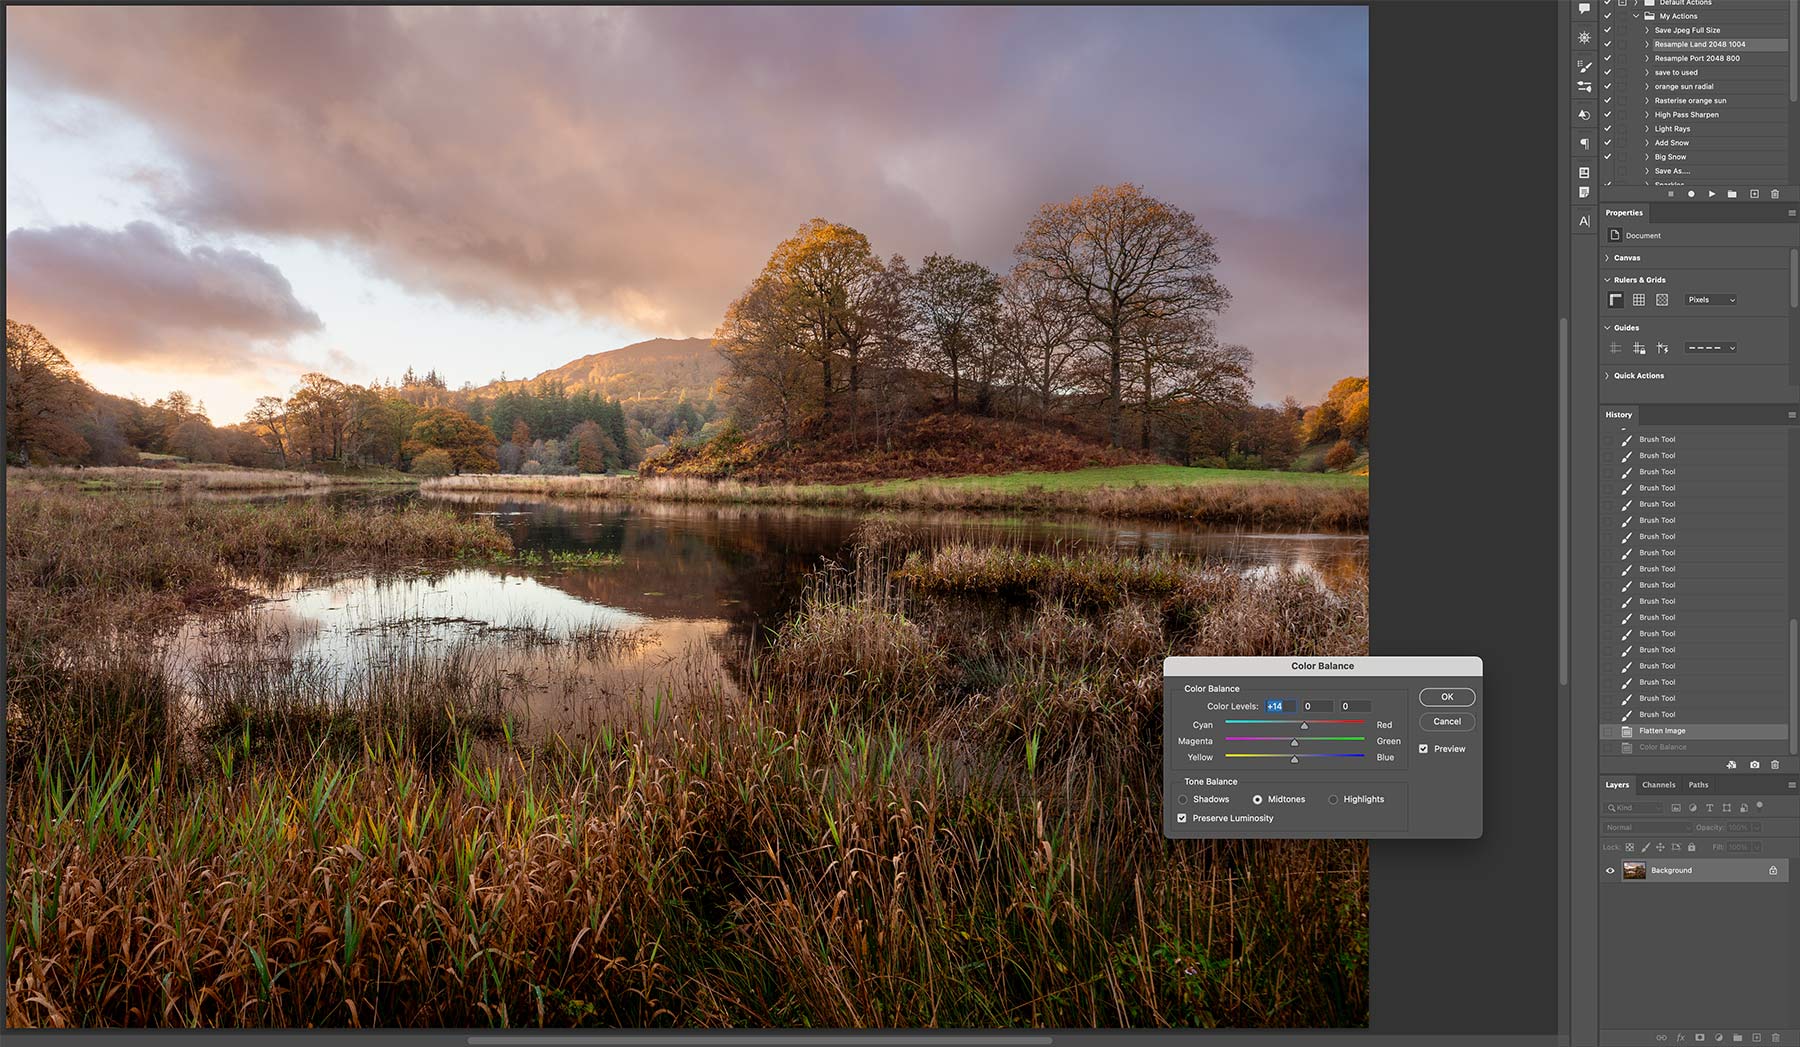
Adjusting Colour
I use Colour Balance and Hue/Saturation to adjust colours mostly. Both have advantages; Colour Balance will shift the balance in whatever way you like by adjusting the sliders and allows it to be targeted to Shadows, Midtones or Highlights. I use Colour Balance often, I do like how I can quickly target general colour and shift it the way I want and manipulate an image with the History Brush.
Hue/Saturation allows more targeted alteration of colour by selecting individual channels and altering the hue, saturation and luminosity. Using the History Brush means I can make quick adjustments, I can warm up an area, paint it in, then cool down another area very quickly. I’ve warmed up the image with reds a little, then increase saturation a small amount just on the sky. Make the adjustments, undo it, then redo with the History Brush, or use an Adjustment Brush for each one.
HUE / SATURATION
I then use Hue / Saturation for adjusting colour with more control in specific areas. Select the colour in the dropdown or use the finger icon to click on the image.
There are plenty of areas where I want to alter colour to make them ‘pop’, the reds in the trees and the hill in the background, and the green tips of the grass in the foreground. I can alter the saturation and note I also alter Lightness.
Lightness makes a colour lighter obviously, and it actually reduces saturation. If I want to reduce how saturated a colour is but retain luminosity I will often just alter lightness. If I want to make a colour pop I will make it lighter and increase saturation, not just saturate it because it just makes the colour denser but not brighter.
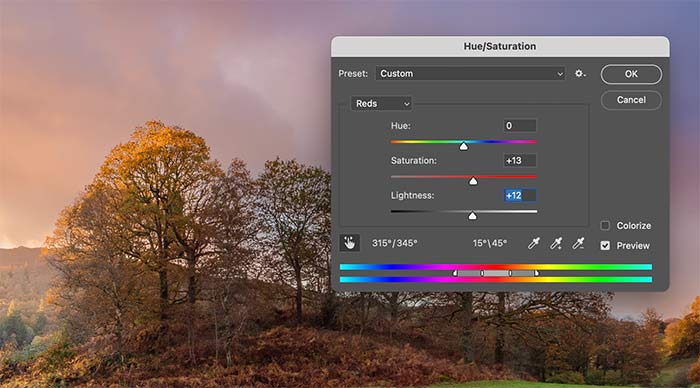
Hue / Saturation
Here I have have made the colour in the edge of the trees more vibrant with saturation and lightness.
What is really important is to follow the light. Where light hits objects the colour will be brighter not necessarily just more saturated, so I look for where light interacts with the scene and enhance it, sometimes even doing the opposite in shadow areas where colour will not be saturated, just darker. Hue will allow the colour to be altered too, a little warmer cooler. This is the same as LR Colour Mixer, and being honest the LR dialogue is actually better, though they do the same thing.
I want the green tips in the foreground grass to stand out more. Green is often more yellow than green, so I select yellow and increase lightness for more luminosity and saturation a fraction.
I use the colour channels adjusting as I need, then in History undo it and repaint it back with the History Brush. I can quickly start to edit colour the way I want without messing about with lots of adjustment layers. Remember it is destructive and this method is not for everyone, so stick with using Adjustment Layers/Brushes if you prefer.
VIBRANCE & SELECTIVE COLOUR
I rarely use Vibrance, I find it a little too much, but I do use Selective Colour. In the Hue/Saturation tool there is a Hue slider obviously. it can be limiting because you can only drag the slider one way or the other.
With Selective Colour we are able to target a colour and then refine the hue. Here I find some reds are not quite warm enough so I can alter that by reducing the Cyan. It seems complicated but it really isn’t, it is more case of playing and adjusting to suit. You may not even need to.
TIP – Press Cmd when any dialogue box is open and Cancel will change to Reset, allowing you to reset any changes if you want to start again.
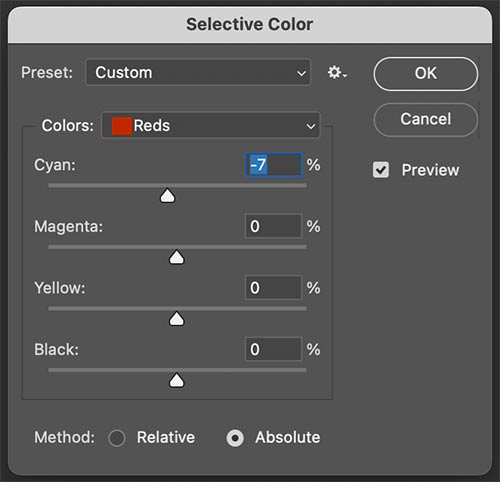
Selective Colour
ADDING SUN GLOW
I’m happy with the progress so far, all the colours are fine and the tones are fine too, they are a little dark in some areas which I have not adjusted yet because of the next step. I want to make the background where the sun is rising glow, which in turn will will alter where I add brightness levels in some areas. You have probably seen many images where bright light has a soft glow; light bleeds over darker areas and it can be recreated in your image.
There are quite a few ways to achieve this in PS. The crude way is just to paint on the image on a new layer and change the blend mode, then mask parts not needed. A more sophisticated way is to use a Radial Grad which is feathered. Select the Gradient Tool, change it to Radial and then edit the colours and the graduation range.
Creating a radial graduation to use as a layer for a sun glow can involve quite a few step, luckily I created one you can download and use as an action. When the layer mode is changed the colours look brighter and the black background disappears showing the image underneath.
Download it below. The Action is called ‘Orange Sun Layer’. Obviously you need to be on a computer to download so if you’re reading the eBook please visit the online guide.
It may save in your ‘downloads’ folder. Move the file into a folder on your hard drive so you know where it is, you could make a new folder for example ‘PS Actions’ so you know where to locate it.
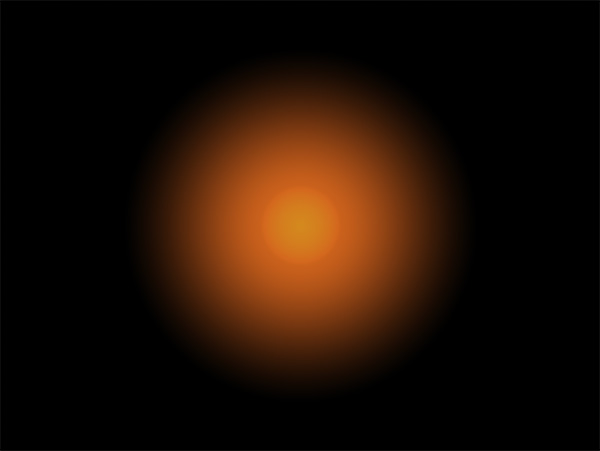
Sunglow Layer
LOAD THE ACTION
In the Actions pallet click the menu shortcut (three lines) and select Load Action. Browse to where you save the action and load it.
Now you will see the Action listed in the pallet which will play every time you click the play button, creating new layer with the sun glow radial graduation and with the layer mode set to Screen.
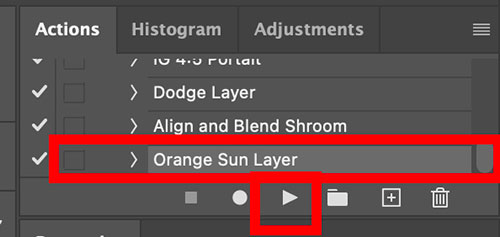
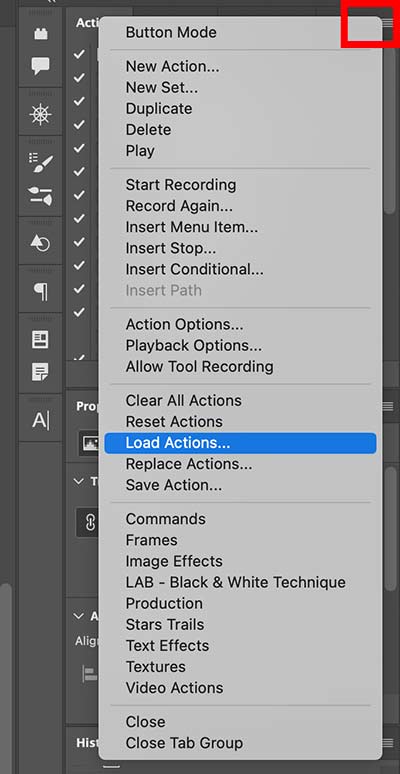
Load Action menu.
PLAY THE ACTION
Click Play and the layer is added. Notice the layer mode is set to screen which it transparent, hiding the black and making the colours more vibrant. The Opacity is also 100%. Ignore the layer underneath, I was going to show how to just paint on a layer the crude way but it really is crude.

Sun Glow Radial Grad added.
MOVE POSITION, AND MASK
Using the Move tool I reposition the layer to just over the horizon area.
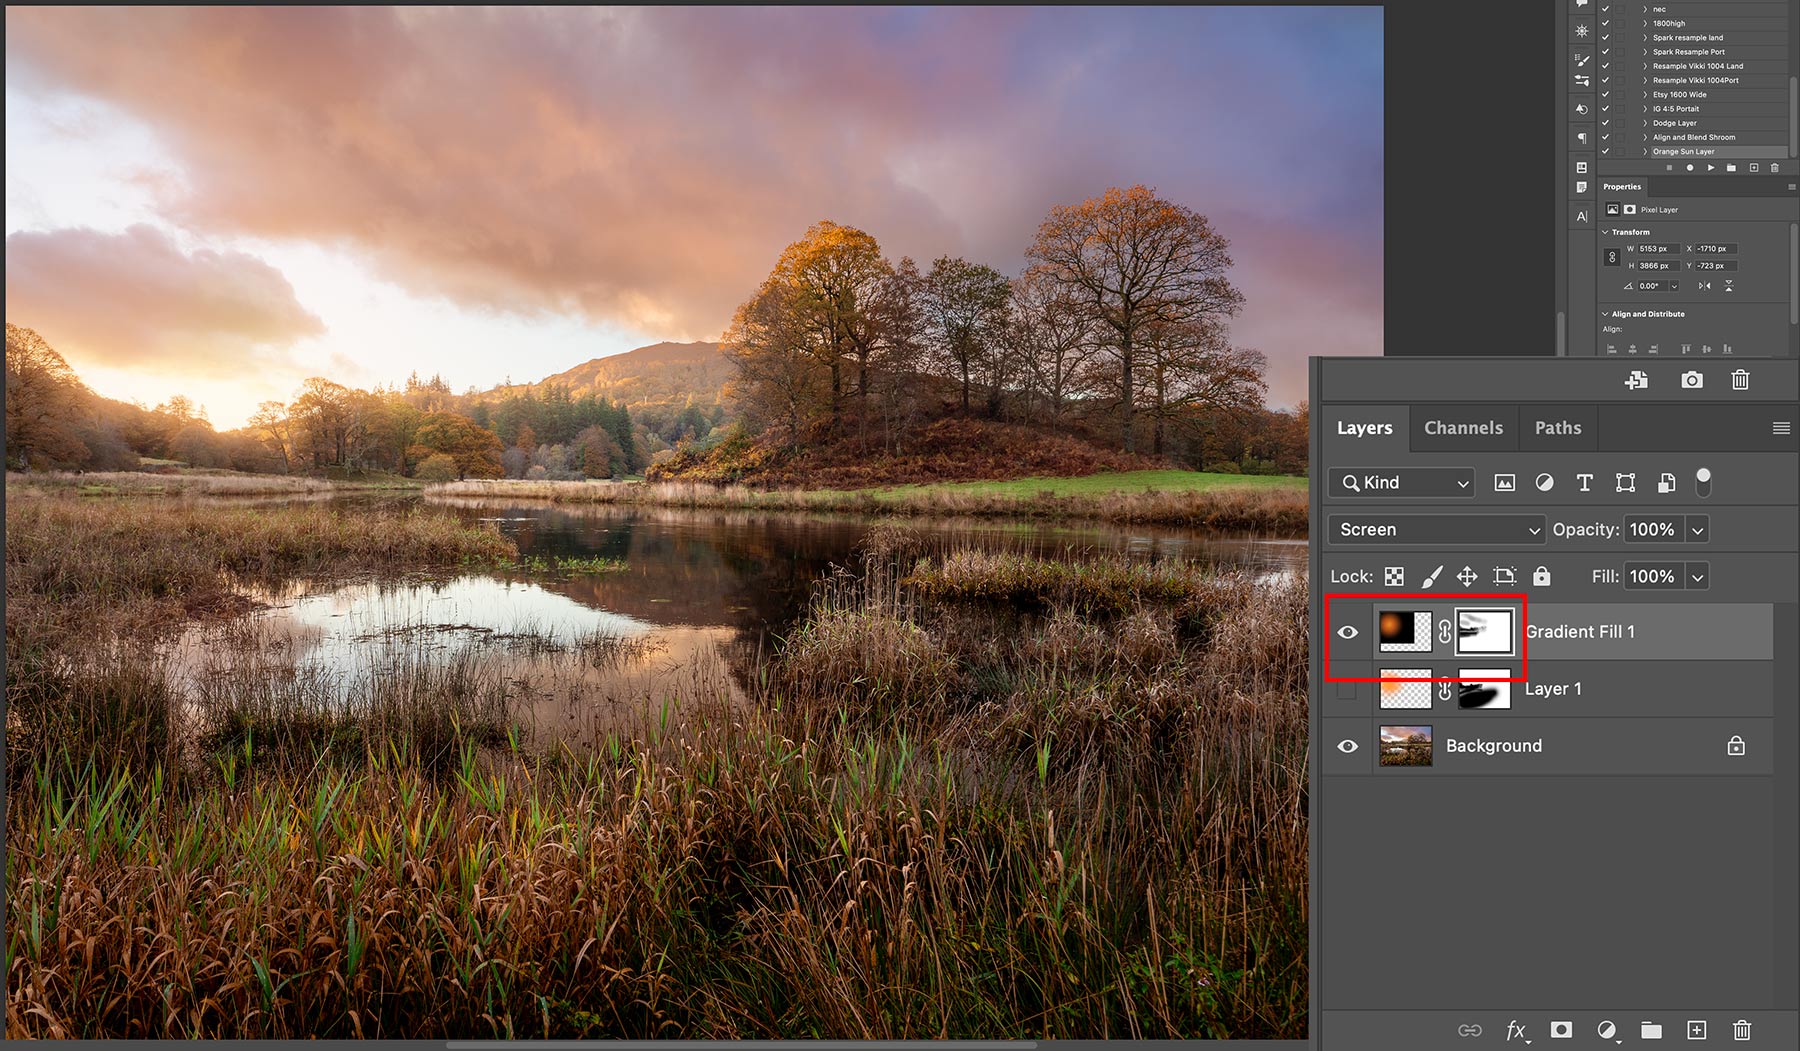
Removing parts of the glow.
We have a ton of options to manipulate the layer. Using the Move tool and the transform options I can grab one of the handles and alter the size, or pressing Shift at the same time I can alter the shape making it oval. I can alter the Opacity if it seems too bright depending on the image I am working on, I can even change the colour hue or saturation with Hue/Saturation.
On the mask I select the Brush tool (B) and start removing it from areas I do not want it in, parts of the sky and on the foreground. Alter size and opacity of the brush as you work. On some images I may want to be more accurate and use a selection first, especially if there are straight lines. The effect is very subtle as it should be, I just want some warm light to bleed over the tree line and the hill in the background. I could enlarge the sun glow so it overlaps the grass in the foreground and blend it so it looks like light is illuminating it too, but the key is to be faithful to the image; the sun is below the horizon and wouldn’t illuminate the foreground directly yet.
SAVE
Remember to save again. Flatten, or carry on with layers, whatever suits you.
ADDING DEPTH
The next ‘creative’ edit before I make final checks on tones and colours is to add some depth. What do I mean? When a scene has layers they’re usually separated by receding layers having atmospheric haze, getting lighter and with softer detail the further back they go. This scene already has some, the hill in the background is brighter because of the sunlight, but it is actually lighter with softer detail and less contrast because of the distance. The key is softer and less contrast.
I can recreate this and apply just where I want on the trees in the background. This is a useful technique because you can separate areas and increase the depth in your image.
There are quite a few ways to achieve it. Remember Negative Dehaze in LR? PS does not have a Dehaze so we cannot use it. Remember Camera Raw is LR so I can access it there. There is an easier way just using Levels or Curves, but it is worth pointing out that we can go back to Camera Raw (LR in a fancy frock) any time.
→ TIP We can use Camera Raw any time but there is an issue; select the image you want to edit in it and select Filter>Camera Raw. It will open allowing you to use all the goodies in there but any of your edits on Adjustment Layers ABOVE IT are not included, because they are layers. To rectify it Stamp your layers into a new one (Shift/Alt/Cmd+E or Layer>Merge Visible+Alt). Now use this to send to Camera Raw. Now I could send the image to ACR, use Dehaze, then apply a black mask to the entire layer and paint back to reveal just what I want to see.
LEVELS
Instead of Dehaze I’m going to use levels again. I could also use Curves, which in many cases is superior because it has much better tonal control. Levels is fine because all I want is a quick basic adjustment and it is simpler too. In the screen shot I have moved the darks Output Level up with the slider. It has the effect of reducing the amount of black in the blacks and reducing contrast, similar to negative Dehaze.
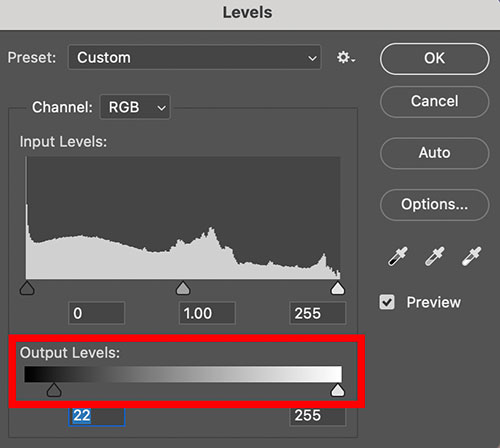
Reducing black with Output levels.
Should I apply it with an Adjustment Layer or an Adjustment Brush shown in the screenshot? It’s personal choice, as discussed I can use an Adjustment Layer, view what I am doing and then invert the mask to black (Cmd+I) or use an Adjustment Brush. Again I cannot see what the adjustment is straight away unless I Shift/Click to disable it temporarily. Notice my layers show Background Copy? I flattened it and then duplicated it, if I’m working on something complicated I will retain layers until the end.
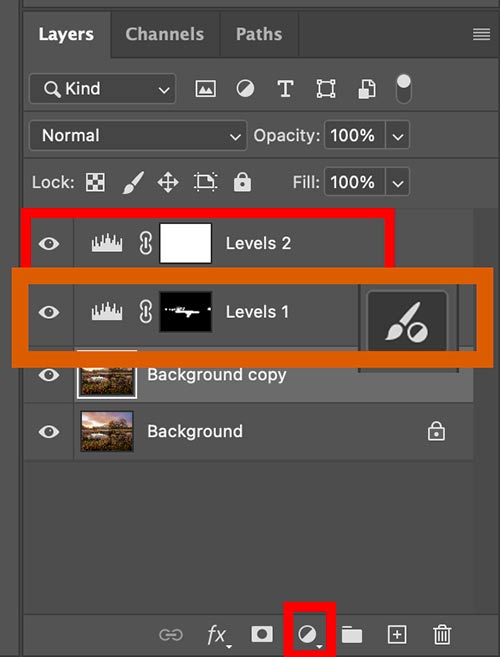
Layers
I went ahead with the Adjustment Brush and painted with the brush where I want to reduce the blacks and therefore the contrast too, similar to negative Dehaze. The mask icon shows where I applied it, around the trees in the background and along the edge of the water and the black tree shadow. I can swap between black and white paint adjusting it on the mask until I am happy.

Before Top, and After, Bottom
Can you see the difference? In this image it is very subtle as it should be. I painted on the trees in the background on the left, less so on the group of trees. Now the small oak and the large main trees have more depth because the fir trees between have less contrast, pushing them back. It is almost as if there is a feint mist. I softened the contrast under where the sun is rising, and also the dark shadow of the main tree which separates it from the tall glass in the foreground. Very subtle, but the image requires it. In a different image I would perhaps be more aggressive with this technique.
FINAL STEPS
Almost finished now, my final steps are normally to double check my black and white points just in case something has gone awry, check if I want to make any more adjustments to colour saturation, hue or brightness, and to check Auto settings. Auto? After all that? Why not, sometimes it can catch errors.
I went and had a coffee. Take a step away and have a break, come back with fresh eyes. I decided I need to adjust colour again so I want around the image and just made a few tweaks to colour where I wanted. There was some green in the foreground that was too vivid so I desaturated and darkened the luminosity. It also made me realise the greens in the firs in the background were too strong. Instead of using any adjustment layer I just did this by eye with a direct adjustment, undid it and painted back with the History Brush.
The bottom of the image was a little too dark, shadow had become a little too blocked in. A quick fix is the Shadows/Highlights adjustment. Oddly there isn’t a layer for this so I just altered it the same way, applying it and undoing and then paint back just where I want it with the History Brush.
BLACK / WHITE POINTS REVISITED
Again using Levels I check the black and the white point.
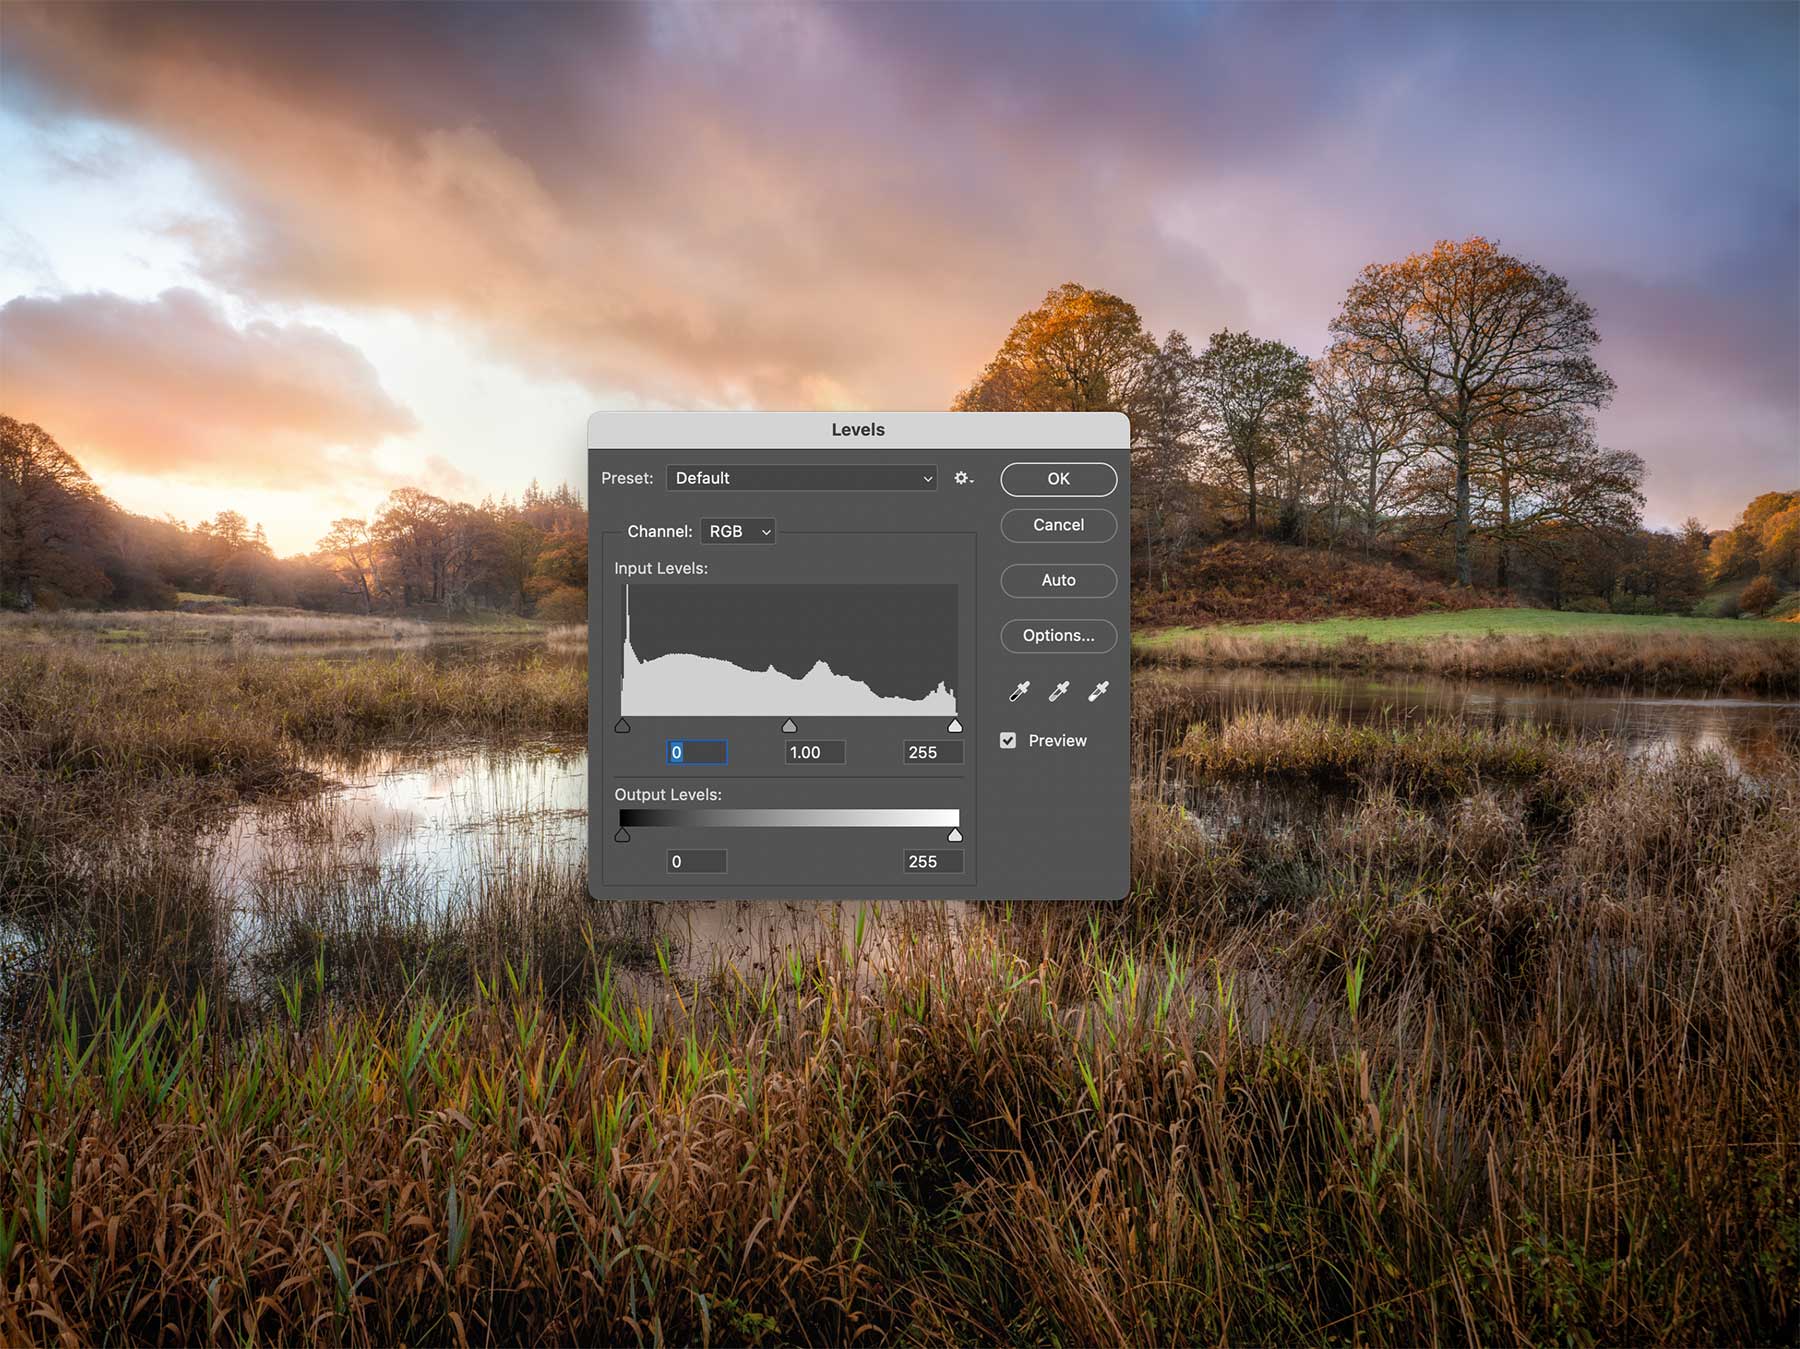
Checking Levels
I know they are fine but I check anyway. I’m looking for a gap between the white slider arrow and the histogram, and the same with the black. If there is a gap it means there is no information so I would move the slider arrows up to just touch the Input Levels histogram and improve contrast and tones. This is fine though.
I can also use the eyedropper to click the white and the black, but there is another way as below.
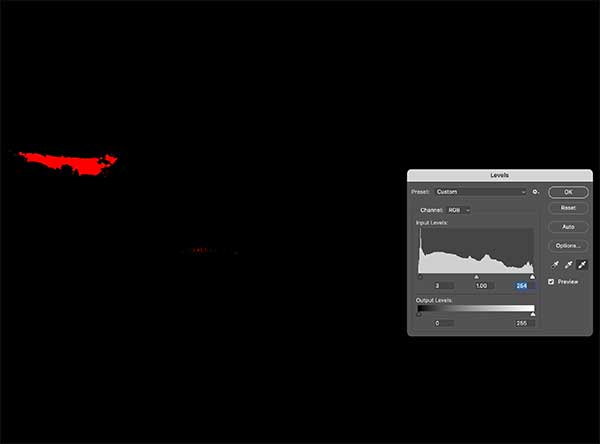
Check White Point
To check white point I use the mask overlay. Moving into the image and holding the Alt key the image will turn black. I should see where the whites are just starting to show, if not I can adjust the slider. If I click with e eyedropper where the tone is just starting to show it will correct any colour cast.
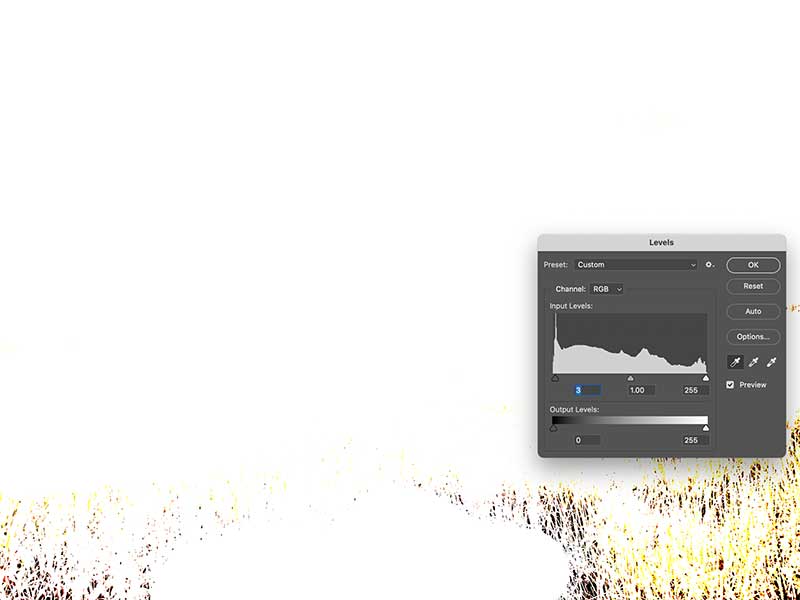
Check Black Point
Similarly I do the same with black clicking, holding the Alt key and watching what happens with the image area. I want to see blacks just starting to show. The histogram is telling me the blacks have clipped. Checking closely there is about 10% of the height that has clipped. I adjust it slightly and decide it looks false with no clipping whatsoever so I accept a small amount of clipping.
AUTO CHECKS
In the Image Menu we have Auto Tone, Auto Colour and Auto Contrast. They are handy to check because sometime they will find an issue. They are algorithmic, PS automatically analyses the image and makes adjustments accordingly. There are no Adjustment layers or brushes unfortunately. Sometimes doing a quick check will reveal where you have gone wrong somewhere, sometimes it is dreadful and you’ll wonder what on earth PS is thinking. You don’t have to accept it, and you can always accept it just in part with…the History Brush.
A BIT OF BLUR
Last I am going to add a bit of blur or softening with a technique called the Orton Effect. Basically it involves blending a layer that has been blurred with a layer that is sharp and creates a very soft dreamy effect. If you have not heard of it you will have seen it, and it’s true to say it has been thrashed to death. Over-done and it looks dreadful, but used sparingly it can be very effective. Please don’t add this to every image, I am using it here to show the flexibility of PS and it only suits some images.
→ TIP We need a copy of the image to work on. If you have preserved layers the best way is to stamp all visible into a new layer Layer>Merge Visible+Alt. If you flattened layers we can simply duplicate it by dragging the layer to the + icon.
On your stamped or duplicated layer we will turn it into a Smart Object (Layer>Smart Object>Convert to Smart Object).
SMART OBJECTS
What are Smart Objects? This is the first time we have used them and they are simple to understand. Converting a layer to a Smart Object turns it into it’s own file and anything you do to it will show, but will not affect the original image, therefore it is non-destructive and can be undone or altered again. They are powerful in this way, for instance If I was working on a graphic layout such as a poster and introduce another image as a layer, then reduce the size of that image, I can later increase it again without the resolution being destroyed as it would if not a smart object.
A Smart Object has advantages in a complicated workflow where many layers are used, and adjustments are stacked with that particular object allowing them to be revised. The disadvantages are they are memory hungry and can slow PS down (pc spec dependent), and quite a few tasks cannot be applied; we cannot use brushes, including Adjustment Brushes, Clone Stamp, Healing, Remove, Dodge and Burn, History Brush, or any of the tools and edits directly affecting the image because they are destructive, and a Smart Object is non-destructive. Full disclosure, you can in a way. Double click the smart object and it will open in a new window allowing you to edit it in anyway and when saved the smart object is updated. But then those changes cannot be altered, much the same as just duplicating a layer.
I have not introduced Smart Objects until now because of the limitations of not being able to use Adjustment Brushes, History Brush, or cloning and spot removal we will often do. The workflow to this point is actually very straight forward and once you are familiar you will realise how quick it is, and there are few points when a Smart Object would have really added any benefit. It will be useful here because I will want to adjust it a few times.
In the layers Pallet the stamped or duplicated layer is now a Smart Object indicated by the icon over the thumbnail, and a mask is applied. Any adjustments we make will be shown as a Smart Filter which can be switched on and off by the eye icon, and re-edited at any time. Note these are different to an adjustment layer because they do not have individual masks. Add a mask to the smart object.
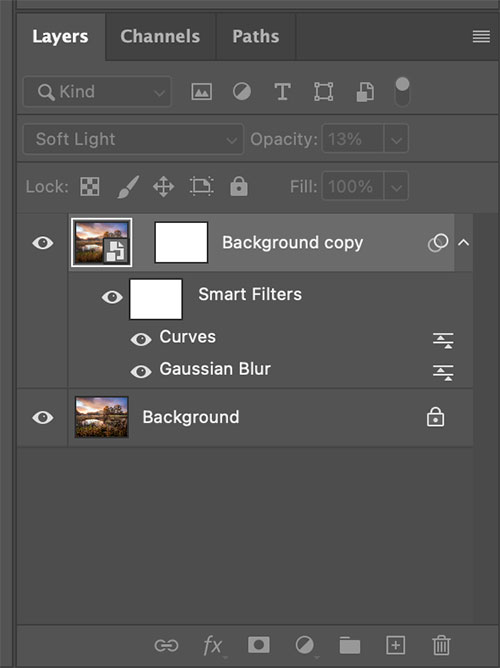
Layers for a Smart Object
In Filter>Blur select Gaussian Blur. A rough rule is to set the pixel size to the same size as your camera megapixel, in my case 20. It is going to be completely out of focus which is fine, the layer blend mode will correct it.
Now add another adjustment which will be used for increasing contrast, either Levels, Curves or Contrast either are fine. Don’t worry about the adjustment itself yet.

Gaussian Blur Filter
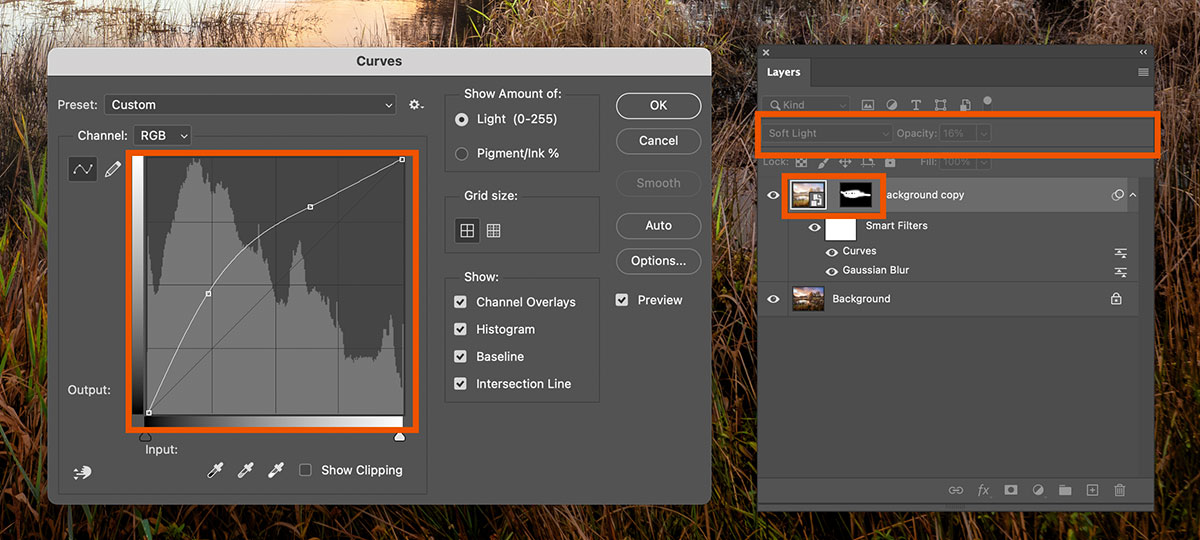
Changing Blend Mode and Masking
Now the crucial part, with the smart object selected change the Blend mode of the layer to either Soft Light or Overlay (indicated in the box). The effect is far too strong so now alter the Opacity to what looks right to you. I turned it all the way down to 16% which gave me a very subtle soft glow. Then adjust the curves again to what suits. Rather than increasing contrast with brighter brights and darker darks which is what contrast is, I made the brights and the darks brighter by dragging the curve up.
Notice the layer mask on the smart object layer? I can Invert the mask to hide the effect on the whole image and then with a white brush just paint on the mask and add it back to where I want, mostly just on the background trees and avoiding the main trees and foreground. I can go back to the Curves and Blur and readjust if needed.
ADVANCED STEPS
The method above is fine for a small area when I don’t need to be so precise. An Orton effect when used well gives a soft pleasing effect, especially for this type of image. Lights will glow and bleed into darks which is fine, but darks can sometimes bleed into lights which will look odd and is especially noticeable when used on a whole image. We can correct this very easily.
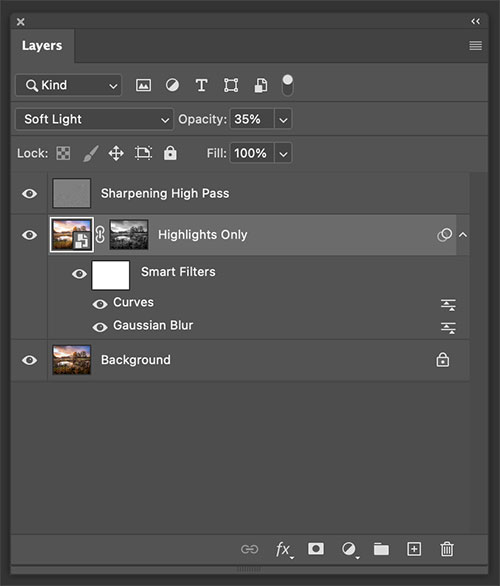
Constrain Orton to Highlights Only
To constrain the effect to just highlights first delete the mask, we will add a new one.
Go to the Channels tab of the layers panel and press Cmd/Windows Click the RGB thumbnail. Marching ants will appear indicating that highlights have been selected.
Go back to the Smart Object icon in the layers and just click the mask icon to add a mask. Notice on my mask how different it looks, I renamed Highlights Only. It looks almost like a negative or a black and white because now only the the highlights have been selected and the darks are removed.
I can obviously paint on the mask and remove it in areas if required, and because just highlights are affected I can increase the opacity a little more.
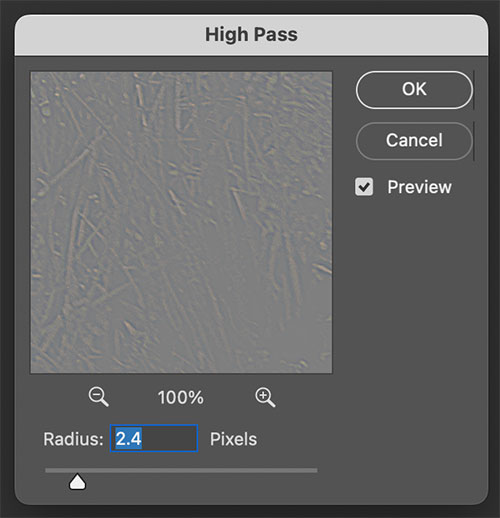
High Pass for detail.
HIGH PASS FILTER
You may find some detail has been softened and need to recover it. High Pass is the best way, in fact this is a great way to increase detail and sharpen, without sharpening which tends to introduce halos and noise.
You need a duplicate of the main image, not the smart object so drag it to the plus icon, then drag it to the very top layer. Next go to Filter>Other>High Pass and set the radius to between 2-3 pixels. The layer will be just grey because the layer mode is Normal.
Change it to Soft Light and see how much better detail looks, without destroying it trying to sharpen. Sometimes saturation can be affected, if so just desaturate the High pass layer 100%. Again because of the power of PS you can alter the opacity of the layer if needed, or even add a mask and remove it from areas.
SHARPENING AND NOISE REDUCTION
You should not need to sharpen at all now, it was done in LR at the beginning. if you do need to sharpen and have not used the High Pass Filter I would use that first, otherwise use the Smart Sharpen in Filter>Smart Sharpen.
There are options to try such as Motion Blur and Noise Reduction too. Do not set Pixel radius above 1, nothing looks worse than an image that is over-sharpened. And remember when pixel-peeping at 200% you will find detail that doesn’t look right, so just don’t do it.
Similarly with Noise Reduction, if you need to reduce noise that was ok when we applied AI Noise Reduction in LR it means you have gone too far with the edits. As this is no longer a raw image we cannot access the AI noise reduction again in Camera Raw. Photoshop does have a Noise Reduction filter which you can try. Duplicate a new layer first, then be very careful with the settings, aggressive noise reduction can and will reduce detail and make things look plastic.
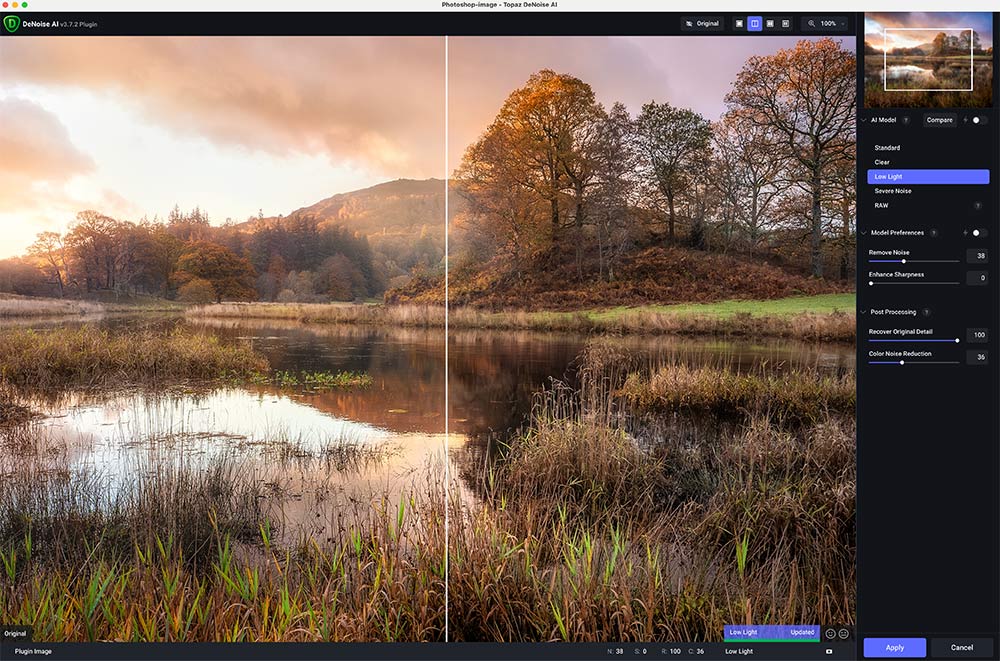
Topaz Denoise
Sharpening and Noise Reduction have never been the strong points of LR or PS. As said before it has been massively improved with AI Denoise and PS Smart Sharpen has got better. If I find I have introduced noise I prefer to use Topaz Denoise. There is a cost for it of course, as all applications. It can be installed as a plugin to PS and accessed with the Filter Menu or set with a keyboard shortcut. Run it on a duplicated layer and select the most appropriate option, Standard works well though it will also sharpen even with sharpening reduced to 0% whereas Low Light will not.
COMPLETE
We are finished. You should have already saved your image many times as a Photoshop Document (PSD) which will preserve your layers for future reference. I tend not to do this unless it is an image with lots of layers that will take some time such as one of my Glowing Shrooms images, or a Minimal Mono. Most times for a landscape I just flatten it and save as a Tiff, in my Processed folder.
Did you create an Action? If not go back and review the previous section. I would now use my action which will save the image as a full size Jpeg, and two resampled Jpeg images. You can of course do it manually, saving to whatever you need. What matters now is making sure you have saved the image and archived it in whichever file type you want.
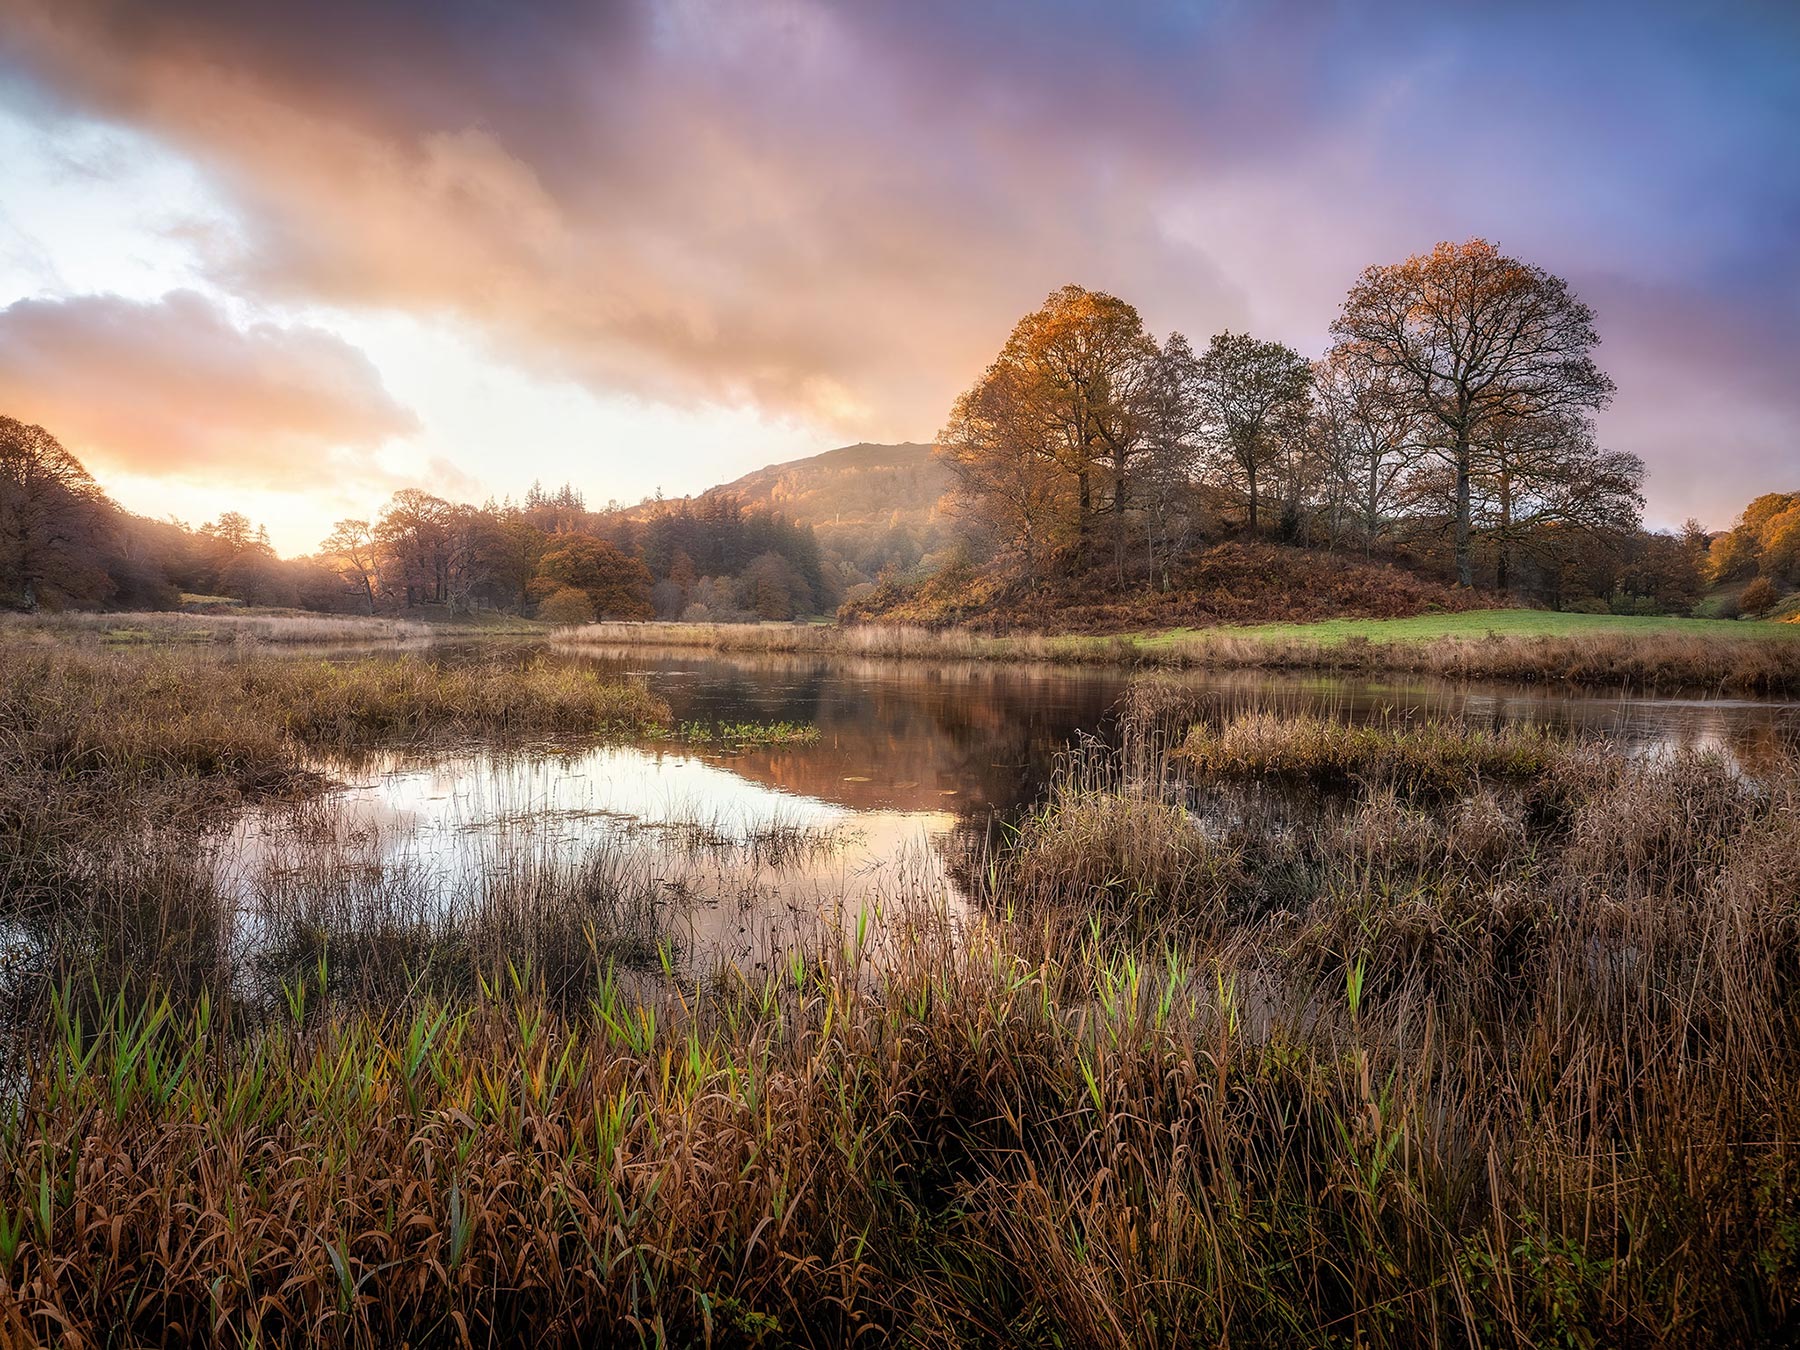
Completed image
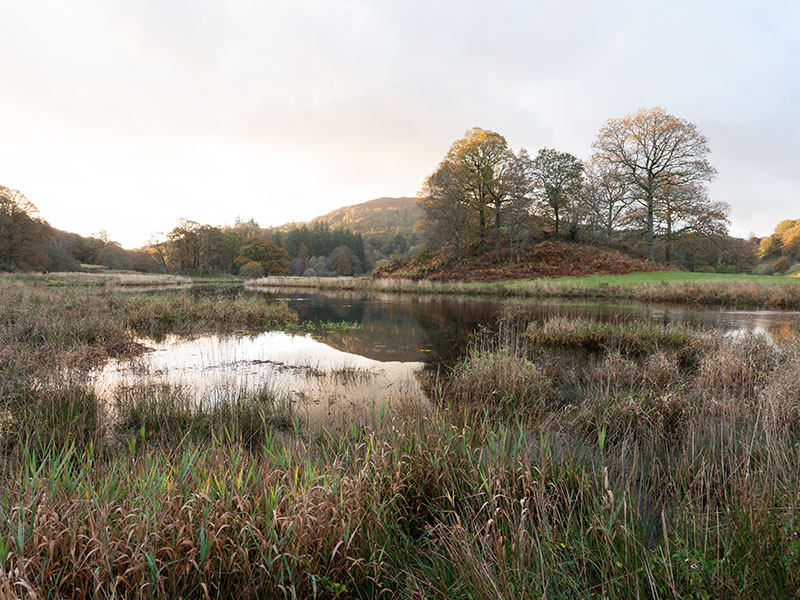
Original Raw Image

Image processed in LR
A REVIEW OF THE IMAGES
The original Raw file compared to the image processed in LR and the final image from PS. We have come along way. In PS we have learned how to use layers and masks, how to blend two images together, use adjustments both as layers, as brushes, and how to use the History Brush to work intuitively. We have also explored how to use techniques for adding depth, adding glow, editing colour, and advanced techniques for using special effects such as Orton Glow, and High Pass for sharpening. All of these techniques will help in your PS processing.
NEXT – 8 SELECTIVE EDITS IN PHOTOSHOP
The next Section we will again exposure merge two images, learn how to remove dreaded halos and how we can manipulate a foreground.
