
CUSTOMISING BUTTONS
Setting up your first set of buttons on the OM1-MKII
In the previous section we went through the main menu and set it up accordingly. Now we will look at how to set up the various buttons on the OM1-MKII, the options available, and how to change them. They will form the defaults for the standard PASM modes and the base for your Custom Modes.
FAMILIARISE YOURSELF
First get to know which buttons can be changed and how to do it, it is actually very easy.
→Cog Menu 1. Operations/Button Settings.
From here you will see buttons we can change. Note the Lens Fn button can be changed and also the additional battery grip if you use one.
Also important to note are buttons and functions which are not available. Some would make little sense to change and others would be dangerous. Imagine changing “Menu” and then not being able to access it?
⊗ ITEMS NOT AVAILABLE TO CHANGE
Menu
OK
Info
Playback
Top Mode Dial exc. C1-4
Left Button Set – AF/Metering
Left Button Set- Drive/Timer/Flash
Direction Pad Up
Direction Pad Left
‘OK’ Button
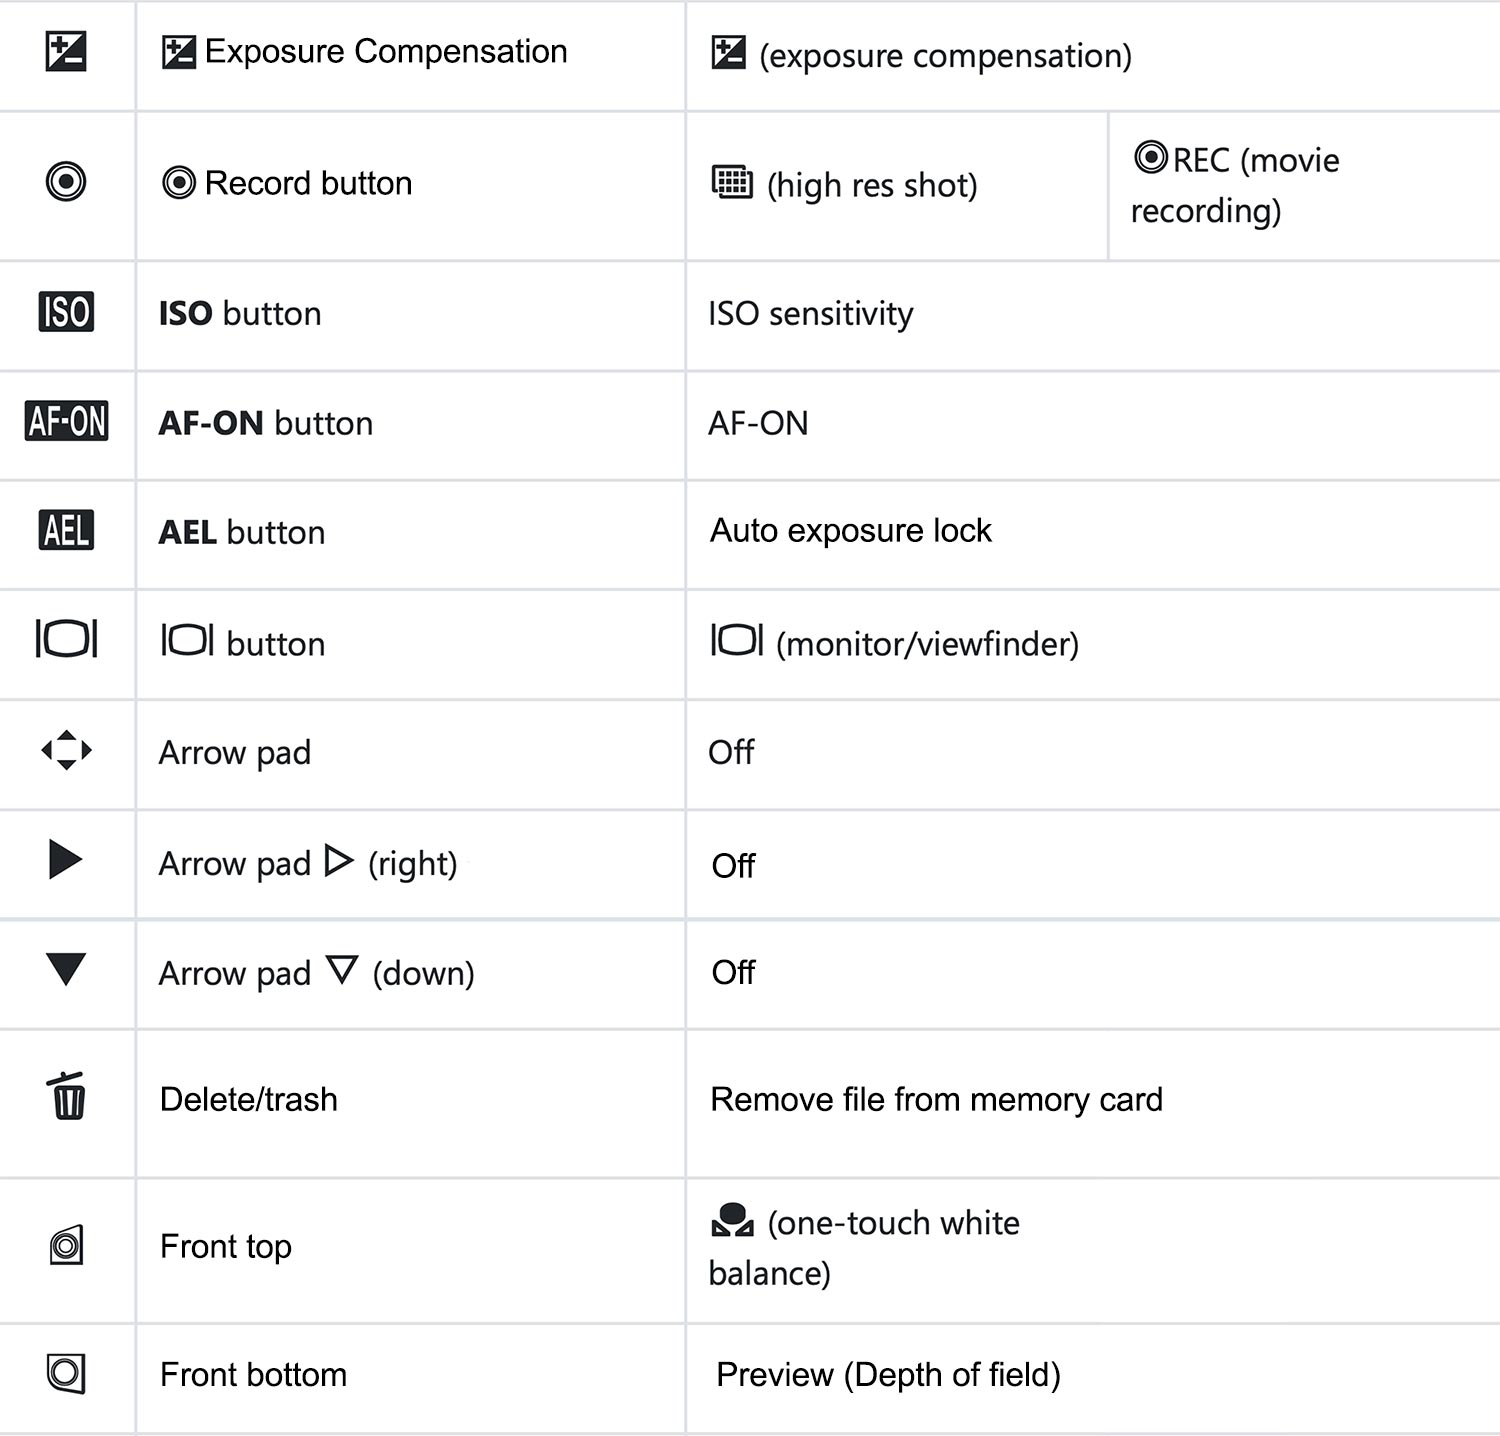
FIRST BUTTON SET
Set your buttons up as below. Although you can change some of these suggestions to your own preferences, it’s important to keep a logical rationale. Don’t make them too complicated because we will change some of these further in Custom Modes. Read the section “Custom Modes” to get a sense of how this button set works and fits in with the overall scheme. You may want to make a plan of your own, planning is key.
View this first set as a starting point and remember that they are the buttons that will be active in standard modes such as A and S. Also see the Notes below. Set the dial mode to A, S or M and starting going through the button menu.
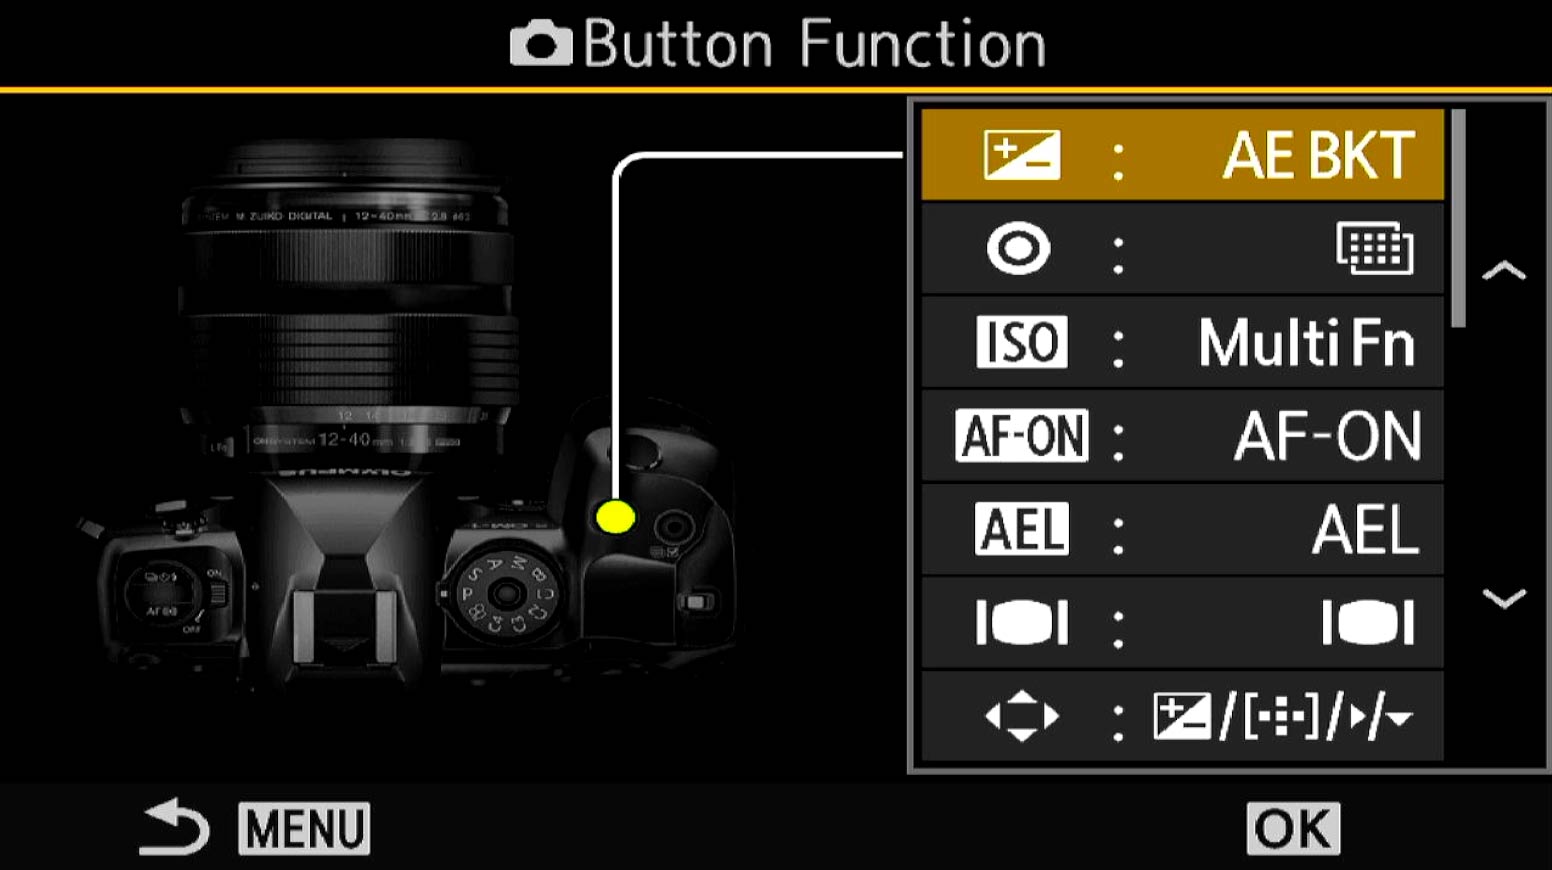
Cog Menu>1.Operations>Button Settings. Make a note of the default button settings just in case you want to reinstate them without doing a reset.
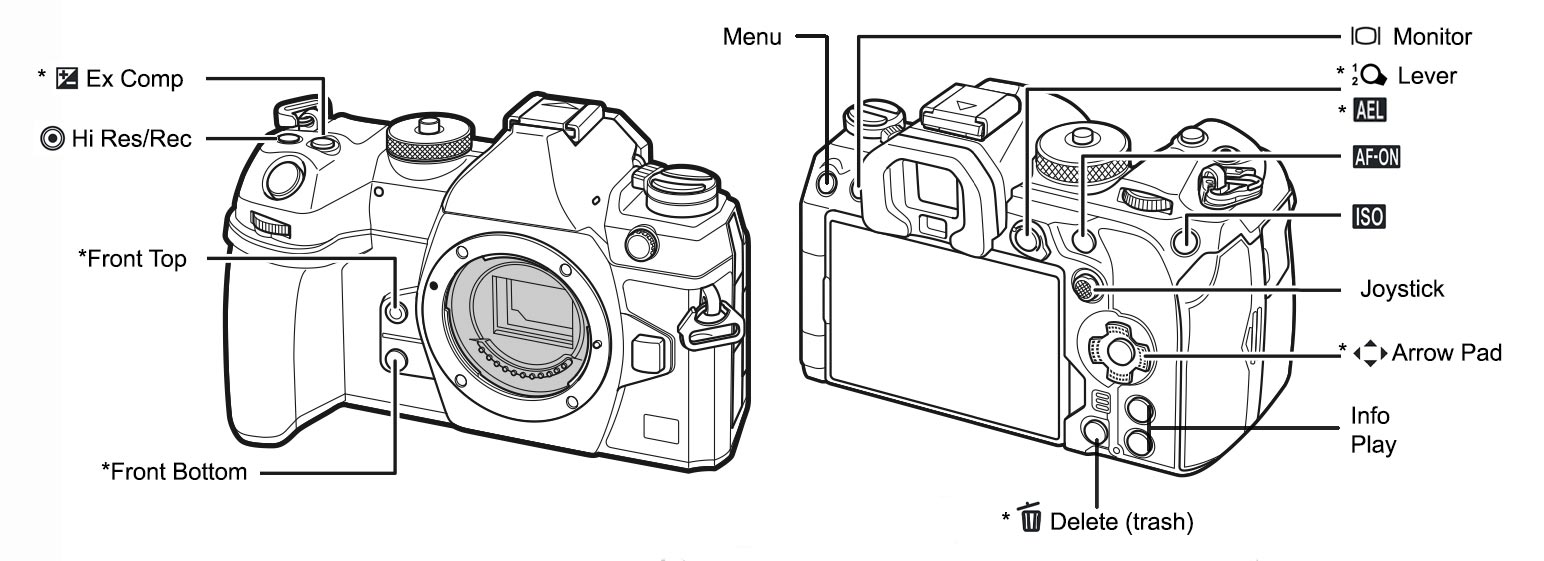
Only buttons shown with * will be changed. The others will stay as default.
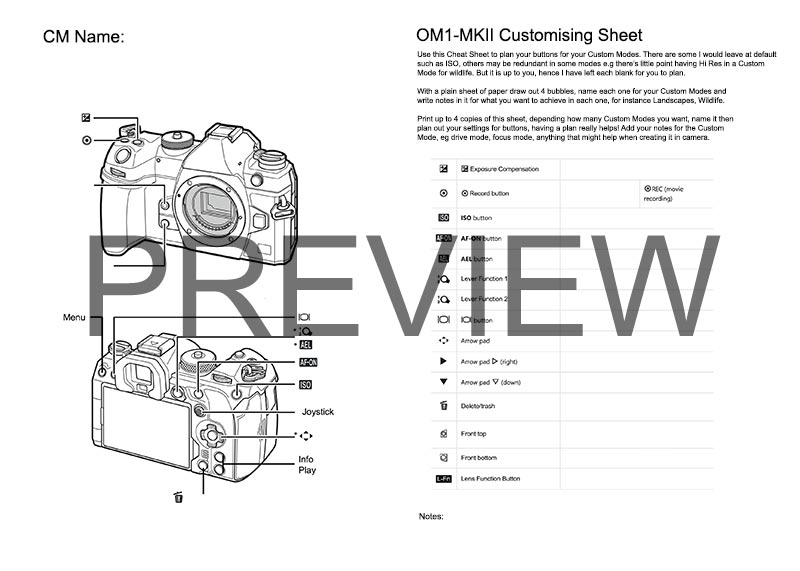
BUTTONS AND CUSTOM MODE PLANNER
I produced a Planner to help you gather thoughts and plan out your Custom Modes and Buttons as a printable download. Download and print it, and read through the notes for guidance. Click Download and a new window will open for you to save the PDF wherever you like.
Bear in mind these are only my suggestions and they are what suit me. You may want different options. If you are new to setting up buttons it can be bewildering just knowing what to choose, so this is a good place to start. Buttons shown with an Asterisk * are what have changed.
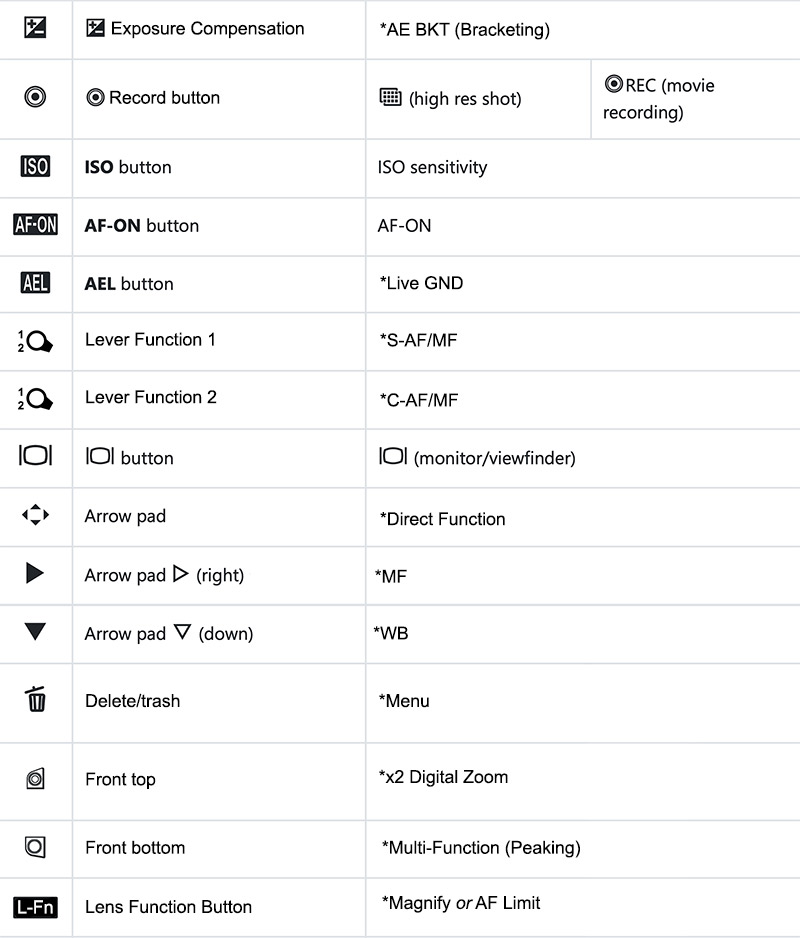
HI-RES, ISO, AF-ON
These are all default and there is no need to change them because they are useful, leave at default. You may want to change them in a Custom Mode, for instance do you need High Res for a Wildlife CM when subjects are moving?
EXP COMP > AE BKT (BRACKETING)
AE BKT allows Auto Exposure Bracketing for challenging light situations. Press and hold the button turning the front dial and further options are revealed for the number of frames and exposure difference per frame to select from. Confusingly HDR has further bracketing options available which are not included in the BKT menu for some strange reason. Exposure Compensation is largely redundant because in all modes we can simply use the front wheel to alter the shutter speed which is in effect providing exposure compensation. It will be useful in a Custom Mode for Wildlife as we shall see, but for now it is better to map it to something more useful.
It continues to be a puzzle to me why the choices for selecting the number of frames and the exposure variance are still split across AE BKT and HDR. AE BKT has a maximum of 5 frames at one stop, whereas as HRD will allow 7 frames at 2 stops or 5 frames at 3 stops. They should be all under HDR and then we do not need AE BKT. If only HDR permitted 1 stop. However the most I ever need is 3 frames at 2 stops apart which is the same as 5 at 1 stop, just delete the other frames. I never use the actual HDR function which merges the images into a Raw file for processing, they are always too extreme for my taste.
See the Section ‘Features-Exposure Bracketing‘ for a detailed explanation. You may feel Bracketing is not important to you or you are happy to do it manually by taking additional shots over and under-exposed, in which case you can select other items for these buttons.
AEL > LIVE GND
With the addition of Live GND it makes much more sense to have quick access to this and use it on AEL Button instead of Auto Exposure Lock. Auto Exposure Lock will be disabled but I rarely use it anyway. If I need to lock exposure for a number of frames for panoramics for example I use Manual. Live GND can be used in any Mode, A, S, M or P, whereas Live ND can only be used in M or S. We will see later a Custom Mode I suggest for Live ND and one for Live GND. They cannot be used together unfortunately (two computational modes cannot be combined). You may feel Bracketing is no longer needed with Live GND (again they cannot be used together), so make button changes accordingly. Personally whilst I use the GNDs and find them very useful there are times when it is not suitable such as when the scene also dominates the sky (mountains), or there is movement, and bracketing is the best option in challenging light.
AF-ON > BACK BUTTON FOCUS
Back Button Focus is simply setting the shutter button to shutter release only, ie taking the shot, with AF set to a different button. The OM-1 and the OM1-MKII are already set for BBF with the inclusion of AF-ON when the focus mode is set to Manual Focus (via the camera and not the lens clutch which disables it). The shutter button is then just shutter release, not AF, and AF can still be performed by pressing AF-ON.
Previous cameras (EM5-EM1) allowed the Arrow Pad Right> to be mapped to MF, but it was removed in the EM-1 MK3 meaning BBF had to be set up. BBF became default so an alternative was to set the lever functions (Position 1 S-AF/MF, Position 2 MF) then set AE-L Button as AF-ON, and disengage the shutter button half-press AF. The MK3 actually shipped with this set as default. This lost some flexibility to use the Lever for Continuous AF in standard modes.
This is the main reason why the inclusion of the AF-ON button is so great. I still need a way to set the AF to MF without using the clutch and the easiest way without going into the menu is to map a button. Using Arrow Pad Right> to MF is quick, I can Auto Focus then press Arrow Pad > to activate MF and effectively lock focus, and the AF-ON is still active so refocus can be done if needed.
LEVER 1 & 2
You will have already set this in the Basic Settings. If not, in Menu>Cog 1 Operations>FN Lever Settings> Set Mode 2. This allows the lever to be programmed to different AF Settings which are more useful than Mode 1 and 3. Mode 1 changes the dial functions, Mode 3 follows the mode dial settings in position 1 and Movie Mode in position 2. Controlling the AF Target pattern and size is more useful.
Setting the lever is very easy, exit the menu and press the ‘OK’ button to access the Super Control Panel. Alternatively Press/Hold the Joystick and turn the front dial. Now with the Lever in Position 1 set the Focus Target to the small single point, or the C1 setting with 1×1 set which allows for much finer control over where the focus point can be positioned. Also set AF Mode to S-AF/MF. Now move it to position 2 and change it to the Target size you want, and the AF Mode you want such as C-AF/MF (Continuous AF). Remember that the Target is the size/pattern of the AF points, and the Mode is how they perform, single AF/continuous AF/Tracking etc. Once each is set they will be recalled by switching the lever position, and they can be set differently for different Custom Modes but do keep it simple to avoid confusion. We will choose different options for a Wildlife Custom Mode.
Setting /MF allows manual focus with the lens ring whilst still in Auto Focus. I find this quite handy, allowing me to check my focus if needed. Do be aware however that if you change focus with the MF ring once you press the shutter AF is again active and your focus will change again. To Autofocus and fine tune it with MF keep the shutter button half pressed. Having MF mapped to a button means I can quickly swap to Manual Focus (see below) and use the rear AF-ON button for Auto-Focus. This is Back Button Focus, when the shutter release and AF are moved to independent buttons rather than the shutter button performing both. Once each lever position has been set they will will be recalled automatically.
By setting two different options on the lever you have great flexibility. You could set L1 and L2 with different AF Target patterns (the focus grid size). This is where experience matters but don’t worry too much, you can always change it as your experience grows.
MONITOR
Personally I leave this as default. It is quite useful at times if I want to switch the view of the rear screen, and more importantly there are no functions I need to map to it that I haven’t already accommodated that I want on the left side of the camera. Consider for yourself if you would prefer a different function.
REAR ARROW PAD
When setting options to the 4 way Arrow Pad on the rear of the camera first select ‘Direct Function’ to access other options. By default according to official manuals the Arrow Pad is inactive, however it may be set to moving the AF target. When setting the Arrow Pad to ‘Direct Function’ you do not lose the ability to move the focus point (the Joystick is just above and serves this purpose too). Press the left Direction and focus point position is activated again, returning each button back to the original function temporarily. In other words the Arrow Pad can be set to have much more functionality than the default.
ARROW RIGHT → MF (MANUAL FOCUS)
There are times when having the lens in Manual Focus is essential. When for example using a physical ND filter for a long exposure, focus has to be set before inserting the filter and then locked to manual otherwise the lens will try to focus again when the shutter is pressed. Many times it will be too dark and the lens will hunt being unable to achieve focus through the filter. Shooting panoramic images it is preferable not to refocus for each frame.
The obvious solution is to use manual focus, but what if you prefer like me to auto focus? I rarely focus manually, I find AF faster and more convenient and despite what you may see online it does not mean I’m not a ‘proper’ photographer. Alternating between AF/MF with the lens clutch is erratic and best avoided, if you use auto focus and then pull the clutch to manual the focus is often disturbed. It will also disable AF-ON. And what if using a lens without the clutch? For this reason I always avoid using the lens clutch and map MF to the rear Arrow Pad right direction for convenience. You could also set it to the lever as an alternative.
ARROW DOWN ↓ WHITE BALANCE
Shooting in RAW means you have direct access to WB and you can change it during post; most photographers do not bother to change WB at all just leaving it in Auto. This is perfectly acceptable and I have Auto-WB set as default, but there are times when auto gets it completely wrong. Sunset and sunrise, and at twilight the temperature of light can change beyond what Auto will get right. Blue Hour does have hints of blue tones but it is not electric blue, so being able to correct it quickly is useful. I like to see the image in camera close to what I actually see in front of me. There are other ways to set WB, with the rear screen and the SCP, or by changing the functions of the lever, however setting it to the Arrow Pad Down∨ is fast and easy to access.
Another option here is Drive Mode, which I have advocated for many times. But the top right has a button for Drive Modes which is fine for the times I need to change it. Models before the OM1 did not auto-switch drive mode when bracketing, which meant needing quicker access to it. The only time drive mode becomes more important is for fast action and wildlife, so we will change it for that instead.
TRASH > MENU
Finally we are now able to move the Menu function to another button. Setting it to the Trash button is far more convenient for right handed operation when using the viewfinder. Your left hand is supporting the lens when hand holding and it was a faff having to use the Menu on the right side of the camera. Trash is not disabled; when using image playback it will return to the normal delete function. The Menu button still performs as a menu shortcut, which I doubt will change in the future, it could be too risky if someone changed the menu button before remapping it to another button and then losing access to the menu.
FRONT TOP > x2 DIGITAL ZOOM
x2 Digital Zoom effectively does just what it says, increasing your image by x2. It does not actually increase anything, rather it will crop the image and it can be useful when in a situation that I do not have the focal reach. Note that the Raw image will still be the full image with a frame showing the zoom level. These days with so many apps providing good upscaling such as Lightroom and Topaz Gigapixel even a 20mp image cropped so much can still yield a decent image.
Note that there is a difference between Digital Zoom and Magnify, which zooms the view to an increased magnification for inspection.
FRONT BOTTOM > MULTI-FUNCTION (PEAKING)
Setting Peaking is possible in two ways, by setting Peaking directly, or setting the Multi-Function option. Set Multi-function as the button, and then press/hold the button, turn the front dial and set it to Peaking. The advantage of using the Multi-Function button is you now also have access to other options. Check them out and see if you find any of the options useful. Colour Creator & Shadow/Highlights only affect Jpeg so have no use for Raw. With Multi-Function you also have access to WB, ISO, Magnify, Image Aspect and S-OVF (emulates an optical viewfinder, but very limited use).
Peaking is incredibly useful, not just for manual focussing but also for viewing what edges of a scene have high contrast and should be sharp, effectively seeing your depth of field.
We previously enabled Peaking and Magnify for focus assistance in the main menu (AF.6 Focus Assist), and as I said both can be useful and also annoying. When both are enabled the scene is magnified and peaking can be obtrusive, all you can see is highlighted edges and not the full scene, but it is doing the job intended, showing what is in focus in detail. Having Peaking set to a button can get around this. As the AF mode is set to AF+MF, turn the focus ring and the view will magnify and show peaking at the same time allowing you to focus accurately, but you cannot see the whole scene. Press the Peaking button before manually focusing with the focus ring, and the view will not magnify.
Enabling Peaking with the button effectively disables Magnify until you press it again. When using AF, pressing Peaking can also be used to show what parts of a scene will be in focus similar to Depth Of Field Preview. Keep in mind that as peaking shows high contrast edges it is not entirely accurate for DOF, but it is a good guide and it is actually better than the Preview (DoF) function which is not reliable and useless in low light.
LENS Fn > MAGNIFY or AF LIMIT
There are many options for mapping to the Lens Fn button but one thing to bear in mind, what if you have lenses that do not have an L-Fn button? Do not map anything you really need if your lenses do not have an L-fn button.
L-Fn is mostly suited for mapping features for long lenses such as AF-Limit. Press and turn the front dial to set a limit that the lens will focus to. Pre-MF allows a preset distance to be set for manual focus, useful to anticipate the position of a subject. It’s also useful as a handy tape measure if you want to know the distance to an object. See Depth of Field.
I tend to favour Magnify as most of my work is landscapes. Magnify and x2 Digital Zoom should not be confused. Where x2 Zoom is for recording a zoomed image, Magnify is for checking focus more accurately. We can set magnify as part of the MF Assist, but it is only active when the MF ring is activated. Setting magnify to a button makes it active whilst in AF Mode. Press the button and a box appears showing the magnified area. Press Info to increase it or decrease. Press the Arrow Pad or Joystick to move position and press OK to quit it. When using a long lens it is also useful for being nosey.
COMPLETE
That’s your first set of customised buttons applied and saved. Now it’s time to look at Custom Modes, what these are, how you can define them and how to further customise the camera button settings.
