
LIVE COMPOSITE
Using Live Composite for creating dynamic long exposure images
Understanding Live Composite and the unique images that are possible with it.
Live Composite is a feature unique to Olympus / OM System which allows a base image to be captured and then leaves the shutter open to record new light entering the scene. This makes it a mode that is nothing short of wizardry in how images can be created and is limited only by your imagination.
LIVE TIME & LIVE COMP
The two modes are often confused with new users not quite grasping the differences between the two modes.
Live Time as we have seen is specifically for creating Long Exposure images of a duration to suit your scene. Once a few setting have been entered the camera shows previews and your long exposure image builds over the time period. The final image takes account of all tones in the scene and any changes during the exposure.
Live Composite is completely different; after a base image is taken with correct exposure the shutter is then left open. Any new light entering the scene is recorded without the original base image over-exposing. This is the important difference, that the shutter can be left open for any amount of time in preparation for new light to enter the scene, or for existing light to move. Live Composite is ideal for shooting scenes such as Star Trails, Car Trails, Fireworks, Light Painting and Lightning.
Live Composite actually works in a similar way to the ‘traditional’ method in Photoshop where a sequence of images are stacked as layers and the blend mode is changed to ‘lighten’, meaning only the brightest parts of an image are revealed into one frame. The advantage of Live Comp is only one Raw image is produced and it’s much more convenient.
LIVE COMP SETTINGS
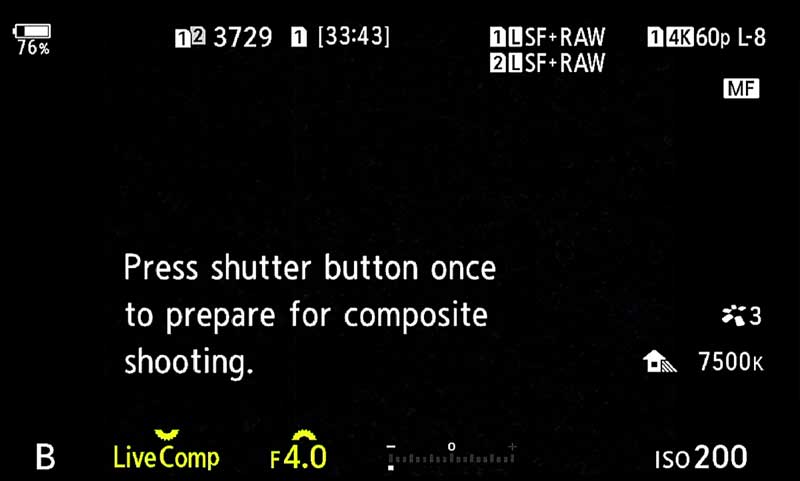
Live Comp Screen Mode Dial B>Live Comp
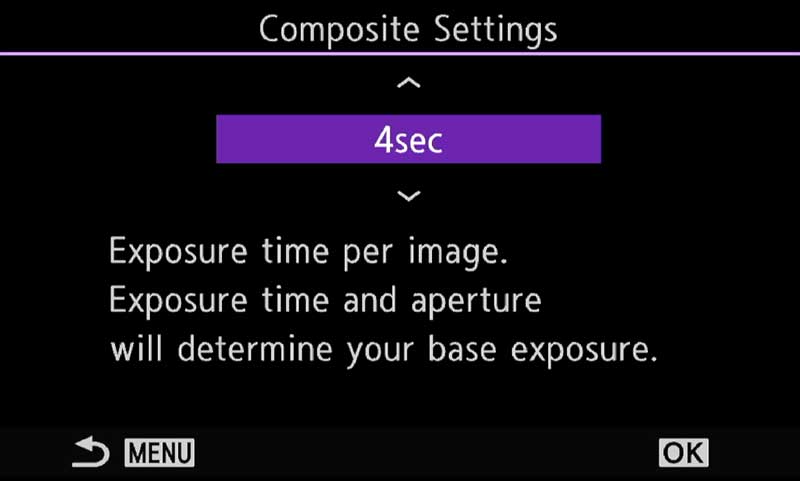
Settings Screen press Menu
To access Live Composite turn the top Mode Dial to ‘B’ and use the front dial to scroll to it. You will be presented with the first screen showing your scene, settings and a message informing you to press the shutter button to prepare. Before this we need to set a few settings. In Live Comp we do not have a shutter speed in the normal sense, rather an exposure per image combined with aperture and ISO. By selecting the appropriate aperture, ISO and Exposure per image we can obtain a good exposure and shift the pointer on the exposure meter to Zero where it is needed.
The exposure and length per image is scene dependent, there are no hard and fast rules so you may need to experiment to find a setting you are happy with. For fireworks you may want to capture a relatively short exposure of just a few seconds to capture a cluster as they explode, or stair trails which may be 30-60 seconds. If you are not sure how many seconds to set in the Composite Settings, try a standard shot first in Manual. This will give a guide on what a ‘good’ exposure will be. Note the longest per image is 60 seconds as with all computational modes.
→ TIP Remember Live Composite Mode leaves the shutter completely open until you end it. A whole sequence of images can be recorded allowing the light in scene to build up, such as star trails, light painting or car trails, OR it can be used in anticipation of capturing a specific event such as lightning. In the case of lightning set the sequence running and end it when the lightning strikes, or leave it running to capture more.
How ever many frames are captured, 5, 50 for example, noise is calculated at the first frame, not the total length. If you had a sequence of 30 images at 30 seconds the total run time may be 15 minutes, but noise will be calculated at 30 seconds. It is a very efficient way of creating dynamic long exposure images without the consequence of high noise levels.
DAYTIME LIVE COMP
Live Composite is best used in lower light scenes at night or twilight but it can also be used in daylight. You will find however that depending on the ambient light an ND filter will be needed. As it depends on the ambient light it’s difficult to say which ND but I would suggest a 6 stop. Unfortunately Live Time cannot be used with the in -camera Live ND’s because they are both Computational.
A Variable ND could also be a solution but they will give a cross effect called cross polarisation used on lenses wider than around 12mm. Avoid Variable ND’s that go to 10 stops, they are worse.
EXAMPLES
LIGHT TRAILS
This image was a late evening up on Winnats Pass in the Peak District, and a young lady was wild camping on top of the cliff. After a few shots on the top I dropped down a level so I could get her tent in the shot too. The flame in the distance is a bonfire that had been lit.
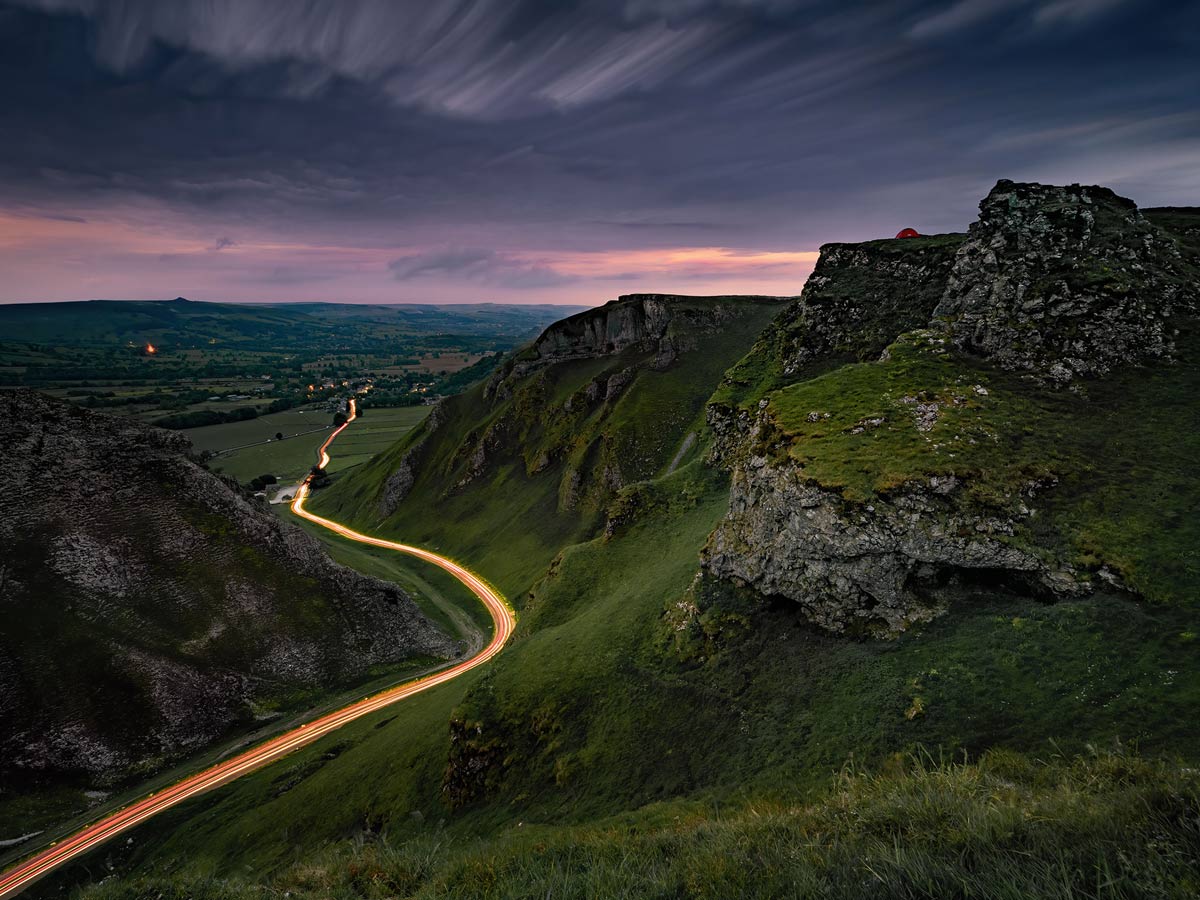
8-25mm Pro @8mm f6.3 ISO 200 Live Comp ( Base Exp 4s x 19 frames)
A few experimental shots were needed to determine the best exposure length for each frame. Starting off at 15 seconds it was under-exposed, I would need to open the aperture more from f6.3 or increase ISO which I didn’t want to do. Even though the OM1 and OM1-MKII have better noise control at higher ISO changing from 200 to 400 there is little improvement and I always use lower ISO were possible. At f6.3 to give me the Depth of Field and ISO 200 the exposure reading was optimum at 4 seconds per frame. I expected quite a few cars with it being such a busy day but typically it was quiet by this time. But with Live Comp I can leave it running with the shutter open, and just wait for more cars to come. A total of 19 frames (19x4s = 76s) and enough cars had passed giving the effect I wanted.
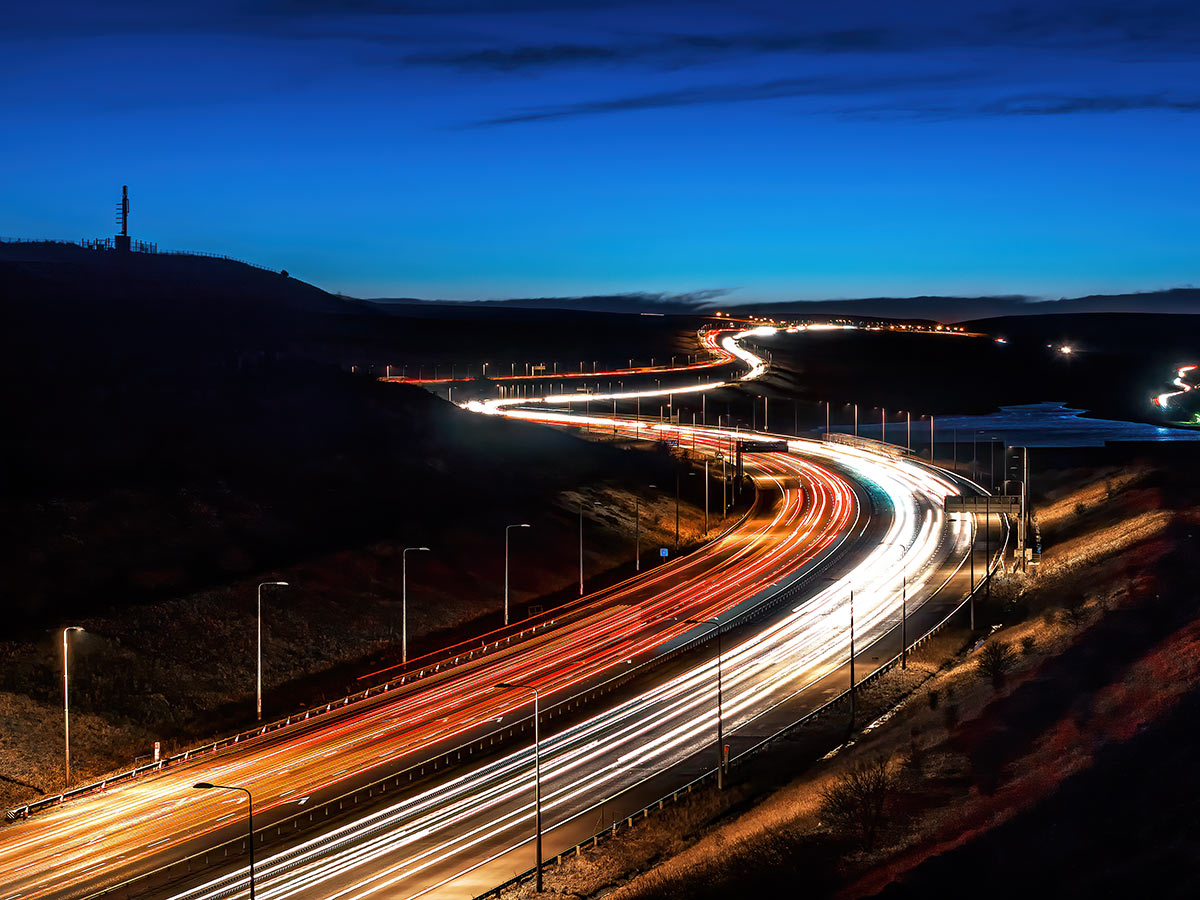
12-40mm Pro @ 20mm f2.8 ISO 400 Live Comp ( Base Exp 5s x 10 frames)
A busy motorway bridge over the M62 which twists and curves on the way to the point it reaches the highest motorway in England. Live Composite recorded the car trails very well and the very slight whispy clouds gave a little detail for the early evening sky. It is always better for scenes like this to try and get a twilight sky for some colour and detail rather than just black. More cloud would have been nice but you can’t always have everything.
Live Comp Mode for images like this is quite easy. Take a test shot in manual first just to determine how many seconds and ISO will give a good exposure, and whether you auto focus or manually focus make sure it is locked onto MF when the final shot is taken. Also make sure you have a rock solid tripod, I actually used a Gitzo Systematic tripod for this which is a beast and still have some issues because the bridge had quite a few vibrations.
→ TIP Be aware that Live Comp adds new light entering a scene and it can have unexpected consequences. In the Winnats Pass image above a few attempts were aborted because whilst cars travelling away from me recorded very attractive red tail lights, traffic coming towards me would record white headlights which over-write the red tail lights. The same is true of skies. Live Comp can create very interesting effects with skies, almost like an impressionistic ‘painterly’ effect. It’s easy to over-do it so the result looks like a bad Instagram filter, and if left running for too long any bright clouds will eventually obliterate all other tones leaving nothing but a blank sky.
SLOW WATER MOVEMENT
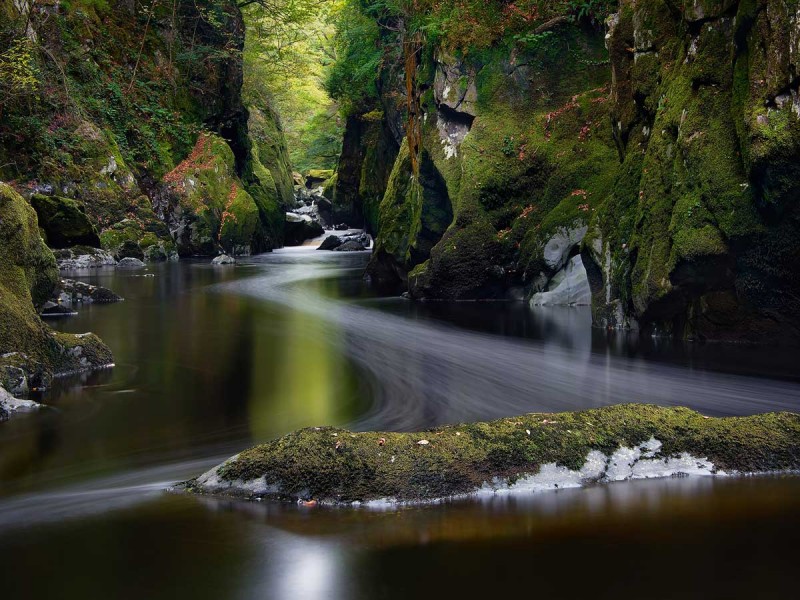
We saw another example of this location, the Fairy Glen in Snowdonia Wales in the Long Exposure Section where a slow shutter was used.
As water passes through the gorge and runs over the ledge in the opening it slows down dramatically and almost always has lines of bubbles on the water surface, lending itself to creative slow shutter images.
I decided to use Live Composite for something different in the second image here. A Polariser was used to remove reflected light from the rocks and moss together with a 3 stop ND to slow the shutter to 4 seconds. The result was an image looking like the water is full of snakes. The coloured trails are leaves that were floating on the water.
Live Comp tends not to be suitable for faster water such as waterfalls since the brightest movement starts to overwrite any detail leaving it very ‘milky’. But of course you may like the effect, it is all very subjective.
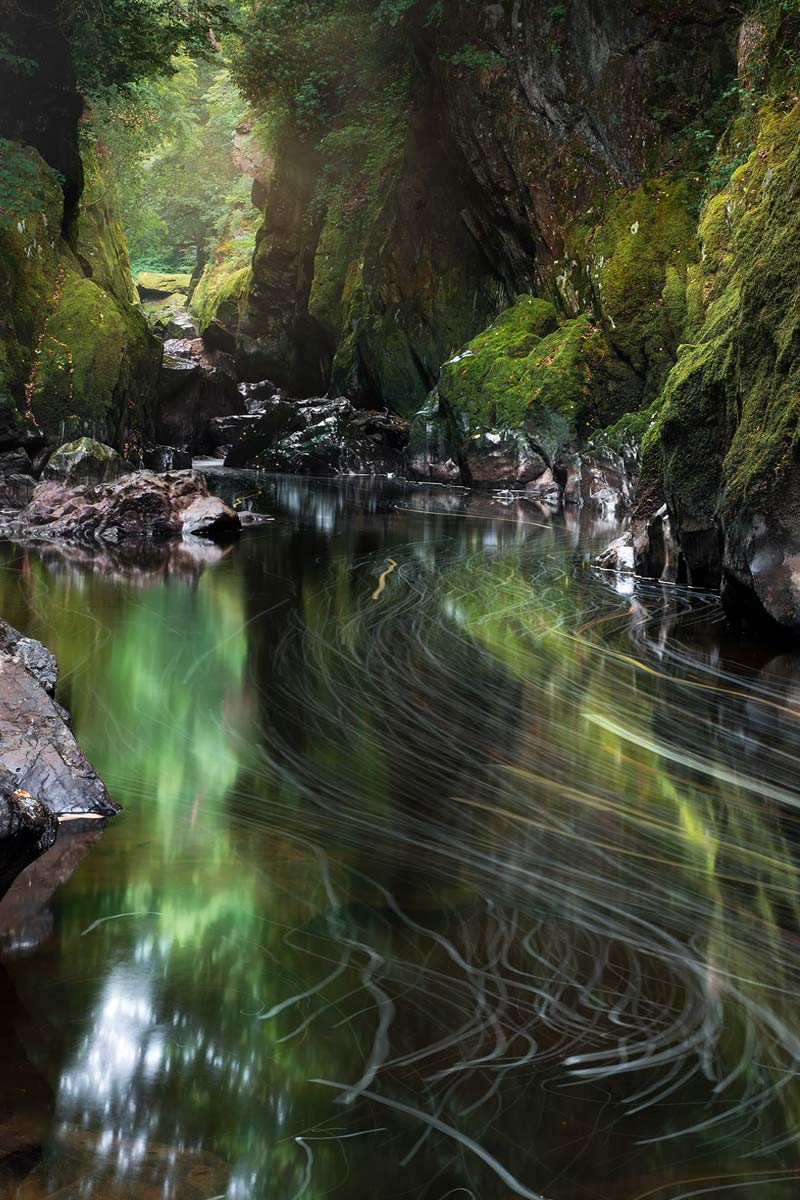
12-100mm @45mm f6.3 ISO200 Live Comp Mode (Base 5s x 4 frames)
NIGHT SKY
Live Comp is very useful for creating star trails to capture stars streaking across the night sky in an arc, or a circular motion. If the composition is centred on the Pole Star you can create some interesting circular trails as the stars appear to rotate around it, it is of course rotating. Use Starry Sky to focus and set your base exposure depending on available light and the scene. This is how long each frame will expose for. Then shoot for anything between 30 minutes to an hour.
Try to find an interesting foreground otherwise it is just an image of star trails, it will need some context and something for the viewer to explore. Make sure you have a very stable tripod, a cable release and take a few tests shots to determine the best exposure before committing to your long Live Comp. A fast lens is best for maximising the light entering the lens and reducing noise. Thanks to Starry Sky AF focussing is quite easy, enable it from the Super Control Panel, set focus and then lock it to MF.
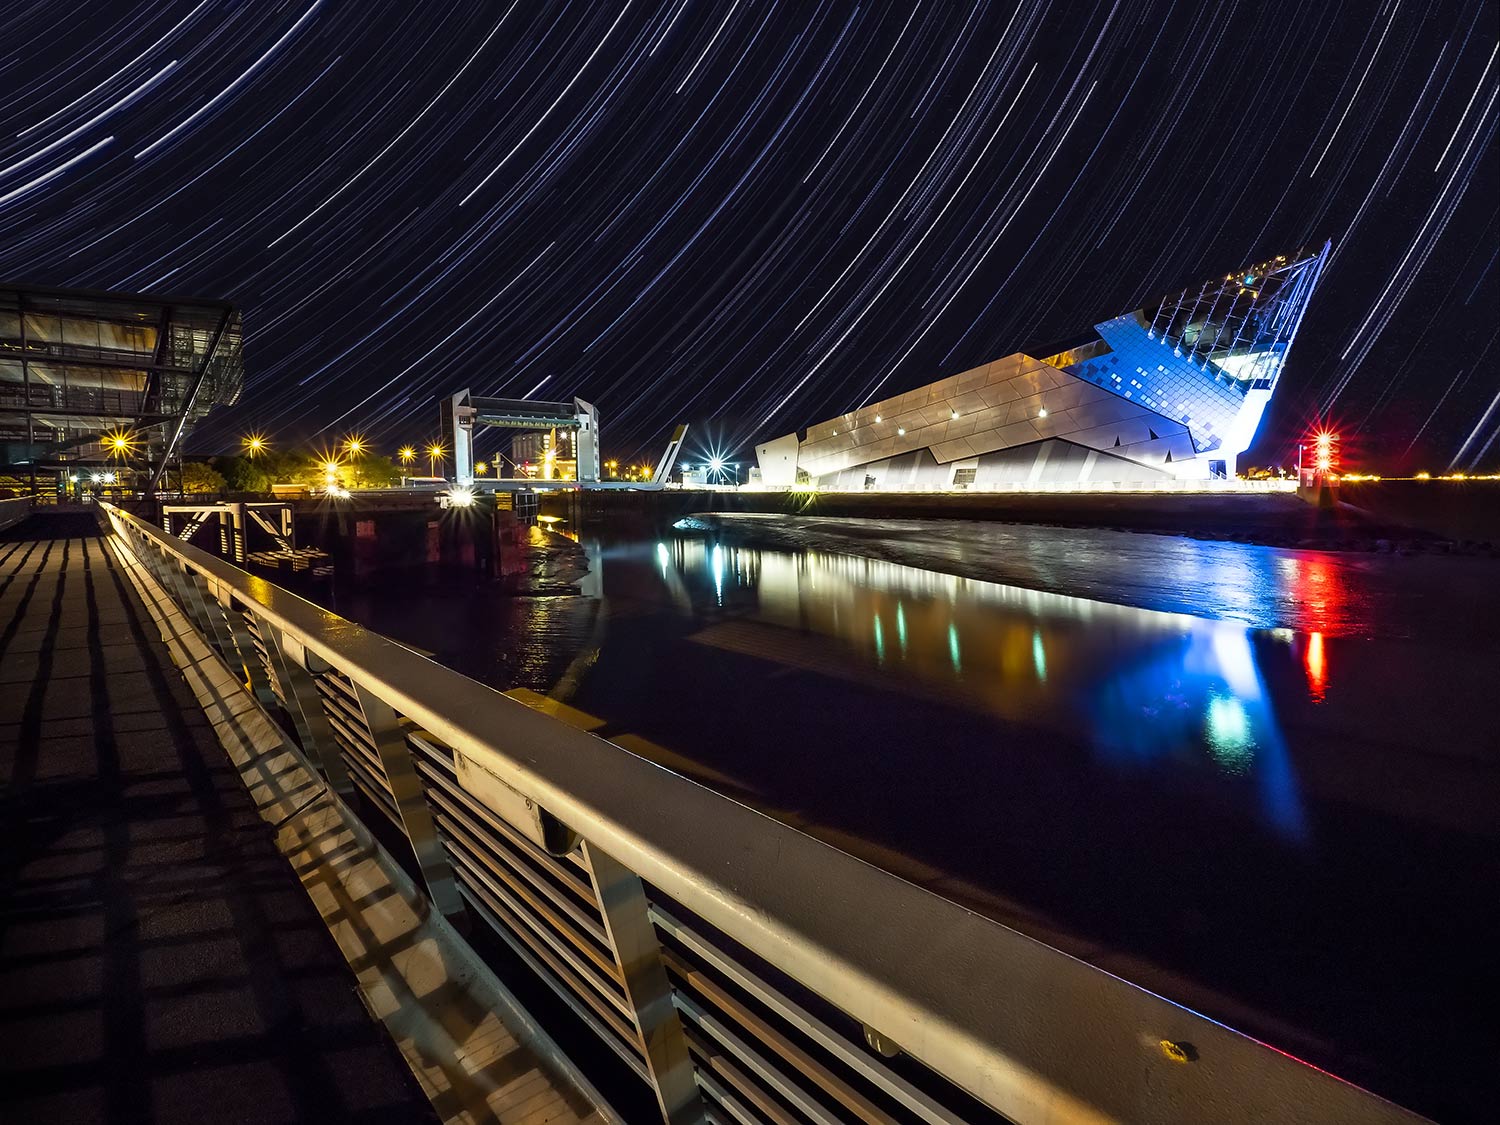
7-14 Pro @7mm ISO1600 f2.8 Live Comp (Base 15s x 160, 40 minutes)
This image was quite a challenge, mainly because of the foreground and the depth of field. As such it is actually a Live Composite composite. A test image first at 15 seconds and f2.8 ISO 1600 showed the stars to be fine, but obviously I had no depth of field. It would mean focus stacking, but there is no need to do multiple Live Composite focus stacked images, I would have been there for hours.
The first task is to get my foreground images, f6.3 and 4 seconds was fine. Two images with the focus point set in around 1/3rd in for the foreground and another on the building on the left was all I needed.
Then the stars, in Manual I first set focus using Starry Sky focus on a bight star and then locked into MF (I have the rear Arrow Pad > set for MF so I do not have to touch the clutch). You can of course use MF but you may as well make the most of the features we have. Switch to B on the Mode Dial and rotate the wheel until you enable Live Comp. The screen will show ‘press shutter button once to prepare for composite’ when the shutter is half pressed. Press Menu and set the desired exposure time per frame that you have identified in a quick test shot. I set 15 seconds. Set your ISO and aperture and take a shot, which is your base image. Then just watch as the image starts to build up, showing the effect of new light in the scene. The screen will show a Histogram and also a counter of the number of frames taken. Just end the shot when you are happy with it.
My final image for the star trail was fine, and whilst the foreground was too bright there was no depth, the reason why I took additional images. The next step was to process the images in Lightroom, open them in Photoshop and stack them with Auto Align. It did a great job after a few small adjustments.
THINKING OUTSIDE THE BOX
This image of Penmon Lighthouse on Anglesey was taken the night before I was due to lead a workshop. The challenge was not so much the Milky Way but capturing the light on the lighthouse itself which only flashes once every 5 seconds. Using Manual for 30 seconds the Milky Way was fine but the lighthouse was under-exposed and the light spreading from the lighthouse was feint.
I could exposure bracket and then blend the images afterwards. Instead I decided to try something else, using Live-Composite.
Live Composite was set at 30 seconds base, ISO 1600 at f2.8. One frame was exposed for the Milky Way and then covered with a black piece of card I always keep in my bag (to separate ND Filters), just leaving the lighthouse exposed. The card was moved around to avoid a line just like ‘dodging and burning’ for an additional 30 seconds to gather more light on the lighthouse, and this was the result. The lighthouse is better exposed because ambient light built up more, and the light shows part of the beam spreading out.
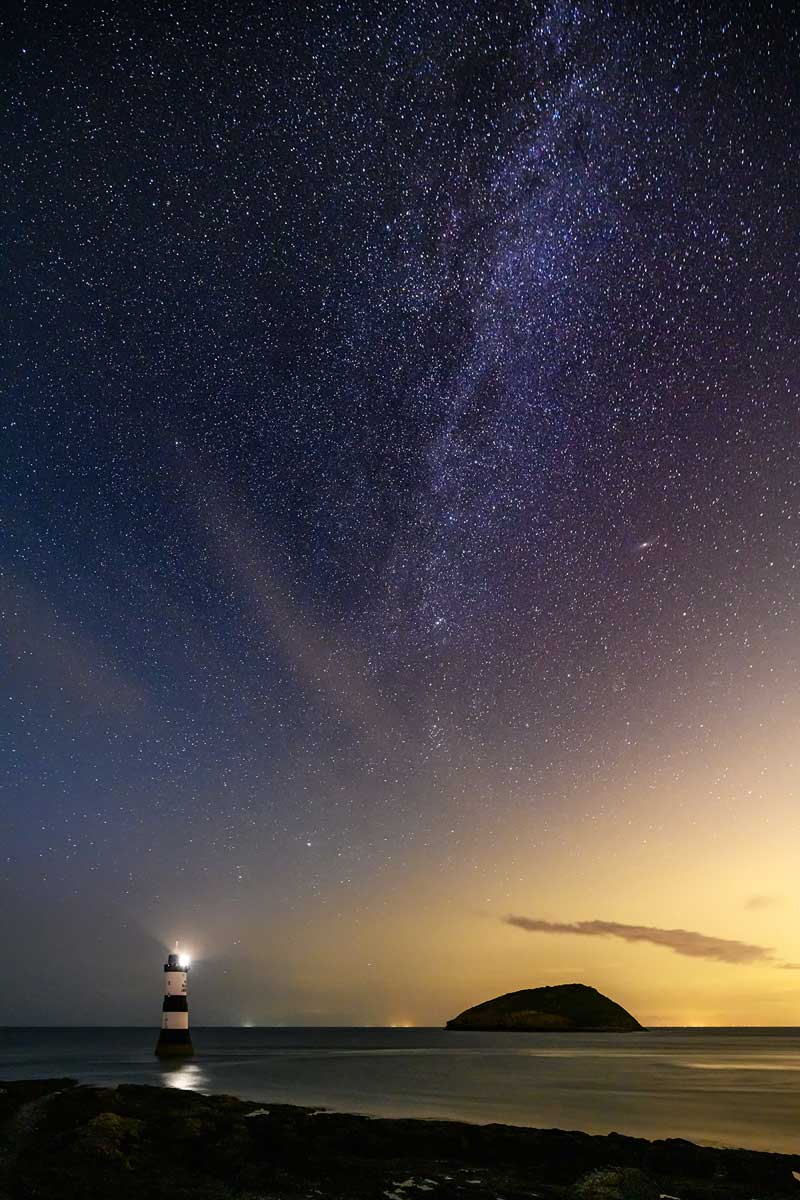
7-14 Pro @7mm ISO1600 f2.8 Live Comp Mode
AVOIDING MOVING STARS
Live Composite is used for capturing new light, light painting for static scenes, or capturing movement like above. Although capturing sharp stars has nothing to do with Live Comp, what if you want for example to shoot the Milky Way? You can use Live Time or Bulb/Manual and work out the exposure with the 500 Rule.
The 500 Rule gives a guide for Full Frame cameras, which is 500/ (divided by) lens focal length. So a 14mm Full Fame lens would be 500/14 = 35 seconds max, before stars move. For M4/3 we can simply half that and use 250, therefore for the 7-14mm the calculation is 250/7 =35. It works as a rough guide.
500 Rule halved for M4/3 equals 250/focal length.
This is not the exposure, it is the longest you can expose before you’ll see stars move and therefore blur. The aim is to get a well exposed image within the longest you can shoot for, so with the 7-14 I would want a good exposure under 35 seconds. The way to do this is to use the widest aperture you can, or f.28 in this case. increase ISO to whatever is required, starting at say 1600 and take a shot. If it is under-exposed increase ISO and try again. We cannot shoot for longer, or open the aperture any more so ISO is the only setting we can change. For basic settings I would start wide open, ISO 1600 and know what the max exposure time is I can shoot for. A 12mm would be 20 seconds, 45mm 5.5 seconds and so on.
You can use Live-Time, but remember you cannot let it run a little more if it is under-exposed because stars will move, so it becomes easier just to use Manual. Focus on the stars, use a steady tripod, set settings and take the shot with a cable release. If you have a foreground you may have to focus on that instead if it is close, or even take two images and blend them together. The old trick is to focus on infinity, but starts are not technically at infinity, and most modern lenses do not have an infinity marking. We have Starry Sky focus so use that, it is very good.
For even better Milky Way images use a tracker. They move the camera in line with the stars moving and allow multiple images to be taken and stacked in post-processing for better detail and less noise.
SKIES
Live Composite can create some interesting effects with cloud movement. Look at the sky in the first image of Winnats Pass and notice how it has a very ‘painterly’ brush stroke effect. The effect is more pronounced actually with shorter frame exposures of perhaps 2 or 3 seconds, allowing for different states of movement to be captured. For me personally I find it can look a little unnatural so I prefer to use Live Comp with longer base exposure times.
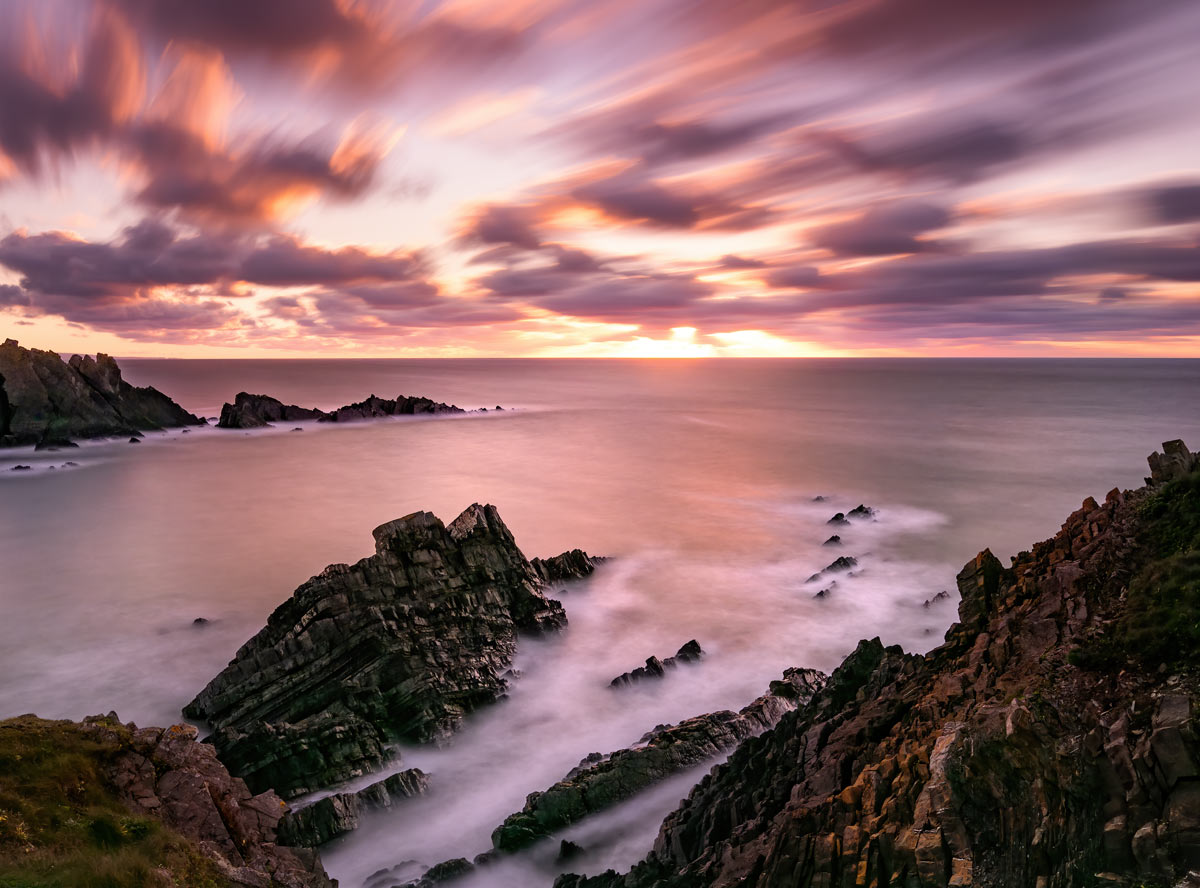
8-25mm Pro @ 8mm ISO 200 f7.1 Live Composite Mode (30s Base x 4 frames)
The image above taken at Hartland Quay North Devon was taken with Live Composite set at 30 seconds base exposure with a NiSi 6 stop ND and a 3 stop Reverse Graduated ND to balance the bright sky with the foreground. When shooting a situation like this working out how many seconds to set the base exposure to is simply trying it out; insert the ND, set the base exposure and adjust it along with ISO and aperture to get a good reading with the exposure meter. A more methodical approach is to set Manual or A Mode first and see what the exposure reading is.
An exposure of 30 seconds x four frames gave the desired image. Notice how some of the clouds in the left hand side resemble brush strokes overlaid in slightly different directions which is typical of Live Composite. The total runtime was 2 minutes, and although the clouds on the distant horizon were hardly moving if I allowed it to run any longer I risked too much movement on the sun on the horizon.
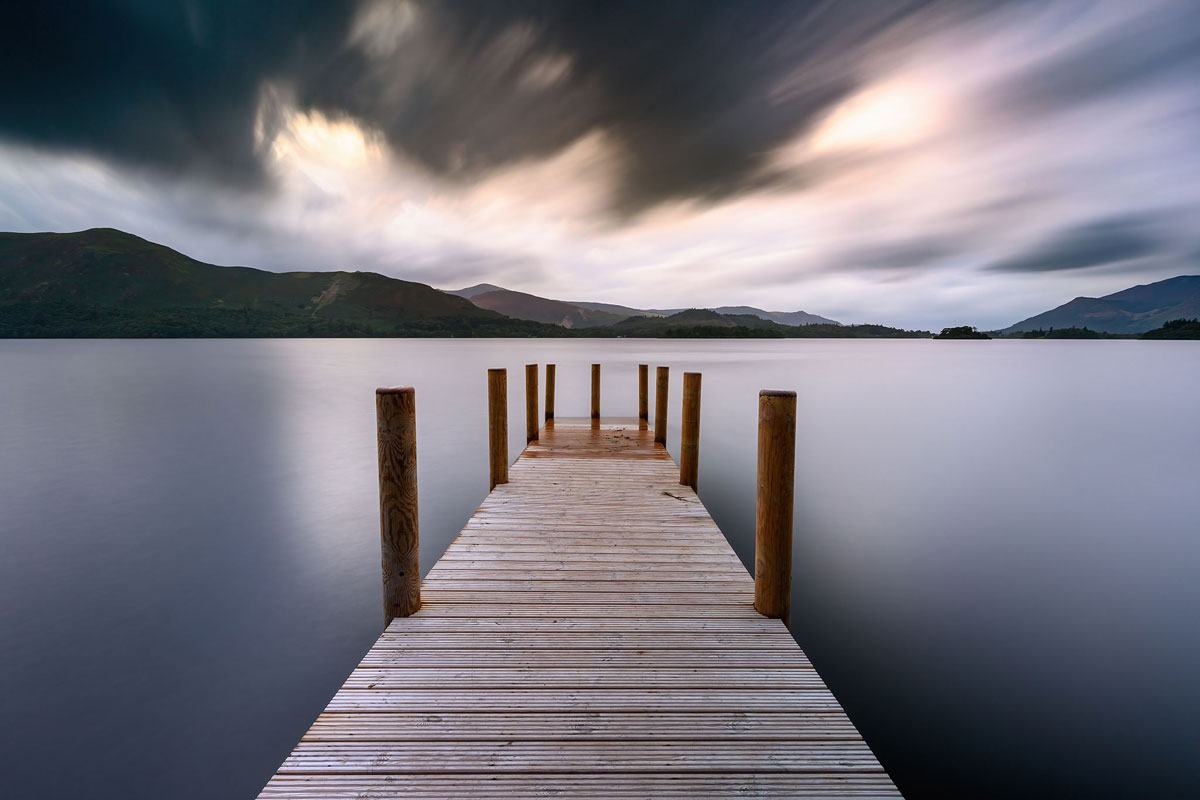
7-14mm Pro @7mm ISO 200 f6.3 Live Comp Mode (Base 30s x5 frames)
Another example in the Lake District of Ashness Jetty on Derwentwater. Again a 6 stop ND filter was used with a Medium Graduated filter on the sky. Live Composite was again set at 30 seconds and exposure was five frames. Balancing the effect of the cloud movement and the flattening out of water can be a little tricky. As I said using shorter base exposures will create an even more dramatic sky with more movement, but will not flatten water enough. Running the number of frames for longer would flatten out the water more and will make the sky even more ‘painterly’. To my tastes it can quickly look far too messy, however the great thing about Live Composite is that it allows creative freedom and that is the whole point; experiment and do what makes you happy.
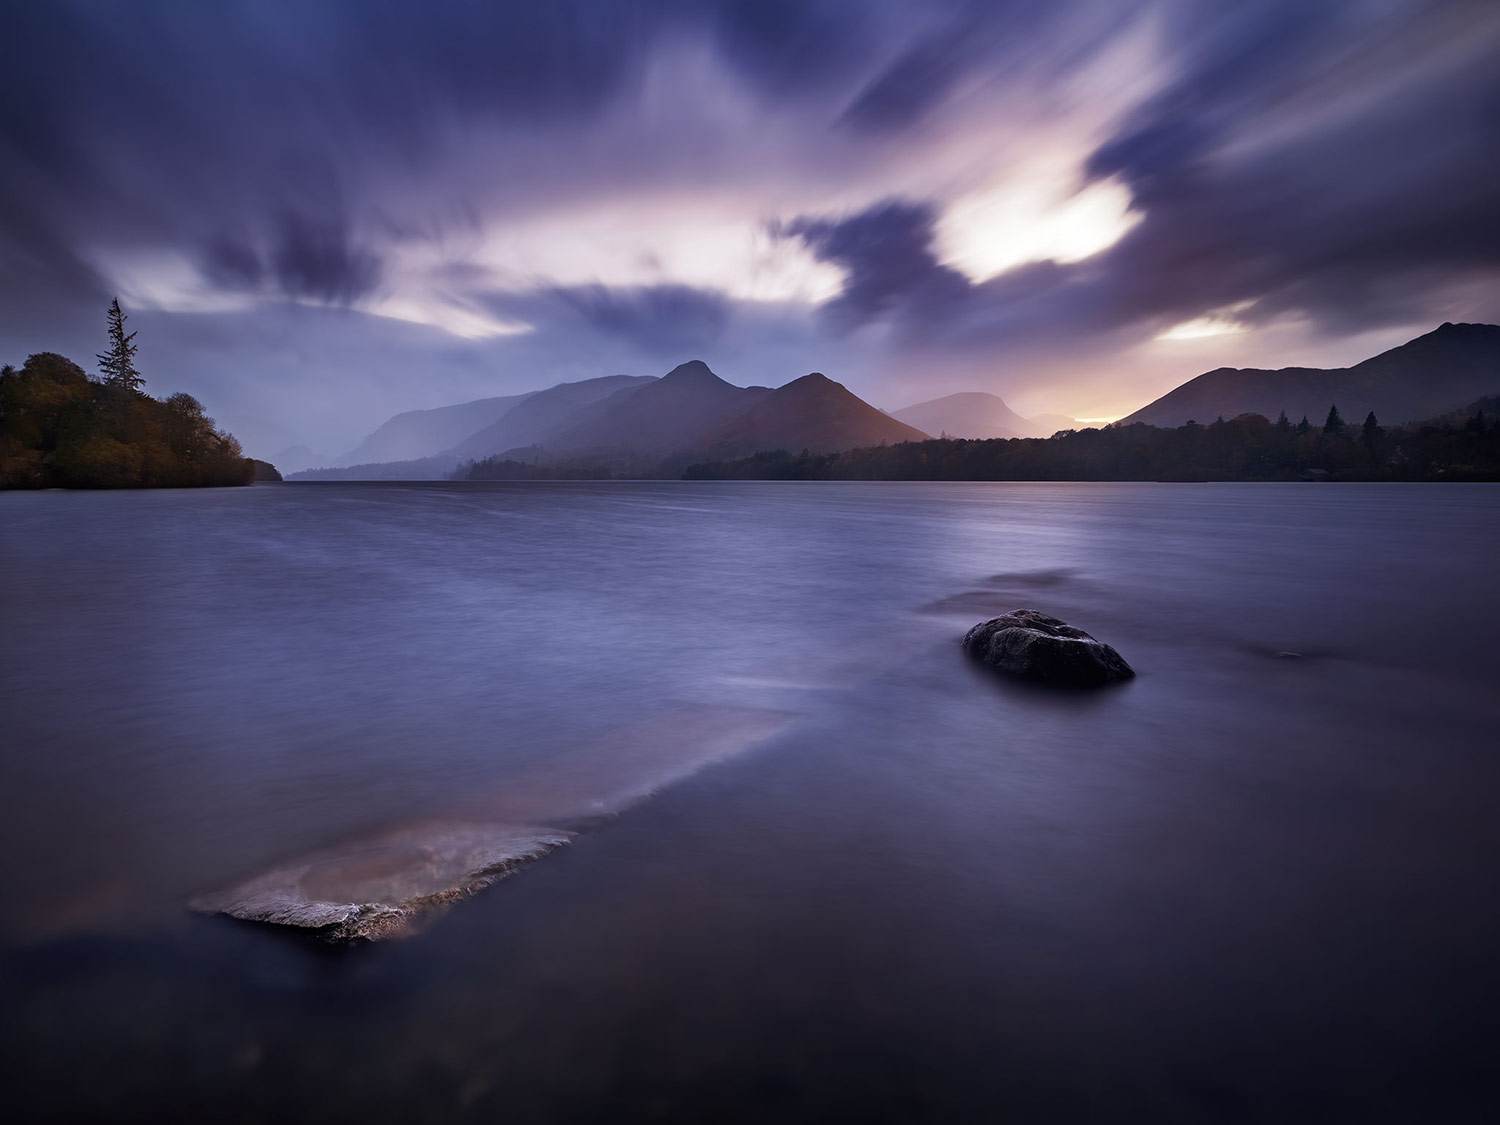
8-25mm Pro @8mm ISO 200 f6.3 Live Comp Mode (Base 50s x3 frames)
A twilight image on Isthmus Bay, Lake District. A 10 stop ND filter was used with a Medium Graduated filter on the sky. Live Composite was set at 50 seconds and exposure was 3 frames. The first frame of 50 seconds recorded the water just fine and the light of the sun setting behind the fells. The dark streaks of the cloud movement are recorded on the first frame and the subsequent 2 frames record a little more of the lighter streaks. remember Live Comp adds new light, not new darks. By limiting the image to just three frames I got an interesting effect on the sky and avoided the very painterly brush stroke effect.
LIMITATIONS
There are some limitations to be aware of although they are minor.
The main limitation is Live Composite cannot be used with other Computational Modes such as High Res, Live Time and Live ND. It is pretty obvious when you understand each of these modes are taking a number of frames and combining them, so expecting it to do two things at once just is not possible (a little like my brain). It sure is a shame Live ND cannot be used at the same time.
Other limitations:
- Min and Max Shutter Speed – 1/2s and 60 seconds. Note this is the ‘Composite Setting’ and determines the exposure for each frame.
- Max Live Comp Time – 6 hours (previous to OM1 limited to 3). Anything more than an hour and I would use an external power pack.
- Max Iso – Now 6400, previous to OM1 were limited to 1600.
- No Self Timer – Self Timer cannot be used but it is now possible to use hand held, obviously only for what you are capable of.
DETERMINING NUMBER OF FRAMES POST-SHOOT
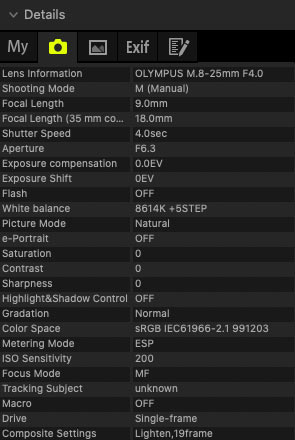
If you are interested in the number of frames taken for a Live Composite image after the fact it can be hard to discover. All processing apps such as Lightroom will only show the Base shutter speed for the first frame, in the case of the car trails image above 4 seconds.
The only way to find it is in Olympus Workspace:
Workspace > Info > Camera > Composite Settings
Click Info at the top right to open the Exif dialogue box and under Camera you will see the number of frames used to capture the final image. Interestingly it also says ‘Lighten”, which is the same blend mode used in Photoshop to create a similar effect from multiple stacked images.
CONCLUSION
Live Composite can be a fun way to create original images, and the best way to explore what it is capable of is to get out and try it. Try some light painting, star trails, and don’t be put off when I say it is not my thing. It is a creative mode and it’s up to you to be creative and decide what appeals to you.
