
CORRECT METERING
How to meter for correct exposure
Metering is simply how your camera reads light in a scene and determines what is a correct exposure using user selectable modes.
Metering is fairly straight forward with digital cameras these days having built in light meters with different modes, but it wasn’t always that way. Back in the day before internal meters we had to use an external hand help meter. Imagine that.
I tend to use Evaluative Metering for almost everything. Spot metering is useful when a subject in the scene has priority such as wildlife, and I set my Custom Modes accordingly. It’s useful to understand the different metering modes, what they are for and how to use other information such as Histograms
UNDERSTANDING METERING MODES
All modern cameras have metering modes built in and they are based on three main modes with different brands giving them different names.
With the OM1-MKII we have ESP (Electro Selective Pattern), Spot Metering and Centre Weighted. There are two other Spot Modes, Spot Hightlight and Spot Shadow which give priority to shadow or highlight as named. Access the modes through the Super Control Panel or the Menu Camera1>5>Metering.
ESP takes light readings from the centre and surrounding areas and tries to calculate an average reading of the light to determine the best exposure.
Spot takes a reading from a small spot in the centre and calculated exposure based on the light in that area.
Centre Weighted reads a larger area of the scene with bias towards the centre, exactly as the name suggests.
The camera has a standard it compares light to when evaluating it, which is 18% grey (50% grey on your monitor). If the majority of pixels are brighter than this 18% grey it will reduce the exposure, or darker and it will increase the exposure.
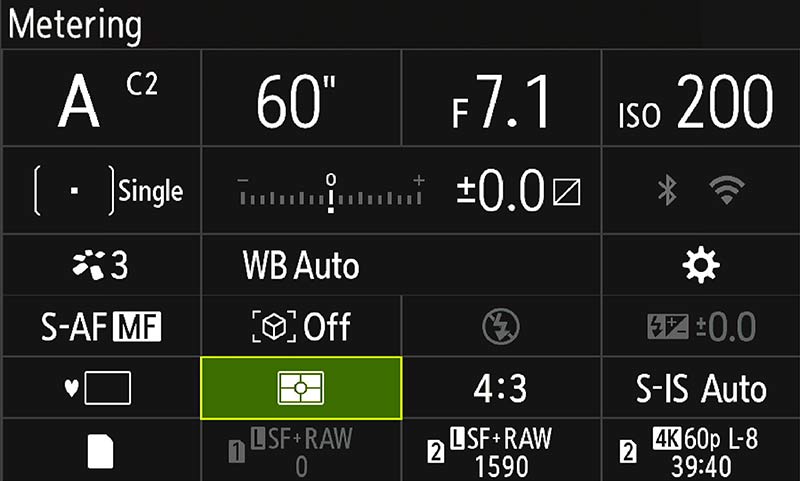
ESP shown on the Super Control Panel. Select to bring up further options below.

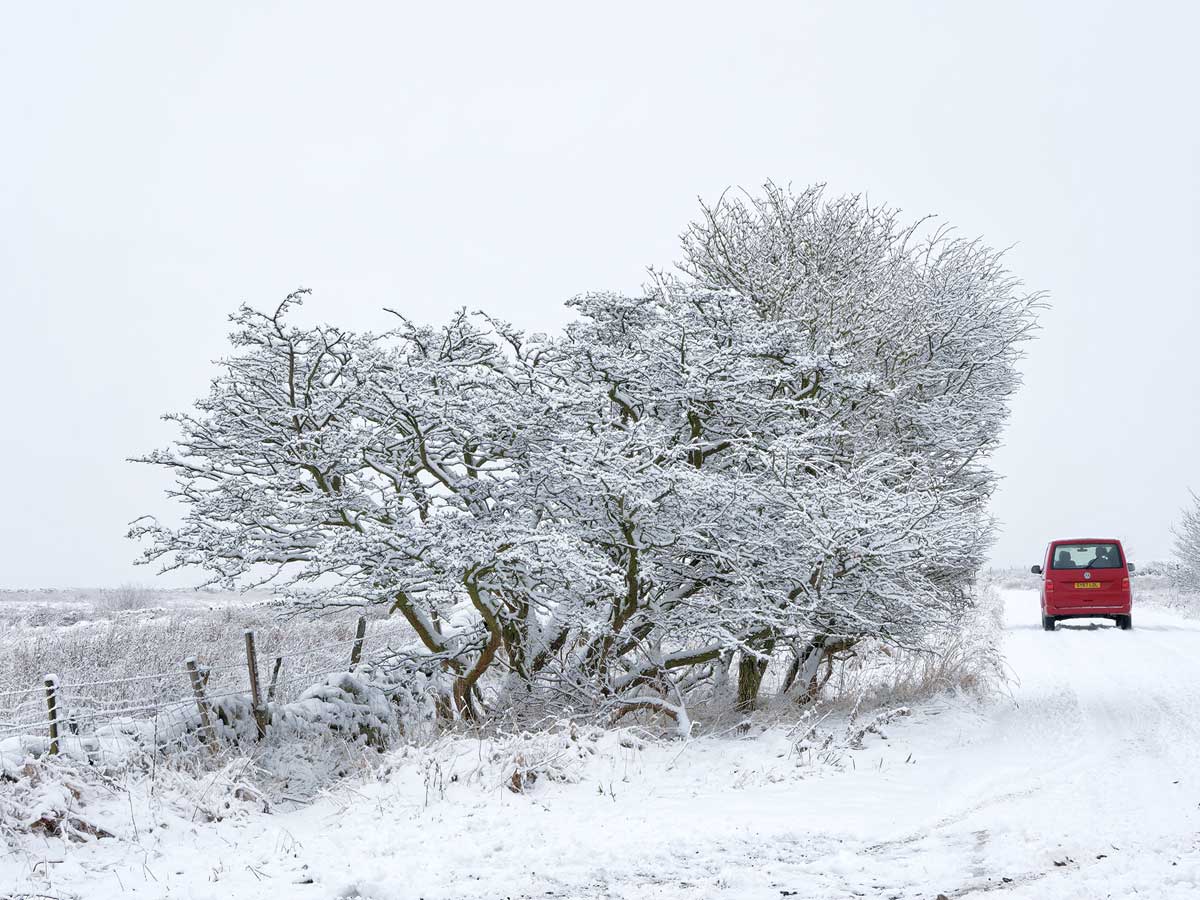
→ TIP The camera is not intelligent and has no idea what the scene is. Ever taken a picture of bright snow which turns our a horrible grey? As far as the camera is concern it is just bright light which is brighter than the 18% grey benchmark, so it reduces the exposure.
It thinks it is being over-exposed and has no idea it is snow and should be bright. In these situations you need to override the exposure to brighten it. This image was very under exposed. I brightened it by using exposure compensation being careful not to blow out any tones.
WHICH METERING MODE TO USE?
The truth is there is no right or wrong. ESP which I use most of the time will read more of the scene and give an average of the readings. Spot as we know will read just a small portion. Each has advantages and disadvantages, for instance when using ESP you may have a main subject which is back illuminated and greatly under-exposed. This is particularly true for Wildlife photography and Portraiture when Spot would be more accurate. Spot metering and Centre Weighted may fall on a particularly bright or dark part of the scene which would adversely affect the whole image too much.
Whichever mode you use should be the one you are more comfortable using (for me ESP) and it is not fixed in stone because we have ways of controlling exposure to override what the camera suggests is correct.
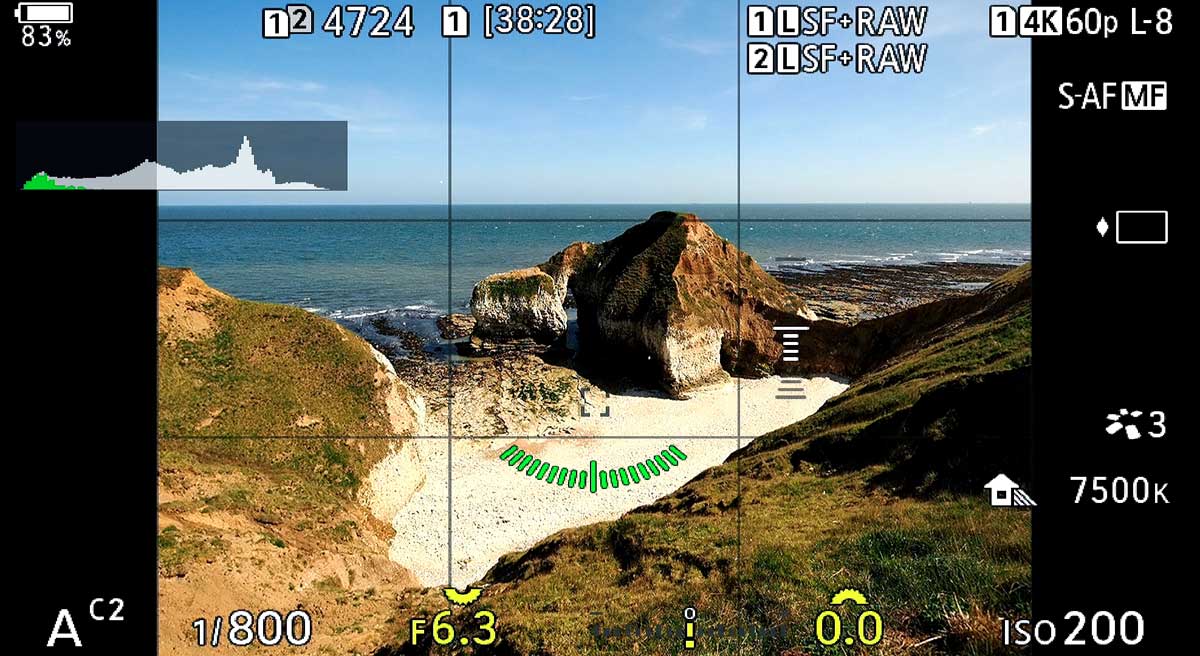
ESP metered this bright scene at 1/800s @f6.3, reading all of the screen and making a comparison to the 18% grey correct exposure.
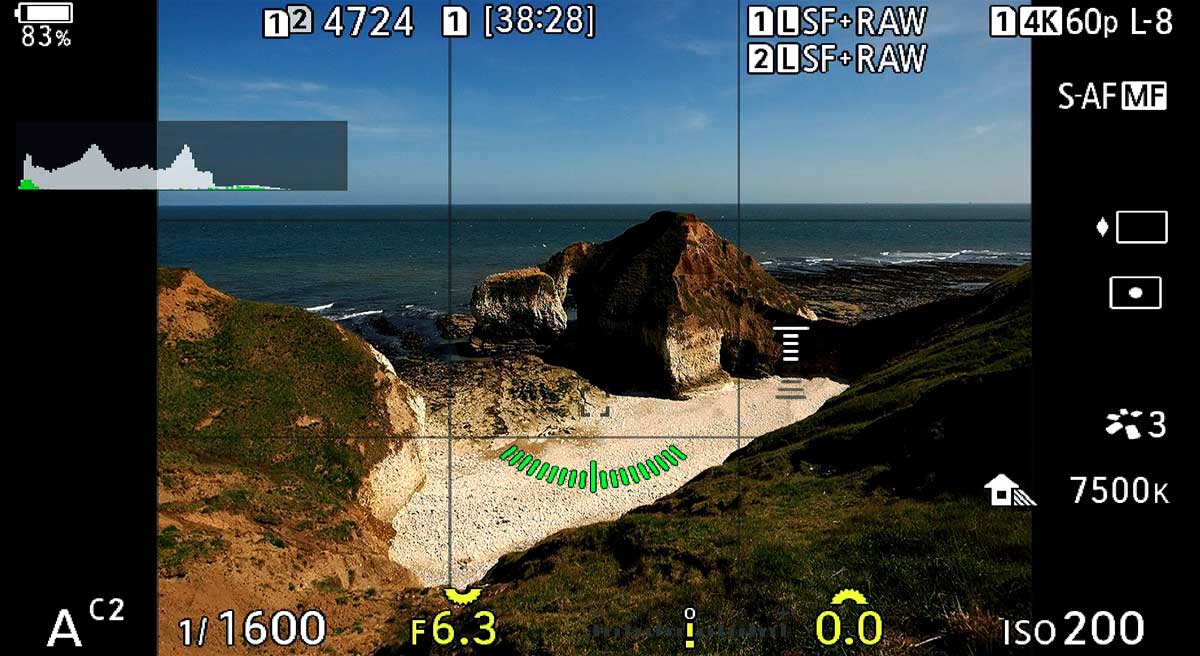
Spot metering just from the centre which was much brighter. The camera has under exposed the whole scene. Notice how the Histogram has also moved further into the dark tones.
TAKING CONTROL OF EXPOSURE
We can use the camera to give us a guide for the correct exposure. Remember it bases the suggested exposure on a pre-define 18% grey point or zero. It can easily be fooled into under or over exposing based on the scene which means we have to make judgements ourselves. To do this the absolute best indication is the Histogram. Getting familiar with it will serve you well.
LIVE HISTOGRAM
The Live Histogram gives us a real time representation of the light in the scene and allows decisions to be made based on it. It can be enabled in the menu for the rear screen, the EVF, or both and I would set it for both. You can also view the Histogram when previewing an image by pressing Info.
Cog menu >4.Information>Info Settings
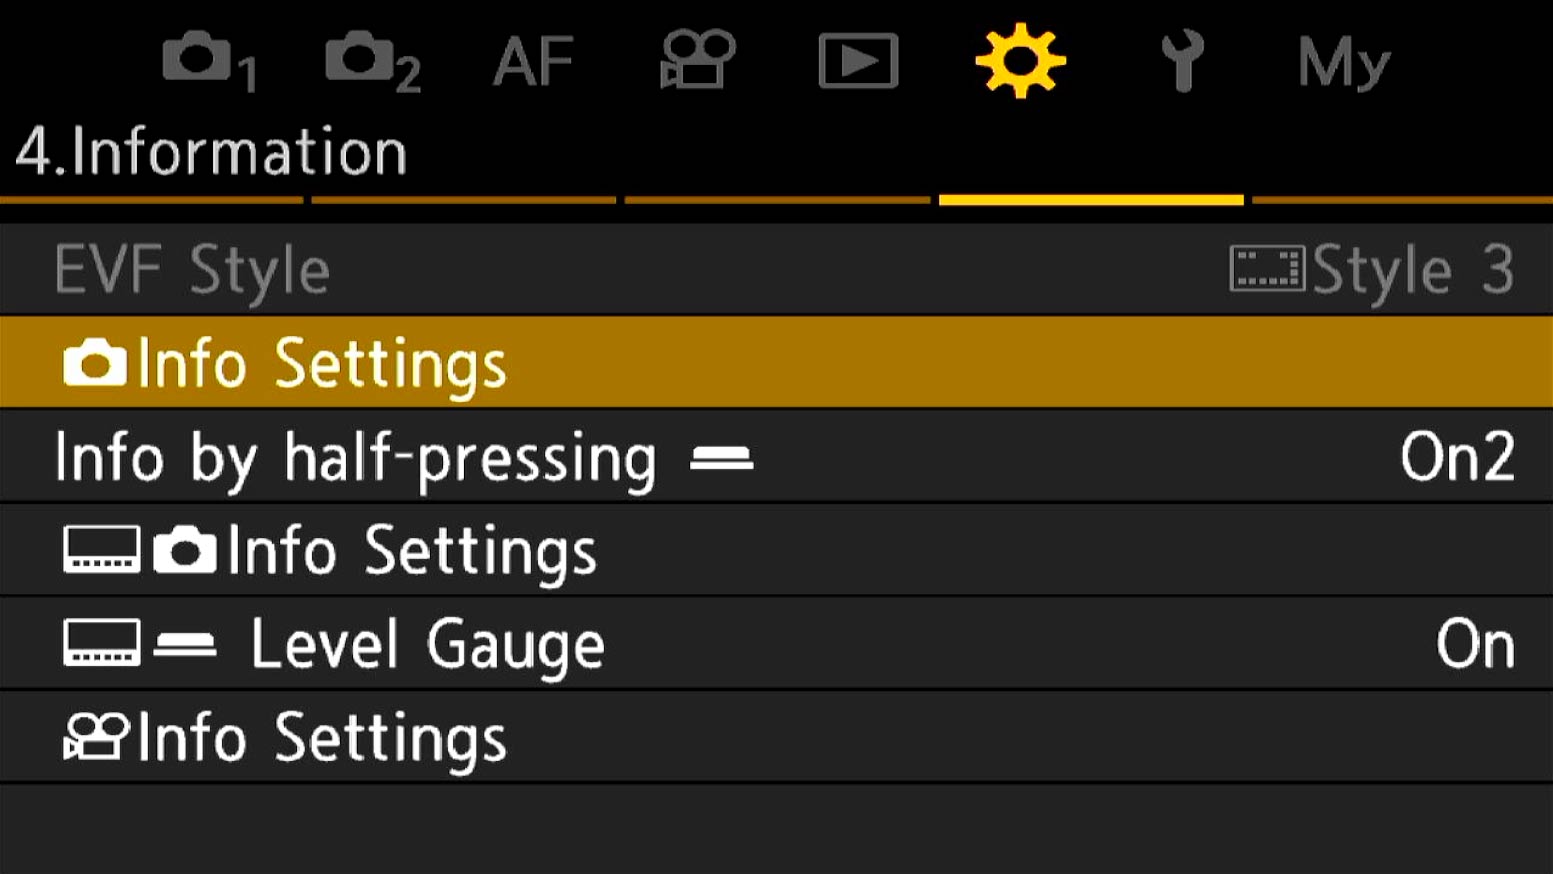
Select settings to set up. You have the options of setting up the rear screen (Camera Icon) and EVF (Screen/Camara Icon) individually. I suggest keeping them the same.
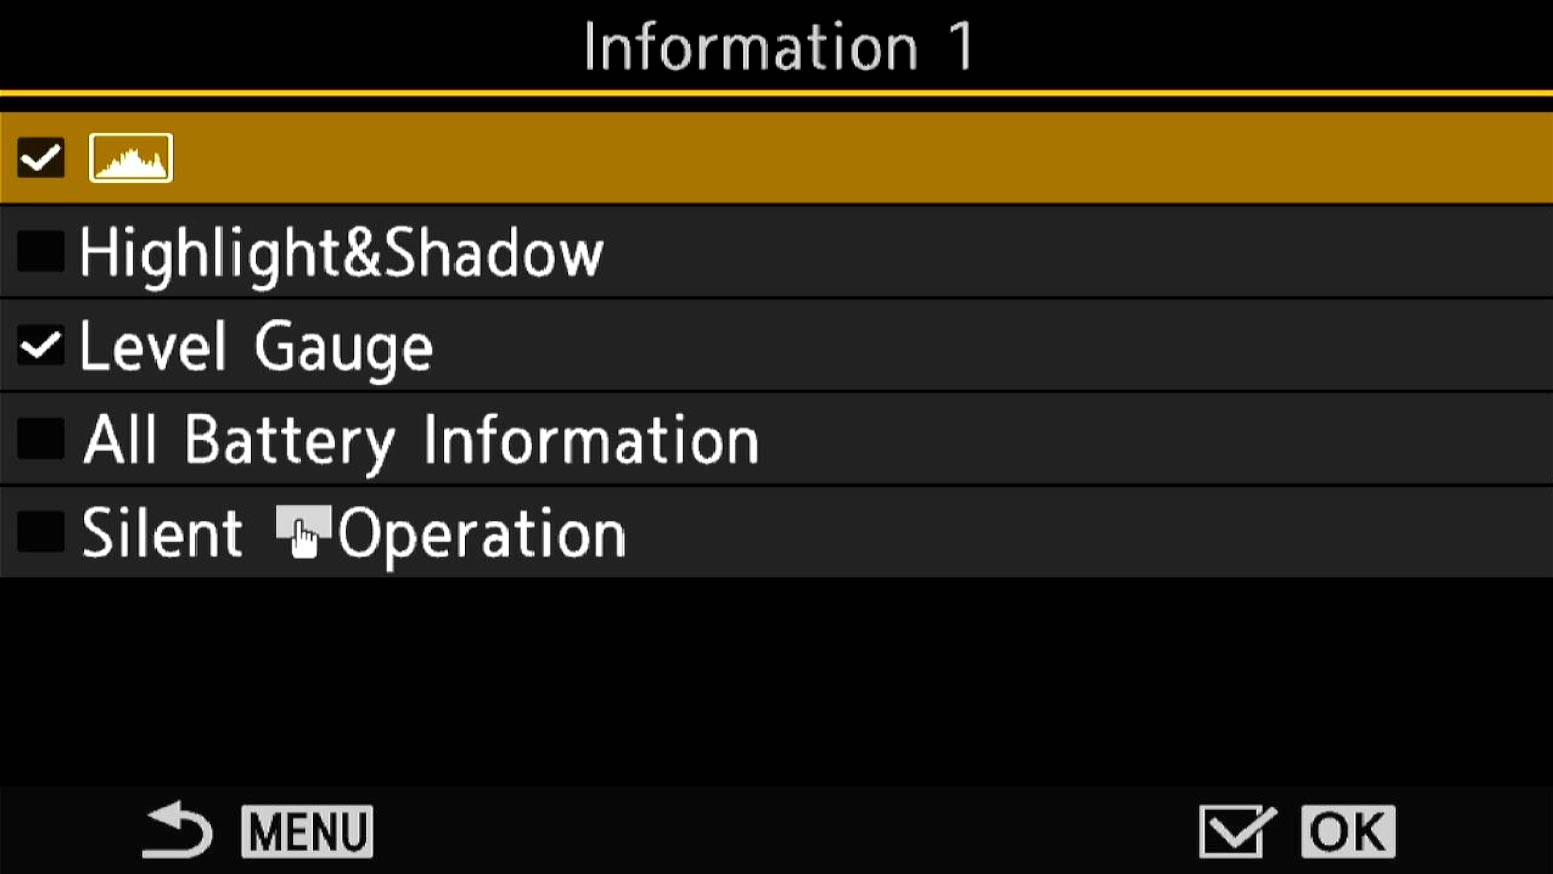
Entering each one you have 3 sets of settings to enable, Information 1, 2 and 3. Select the settings you would like to see each time Info is pressed. Set Histogram in Info1.
WHAT IS THE HISTOGRAM SHOWING US?
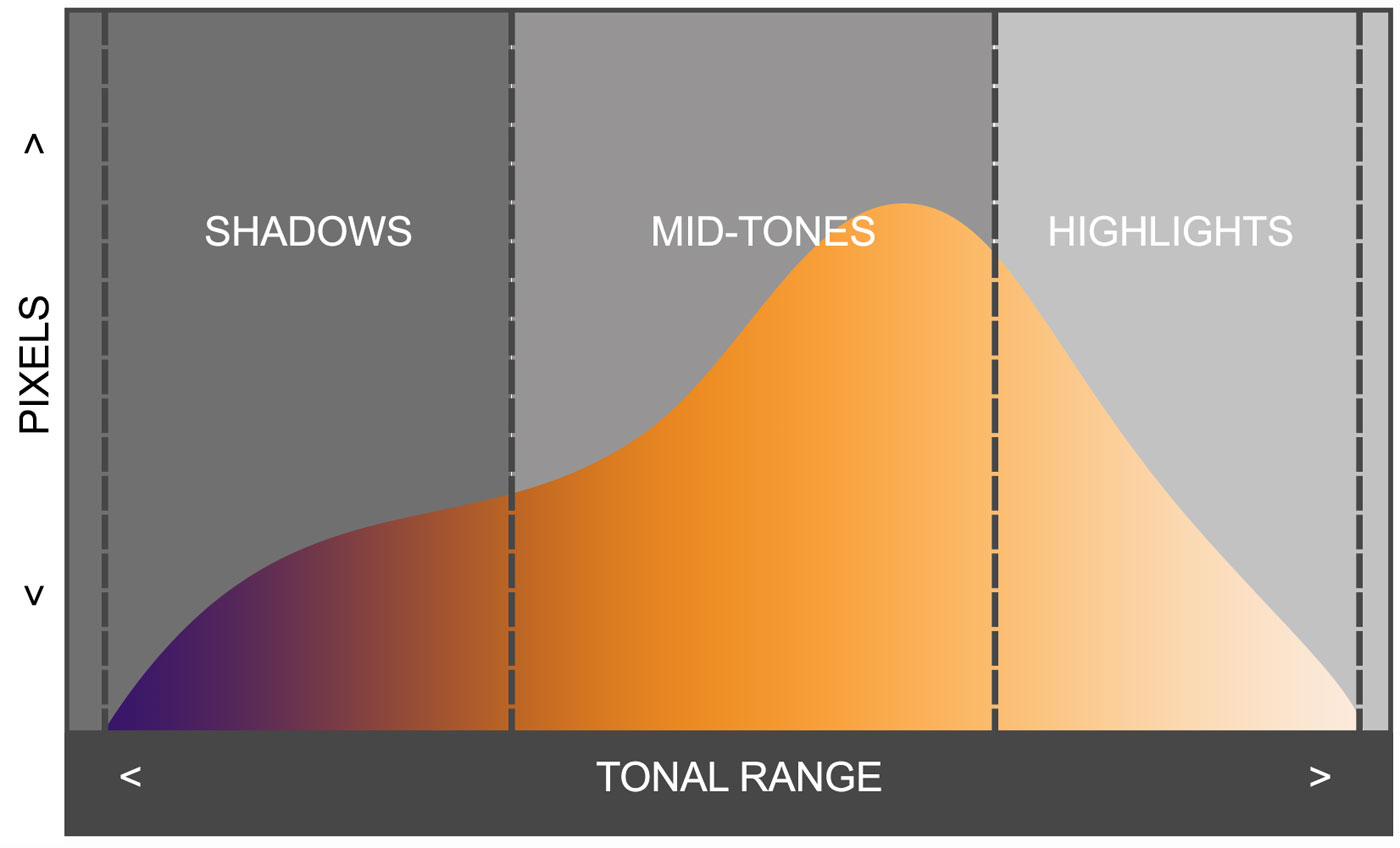
Based on the light the Histogram shows the levels of brightness in the scene, with dark on the left (pure black on the left edge), midtones in the middle and bright on the right (pure white on the right edge). The height, or the vertical axis, shows how many pixels of each brightness are in the image. You may also see colours too, with Green representing the pixels within the Spot metering range even if you are not using it, Red representing areas above the upper limit and Blue representing areas below the lower limit.
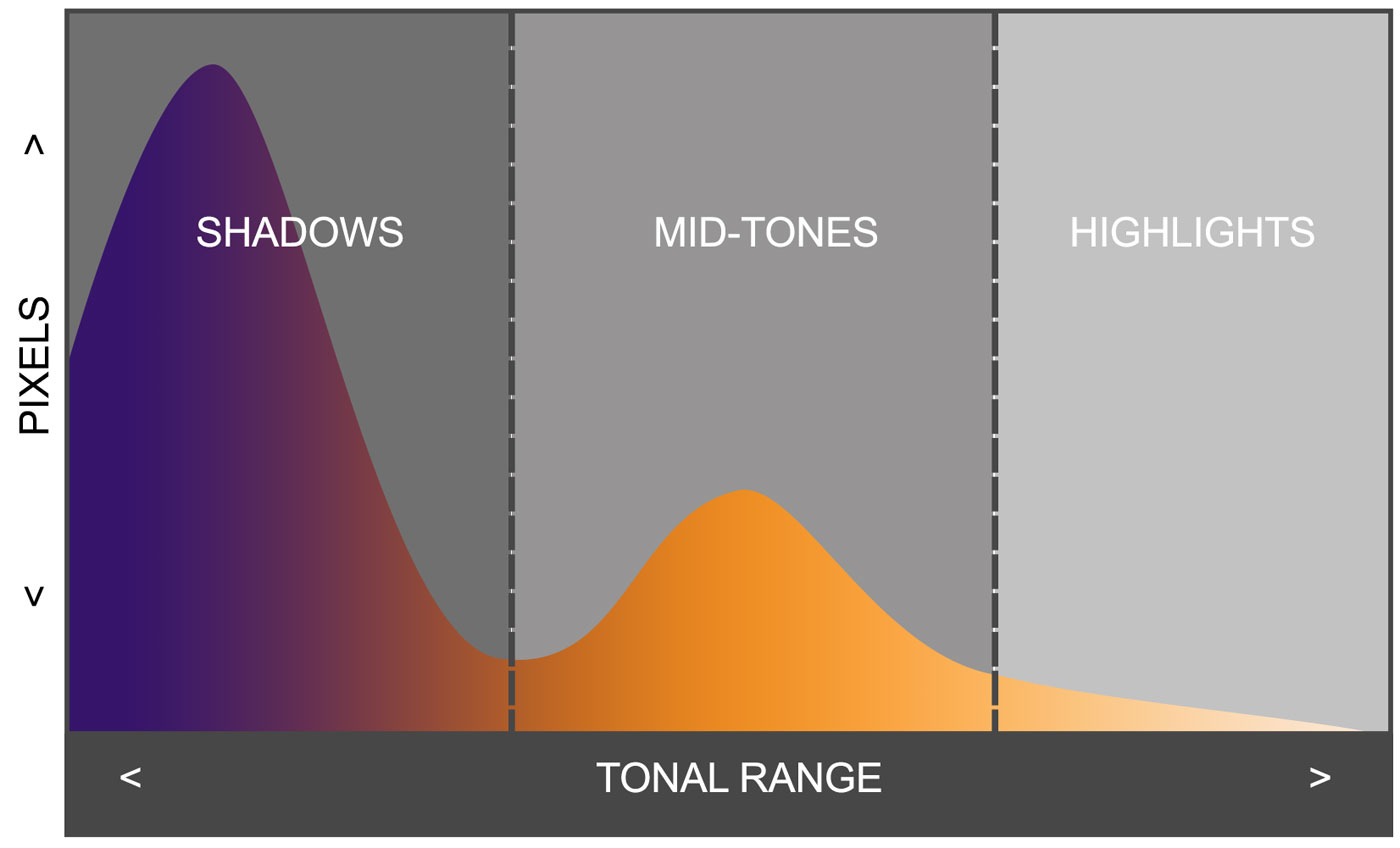
Histogram with mostly dark tones – Signifies underexposure.
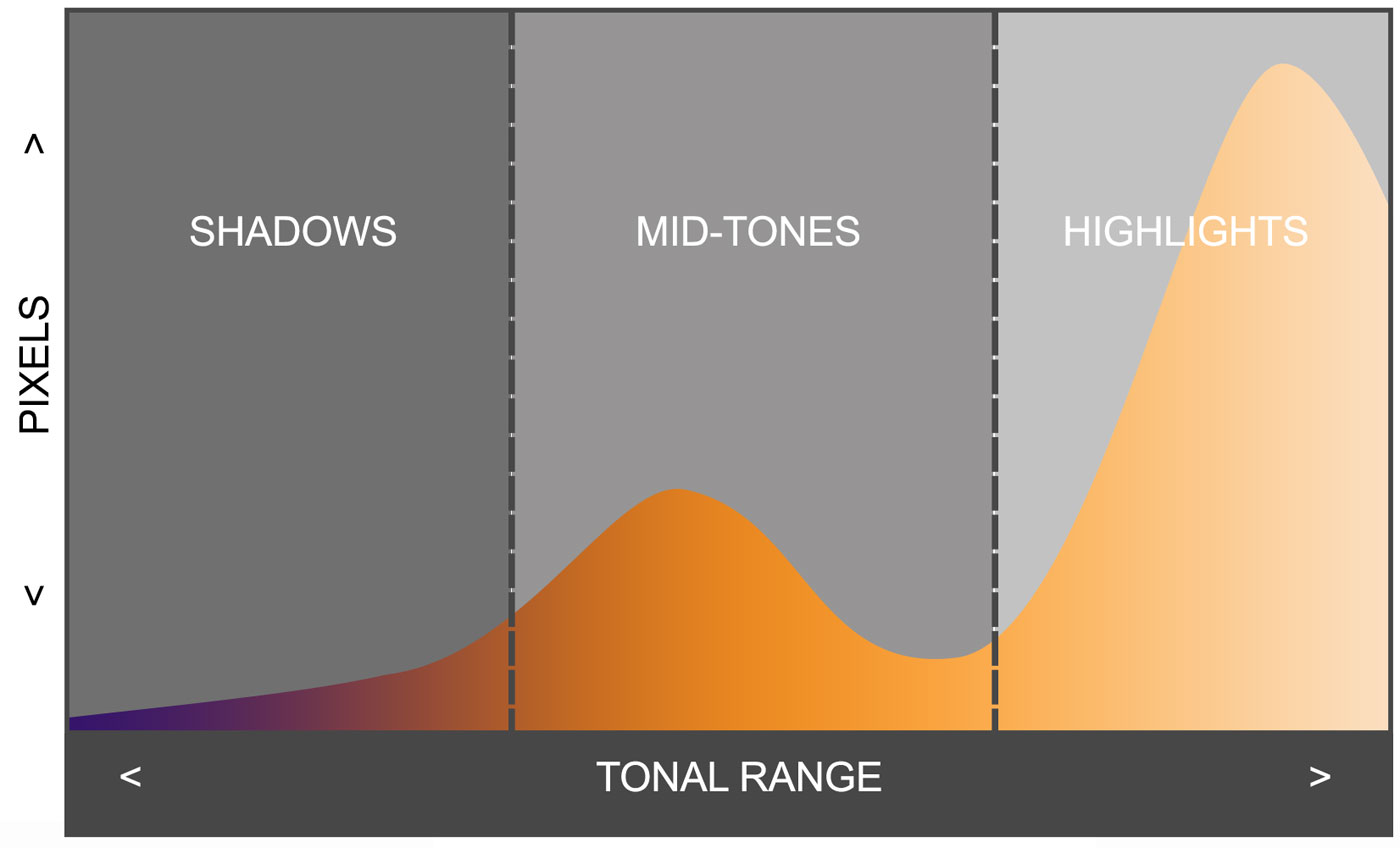
Histogram with mostly bright tones – Signifies overexposure.
READING THE HISTOGRAM
These simplified graphics representing a histogram show the tones in the first example have dark tones all bunched to the right, and the opposite on the second example. This means they are under or over-exposed just taking the information as it is. Or does it? It needs to be read in context with the scene, a bright scene may have the tones largely in the bright tonal range and a dark scene may have the tones in the darks. Although we do not know what the scene was the tones in both have been ‘clipped’. The first example has the darks going way off the scale so they are pure black and shadows will not have any information other than just black, they will be impossible to open to recover any detail because it isn’t there. The second has highlights way out of the scale meaning the highlights have been blown and again there will be no information other than pure white. Highlights will be impossible to recover. Also in some cases you may find the graph goes out of the top, again meaning the tones have been clipped.
You will soon find it easy to read a histogram and it may have lots of ‘spikes’. That is normal, a light or dark point in a scene will produce a spike and you will be able to identify what actually created it. Reading a histogram can actually provide a great deal of information.
CORRECT HISTOGRAM
If you got ahead and thought the histogram needs to be in the middle you are correct. All the light in the scene are contained within the tonal range of the histogram which means all of the information has been captured and you have a much better chance of being able to process a good image. Notice also that it is within at both edges; the tones have been kept away from pure black and pure white.
A histogram resembling this is your best exposure. It may have many peaks and troughs, it doesn’t matter, as long as you can keep it within the range.
EXPOSURE COMPENSATION
We have seen that the camera will meter an average exposure so how do we override it to set our own exposure? There are different techniques for doing this depending on the shooting mode you use. In Aperture Priority we use Exposure Compensation. In Manual we alter the shutter speed (not aperture because that controls our DoF) to move exposure up or down. In Shutter Priority we alter the aperture.
In A Mode take a meter reading, see what the Histogram is telling you and take a test shot. Then simply turn the front dial and alter the exposure to whatever you feel the situation requires. You will see the pointer on the exposure graph at the bottom move up or down away from ‘0’ and also see the histogram change accordingly. It really is that simple.
By doing this you are taking control of the exposure armed with the information given by the Histogram. If you feel highlights are blowing or shadows are too dark the Histogram will indicate this and you can adjust to suit. It actually means that whichever Metering Mode you use is somewhat moot too because your’e overriding it and making decisions yourself.
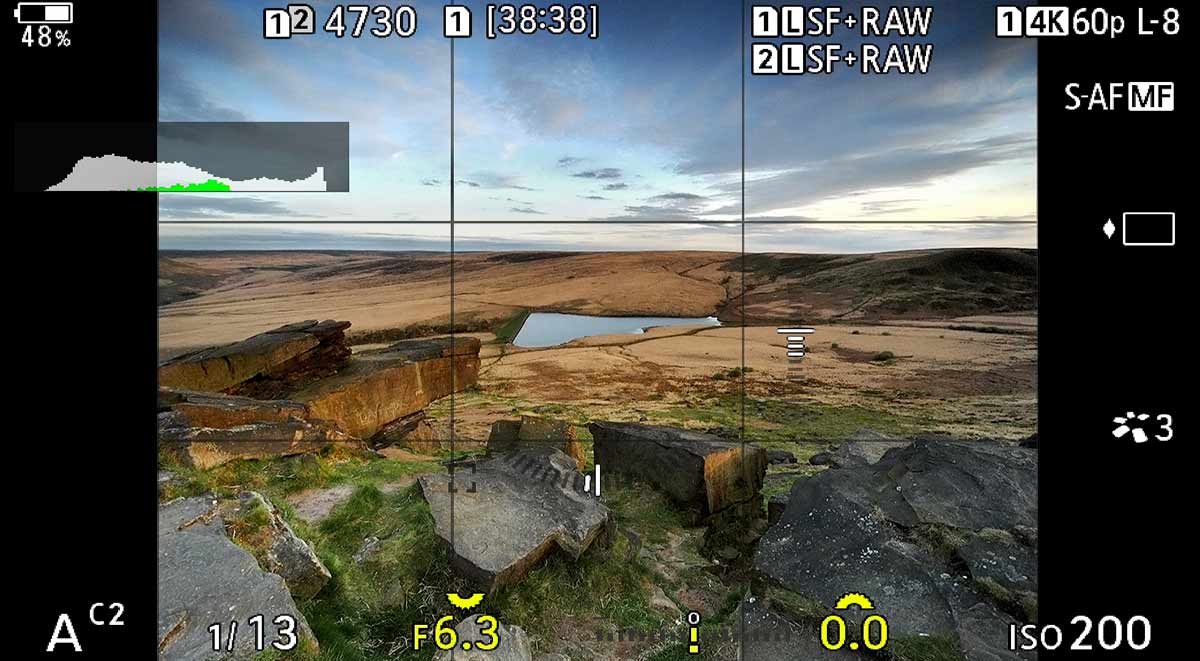
The scene here has a good exposure with no blown highlight. The Histogram shows bright tones are well controlled because I had a graduated filter in place. There are plenty of darks because of the shadows but they are away from the left edge so shadows are not blocked in. I could have moved exposure up a little to the right although all the tones are spread out evenly, all the information is there and nothing is clipped.
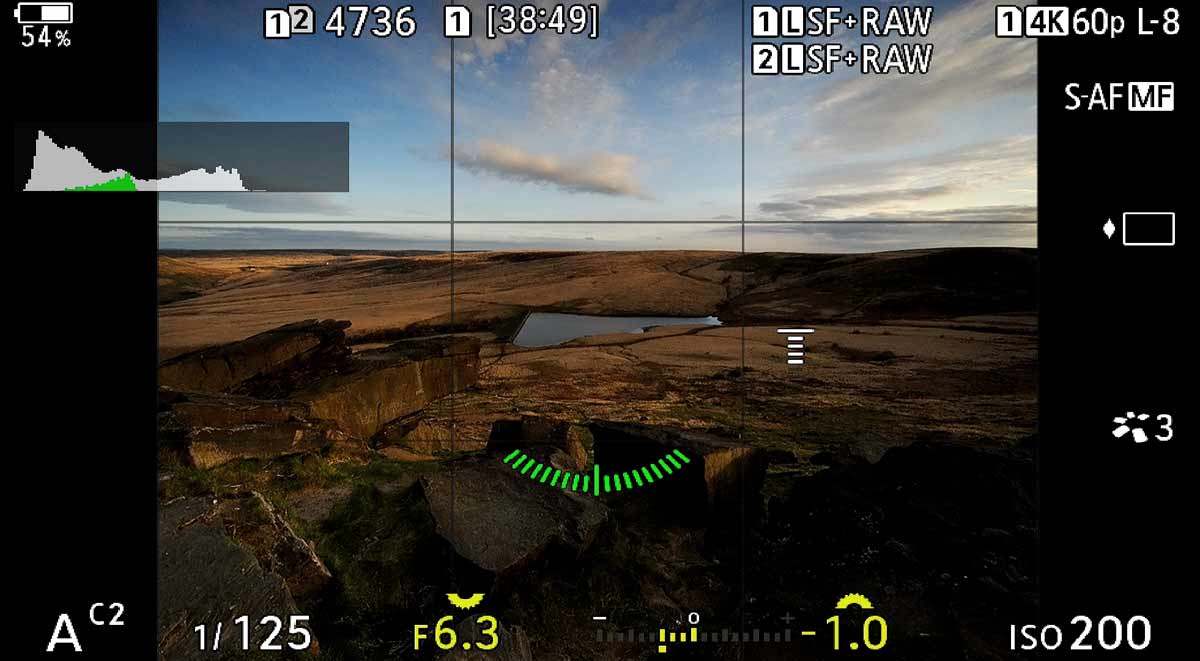
Dialling in 1 stop under exposure (Note they are in 1/3rd increments). This is obviously too dark and the Histogram is telling us the same thing. Darks are not yet clipped to 100% black but they are too dark, mid tones are reduced and there are no bright tones at all. This would result in more noise, the first image will give a much better quality final image.
In Manual mode we don’t have exposure compensation exactly. Turn the rear dial and the shutter speed is altered, thus increasing or decreasing exposure. See the difference? There isn’t one, it is exactly the same and one of the reasons why I say you should never listen to anyone who says you have to use manual for more control, it really is rubbish. By default the wheels are reverse in A (shutter front) and M (shutter rear), you can swap them in the Buttons menu so that are the same.
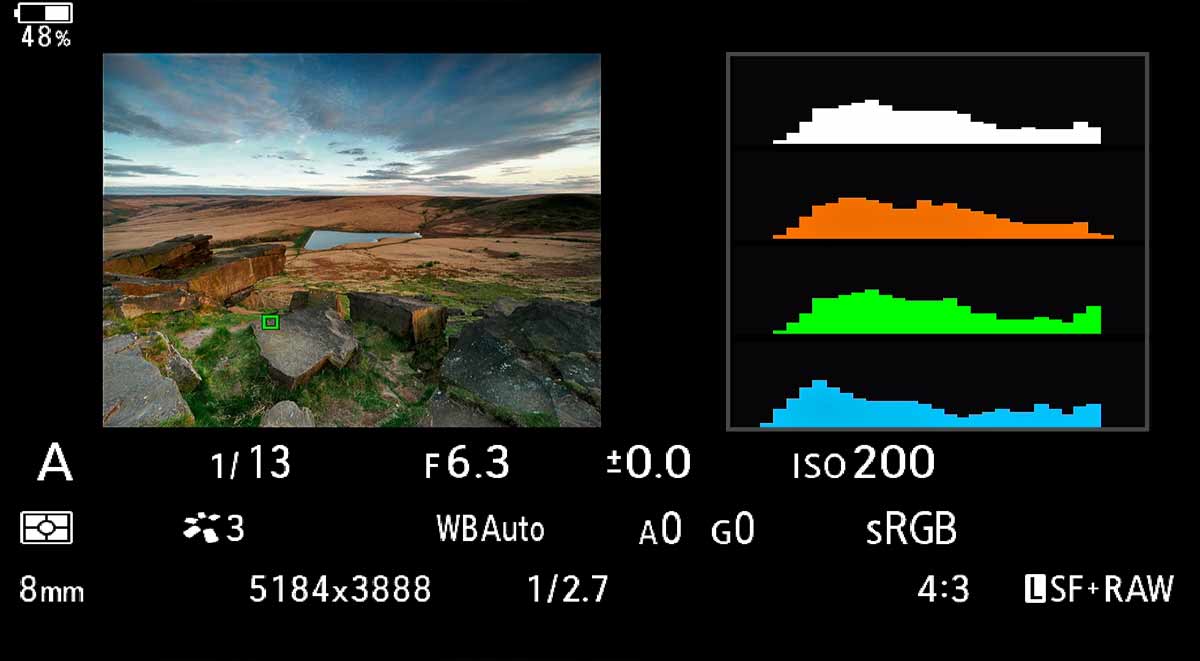
The image Playback Histogram gives the same information with luminance well within what I would want as a good exposure. Here it gives all four channels, including red, green and blue. Being able to see all channels is useful because one may be slightly blown allowing you to make changes.
THE HISTOGRAM HAS FOUR COLOURS
- White: General luminance or brightness for the whole image.
- Green: Luminance of the Centre Spot (a handy spot metering indicator even in ESP metering).
- Red: Indicates blown highlights.
- Blue: Indicates blocked in shadows.
The second screen on pressing INFO shows another visual feature for controlling exposure, Shadows & Highlights (if you enabled it). We set this up in the Menu Walk Through so that pressing the Info Button cycles through various on screen displays. See Below.
THE CHALLENGE
The challenge with Landscape photography, and all genres is getting a good exposure. In Landscapes we almost always have a sky that is brighter than the ground and we have to find a way to get an exposure that will capture all the information (the dynamic range) of both in one shot. It isn’t always possible which is why physical graduated filters are useful, using Live-GND, or bracketing images by taking multiple exposures and then blending them together. We will cover this in the Bracketing Section. The take-away here is to master understanding the exposure information the camera is giving you and understanding how to change it; it is quite easy once you understand.
EXPOSE TO THE RIGHT
→TIP – Expose To The Right (ETTR) is a technique you may hear and it is important when using Olympus /OM System. ETTR means pushing the exposure a little into the upper mid tones and highlights but without clipping or blowing highlights. This is because the more information you can gather in an exposure the better and the less your shadows are ‘blocked in’ the better. It is easier to reduce exposure when processing than it is to increase exposure because of noise. We looked at noise previously and we know we want to avoid it. Do note however that it is scene dependent and you may not need to push exposure to the right. What is important is not under-exposing. Another factor that is important is the Signal To Noise Ratio and it plays a large roll in why we expose to the right.
SIGNAL TO NOISE RATIO (SNR)
Without getting too technical Signal To Noise is a scientific way of expressing signal to noise for electronic devices including cameras. A high signal means the information stands out from the noise, where a low signal means it is less distinguishable from noise. As the ‘information’ is light the more we can gather the less chance there is of noise dominating the image. There is always noise, how we control it is by giving more signal so it cannot rear its ugly head. An under exposed image will have much more noise, and trying to brighten it in post just amplifies the poor signal you captured. Shifting the exposure over to the right will result in less noise. Do remember though sometimes it is unavoidable, in long exposures for example we also have sensor heat noise, but the more you do to reduce it with good technique the better.
Smaller sensors with lots of pixels generate more noise than a larger sensor with less pixels because the pixels (or photodiodes) are larger and can gather more light. The Signal To Noise Ratio will be higher. Olympus sensors are small so they are inherently prone to more noise so it follows that increasing signal for a better exposure reduces this. This is one reason why OM System have not exceeded 20mp and unless they find a way to increase it without increasing noise I am fine with that. You may have seen some Full Frame cameras with large pixel counts (46mp) and the same body being available with much lower pixels (12mp). They are designed for genres such as Astro Photography where the ability to capture more light with less noise is more important than high pixel resolution.
AEL – AUTO EXPOSURE LOCK
Another method is using the Auto Exposure Lock and it is worth mentioning how it works. You can influence the areas the camera meters from by adjusting the framing, if you feel the ground is a little dark a bright sky may be the cause. By adjusting the camera down a little the meter reading will change which you can lock using the AEL button. It means altering composition and with the flexibility of just using Exposure Compensation AEL is a function that is seldom used. If you follow the settings guide you have already set it to a more useful function. If you shoot in Manual the exposure you set via aperture, ISO and shutter speed do not change if you change composition, so AEL is even more redundant.
SHADOWS AND HIGHLIGHTS
Another additional visual aid is the Shadows and Highlights which is also available to enable in the Cog Menu >4. Information. It provides a visual warning when highlights will be blown (orange) and when shadows will be blocked in (blue). It is also available in image playback. I find it a little intrusive to have enabled shooting live even if it can be set on a different screen by pressing Info. I find that the Histogram is enough. One thing to note which comes from experience and knowing your sensor, the warnings can be a little conservative and err on the side of caution. If a very minor highlight warning shows it is probably fine and can be recovered in post.
A TRICKY EXPOSURE
Sunset in the Peak District and all the challenges you would expect in one image. Bright highlights, dark shadows and a Histogram that didn’t want to play.
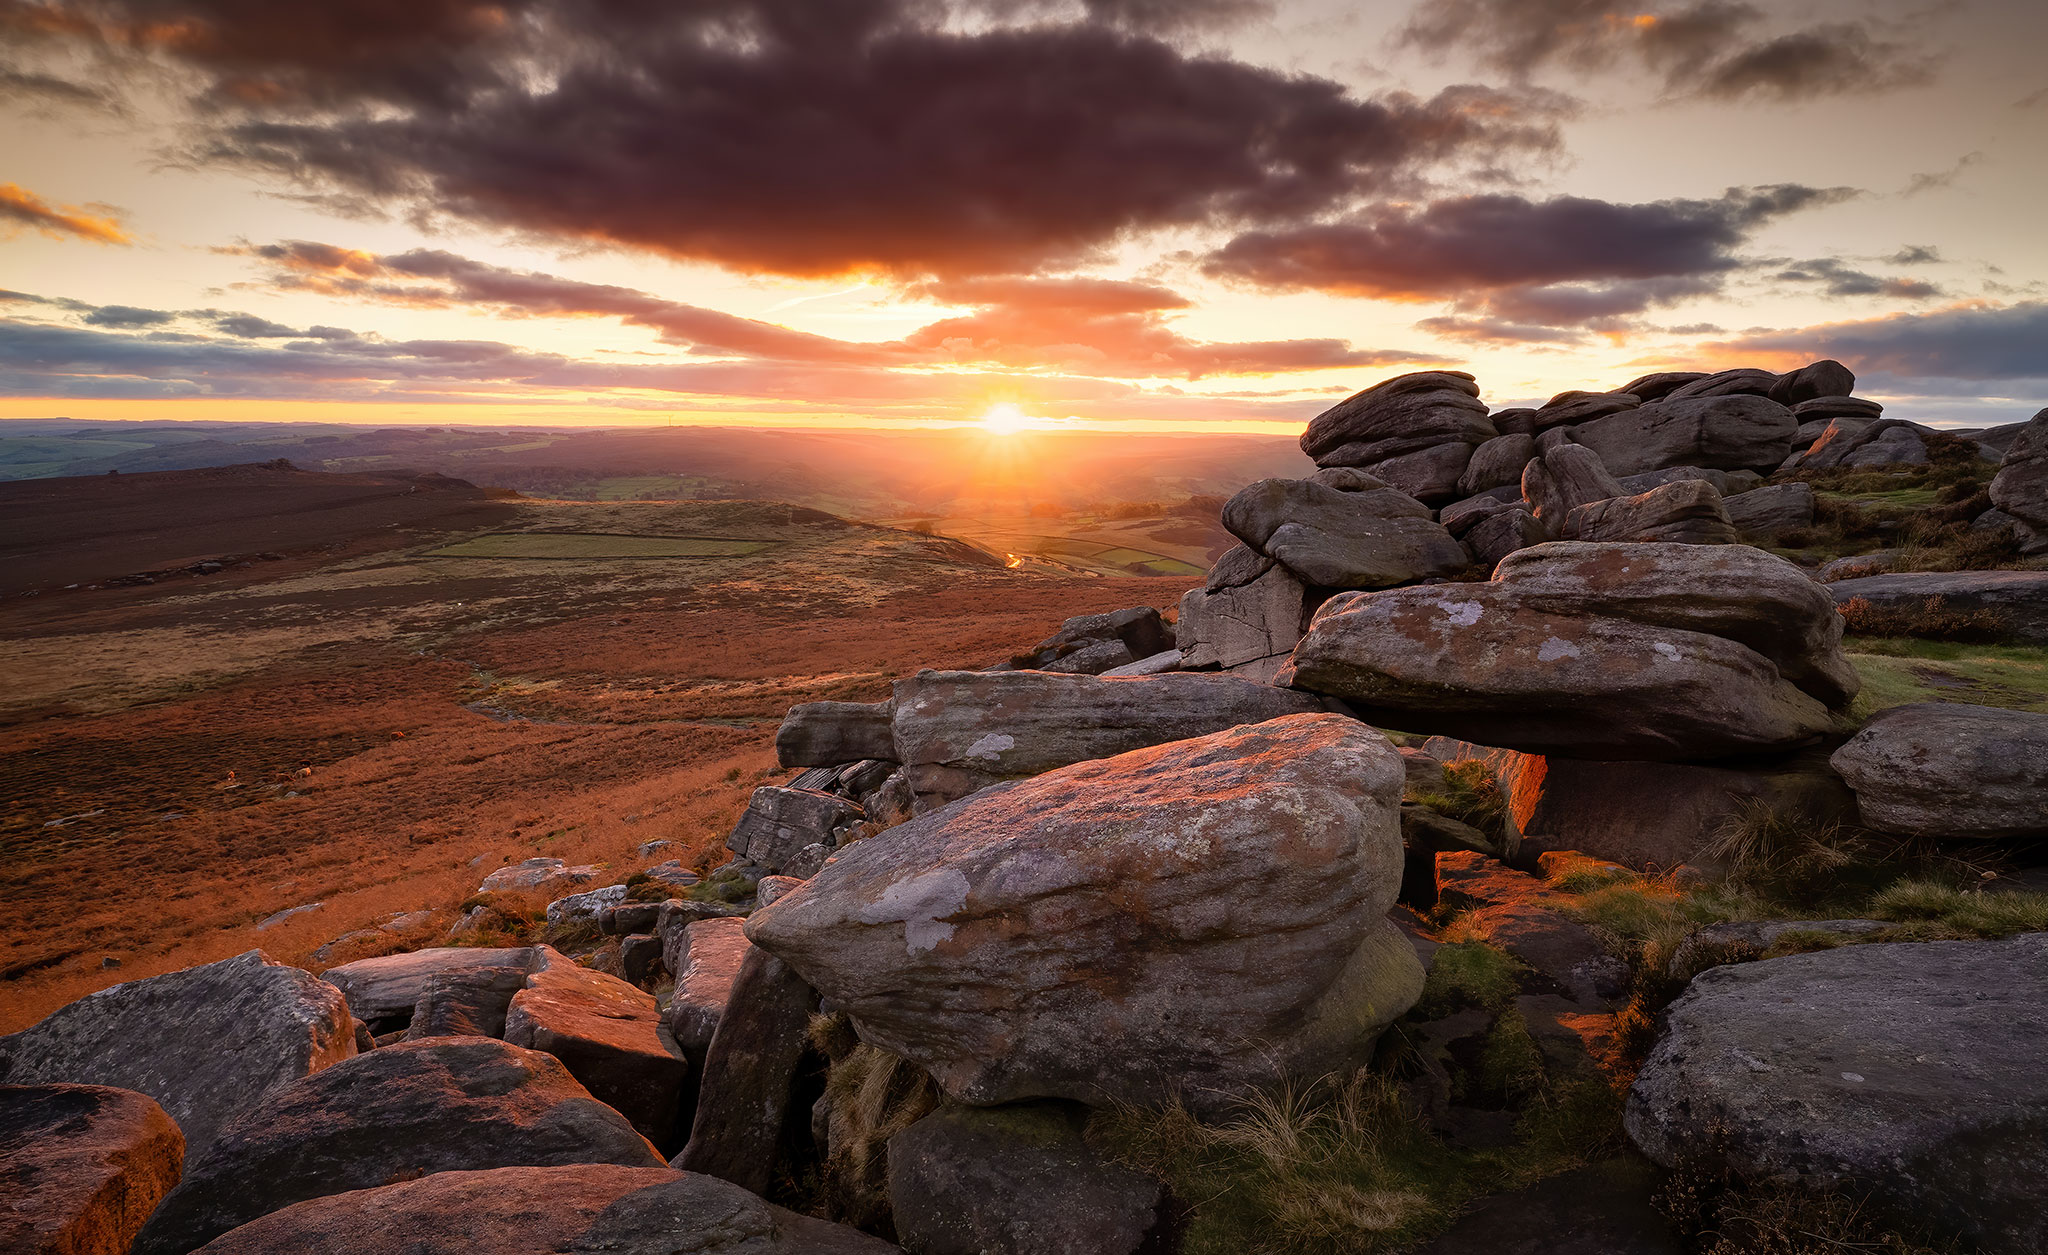
8-25 Pro @ 8mm ISO200 f7.1 1/13s Exp.
Facing directly towards the sun is always going to be a challenge. It is always better to wait until it is at the least intense when right on the horizon, but even so it will still be a challenge. For this image I used a Reverse Graduated ND Filter to bring down the intensity of the sky and sun. Using a grad filter has the advantage of being like sunglasses, it takes away the dazzle and makes the ground more visible. Go outside with a bright sky, shield the sky with a hand and see how much clearer the ground is.
Doing this brightened the foreground which was so underexposed. Now the Dynamic range was closer to what I could capture I had the latitude to actually increase the exposure by a full stop and open the foreground more to stop the shadows blocking in completely. The trick is to always find the balance and to know just how far you can push or pull the RAW images in processing.
Other options would be to use the Live-GND in similar situations or just exposure bracket the images. Live-GND doesn’t have a Reverse Grad which is actually darker in the centre and fades to the top, ideal when the bright part of the image is on the horizon. Without the filter I would bracket this scene and merge them in post.
RUNNING WATER
Running water such as this image of Sligachan, Isle of Skye can often be problematic because the first thing to blow highlights will be the water, especially on a bright sunny day. Best advice, if it is bright and sunny just forget it; the highlights with direct sunlight will be impossible to control, so look for water that doesn’t have direct sunlight, or even better on a day with lots of atmosphere and no direct light.
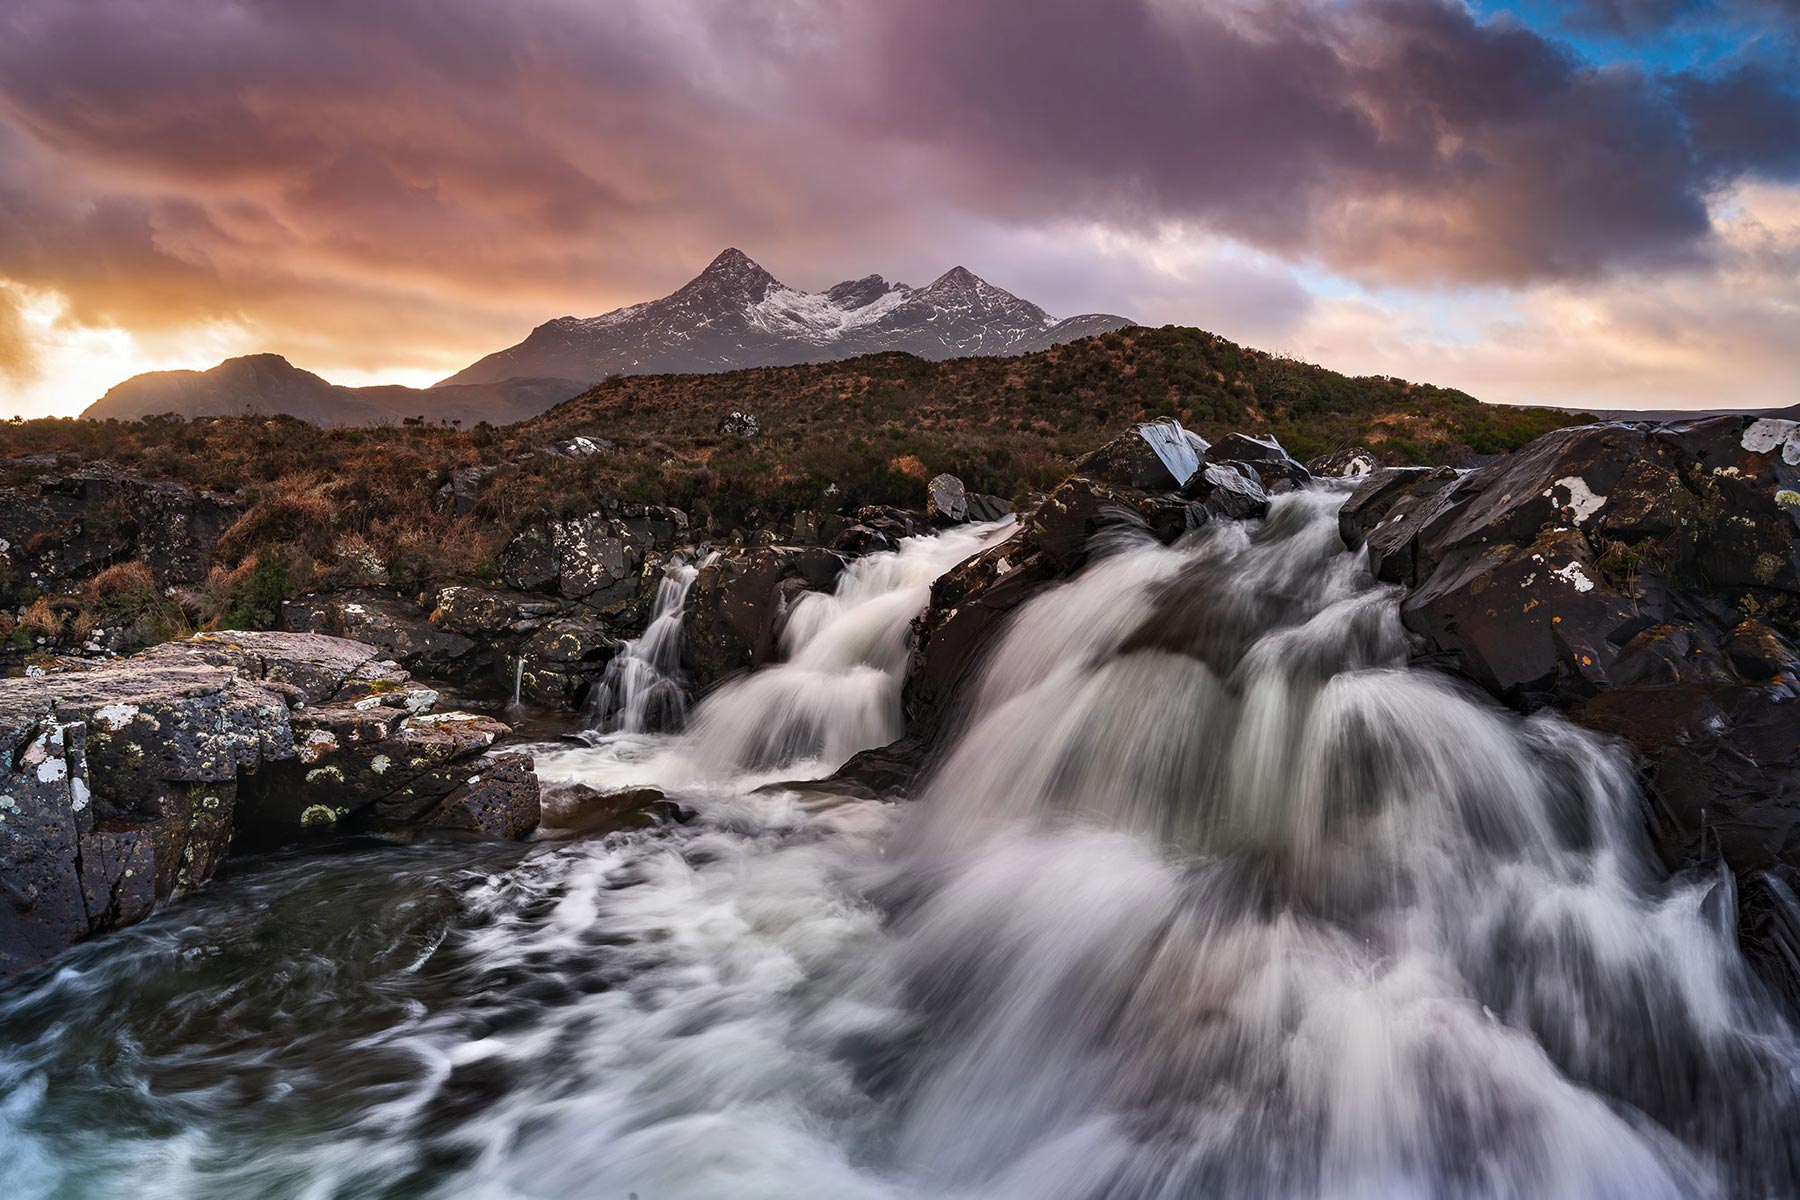
8-25 Pro @10mm f6.3 ISO200 1/6s Exp Live ND4 (2 Stops)
Usually the best approach is to get an exposure that balances the tonal range, and with brights from water try to get a happy medium where you know you can recover a little, without having to open shadows too much. Lightroom’s AI Denoise is now so good, as is DXO, shadow noise should not be too much of an issue.
Another approach which I often do is to take another shot and then merge it into the problem area, exposure compensating under a little for where highlights are blowing. You could Spot meter for the water, but it is faster just to use exposure compensation. The issue is your shutter speed will change, after you just spent time working out exactly what you want for just the right amount of motion blur and detail. For small areas it isn’t really a problem, unless the shutter speed changes so much you know it just won’t look right trying to blend even a small area in.
Supposing you have 1/6th second on fast moving water like above. There’s some wonderful detail, and just the right amount of blur to suggest movement, but a large area at the front is bright and it is blowing out. Under-exposing in Aperture Priority will change the shutter, perhaps to a 1/2 second or a full second; too slow. Therefore change the aperture by stopping down a little, then change Exposure-Compensation (which changes shutter speed) so it matches your original shutter, and the image will be under-exposed. You could also do it it in Manual Mode, however once you understand the front wheel changes the shutter speed in A and M it really makes little difference. Will changing the Aperture matter, and what about diffraction? You probably only need one stop, it will make little difference and it is just one small area you need. You could even change the ISO to do the same thing.
TIP
An old trick using Graduated ND Filters in this situation is to have one upside down; no-one said they can only be used on skies. You could do the same using Live-GND and set it inside down. Remember it won’t be possible if you are using Live-ND.
CONCLUSION
Now we have covered metering modes and how to get the best exposure we will explore the next section; Depth of Field and how to obtain images with the best sharpness from foreground to background.
