HDR EDITING MODE
Editing in HDR Mode
WHAT IS HDR EDITING MODE?
First just to clarify it is not an HDR image, where multiple images are combined to produce an image encompassing all the tones of your image. The names are confusing.
Second, your monitor must support HDR, otherwise all of this is completely pointless. A standard monitor, even high specification monitors, are typically SDR and actually only display around 6-7 stops of dynamic range. More and more monitors are now HDR which give around another 4 stops of dynamic range and the difference when viewing on your screen is incredible, all of those wonderful tones you are missing are now available when you click the HDR button in LR (and ACR). Tones that look flat will suddenly come to life, that detail you knew was there especially in bright tones will be revealed, and colours look more vibrant. You really should try it.
FRAUGHT WITH PROBLEMS
HDR Mode is fraught with problems. When it was first introduced some years ago it was a minefield and after spending two days researching and getting up to speed it is still a minefield.
- As I said it is only viable if your monitor supports HDR. Even some monitors that are not fully HDR compatible will show some differences. The issue here is this is only what you are seeing, not everyone else once you release it into the wild online. With so many devices out there, screens, mobiles, web browsers and apps it is impossible to control everything which is why we calibrate monitors; at least we know we are right. It is the same with HDR, some devices and screens support it some don’t.
- Right now the Chrome browser supports HDR, Safari and Firefox do not. Instagram now supports HDR as does Threads, Facebook does to an extent only with mobile uploads taken in HDR, Flickr doesn’t at all along with other Social Media platforms. Some apps on your computer may or may not support HDR, even if your screen does. You can see the issues right?
- More care is needed when exporting images from LR, you must ensure one of the HDR compatible colour spaces is selected such as HDR P3. Lightroom does have a tool for embedding an SDR image for when the viewing screen doesn’t support HDR, it will default back to the SDR embedded. In all my tests I find this embedded SDR is nowhere near as good as an image I can process just in standard mode.
- Workflow can be affected, for instance we cannot merge HDR images to panoramas. Confusingly LR’s HDR Panorama is for merging bracketed images, so right now even Adobe are not getting to grips with the difference between HDR blended images and HDR Mode images.
- Print is an issue. We cannot print HDR images, not until printers and labs will accept the colour spaces and devices can cope with it. Remember we are talking about images seen on back illuminated screens and printing paper is flat white. Maybe one day back-illuminated paper will be invented. You will have to produce two files, one extra one for printing. And then which one do you display online considering your print client may see the HDR version and then receive a print which will not be the same?
HDR MODE TOOLS
This all sounds pretty negative but remember HDR is still in its infancy despite being around a few years now. HDR will be the norm one day and it will be amazing when it is. We can explore HDR Mode a little below.
I am not going to show what images in HDR Mode look like, it is pointless. Is your screen HDR, are you reading this in Chrome, or are you reading the eBook? They may be flat and even worse than the SDR image so I will just explain the tools and then show how I use HDR as a LR Hack.
Select an image in LR and try it out now.
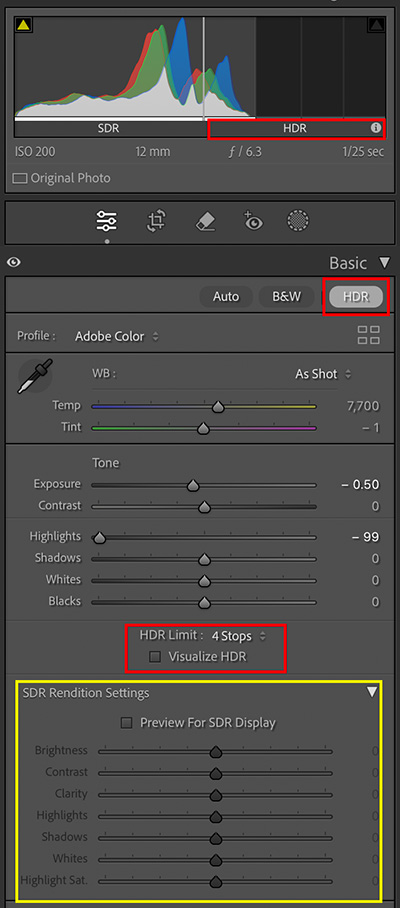
Click the HDR Button in the toolbar and instantly you’ll see the image shown in all its glory, especially with brights. Sometimes you won’t see a great deal of difference which doesn’t mean the image is poor, it just means all the tones you could have are already there.
Notice the Histogram changes. It is now split into two halves, SDR and HDR. HDR has four segments because the HDR Limit below is set to four stops by default. There’s little reason to change it. LR is now using the expanded range of your monitor and for the image I had selected there is an extra stop of tones available to process.
Under HDR Limit a box can be enabled to Visualise HDR. This shows an overlay on the image to show where the corresponding tones are.
SDR Rendition Settings. An SDR image is embedded in the HDR which will be shown when it is displayed on a non HDR screen or application. Enable it and change the settings to adjust it, the default will be poor. I do find this still will not give as good a result as an image edited without HDR enabled.
You can access all of the other settings just as you would normally.

HDR Mode Enabled.
USING HDR MODE FOR BETTER SDR EDITING
As I said there are too many incompatibility issue right now for HDR to be mainstream so I do not use it. But it is still a useful way to assist with editing and revealing information you did not know was there. Here’s how I use it:

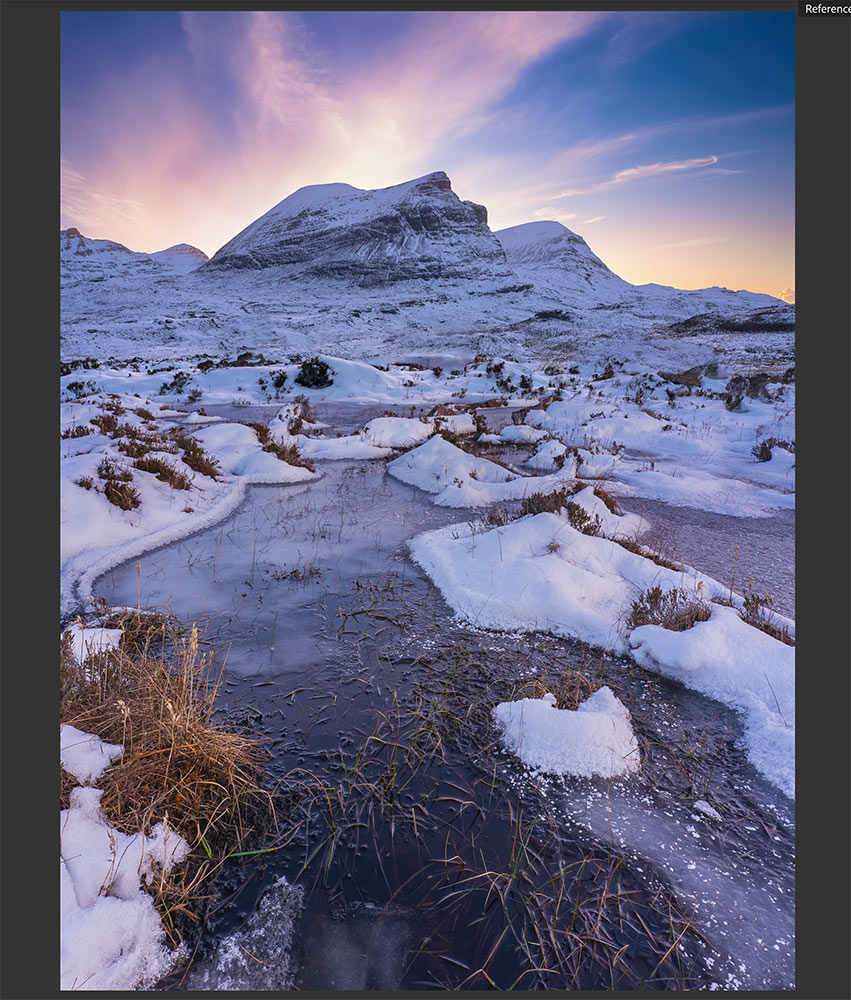
Reference Image-Normally the HDR Image

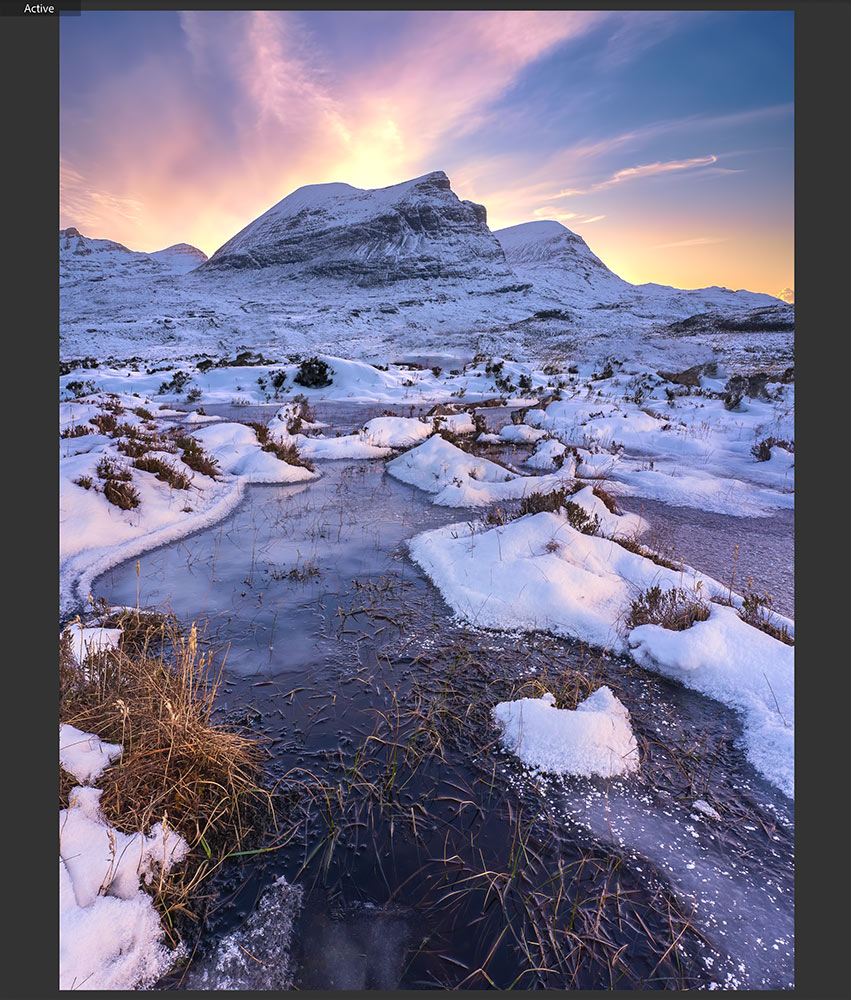
Active Image
In LR Develop click the R/A Grid view at the bottom. After processing my image as best I can I would then make a Virtual copy and add it to the Reference pane and enable HDR. Then add the Active image I am editing without HDR enabled. I can then compare the differences and reveal what I am missing in the SDR Image. As I cannot show the HDR here I’ve added the processed SDR image instead.
Seeing the HDR and standard images side-by-side told me the differences were significant. Colour in the sky just behind the mountains was intense from the sunset and the snow in the foreground was brighter with some colour picked up from the sky. Now I am aware of it I can try to do something about it.
Staying in SDR on the active image I used a sky mask and continued processing, making whites brighter while reducing highlights to stop them blowing. I adjusted colour and then used a Colour Range mask for the yellows. There were areas I did not want it to affect so I used a brush and removed it with Subtraction.
On the foreground I used a Luminance mask and selected the bright snow to brighten it. Because I did not want it to affect the sky or the mountain which would not have highlights I again used a brush to subtract it from those areas. Again a colour range mask allowed me to add a hint of colour to the snow highlights, subtracting it from other areas with a brush.
Whilst this is by no means utilising the full potential of HDR Mode you can at least use it for guidance to show tones you were not aware of and then do something about it, and avoid the pitfalls of HDR compatibility.
COMPLETE
This section is complete and you should have an understanding of what the HDR Mode actually is. If you have an HDR screen try the mode out and be aware of the pitfalls.
Next we will explore four stacking in Photoshop.
NEXT – 10 FOCUS STACKING IN PS
