5 – GETTING ORGANISED
Organising your images inside and outside LR.
Organising you Library is crucial. Think of it as a filing cabinet where you want to find an image. Getting organised before you even import into LR will help in the long run. Do not just import from a memory card with no structure or logic. I see so many people that just import into one folder making organising difficult and slowing down Lightroom because it has to display one huge folder. You could do this and then Keyword images to find them, which takes a lot of time, and still means LR is using one folder. Not good.
A popular way to import images is nonetheless straight from a memory card. If this is you, at least think about folders and file names first. Set up a Filename Template which could include the date, a shoot name and the file name, select the year (parent) folder in the Destination section, then check the Into Subfolder option and then type the folder name you wish to use. Make sure Copy is selected so images are copied from the card to the folder you set up.
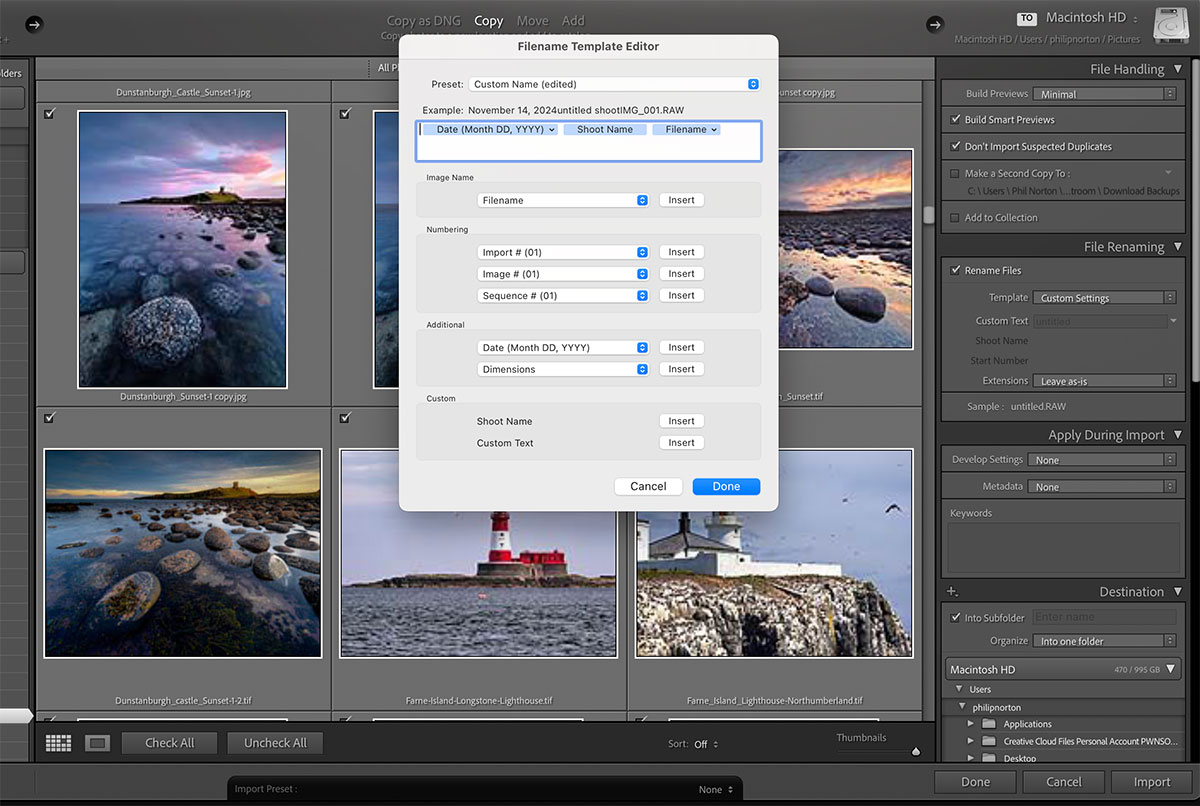
Filename Template. In File Renaming select Edit when copying or moving files.
→ TIP There is an important distinction between the import Copy, Move, Add commands. Each will do just as the name says; if you import straight from a memory card make sure to use Copy to avoid the potential risk of a file being corrupted if it it moved. Add obviously if your images are already on a drive, and Copy as DNG is suitable if your raw format/camera is not supported by LR, they can be converted to a readable DNG raw instead.
I find all this a little taxing. Many times I will have more than one session of images to import, with different locations, making it awkward to do a single import. I may not be able to rename images to one name, and may want different folders. Because of this I developed my own way of building a library and importing images which makes far more sense to me, as a landscape photographer, and it is less taxing on my poor grey matter.
First, a tour of my structure.
RAWS
I use a logical structure where I have a main folder for all of my Raw images on an external 4TB Solid State Drive so I don’t clog up my hard drive. Each time I fill a drive new drives are available with bigger capacity; they never get cheaper, but capacity grows. This is then backed up to my 12TB Raid Drive, and then the cloud.
Note – Your Lightroom Library, the files created with all the data will be ‘catalogue name’.lrcat. Usually it will be created along with other files in Pictures/Lightroom both on Windows and Mac. This is fine, in fact better to have it on your internal drive and the actual images on an external drive.
Inside this Raw folder are folders for Main Location, for example Peak District, Lake District, Scotland etc. I visit many locations many times, so I have a folder for Lake District, and inside this are folders for ‘Lake District 2020’, ‘Lake District 2023’, ‘Lake District 2024’ etc. I separate by year.
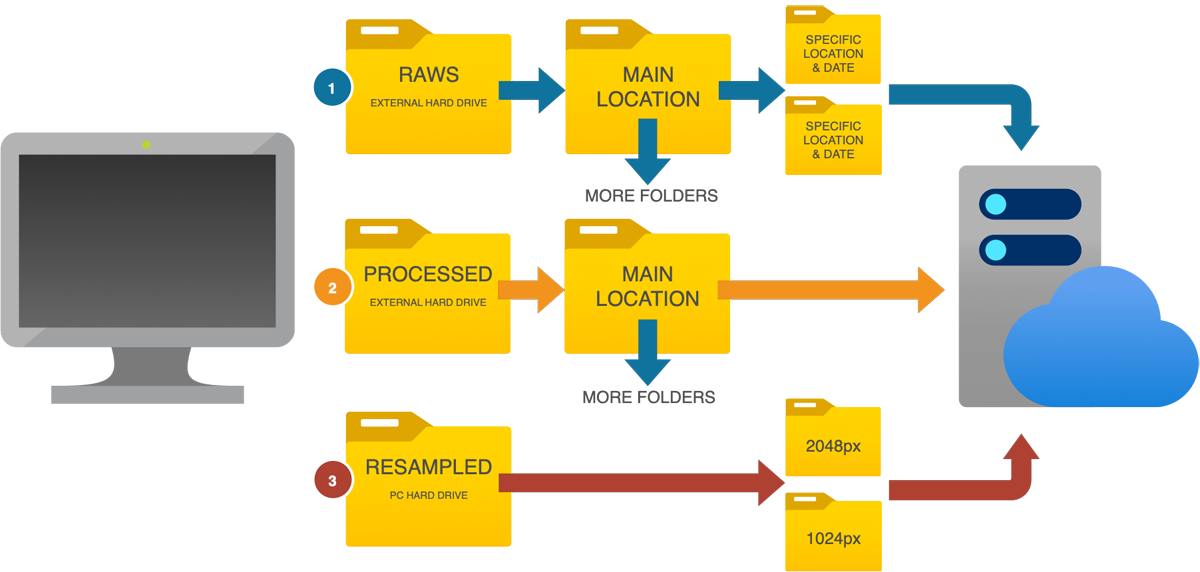
My Organisational Structure
Within each geographic location are many areas, Derwent Water, Blea Tarn etc, so I have sub folders within each top folder ‘Lake District 2024’ for each area. This means I can find images within LR, I can select, rate and cull easier, and I can find images without using LR. It also makes it easier to back up just one folder if needed. I find it is important to be able to locate an image or a folder on my drives without having to use LR.
If I visit a location and only take a few images I may not organise on a deeper level at all, I will put them into one folder, however another advantage of a deep folder structure is naming the specific place. If you visit Isle of Skye and visit many locations will you remember what they are called? Take a note on location and create folders, Quiraing, Fairy Pools, Sligachan etc so you know in the future. You could even use the Map in LR and pin an image but it still means you are relying on LR.
PROCESSED
I also create other folders separate from my Raws for Processed or Finished images. It is important to separate these from your Raws to maintain a logical structure, they do not need to be in LR which will just bloat it. I do not need to create folders quite as deep, just location works for me. Finished images are always named with the location and a date when I save them to help searching, and remind me where it was, I’m forgetful. For example ‘Blea Tarn 1 Sunset 2024-Lake District’. Blea Tarn tells me where it was, the suffix number in case I have more than one shot, a short descriptive tag such as sunset, Autumn, Winter etc, the year, and the main location. These give me lots of information just from the filename, and I can drill down with organising in Bridge or just do a quick search on my drive to find all ‘Blea Tarn’.
RESAMPLED
My ‘Resampled’ folder are images I have saved at a lower resolution for use online. Keeping them in a different folder avoids the risk of overwriting the original. I have one size for use on social media and another for my website. It seems painful right, all these different sizes? Not at all, I use an Action in PS which is far faster than LR. One click does it all. See below.
Here is a typical folder structure for the Lake District. Note the different folders for different years at the bottom. You may choose to have a similar structure but not use years, just Lake District>Derwent Water etc and place all images from that location over time into it.
Also note the folder named ‘All’. This is only useful if you are going to use sub folders to further organise images.
If you use a Mac like me you’ll know Apple are notorious for not giving speedy updates to raw previews, meaning I cannot use Finder to view thumbnails. In this case I create a temporary folder named ‘All’. From my memory card I drag or copy and paste all my images into this folder. Now all my Raw images are safely on my drive quickly and easily and I can organise them more at my leisure.
In LR go to the Library and select Import. Find the folder ‘All’ and import it with ‘Add’. There is no need to select Copy or Move because you already did that.
Important – Remember LR does not actually add images into its own library, it is just data. The images you see in LR are just previews of the files on your drive.
Now all your images are in LR and in that folder. Hover your mouse over the top-level folder (Lakes 2024) and right click to select ‘Create folder inside…’. Create your folders as needed, select the folder ‘All’ and simply drag the images you want into that folder.
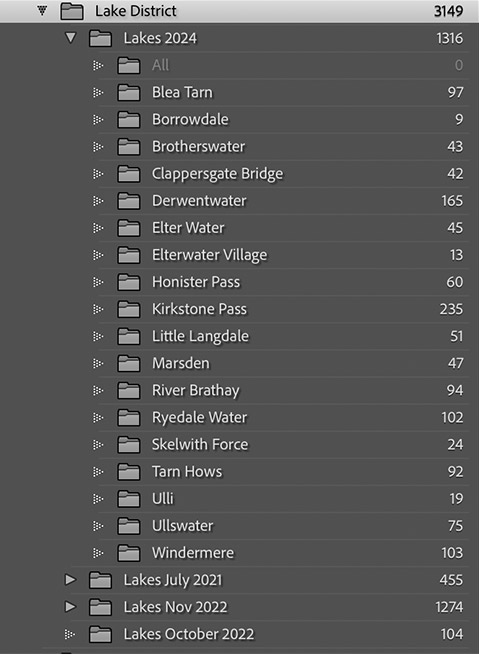
Once complete you can delete the All folder. Note that selecting the Top-Level folder will show all of the images in every folder. Selecting one folder will show images in just that folder. Another advantage of creating a temporary folder (All), when the top level folder is selected all the images in that folder are shown. Move some images into a different folder and they are still shown in the top folder because it is the top level, or containing folder. It can get confusing knowing which images you’ve moved. In the ‘All’ folder, images that have moved will not show, so once it is empty you know you have moved them all.
→ TIPS
1. Using Finder or Explorer to manage your folders? That’s fine, but once they are imported to LR never move folders outside of LR, it will lose the location and you will have to tell LR where they are again. Move folders inside the LR Library. You can of course create new folders and rename folders inside LR and they will also update on your drive.
2. Adding a few new images to an existing folder? Again, this is fine, just drag them from your memory card into the folder on your drive. In Library Module go to Menu Library>Synchronise. LR will scan the folder and import only new images. The new images will show, and you will not see the existing images. Don’t worry, this is just the images imported, navigate back to the folder to see all images. LR always shows the latest imported images first.
3. Quick Collections-Hover over an image thumbnail and a small circular dot appears. Click the dot and the image is added to a Quick Collection. At the top of the Library panels you will see ‘Catalog’. Quick Collections are stored here, and it is a useful way of adding images from different folders into one place during a session. Perhaps you want to select the best from a few folders to process and want to see them in once place. Think of it as a temporary folder which can be cleared when finished. You can save a collection as a Smart Collection making it a permanent collection available in the Library Sidebar.
SORTING, RATING AND CULLING
Now you have your images inside LR you can start to sort, rate and delete (cull) unwanted images. When deleting images you have two choices, remove from LR or Delete. Removing from LR keeps the image on disc and just removes it from your library. Delete is better in most cases, there’s no point in it taking up disc space if you don’t want it.
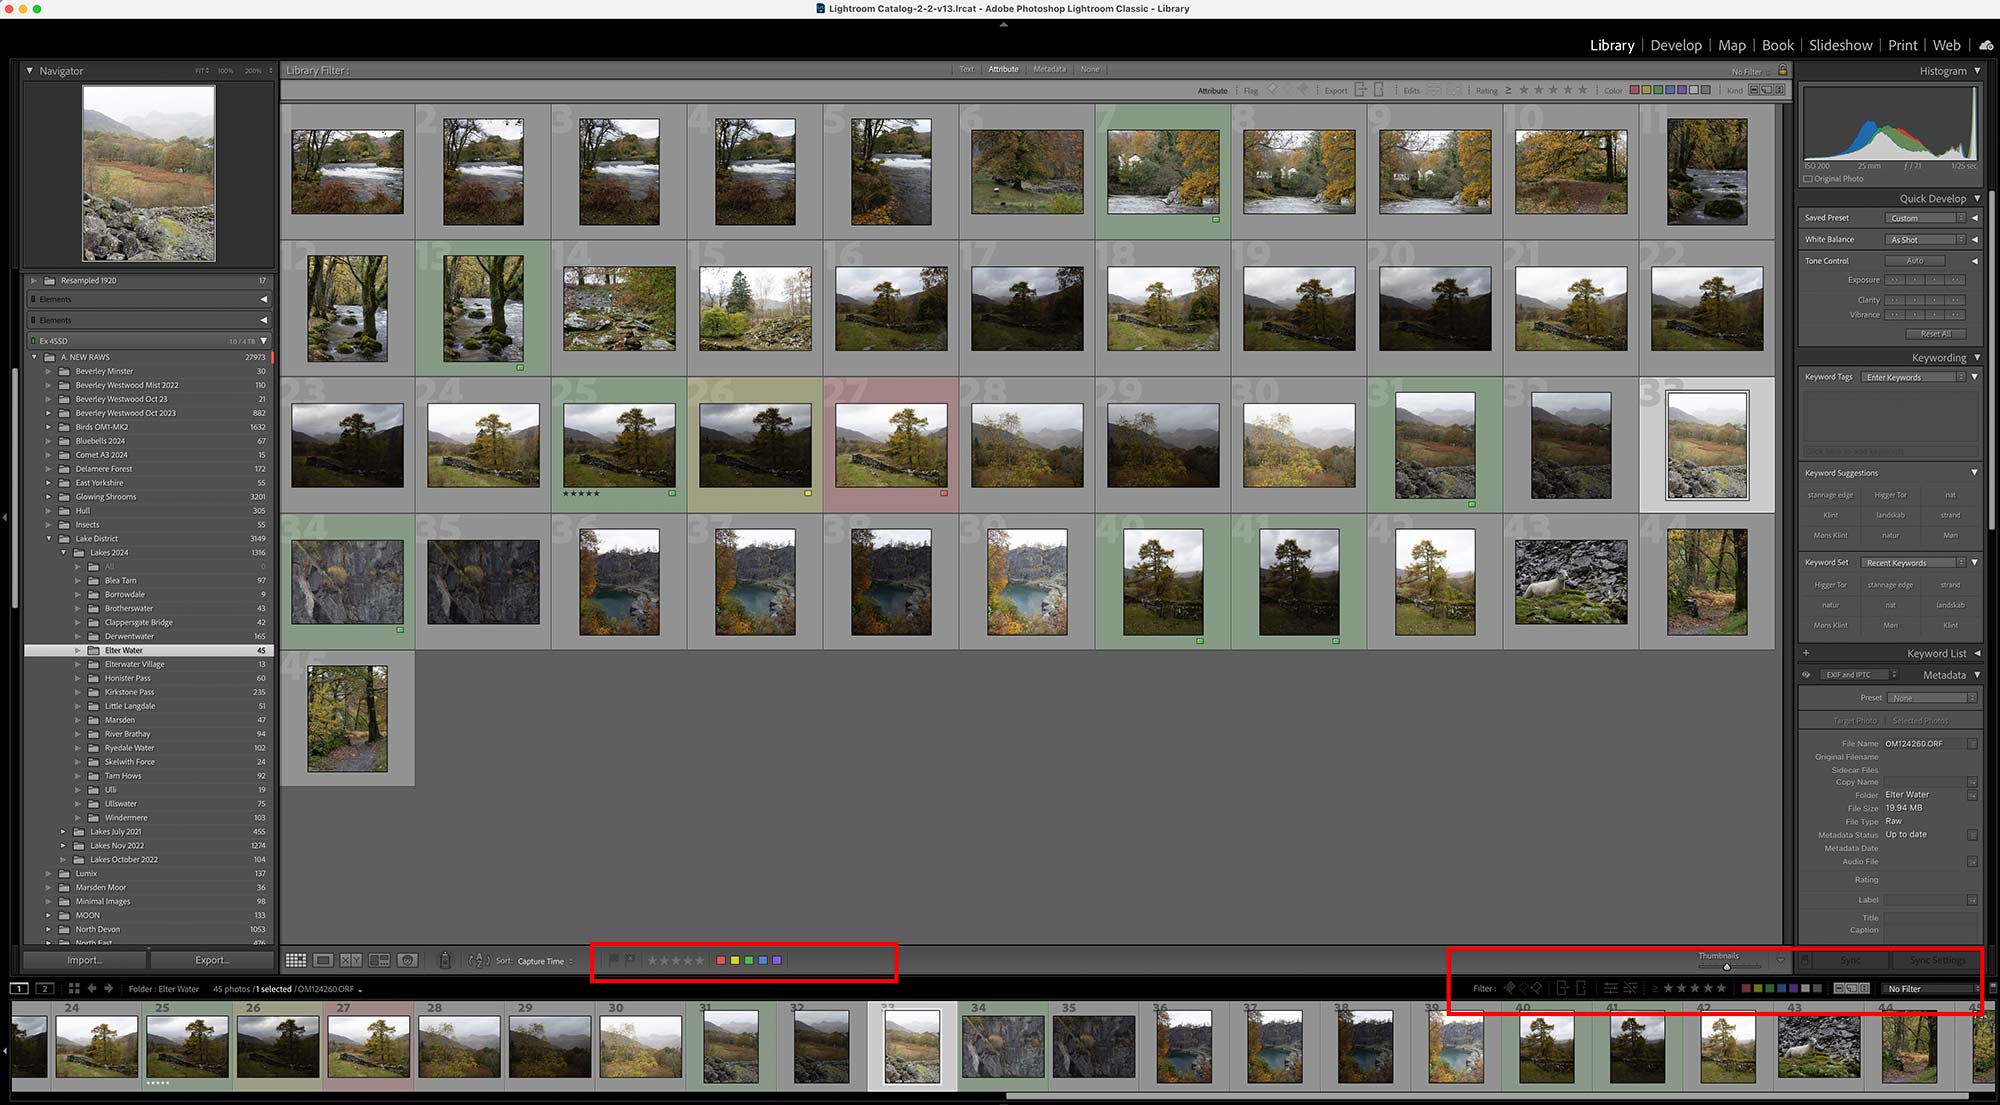
Rating and Sorting in the Library
Delete images you obviously do not want. Rate images you think are best, and maybe some you want to keep for future, I use colour for this.
At the bottom right click ‘Filter’ to show all filter options. In the centre (red box shown) are the available filter options to apply. Select an image and click the option you want. Making it faster, use the keyboard shortcuts. Disclosure, I first started using red for Keepers, green for Maybe. Considering traffic light systems it is probably back to front, but old habits die hard. Use what suits you.
Star Rating =1, 2, 3, 4, 5 (I use colour, not not so much stars but they can be useful for further refining).
Red =6 (to delete), Yellow =7 (maybe keep), Green =8 (best), Blue =9 (your own option).
Now by clicking the appropriate filter on the right, green for example, you can show just those images and hide the rest. Select one colour, or two, or any star rating. Using a colour or a star can help speed up deleting images; rate all images to delete with a star or a colour then sort to show just those images and delete all at once.
Later we will see how this helps when sending images to PS. You may have two images you want to stack in one layer in PS, with images between. Selecting one image and more (press Shift) will select all images in between which we do not want. Colour code the images you want, press the filter to sort and hide the images you do not want, and then select. Or use Cmd+Click on each individual image to select. My habit is to rate them and sort.
Images can also be Stacked. If you have a set of images, say a group you focus bracketed or exposure bracketed and want to make your library view simpler, you can select images and Right Click>Stacking>Group Into Stack. Images will collapse into a stack showing just one thumbnail which can be expanded again at any time.
KEYWORDING
In the Library we also have the option for Keywording. Keywords are simply a word that can be tagged to an image to help with finding and sorting images.
I must confess I do not use Keywords a great deal although some people rely on it. Keywords can be powerful and they are easy to apply once you have them set up. I keep mine very simple, Sunset, Sunrise, Twilight, Long Exposures, Water, Mono for example. I never use location because my library is based on location. Set up keywords in the Keyword List. To apply simply select the images and apply appropriate keywords from the Keyword Set by clicking each one.
PHOTOSHOP ACTIONS
This is one of the reasons I rarely export from LR. I usually finish an image processing in PS so I may as well save it from PS. And I have an Action that will save all the different files I want with one click.
Actions in PS are a set of repetitive tasks you may do often which can be recorded as a set and repeated the the Action Play button. It makes it an ideal way to save multiple image sizes from one image all at once which is why I mention it here because I use one for saving different image sizes into different folders and different Colour Profiles without all the hassle. LR can create presets for exporting one size at a time, whereas PS can do it all at once.
Actions can be used for many things (see the Sun Glow in the processing sections), but only for the same task with no variables. For instance it cannot be used if you use a brush on a particular part of an image, it would make no sense because all image are different. I could upload my action here and make it available but the folder structure needs to be exactly the same otherwise it will fail.
If you use an Action like this give thought to the name of folders and location because you will not be able to change them or the Action will fail.
I have two actions for saving images:
CONVERT HIGH RES (aRGB) TIFF TO HIGH RES (sRGB) JPEG
The first Action saves my processed and finished AdobeRGB Tiff image as a Jpeg, which I only use if I need to send it to a printer because they need Jpeg with an sRGB Profile (ignore if you are only using sRGB). With the Tiff open I created a new Action (I call it ‘Save Hi-Res Jpeg’) and start recording it.
I then used Edit>Convert To Profile and assign sRGB Colour Space, and then save it in my ‘Processed’ folder. I do not have to rename it, the fact that it is a Jpeg and not a Tiff means it will not conflict or overwrite it. I do NOT CLOSE THE IMAGE. I then stop the recording and I can reuse it any time. I now have an sRGB full resolution Jpeg image. I don’t close it because I may then want to use the second action below.
If I need to resize for print I can open it, resize it and then I will save it in another folder I set up called ‘Images for Prints’. Here I will save the image with the same name and add the print size (eg 16×12).
RESIZE FOR WEB USE
My second action converts my original Tiff AdobeRGB to different size images as Jpegs with sRGB colour profiles, a 2048px for use online and a 1024px for use on my website with one click. When I play the Action the image is resized, then it is saved with Save For Web into my ‘Resampled 2048’ folder. It is resampled again to 1024 and then saved into my ‘Resampled 1024’ folder. Just one click and I get all these different images. See below for how I set this one up.
Creating an Action is easy. Click + to create a new action and give it a name. Press Record and carry out the steps required and stop when you are done.
First I resize it with Edit>Image Size width 2048px. Next I export it with File>Export>Save For Web with 60% Quality and 72dpi, ensuring ‘Convert to sRGB‘ and ‘Embed Colour Profile’ are selected and save it in my ‘Resampled 2048‘ folder without changing the image name.
Carry out the same steps resizing to 1024 and Save for Web, this time in my ‘Resampled 1024‘ folder.
Close the image BUT DO NOT SAVE IT. Then click stop to complete recording the Action. If it is saved when closing, your original image is overwritten. I close the image because it means I can open multiple files and convert them without having to then close them again.
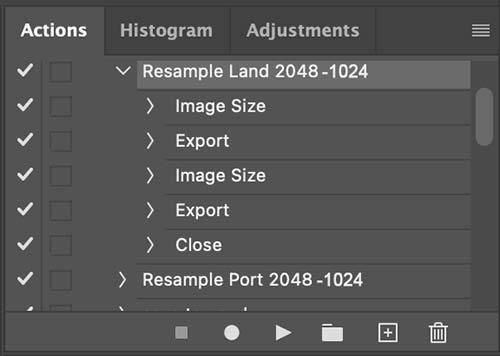
Actions Pallet
The Action will perform the same task each time using the same folder I selected so it is important not to move or rename the folder or it will fail.
Also notice I have two Actions doing the same tasks, one for landscape and one for portrait. When the landscape version is recorded I change the image size on the width to 2048, save it FOR WEB and change again to 1024 and FOR WEB. If I used this on a portrait the width would be 2048, not the height, so the height would be larger. I have to record it again and change the height to 2048.
→ TIP Note Photoshop also has an ‘Export As’ function. This is ok to use for saving different sizes but Export for Web is better for inline use. To change colour profiles you must use ‘Edit>Convert to Profile’.
NEXT – 7 PROCESSING IN LIGHTROOM
You should be well on your way to getting organised in Lightroom and outside Lightroom, and have some images in the Catalog. Next we will start processing an image in the Develop Module.
