
PROCESSING TECHNIQUE
How to process and combine the images.
Inspecting the images, sorting them, stacking the focus bracketed images into sets, fixing issues, then merging and blending into one final image.
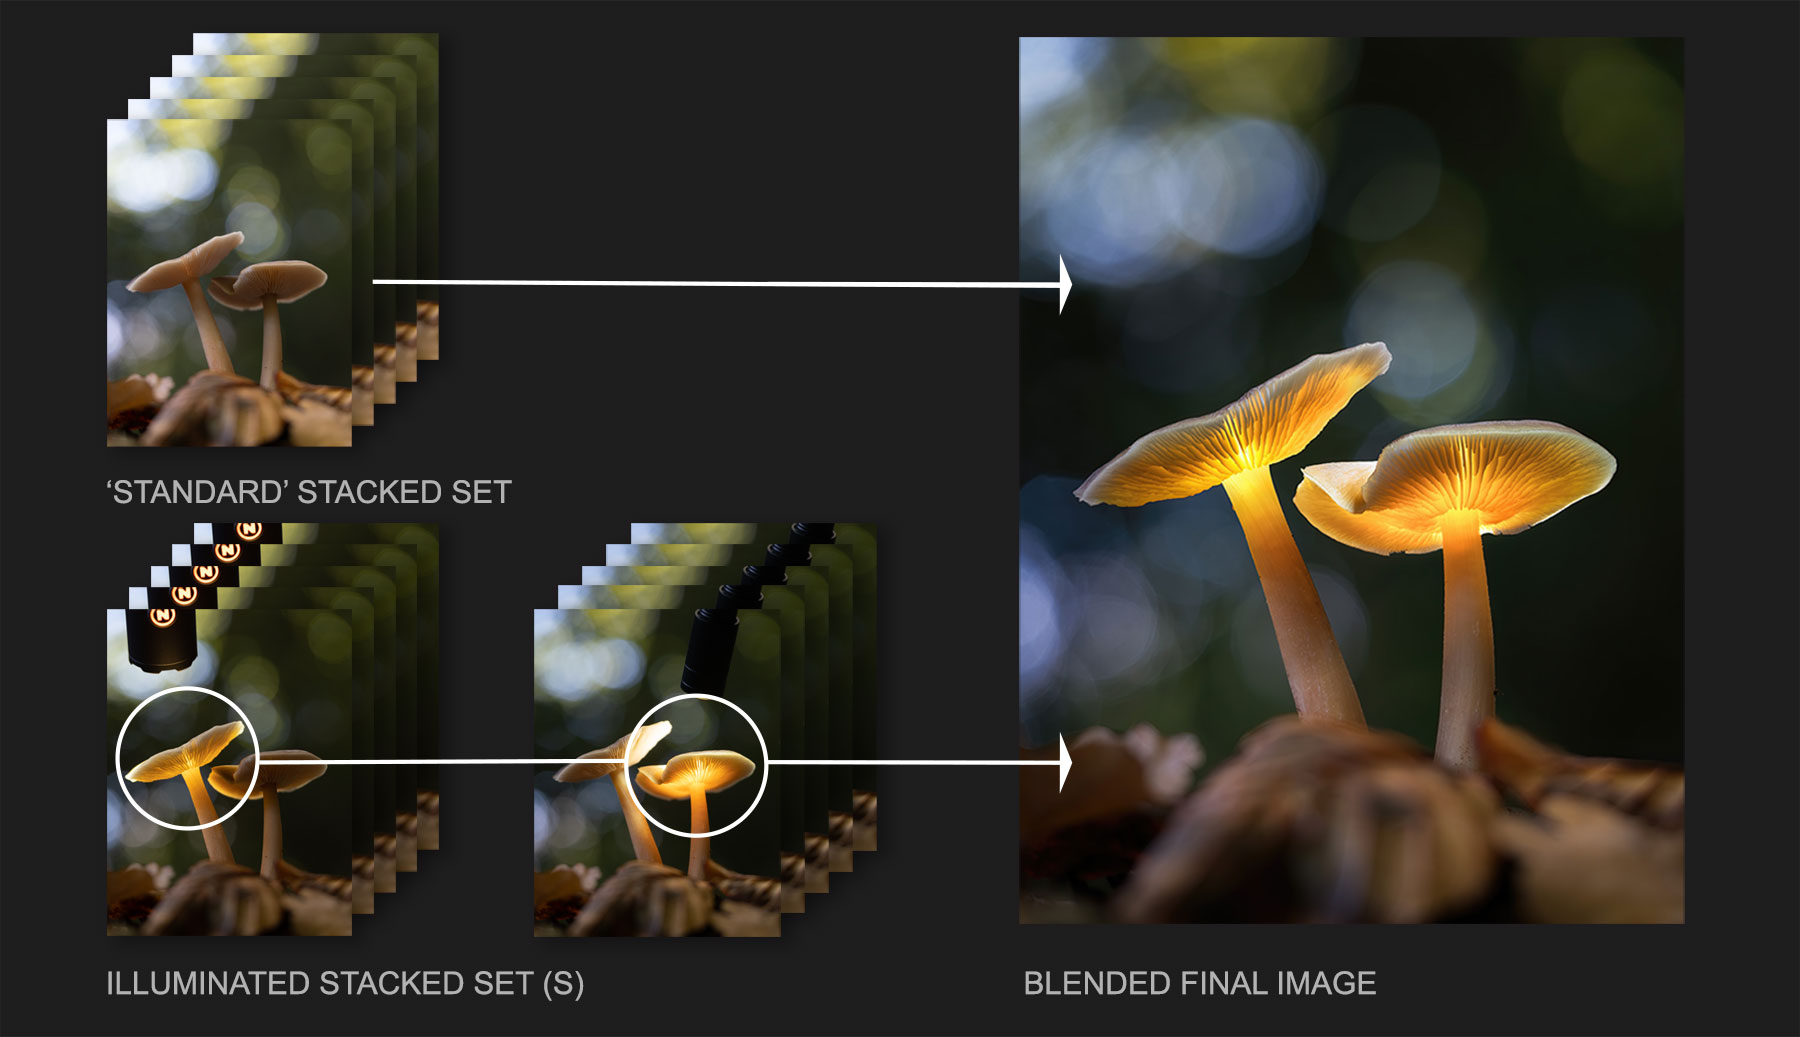
We explored how to shoot the sets of images required, now we need to process the shots and stack them together, then merge the images produced into one final image.We will use this image above for the tutorial which were taken specifically for this.
A first standard set of focus bracketed images were captured, along with a second set that were then illuminated by hand using a torch. As another shroom is also illuminated, another image was taken but instead of focus stacking it was taken in one shot with a smaller aperture to show both techniques of shooting the illuminated sets. Both ways have advantages and disadvantages, being aware of both techniques will allow more flexibility when out shooting. It also allows me to show what to do the you run into problems such as the things don’t quite align.
SOFTWARE
For this step-by-step guide I will be using Lightroom and Photoshop. Lightroom as you probably know is a ‘Raw Image Processor’ and Photoshop is an ‘Image Editor’, and the differences are important. As a Raw Processor LR has more flexibility for processing raw files and importantly a Catalogue for sorting, rating, managing and synchronising processing settings.
Photoshop, whilst it can process Raw files using Camera Raw doesn’t have a Catalogue so it is less flexible for batch processing many files. What it can do which LR cannot is Focus Stack images, and importantly, allow images to be layered and blended with masks.
In truth there are other options if you haven’t subscribed to Adobe, all you need is a way to focus stack images, and a way to blend images as layers.
HELICON Helicon is a dedicated App for stacking focus bracketed images. It is easy to use and is probably one of the best available. It has great tools for fixing issue too. You would still need another App for layering and blending different sets of stacked images together.
AFFINITY PHOTO Affinity is probably the best alternative to Photoshop available right now. It will process Raws, focus stack images and also has layers with plenty of tools for masking and blending. I would personally use it along with a Raw processor such as DXO for all my Raw work and sorting images, using Affinity just for the power of stacking and layering images.
ON1 PHOTO RAW 2022 On1 One does have layers, it will focus stack images and also has masking for blending layered images together. Not being an expert with it I found it not quite as easy or flexible to use, but it may be worth a look if you want to avoid the Adobe eco-system.
→ TIP USING OTHER SOFTWARE
If you are not using Lightroom and Photoshop I would highly recommend Affinity Photo. It is fully featured and at just under £50 it is very good value. Although all the steps below are for LR and PS you can still produce the same with a very similar Workflow. In Affinity you would use Focus Merge, select all the images to open which opens them in a stack of focus merged images. Affinity has a slightly different way of fixing issues using the Clone tool and it is very easy to do. Images can be layered and masks can be used to blend parts of images together, in a remarkably similar way to Photoshop (even the mask icon is the same). You will need to export your Raw image sets first from your Raw processor unless it has the facility to export direct to Affinity, whereas in LR we can simply select the images and send them to PS as Edit in Photoshop As Layers.
The main point here is don’t be put off using other software, you can still follow the steps below and apply the same workflow. There are some great tutorials available, check out these two on Affinity’s website which are very relevant, FOCUS MERGING and using MASK LAYERS.
PROCESSING
STEP 1 – ORGANISE IMAGES
Download your images from your memory card to a folder you’ve set up and named on your hard drive. I tend to add subfolders to this folder so I can start to separate sets of images if I have quite a few, but do this from within Lightroom. Once images are imported to LR never move them externally or LR will lose the path (location) to them.
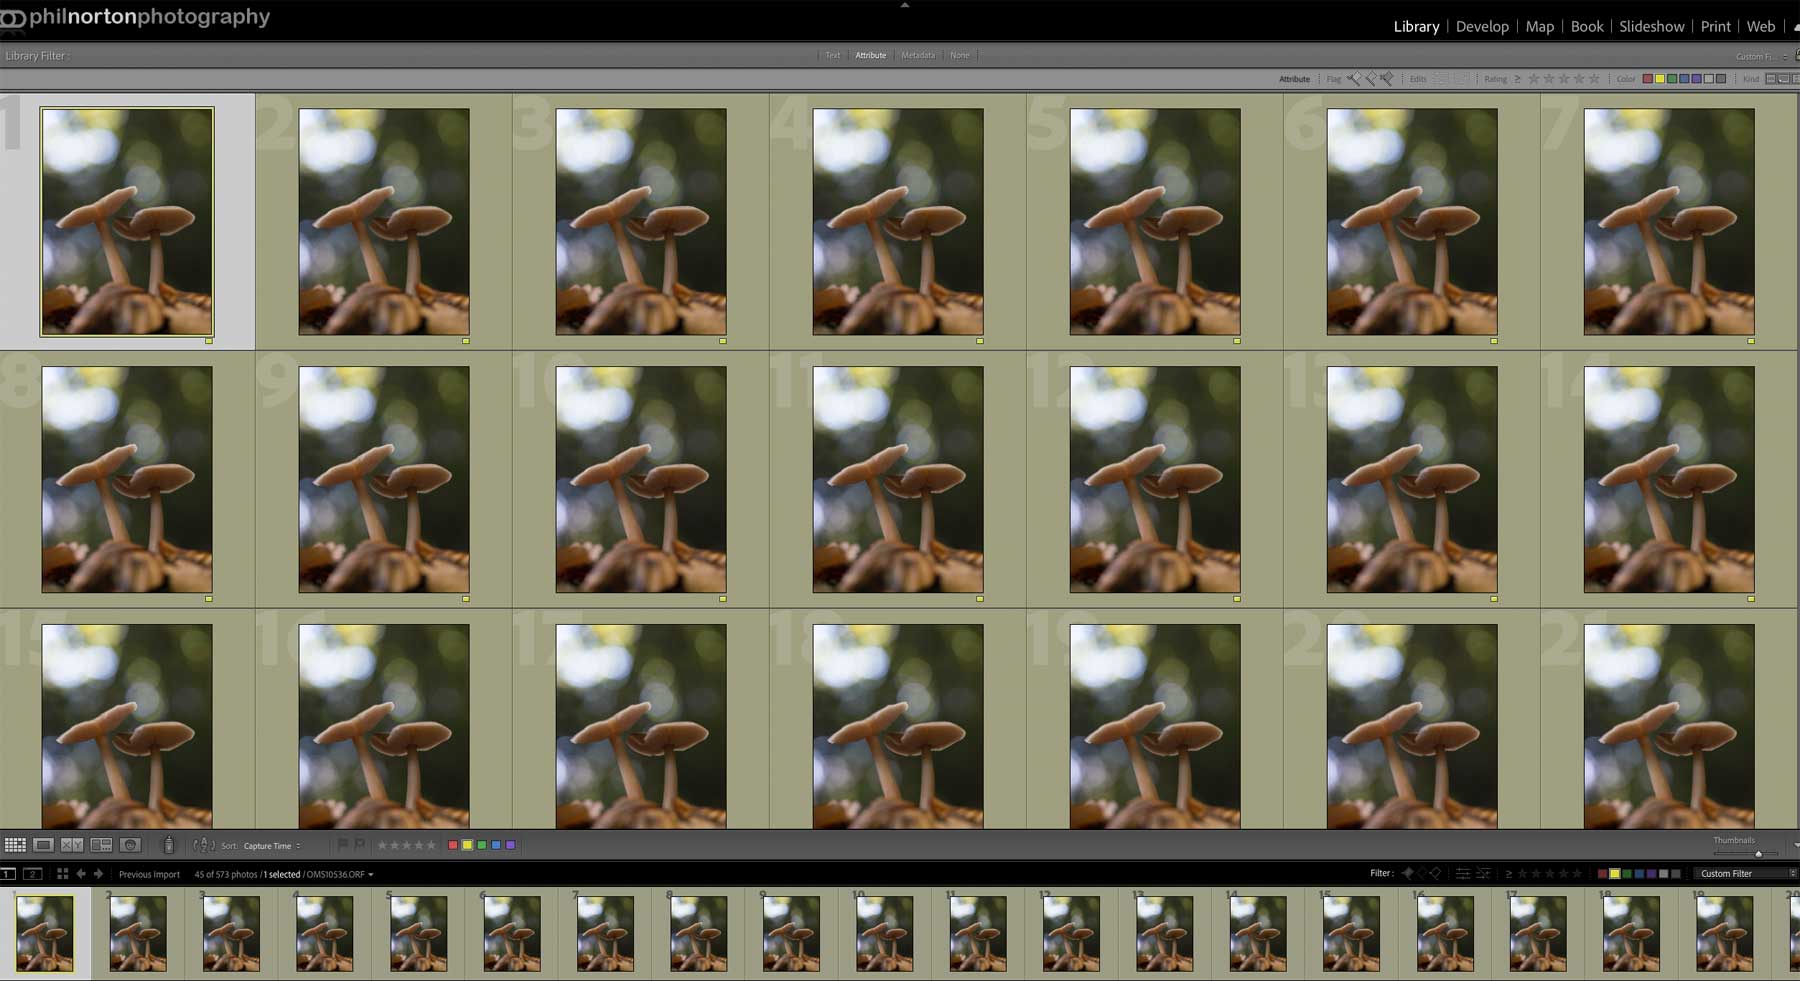
Standard Image Set
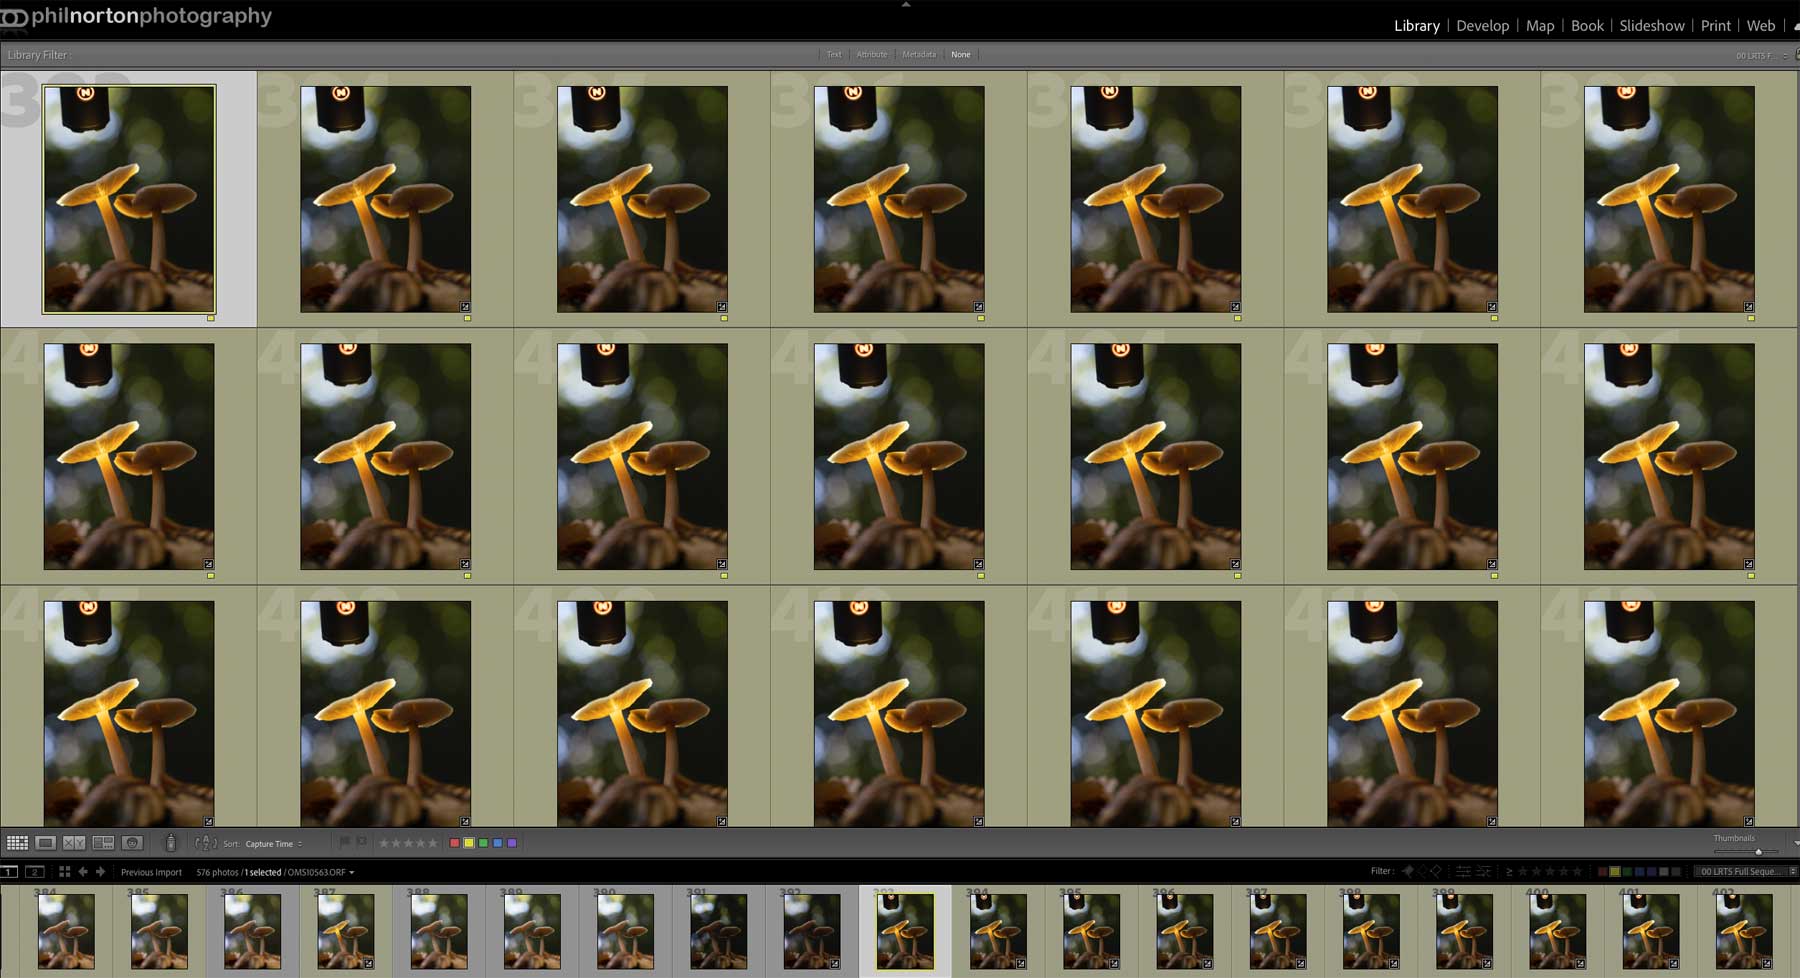
Illuminated Image Set
Start to review images checking which are suitable to be stacked into a Focus Stacked Set. Here I organised both the standard non-illuminated image set and the illuminated image set. I actually had two sets illuminated, but we will get that step. Check they are in focus and that the depth of focus extended from the front to the back of the subject across the set and remove any that extend too far back. For this set I shot 30 images with a step of 1, as it turned out I only needed 21. From 21 to 30 the subject became out of focus so ensure you remove these or Photoshop will create ‘ghosting’ or a halo caused by Focus Breathing which looks like a double image.
Focus Breathing is created by the size of the subject actually changing in the frame as the focal plane moves when the focus point changes. . Normally it isn’t an issue, but have the bracketing steps too wide, or have too many redundant images where the focus is too far forwards or backwards and parts of the image can be merged creating the ‘halo’. Sort the images by simply adding a colour rating, hit 6 on your keyboard to use yellow, applying to the first and the last image in each set to separate them from images not needed. You may even find it easier to create new folders or even Collections.
Apply any processing you may want but there is no need to do too much at this stage. You may want to make adjustments to exposure, shadows and highlights and white balance. On the illuminated set I had over exposed the right edge a little so I recovered it and then synchronised it across the image set. Then select the first image, press Shift and select the last image, then click Sync on the bottom right. The colour coding and adjustments will be synchronised across all the images.
STEP 2 – STACK FIRST SET
Now we will create the first Focus Stacked image from the first set of images. Make sure you have Photoshop open in another window first for ease of use.
Select the first set of duplicated images again. Select the first image, click and hold Alt and then click the last image to select the complete set.
Right click and in the menu which appears select Edit In > Open As Layers in Photoshop.
Wait a few moments and Lightroom will export each image to PS, adding them as layers in one new document.
→ TIP You may want to save this new Photoshop File on your hard drive for future reference. Make sure you save it as a Photoshop PSD so that you can open it again with all layers and masks preserved. Note there is a limit of 2GB, larger files may need to be saved as a PSB instead. I never save my Photoshop files but for your first few attempts it may be useful for you to study later.
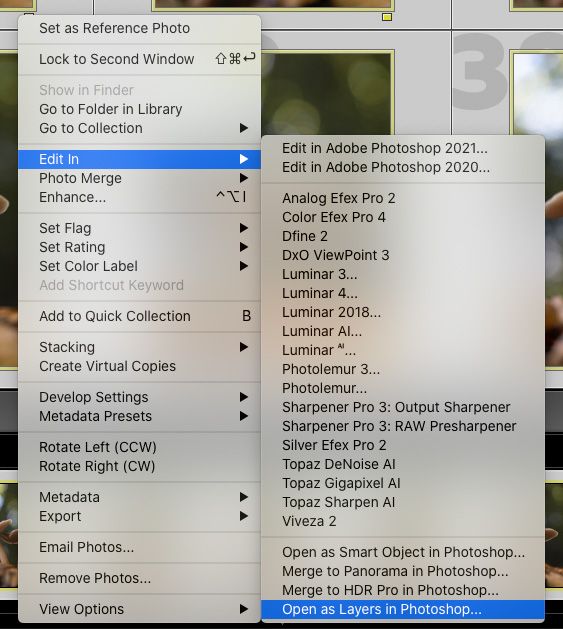
Open As Layers from LR to PS
Before going to the next step we need to copy the images and preserve the originals just in case they are needed later.
In the Layers pallet on the right select all the images by clicking the first layer, hold down Shift and select the last image. Then click and hold (do not release), and drag the whole set of images over the Plus+ icon at the bottom which will create copies of the images. Now if you wish you can add the images to a group for easier management. With the images still selected click on the shortcut menu icon (three horizontal lines next to the word ‘Layers’). Go down the list and click New Group from Layers. A dialogue will appear allowing you to give the group a name. ‘Copy’ is as good a name as any. Click ok, and now you can show or hide the whole set by clicking the eye next to the Group.
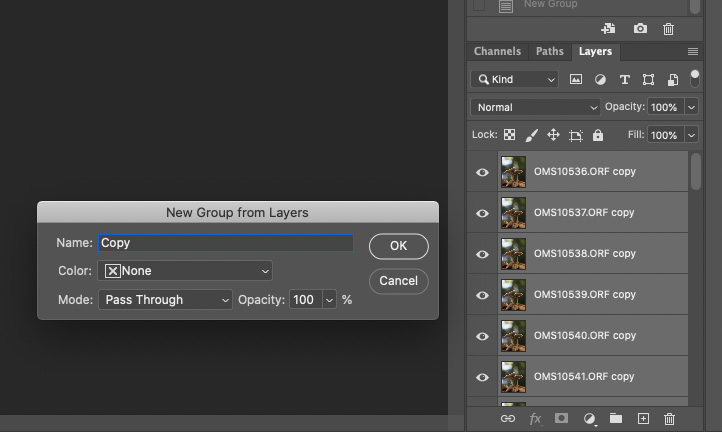
Duplicate the Layers
→ TIP A note on Layers and other Pallets. Pallets are simply dialogue boxes housed or ‘docked’ into the right hand column. If you don’t see ‘Layers’ go to the top menu bar, ‘Window‘, click ‘Layers‘ to make it visible, then click and hold the tab to drag and position anywhere you want in the Dock. You absolutely need to have Layers and History visible.
STEP 3 – ALIGN & FOCUS STACK
Next we need to merge all the images into one focus stacked image. Before this they need to be aligned in Photoshop.
Select the first set of duplicated images again in the layers pallet. Select the first image, click and hold Alt and then click the last image to select the complete set.
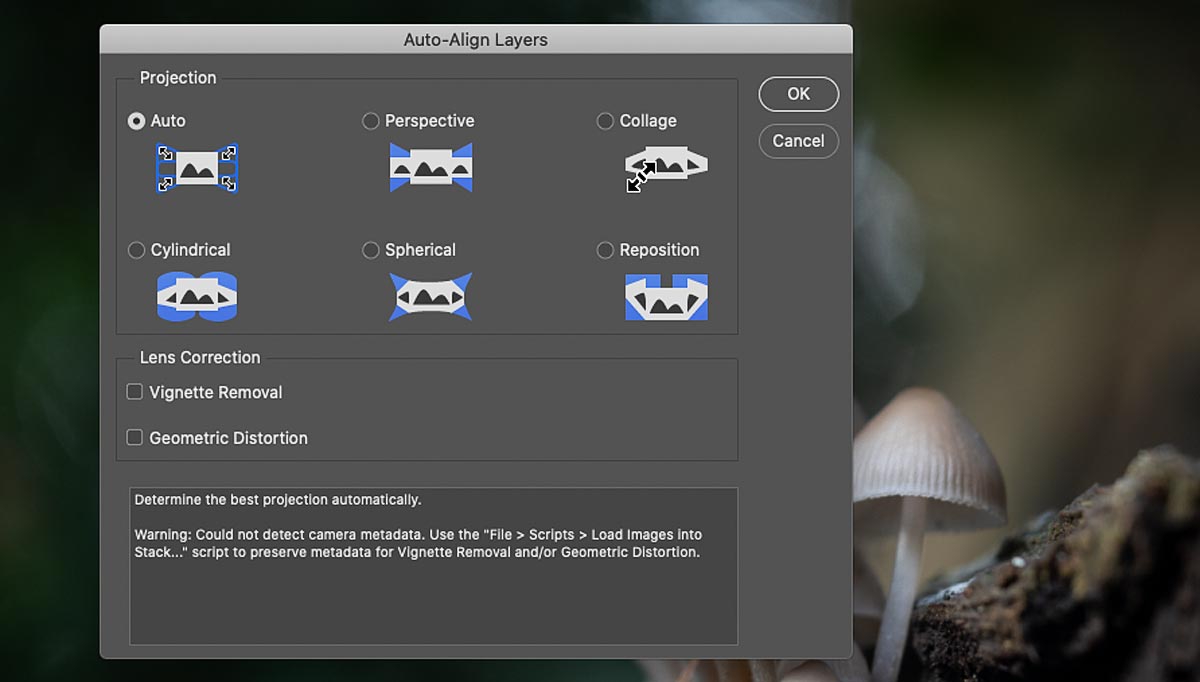
Go to the top menu Bar and select Edit > Auto-Align Layers. A dialogue box will open, select Auto. Vignette Removal and Geometric Distortion can be ignored.
After a few seconds depending on how many images there are PS will align all the images. You may notice a slight shift and the canvas edge being visible which is fine. Too much of a shift will tell you your camera moved.
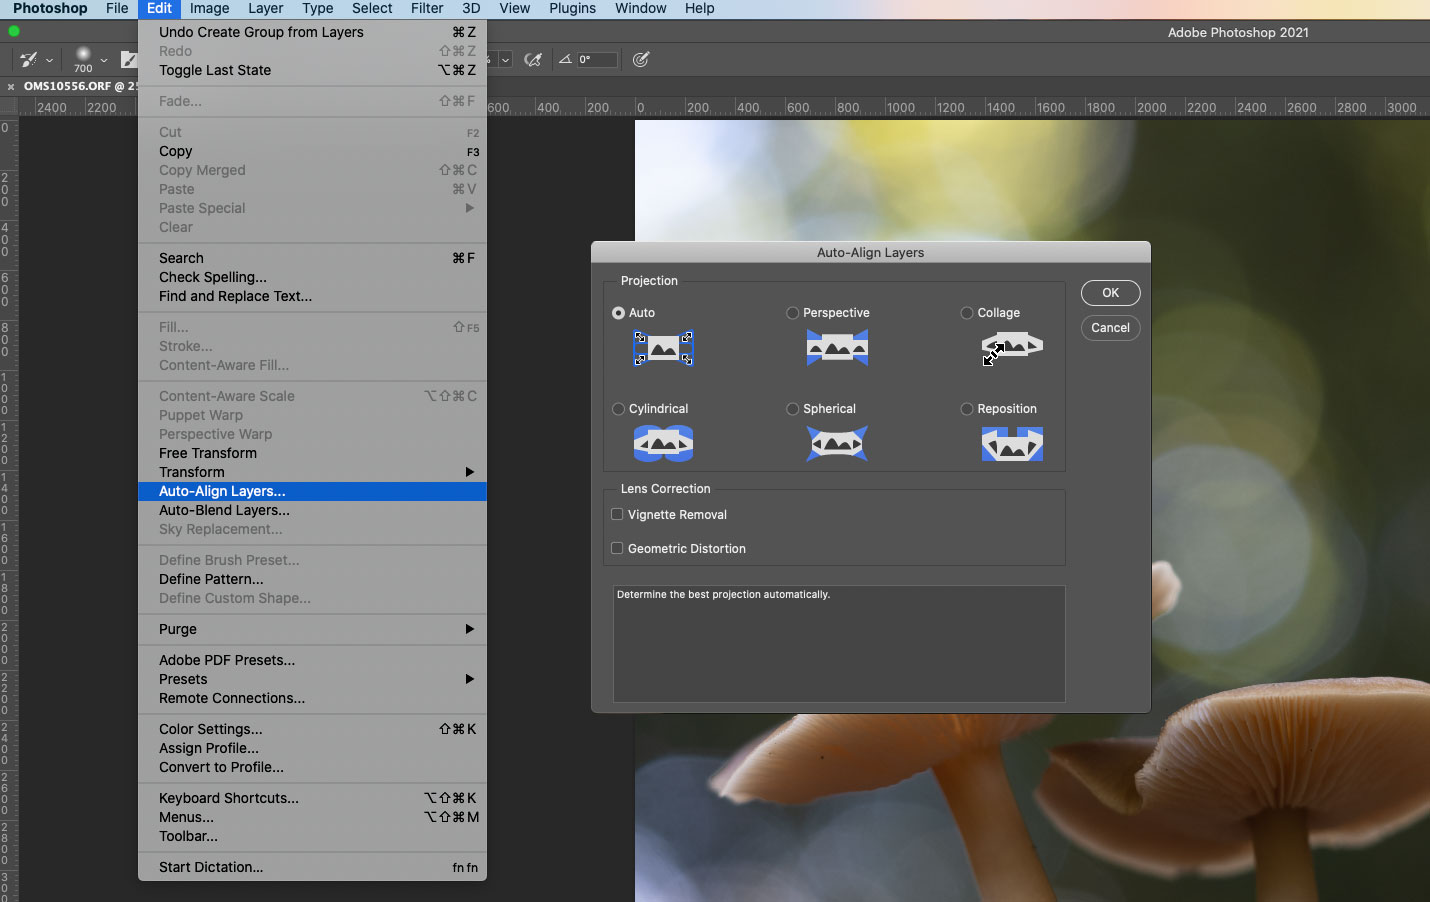
Open As Layers from LR to PS
Now we need to blend the images into a focus stacked image. Select the first set of duplicated images again (if not still selected) in the layers pallet. Select the first image, click and hold Alt and then click the last image to select the complete set.
On the top menu bar go to Edit > Auto-Blend Layers. A dialogue box will open, select Stack Images and enable Seamless Tones and Colours and Content Aware Fill Transparent Areas. Content aware fill will fill the edges of the image so that none of the canvas (the document background) will be visible. Once the process is finished if any filled areas are selected and visible with ‘marching ants’ as they are known, or dotted lines, just deselect them with Select > Deselect (Option+D keyboard).
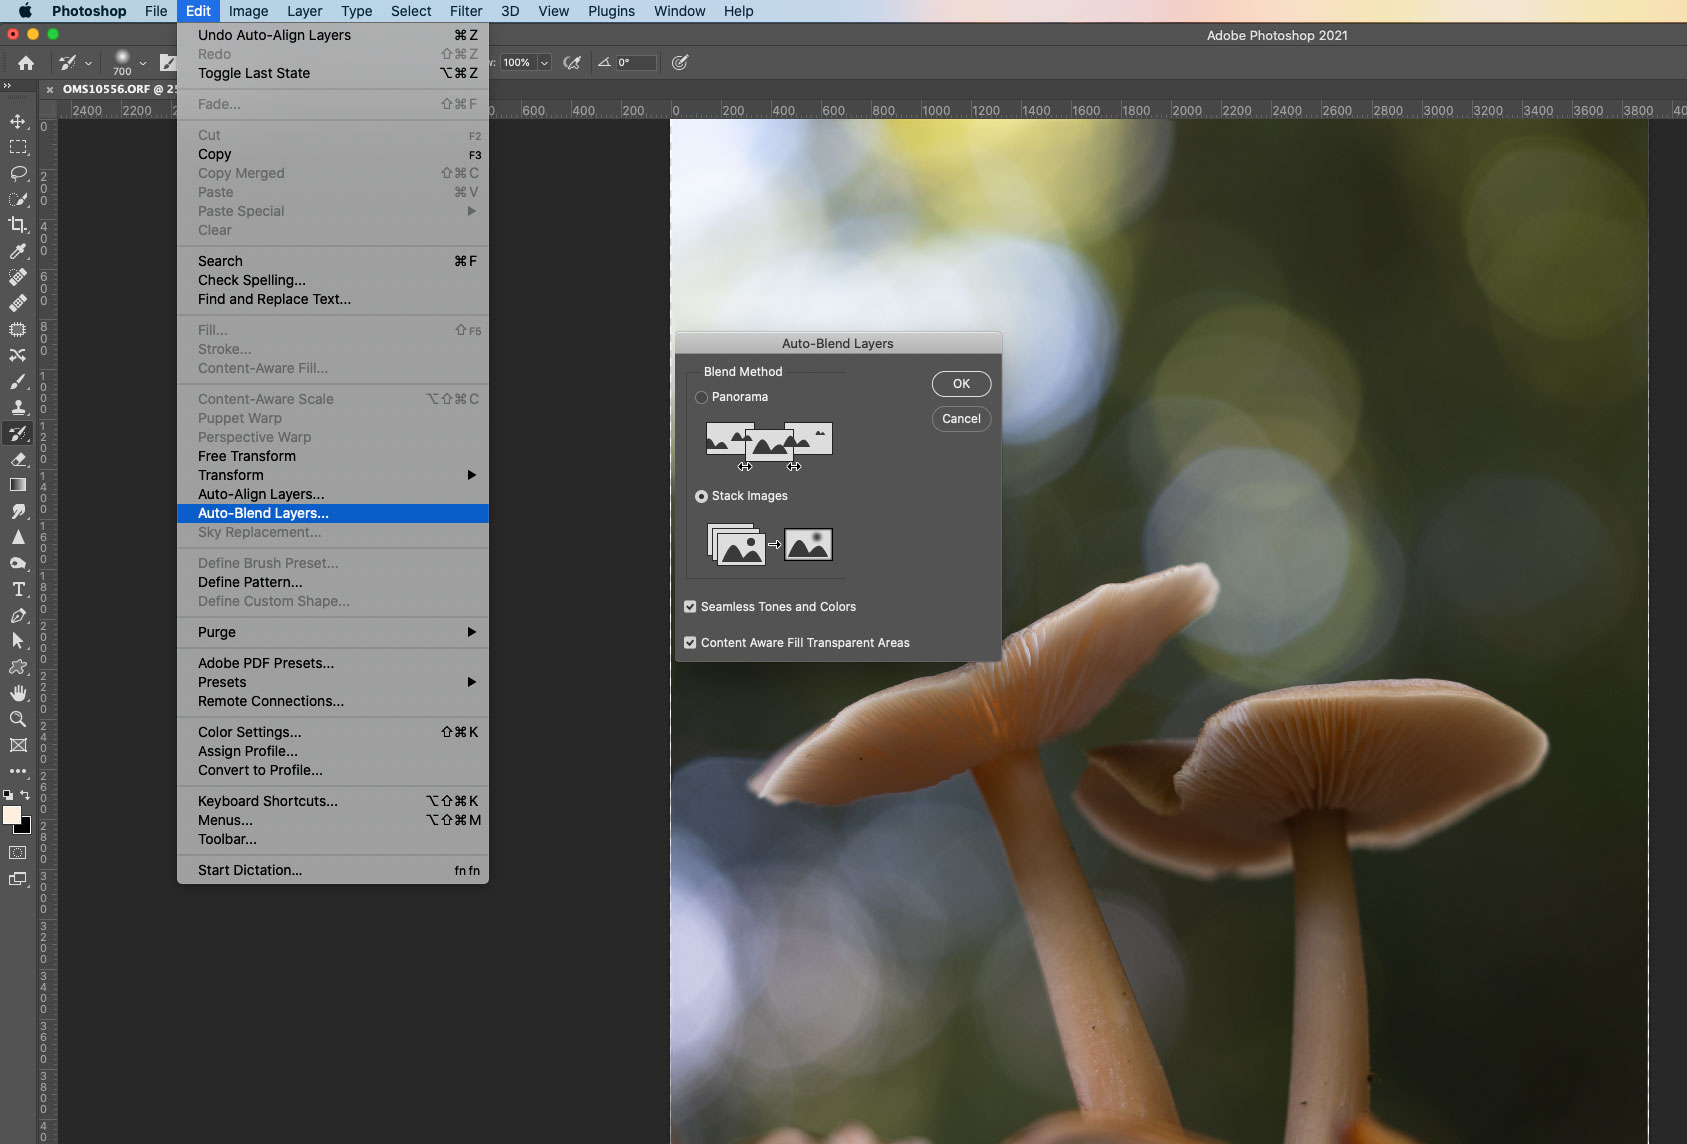
Auto-Blending images into a focus stacked image
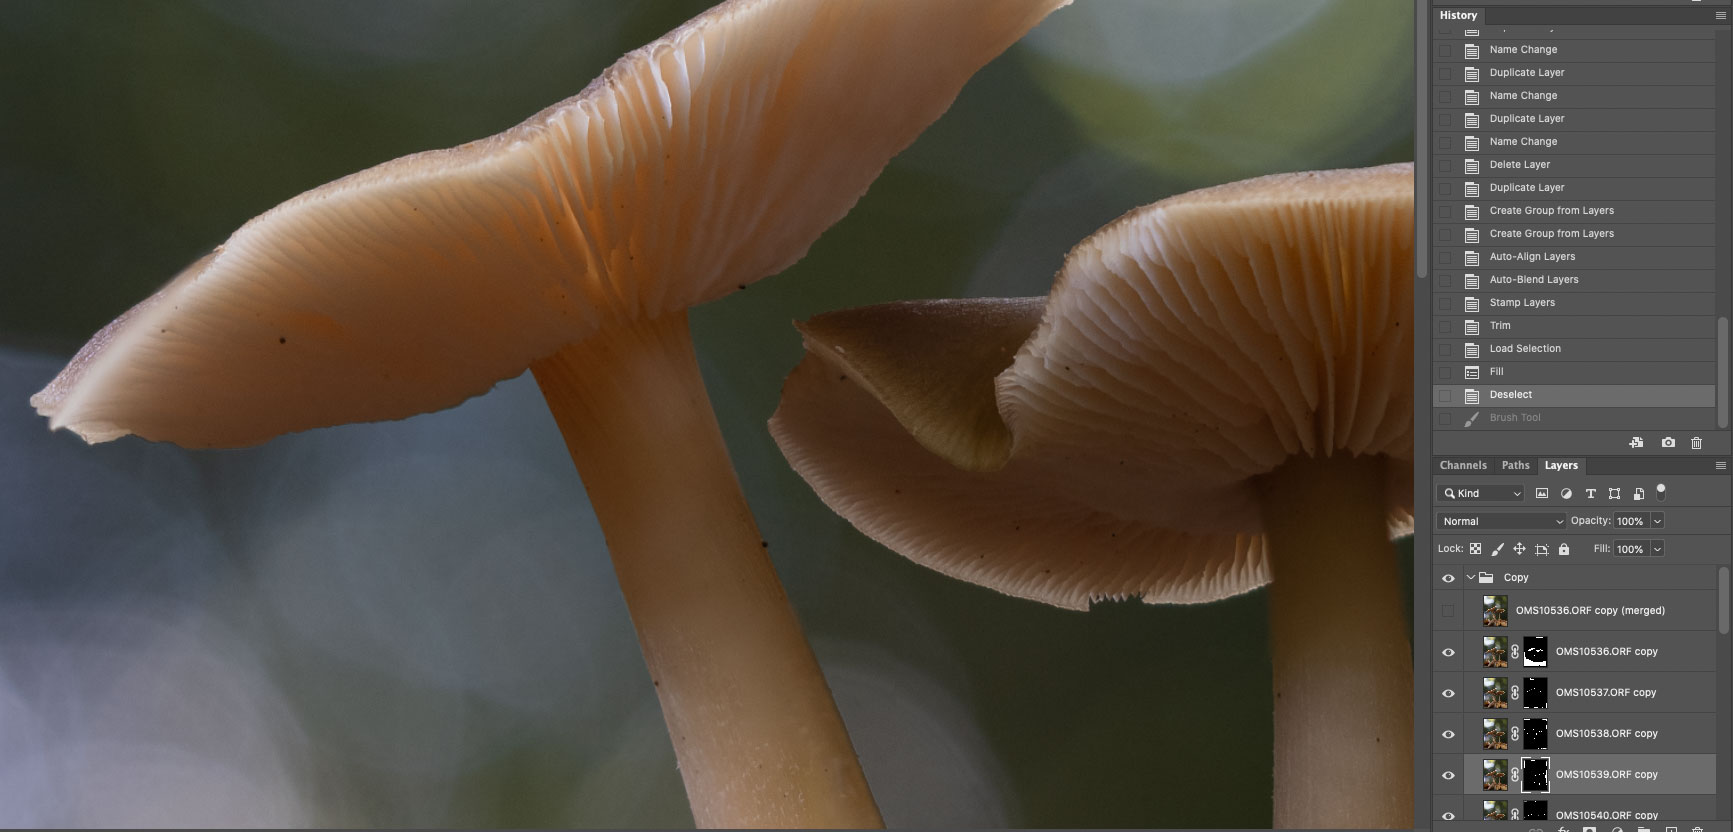
Auto-Blended images with masks applied
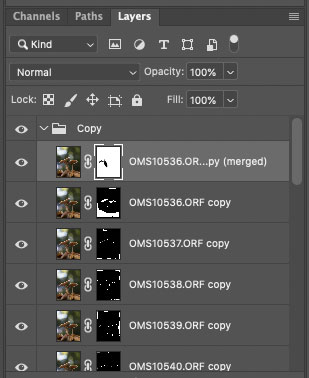
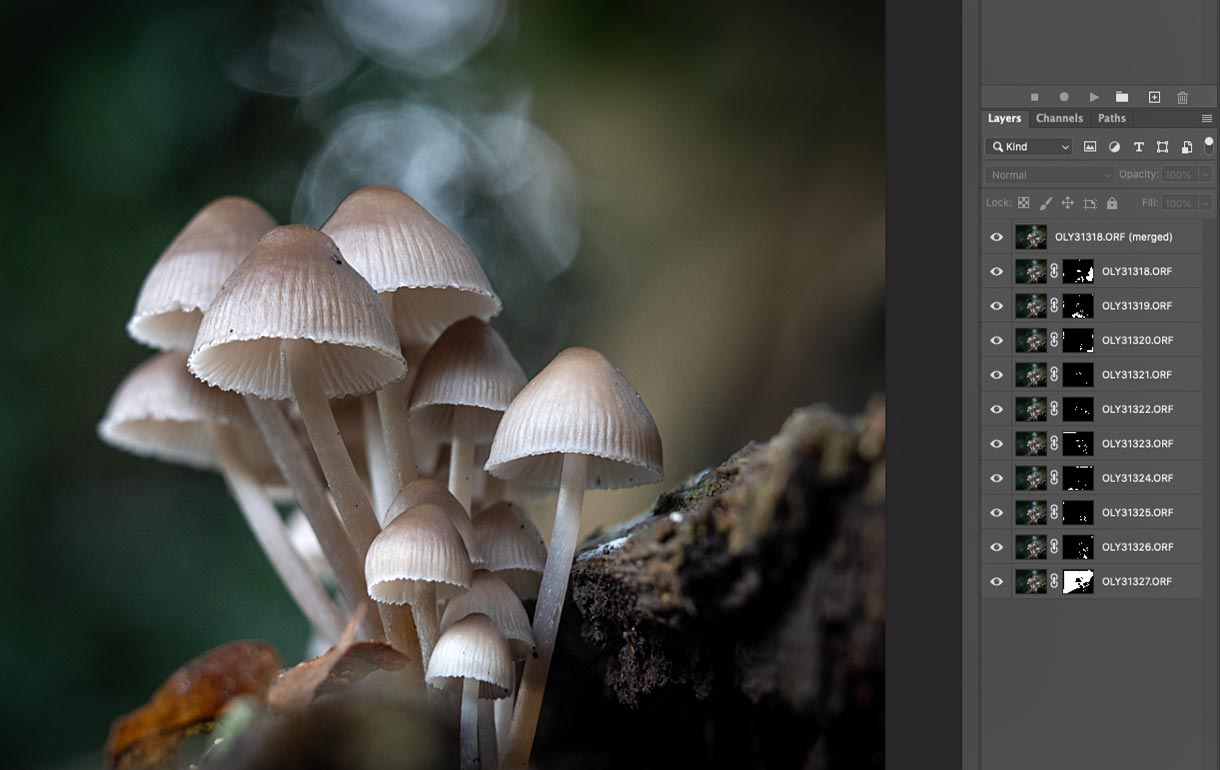
Now notice in the layers Pallet each of the images has a mask applied and the top image will have a name appended (merged). PS has analysed each layer deciding which parts of the image are in focus and applied masks to each. An important detail to understand with masks, white will ‘reveal’ and black will ‘hide’ parts of the image. So in each layer parts of the image have been hidden with black to only show the white areas, or the parts in focus. Each of these will show into the layer above it and the set has been made into a new merged image (or a composite if you like) as the top image. I’ve switched the visibility off ready for the next step.
Photoshop does a great job but it doesn’t always get it right. For some reason the left hand edge of the shroom on the left is not in focus but the detail was there so we need to recover it.
STEP 4 – RECOVERING DETAIL
The first step is to ensure that the detail was actually there. On the layer images this may be difficult because masks have been applied which may be hiding the detail so switch off visibility of the entire set using the ‘eye’ next to the folder icon on the whole group. You will see the original images (which we duplicated) as layers underneath, and you can switch them off individually to find the right image. Alternatively and usually faster, just go back to Lightroom and go though the images until you find the right one and note the image file number.
In LR I found that it was actually the fourth and fifth images that had the edge in focus, noting the image names I can easily find them in the layers. All we need to do is paint the detail back in. Make sure they are visible again if you switched them off, and hide the top merged image by switching the visibility off. We will use the Paint Brush to bring the detail back, just follow the steps below.
PS PAINT BRUSH
I’m going to assume you are unfamiliar with PS and have never used the Paint Brush, we need to set some properties for it. If you are familiar you can skip this bit.
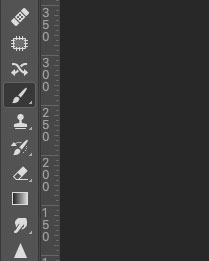
PS Paint Brush Tool
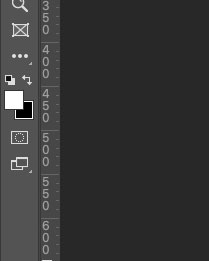
PS Paint Colour
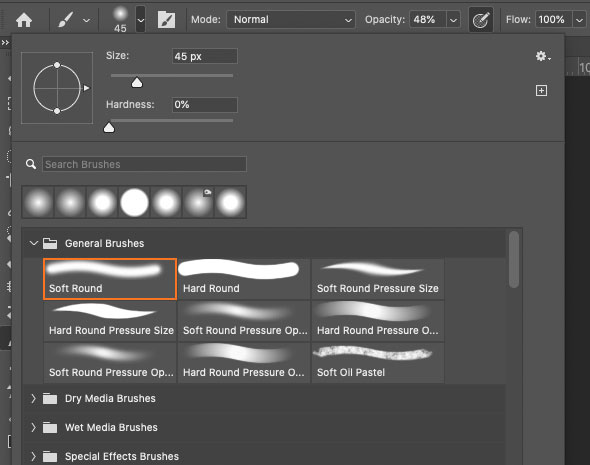
PS Brush Properties
Tools in PS are available in the Toolbar on the left hand side of the screen. Many tools are stacked meaning they may be hidden, any tool that has a small triangle on the bottom corner means there are more stacked in that set. Click and hold and they will fly out. The Paint Brush is the 11th from the top, if you see a Paint Bucket instead just click/hold and select the Paint Brush.
At the bottom you’ll see the paint colour, two squares with black and white and a double headed arrow. The arrow can be clicked to swap the colour, so click it and set the colour to white.
Now at the top notice the Tool Bar has changed. It is context sensitive and will change depending on the tool selected. It has updated to show properties for the Paint Brush. Now click the 3rd icon along to reveal the properties. Select a soft round brush, set hardness to 0% meaning it will have a soft edge, and opacity to 30-40%. Opacity and Flow sets how much paint is laid down and how visible it is. I tend to ignore flow and use opacity to control how much paint is used. Ignore size for now because it can be set using the keyboard bracket [ ] keys. Now you’ll see your cursor is a round circle allowing you to paint, and each stroke you make can be undone if you make an error by clicking back a step on the History Pallet.
SET THE LAYERS
Now set the layers ready to start recovering detail. Important, we need to ensure in each step that the Layer Masks are active by clicking them (as shown below) and not the image. If the image thumbnail is active you will be painting onto the image itself, not the mask. If you make an error just undo it in the History Pallet.
In the Layers Pallet click the top merged image thumbnail and add a white mask to it. The Mask tool is handily placed at the bottom and is a white rectangle with a circle, next to FX. Then click the eye icon to hide visibility of the top layer. Remember this is the composite or merged image of all the others under it, it needs to be invisible so we can see changes made on the images under it.
Now start painting. Go back to the layer you identified as having the ‘in-focus detail’ (there may be more than one), click on the mask layer to activate it, not the image thumbnail, then on the main image in the main window (not the Layers Pallet) start painting over the area where you need detail recovering. Adjust the Brush size with the [ ] Bracket keys on your keyboard and adjust the opacity to suit. You will see detail start to magically reappear. When performing tasks like this it’s always best to use small strokes so if you make an error you can click back in the History Pallet to undo it. And remember white reveals, black hides, so if you need to, swap paint to black and repaint to re-hide an area again.
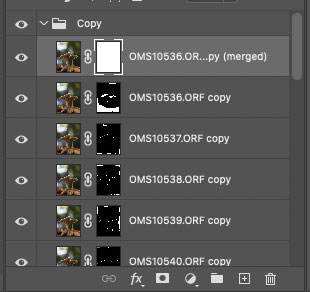
Add a white mask to the top Layer
Now switch the top layer back on again by clicking the eye icon to reactivate the layer visibility. Notice what happens? The details we recovered vanishes again. This is because the top layer is the merged composite of all the images under it, we changed the images under it but they cannot reflect in the top image. Rather than the long process of copying all the images and making a new merged image there is a simple way to fix this.
We already added a white mask, so click it to activate it, then back on the main image window just paint over the areas you just did again, but with black paint. We want to show the changes we made on the layers underneath, white reveals and black hides. The white mask is showing all of the top image so black paint will hide part of it. This time the same amount of care is not needed, increase the size of the brush and increase opacity and quickly paint over the area. Notice I also painted over the stem because there was a little detail on one of the masks I also recovered.
(You could also stamp the layers into a new layer but I don’t want to further complicate it).
Painting on the top layer mask
That’s the first set of images complete, hopefully you managed with this easily enough although if you are completely new to PS it can be daunting.
SAVING YOUR PROGRESS
There are a few decisions to make now. I would normally just flatten this set of images into one layer ready for the next set, but what if you want to save it for future reference? If you do want to save this step go to the top Menu Bar File > Save a Copy. Give it a name that will make sense (eg ‘Shrooms First Set’), make sure Layers is selected to preserve them, decide where to save it and save as a Photoshop document. If you don’t want to save this step with the layers for reference later (I never do) just flatten it and move on to the next step.
FLATTEN YOUR DOCUMENT
It is going to get quite large with all the layers and we will be moving onto the next step so I normally just flatten this document into one layer. On the top Menu Bar go to Layer > Flatten Image. Your document is now one layer. For this tutorial I have left most of the layers intact. We can now move onto the illuminated set of images.
→ TIP Notice the keyboard shortcuts that are displayed on menu items which are very handy to learn. There is also a shortcut menu on the History Pallet at the bottom. There is a New Document icon for creating duplicate of the whole document, New Snapshot icon which will create a snapshot of the current history state, and a Trashcan Icon.
STEP 5 – ILLUMINATED SET
Rinse and Repeat. Yes, start all over with the illuminate images.
Now you have done it once you should be able to go through this step fairly quickly. Again in Lightroom sort the images, send them to Photoshop as a layered stack of images, duplicate the set, Auto-Align them, Auto-Blend them, and you will end up with another document consisting of layered images with masks applied and a top image which has been merged from the full set. Notice in this set the right hand shroom has some illumination which is from the overspill light on the left shroom. I’m not interested in this because I did another image for it which we will get to.
The advantage of doing another set of focus bracketed images is you have not touched the camera at all so there is little chance of the images not aligning. The disadvantage is obviously the number of images you will have and having to go through the alignment and auto blending again, but it is pretty quick when you’ve done it a few times.
Remember to check if any details need to be recovered, but all we are concerned about is the stem and the underside of the shroom. Again save this step as a new document if you want to save for future reference (File > Save a Copy) or if you’re happy with it just flatten it into one.
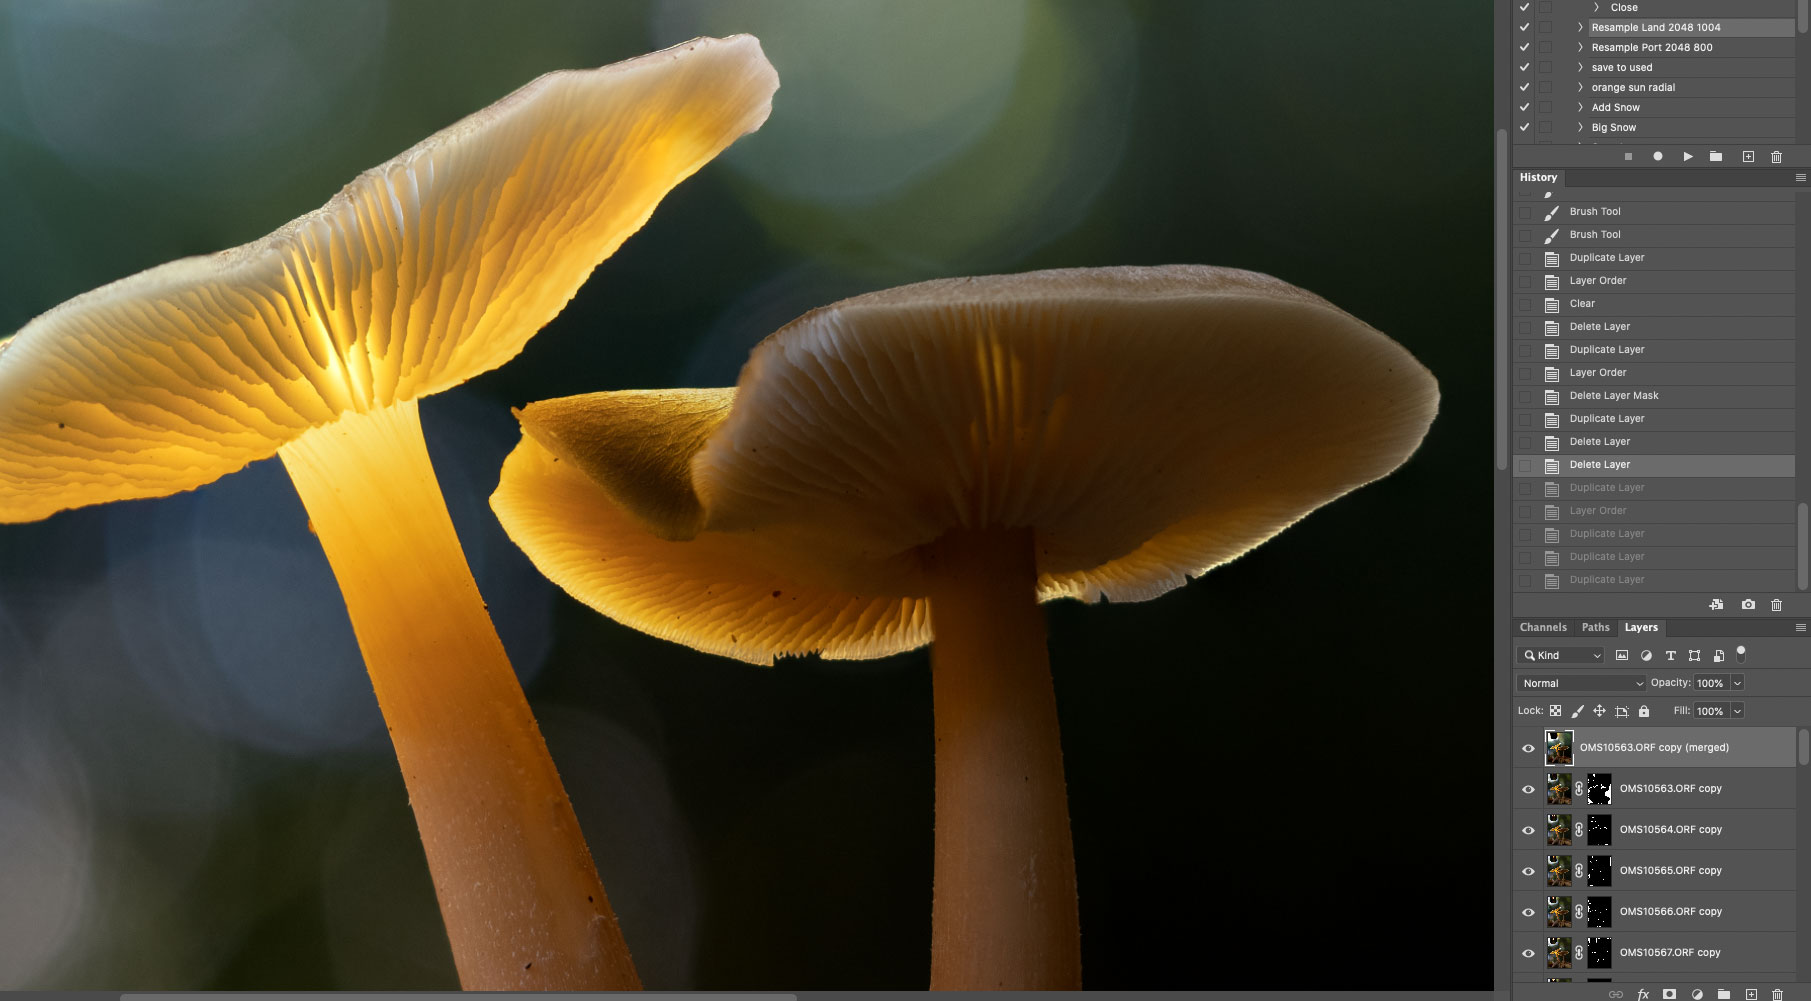
Illuminated set after Auto Alignment and Auto-Blending
STEP 6 – BLENDING THE TWO IMAGES
Now we have two images, one standard non-illuminated set which has been focus stacked into one image, and the same again for an illuminated set, which we can start to merge into one document and one image. We need both images from each set layering into one document with the illuminated image on the top. There is a very simply way to do this which is very fast as shown below.
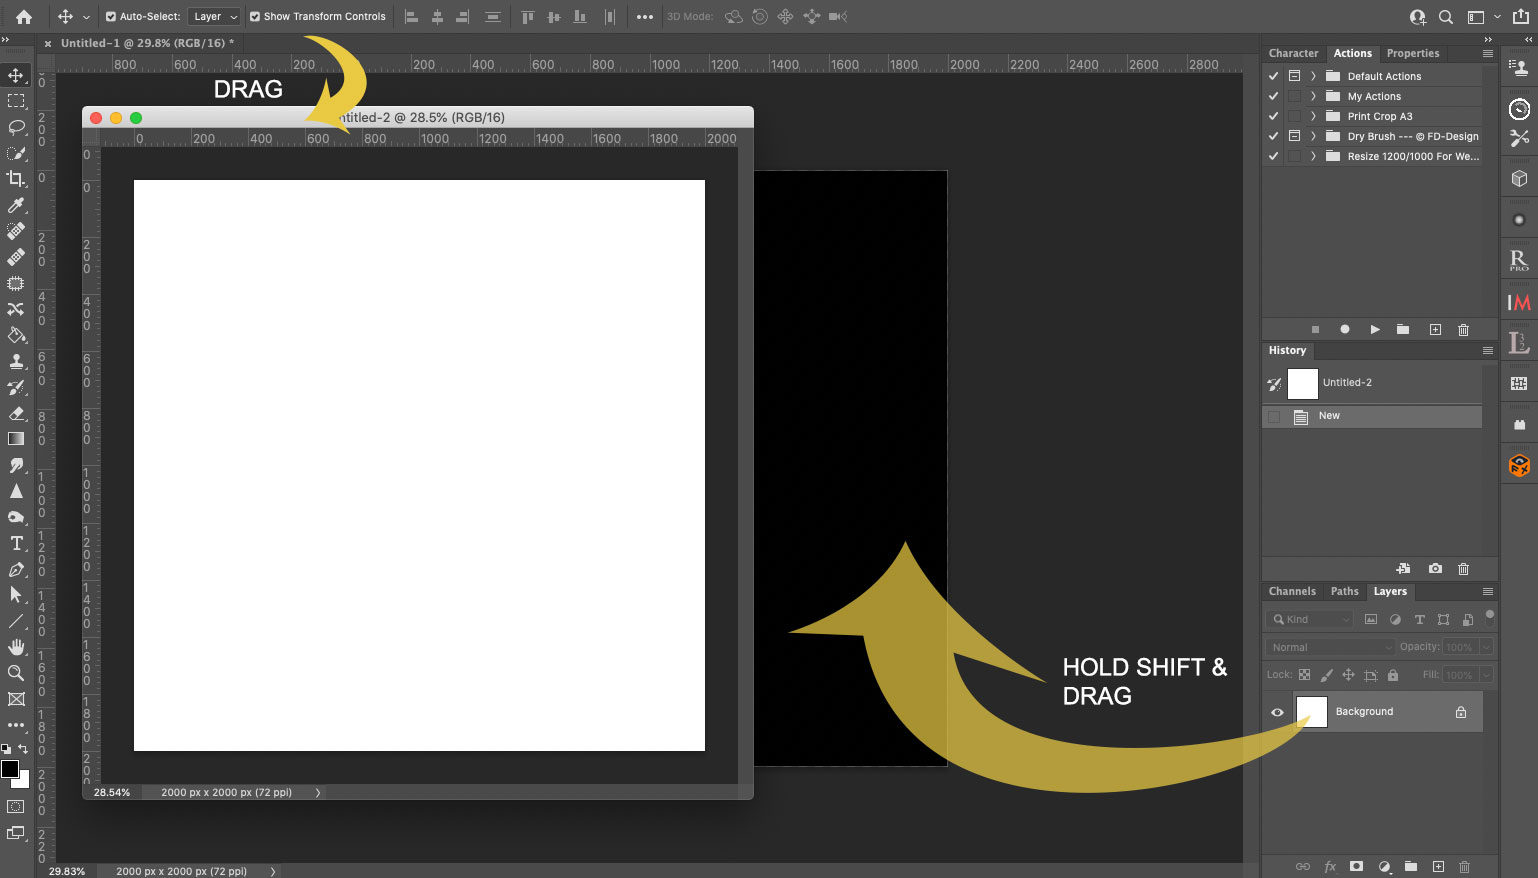
Dragging one layer from one document into another
Both your files will be open and you’ll notice they have their own tabs at the top in the document window as shown. Click on the illuminated shroom image tab, then holding down on it drag it out so that it is a ‘floating’ window over the other image. Make sure you can still see the other image underneath.
Now click the top floating image to make sure it is the active window, click its thumbnail in the Layers pallet, then click/hold and at the same time press/hold Shift, then drag the layer over the image behind it and release. Pressing/holding Shift tells PS to register the layer in the same place so they will be aligned, without doing this the layer will be positioned wherever you ‘drop’ it.
This does seem to take some people a few attempts but its easy and you’ll be surprised just often you use this going forward to take one layer out of a document into another without having to mess around saving and importing. Another way is to click the layer (double click if it is locked), then File> Copy, and then File > Copy and Paste > Paste In Place into the other document. Note if you do it this way the image will be pasted above the layer you have ‘active’, so if it ends up below other layers it’s probably because you didn’t have the top layer active (click it to activate it).
Make sure they align properly. In the Layers Pallet switch the top layer off and on to check it. If it needs slight adjustment you can alter the opacity of the layer and use the Move tool (four direction arrow icon on the Tool Pallet) to adjust it. Use the keyboard arrow keys for very small adjustment.
→ TIP When you have a floating window and click the main PS window to make it the active document, the floating window will disappear. It hasn’t, it’s simply hidden behind the other windows. Just go to the top menu Window > Scroll down to the bottom list of open documents and click to bring it forward again. I use a Mac trackpad and just swipe up with four fingers to reveal them.
BLENDING
There are now two images layered over each other, the non-illuminated image and the illuminated image. All we have to do now is apply a mask and then use the Paint Brush to start showing the illuminated layer into first image, but there are a number of ways to do it.
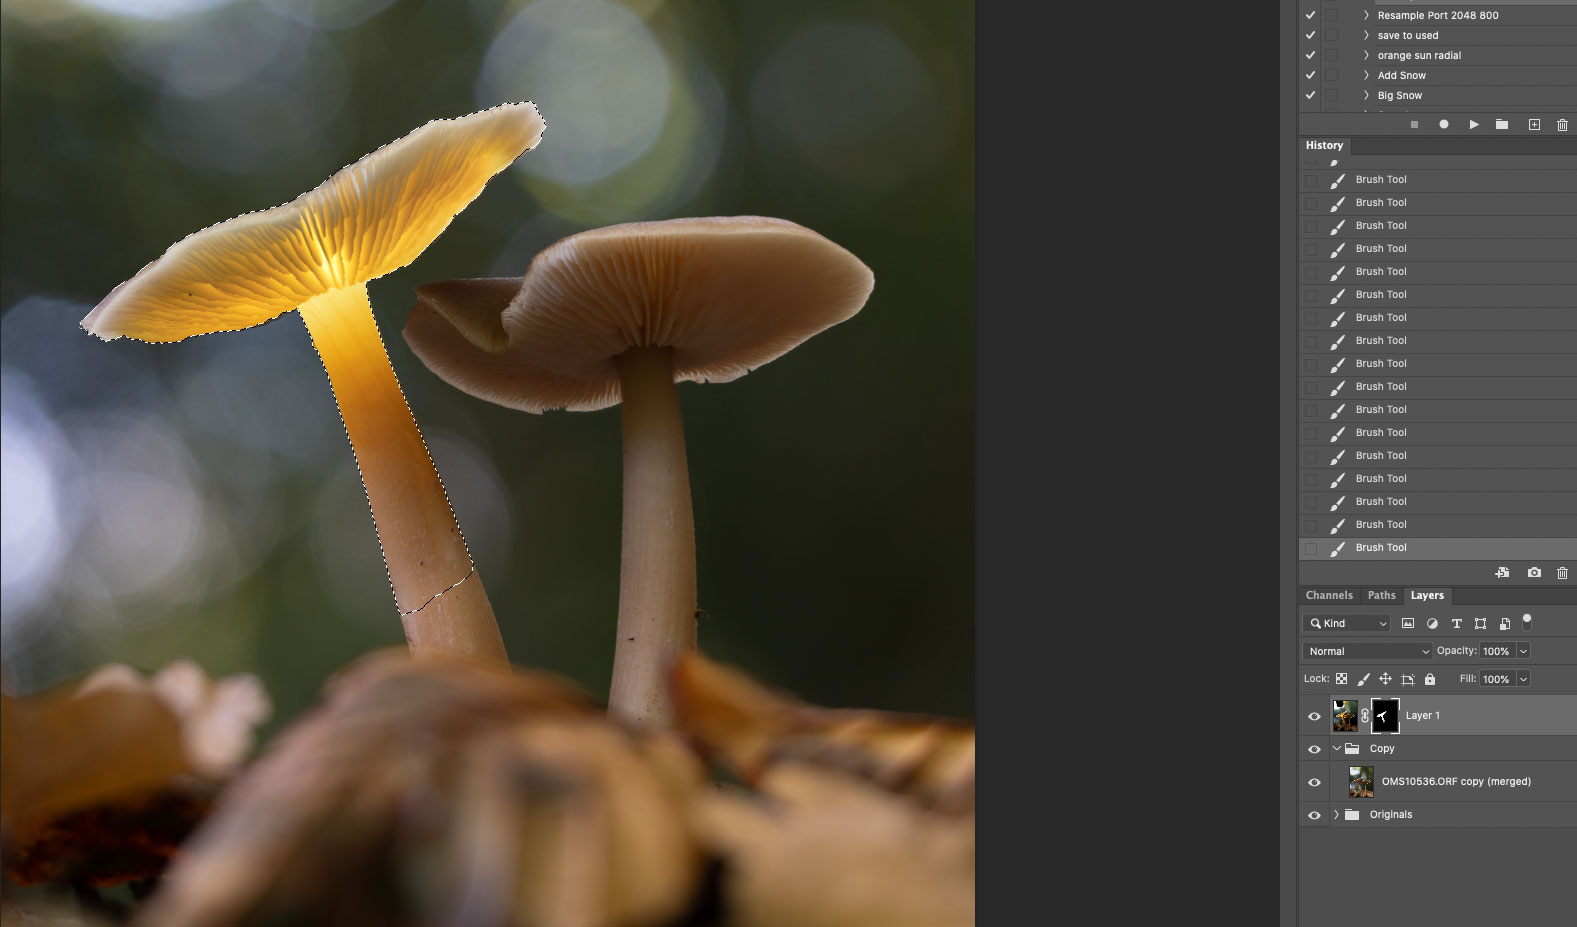
METHOD 1
Activate the illuminated shroom image layer by clicking it, then press/hold ALT and click the Mask tool underneath. Alt tells PS to fill the mask with black, thus hiding the image. Remember black hides, white reveals. Then with the Paint Brush with a soft brush, low opacity and small brush brush size start painting over the shroom (on the main image) to reveal the illumination back into view. Make sure the mask layer is active, not the image layer or you will be painting on the actual image layer and not the mask.
METHOD 2
How good were you at colouring in between the lines? This method is a little more involved but gives much more control. Before adding a mask select the Selection Tool in the Tool Pallet (a brush icon with dotted circle). Notice the menu bar changes again to show properties for this tool with New Selection, Add To, Subtract From, and General Properties. The size of the tool can also be altered with the Bracket [ ] keys.
Set Hardness to 100%, Spacing 25%, then alter the size to quite small and start clicking on the image on the illuminated parts. You’ll see the area being selected and the area shown with ‘marching ants’. Use the Add and Subtract From if needed, but an image like this should be very easy with just a few clicks. Note under Select > Modify there are further tools for refining selections by Expanding, Contracting and Feathering them.
For this image none of the refinements were needed but it’s worth noting because making selections is one of the main skills to learn in PS.
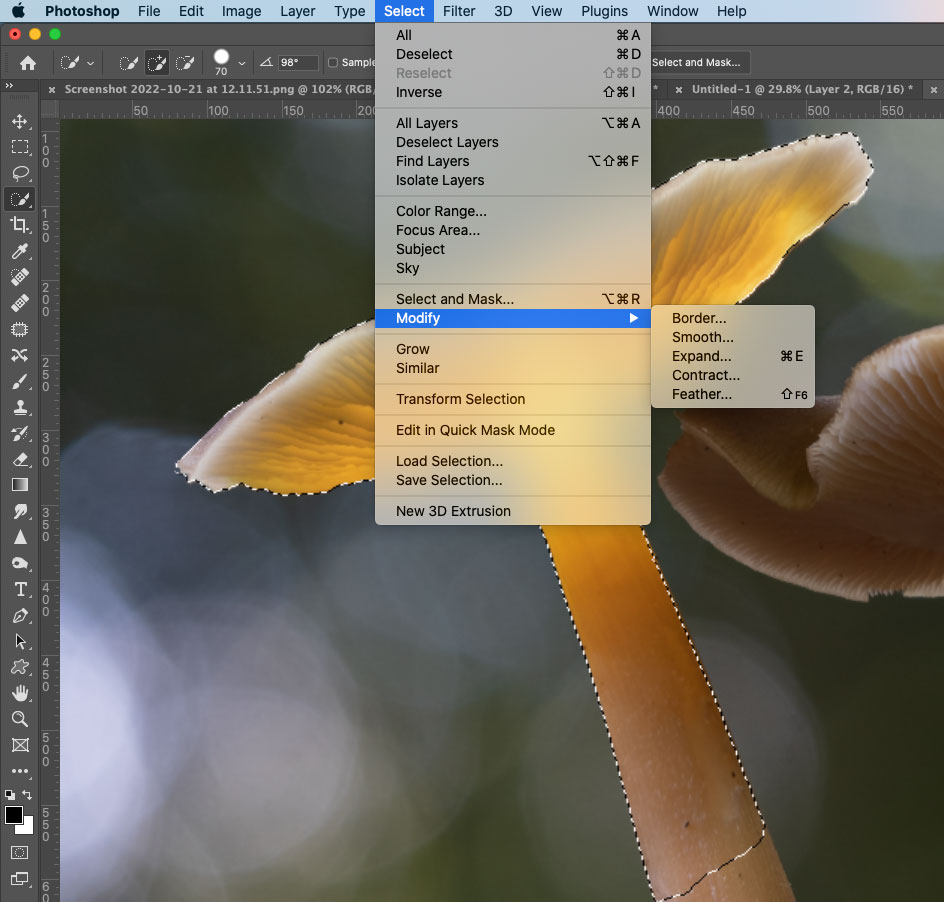
Modifying Selections in PS
Now click the Mask tool again at the bottom of the Layers Pallet and see what happens; the selected area is filled with white and the non-selected area is filled with black, so the illuminated area is now visible and the rest of the image is now hidden. Magic!See the layer thumbnails in the image at the start of this section.
Sometimes this is all that is needed. You can now refine it a little by using the Paint Brush alternating between black and white, altering the size and opacity and maybe feathering edges a little to blend in areas more, paying attention to the stem to blend in seamlessly, and also the top of the shroom too. If you need to activate the selection again go to Select > Reselect to reactive the selection.
→ TIP Remember black hides and white reveals. You may want to work the other way around to gently blend the illumination in. After making a selection for more control on the illuminated areas, then adding a mask, the selection will be filled white to show, with the background black to hide. There’s nothing to stop you using black to paint over the whole mask, hiding it, then using white and slowly bringing the illumination back into the image, working from the centre out towards the edges. Use Select > Reselect to reactivate the last selection if you want to stay inside the edges. Sometimes this way works better if you want light to glow out from the centre.
PROGRESS SO FAR
We are almost complete, so far you will have a standard non-illuminated image and an illuminated image blended together, so congratulations.
Check the image, make sure it is all good and if you are happy and have no need to make any more adjustments save it. If you want to save the layers do as we did before and Save A Copy for future reference. If you are at a point where you are done, save the image after flattening it as a Tiff or a Jpeg. I usually save as both.
We have a few more steps to do with this image, how to fix issues and also how to blend in a second illuminated shroom.
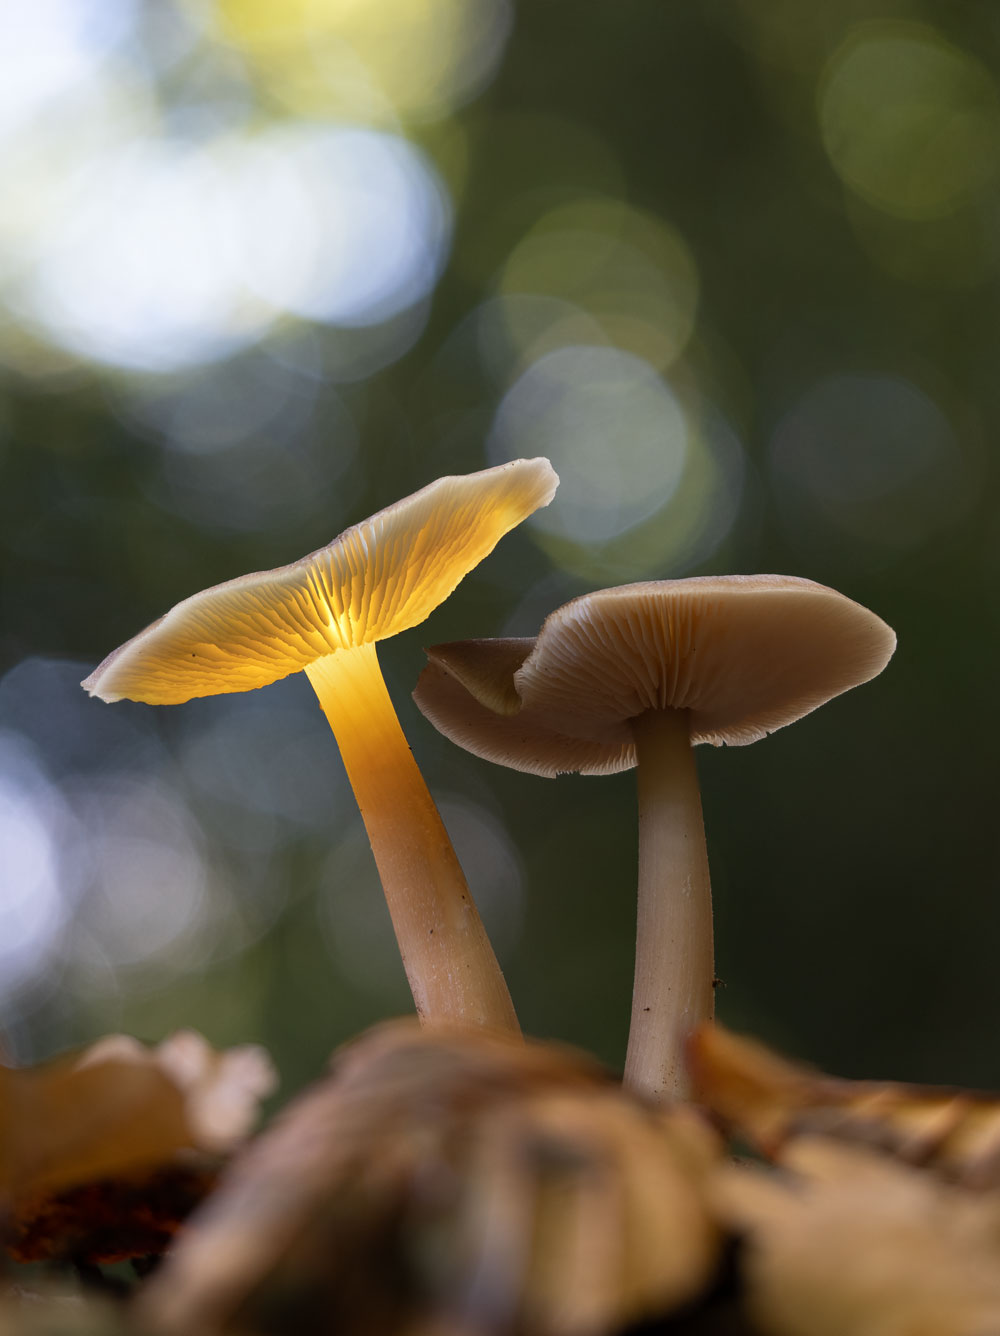
FIXING ISSUES
I noticed on this image there is a slight issue on the bottom edge of the shroom, caused by the two sets of images not quite aligning properly. It can happen and it is an easy fix using the Clone Stamp Tool which will sample the pixels of the background and replace the pixels of the dark edge.
We are going to make a Selection of the area and clone the edge away. Making a Selection gives us a border which will prevent anything we do going over the edge, so just like painting inside the lines.
First I use the Quick Selection tool again, I want an edge to protect the glowing part of the shroom. Selecting the background area didn’t select the dark line, and as I want it selecting, to save lots of messing about I just quit it (Select > Deselect) then clicked over the bright yellow area to select that instead. The edge is much better with the yellow selected, but as I want the background selecting I can just use Select > Inverse. The selection is now reversed or swapped and the dark edge is included. It’s sometimes faster to do this.
Now select the Clone Stamp Tool, which looks like a rubber stamp. The Menu Bar changes again, set it to 0% Hardness, Mode: Normal, Opacity 60%, and size quite small. Position the cursor near the edge and press ALT. It now turns to a target icon which is sampling the pixels under it, click to sample the background but not the dark tones of the edge or the yellow. Now just click/hold and start brushing over the edge and watch the dark line start to vanish. Photoshop is replacing the dark pixels of the edge with the pixels we sampled. Notice a cross hair which shows the area that is being sampled.
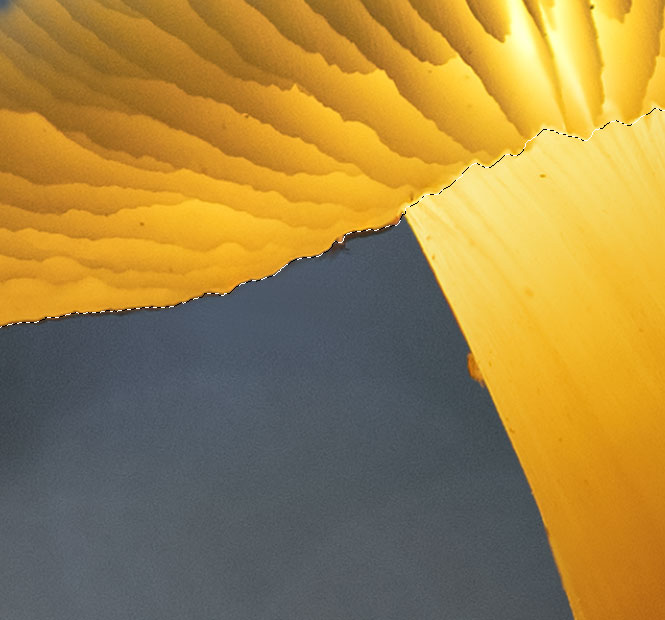
Removing a dark edge with Clone Stamp Tool
→ TIP Ever noticed how sometimes you can end up with an annoying white edge around some elements after processing an image? Usually it’s caused by being a little too aggressive with contrast or recovering highlights. It’s an easy fix, use the Clone Stamp Tool just as above, but set the Mode to Darken, sample close to the edge and run the brush along the white line. PS will then only find the bright line and replace it with the area sampled. And because it is set to Darken you do not even have to be that careful, there is certainly no need to make any selections. Neat!
STEP 7 – BLENDING ANOTHER SHROOM
Blending in another shroom really depends how it was taken. You may have used two lights which means you can blend in the illuminated image as one set, or you may have taken another focus stacked set of images. If so, just follow the steps above and go through the process again. Save a copy of the document for future reference if you wish, then flatten it, produce the next set of images and stack them, drag or copy into the main document as a new layer and blend it again.
Another way is to shoot the additional image with a narrower aperture for depth of field, perhaps f9-f14 depending on the lens and sensor, and not focus stack it. The advantage is obviously less images to process and stack, and if you have a few shots to illuminate in one shot it can be easier.
The disadvantage is by altering the aperture you are disturbing the camera and the images are sure not to align. It can also be difficult to get them to align because by altering the depth of field in one image you will effectively alter the overall size of the shroom, possibly not by a great deal, but enough to make it more work to align. It can be done, and the next steps below will show how.
What will not work is taking an image at f2.8 for the out of focus background and the wonderful bokeh, then shooting the main standard set and the illuminated set at a smaller aperture for the depth of field. The main set would have such soft edges around the shrooms and you will end up with halos which will be hard work to remove. Shoot your first set focus stacked and then additional images at a smaller aperture if you prefer.
The single shot f9 image is opened in PS from LR after copying the same processing settings to it. Once open in PS instead of loading the full image (dragging or copying), I cropped it first with the crop tool.
Because I will need to do some repositioning and some resizing I crop it, just retaining the main subject and making it easier to see the selection handles (the small dots) around the edge.
I lower the opacity of the layer to allow me to see the edges underneath too.
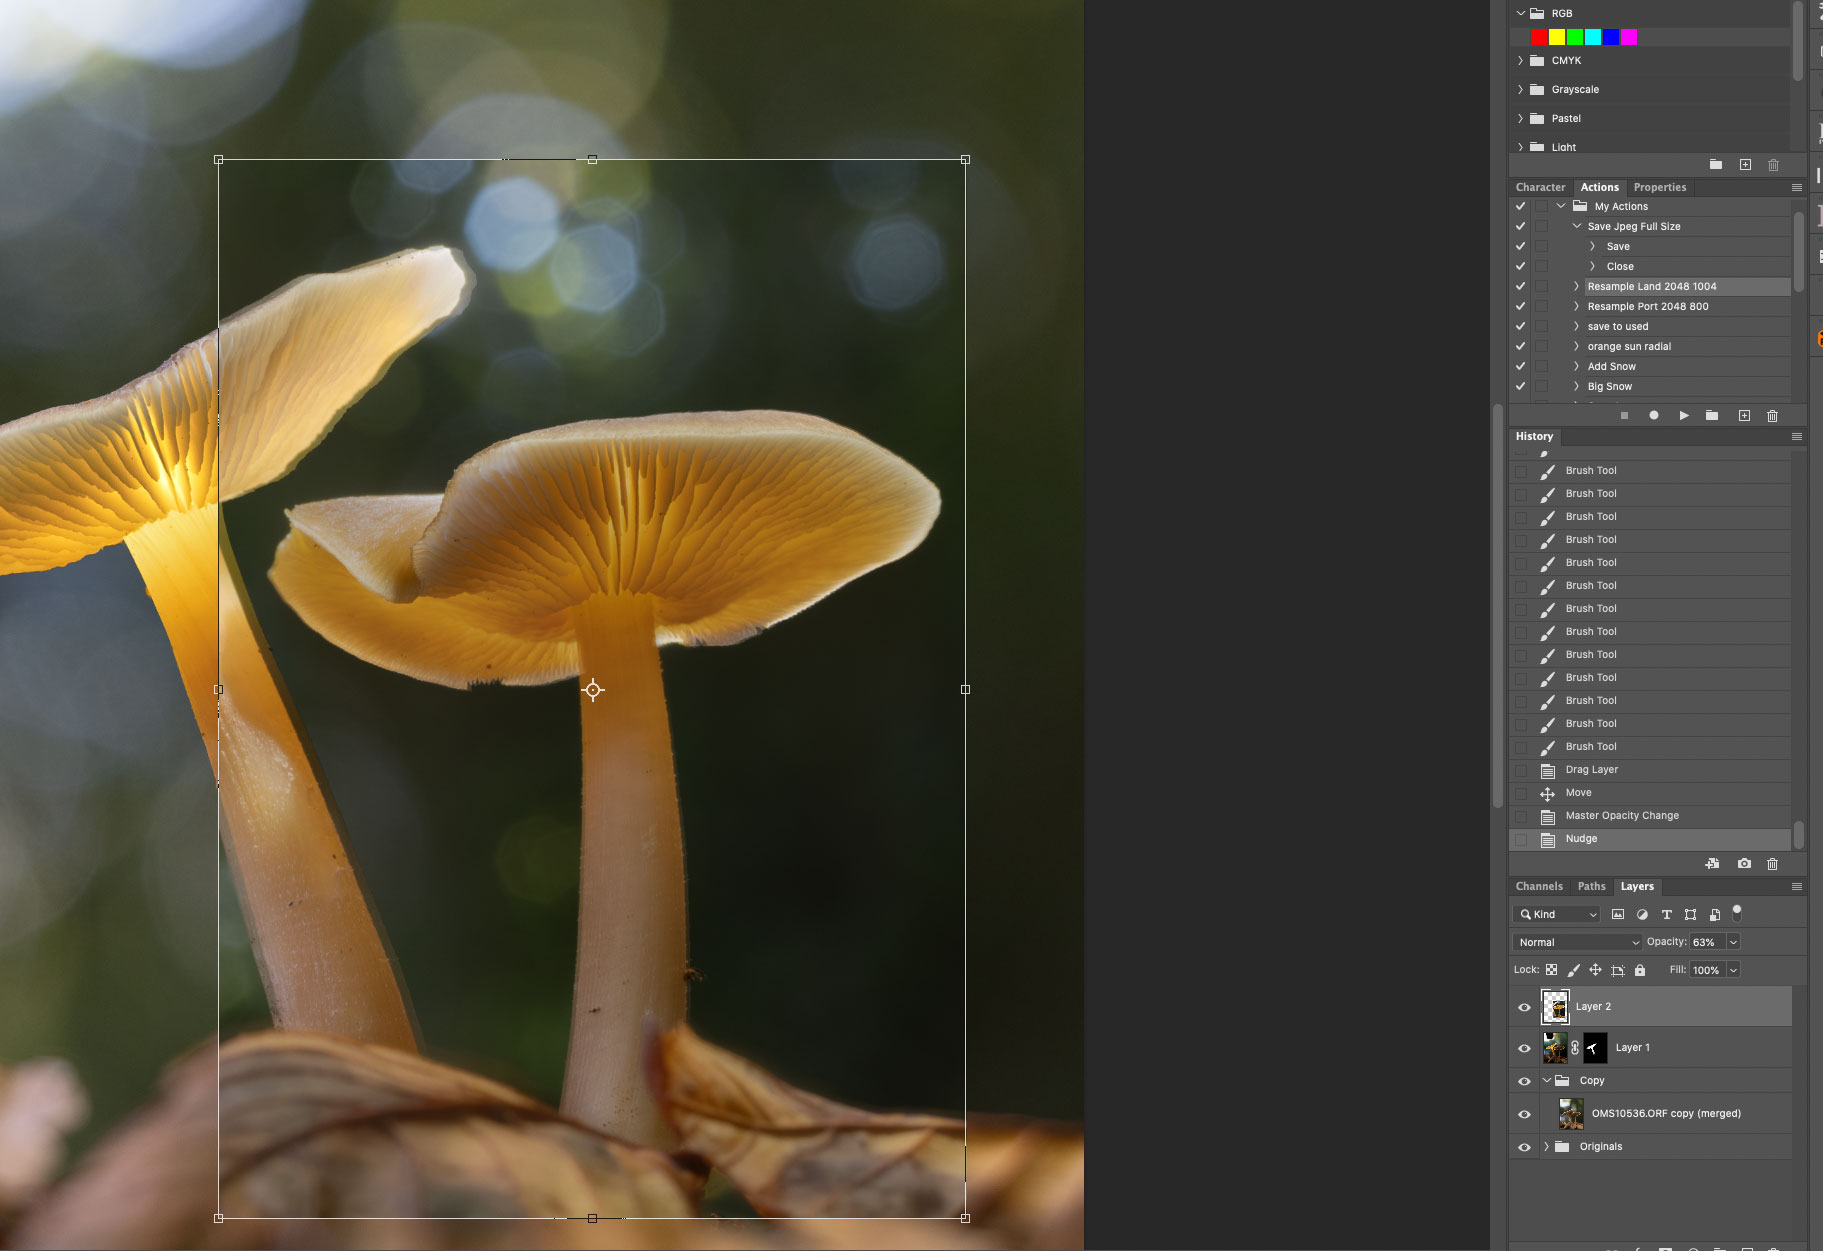
The second illuminated shroom as another layer in PS after cropping it.
By clicking the layer I can then click/hold and drag it into position. Using the Move tool and the keyboard arrows means I can finely place it.
By clicking/holding I can drag the selection handles on the outside the the image, and by clicking one of the corners and holding Command (Windows Control) I can also distort it.
Using all these tools means I can after some adjustments get the image matching up pretty close to the image underneath.
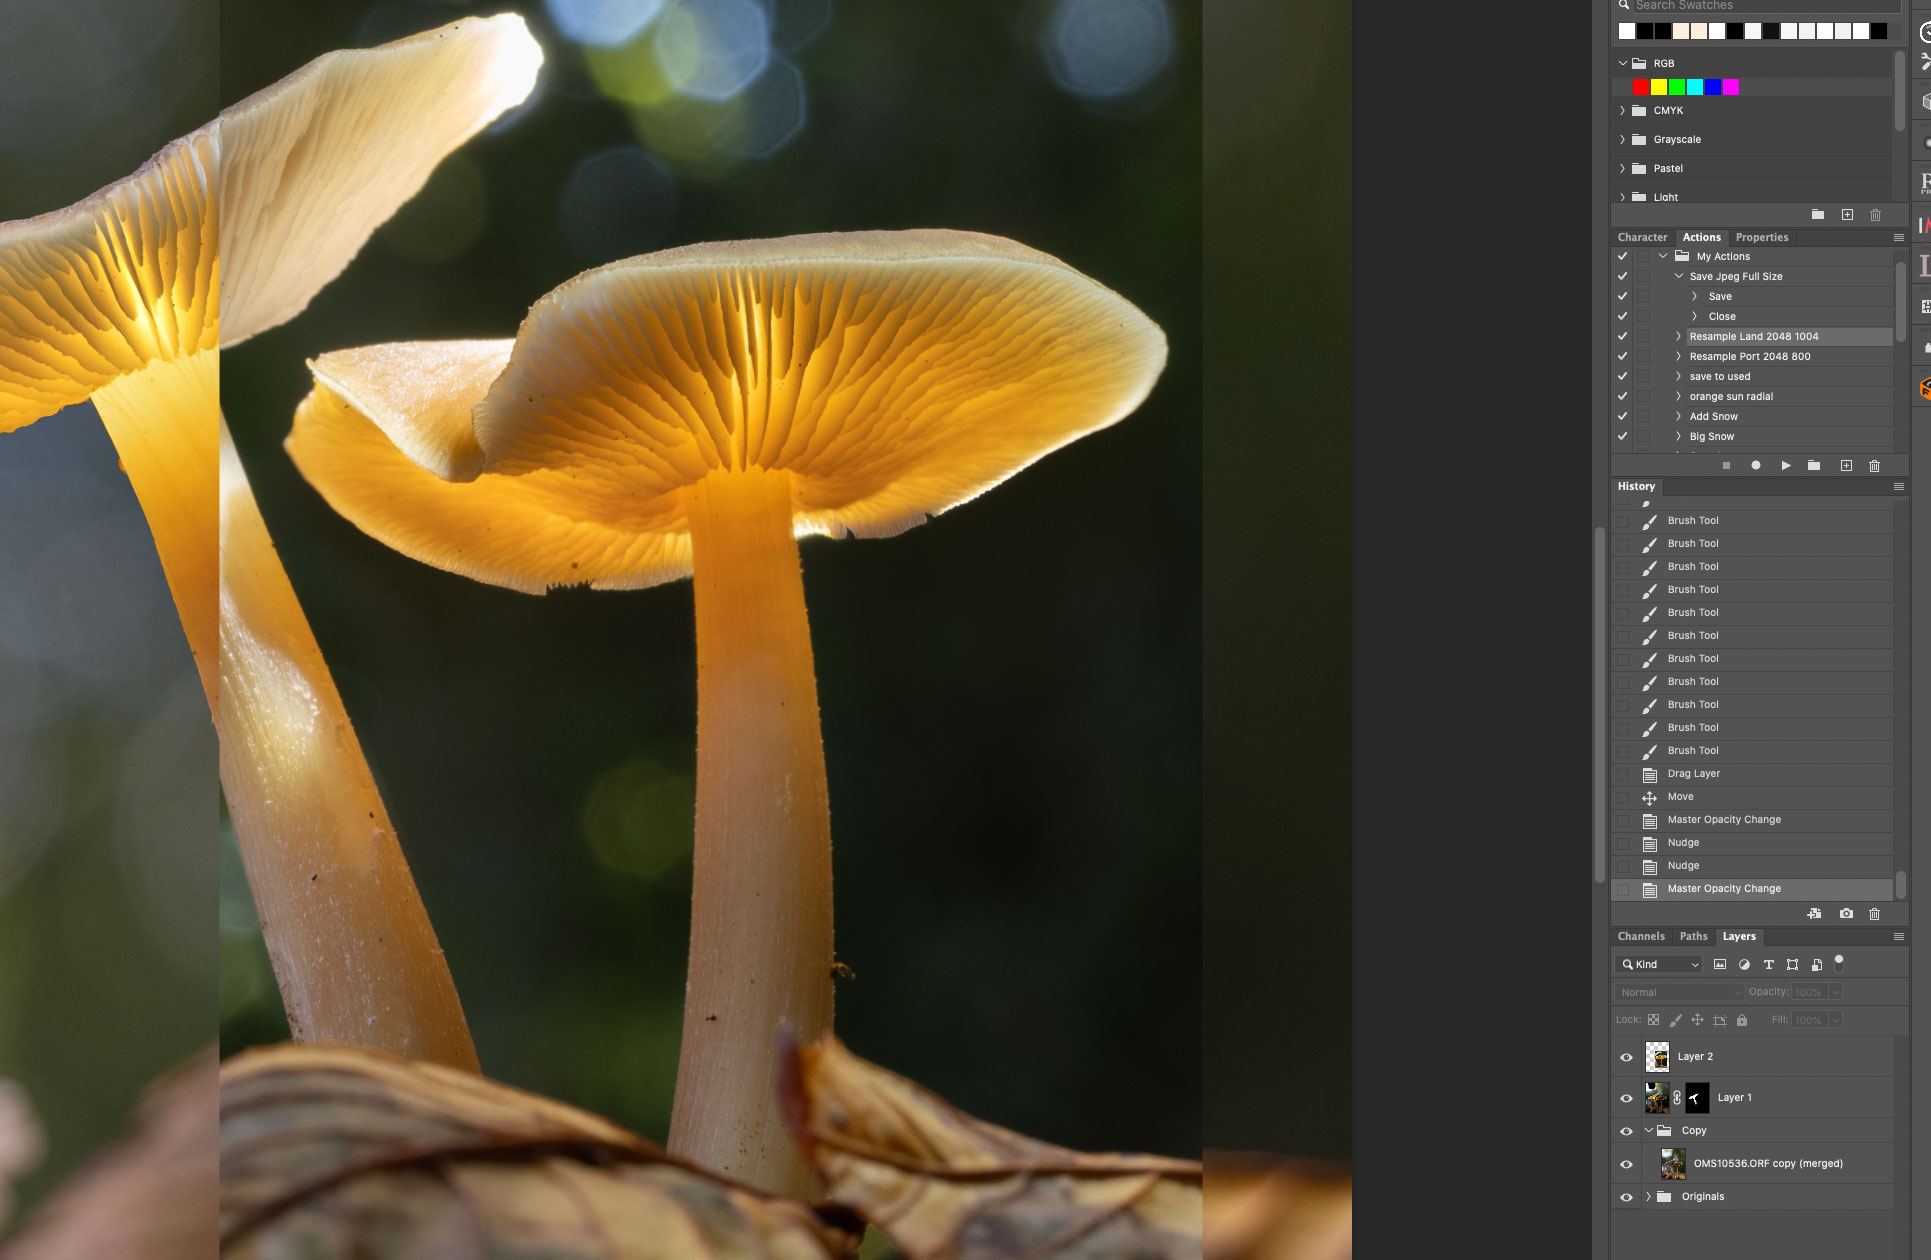
Repositioning the layer as close as I can.
Just as previous I made a selection of the shroom with the Quick Selection Tool and added a mask.
Now only the illuminated area is visible and the background is hidden, removing the part of the shroom on the left which was not matching up.
Another adjustment is needed because there is a double edge on the bottom. Selecting the layer again with the Move tool to show the handles, I can click on the lower centre handle, press/hold Shift and move it up which alters the height but not the width, in other words compresses it.
Finally I can use the brush tool just as before to blend in and refine some edges.
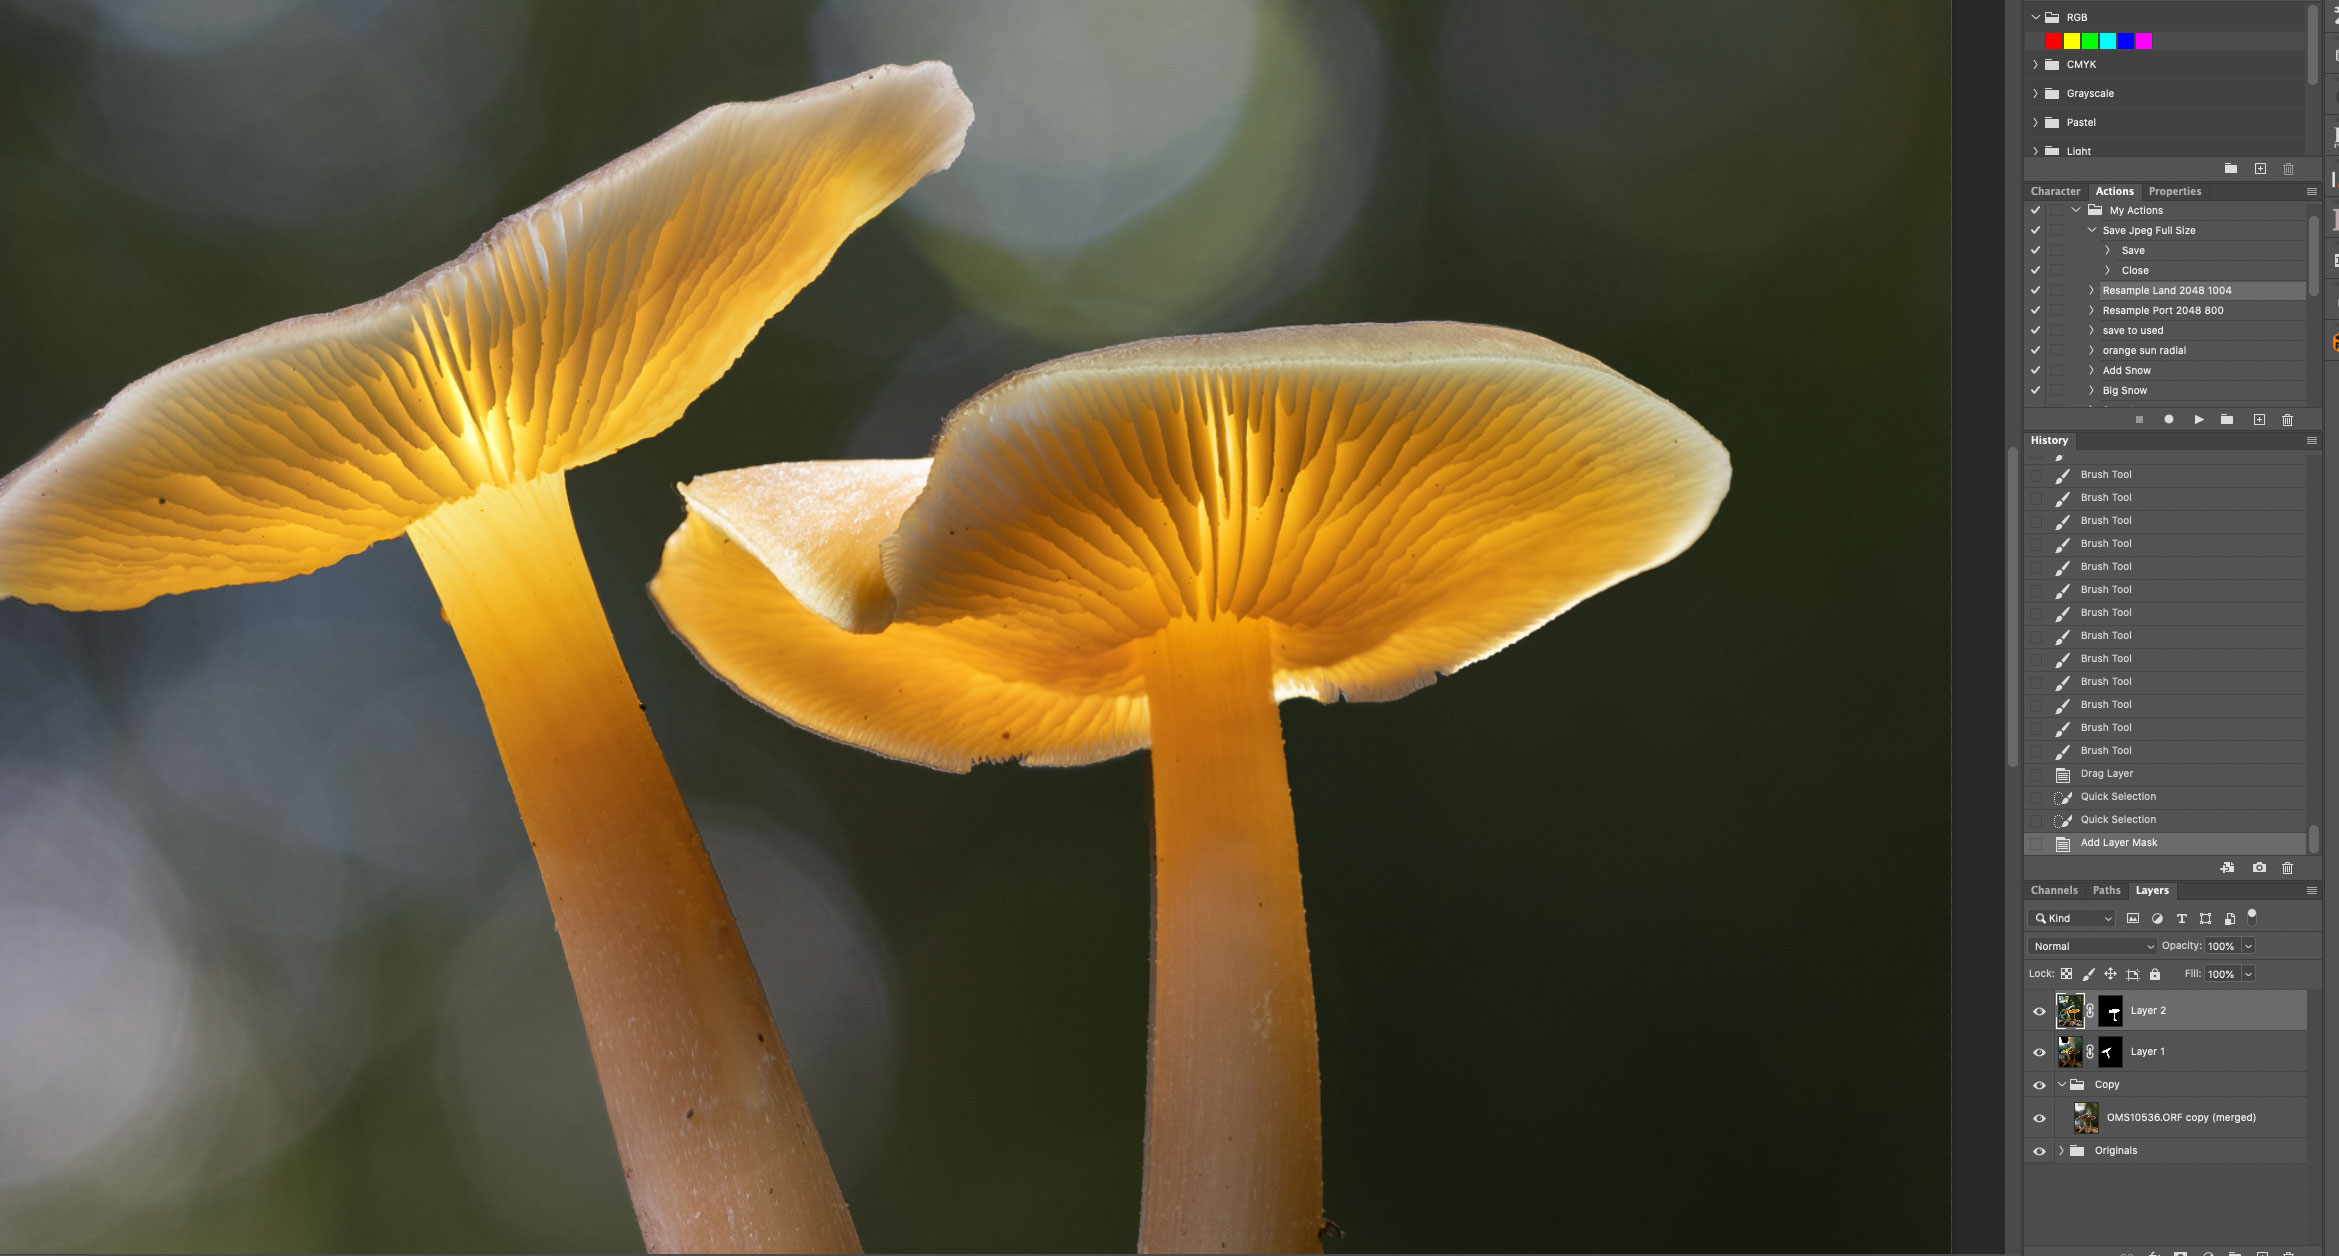
The second shroom now blended in.
STEP 8 – FINAL STAGES
Thankfully we are almost done. As before save a copy of the document if you wish with the layers, and then flatten it. Next I saved the image because I want it back in LR. Do note if you have renamed the file you cannot save it back to Lightroom, which can be annoying. If you want the image in LR again for some further work you can save it and import it, or a little trick that saves a whole lot of time, open one of the images from the set in LR into PS (select image, right click and Edit in Photoshop), then drag the document layer onto the image as before and save, it will then appear in LR. It will be brought back in as a Tiff if you have set Tiff in LR, (LR > Preferences > External Editing > Edit in Photoshop > File Format > Tiff) which can bloat your catalogue. Once I’m done with these I delete from Lightroom because my final image is saved from PS with a meaningful title, so I don’t need to keep them.
In LR I will do my last edits which are more creative, I may alter the white balanced tint into blue to make it look more like twilight, alter tones and contrast a little, and use masks to alter the image. Note you could do your final edits in PS, or whichever App you are using.
Here in the Mask section I’ve used a Radial Grad, then clicking on the icon in the dialogue I reverse it. I can then alter exposure to act as a vignette, and doing it this way means I have much more control over size and positions.
The very last step and one I always do is to open it again in PS, and apply noise and sharpening. I use Topaz DeNoise as a plugin in PS. I copy the layer, run Denoise, and then if needed I can apply a mask and paint anything back in if Denoise has removed any detail.
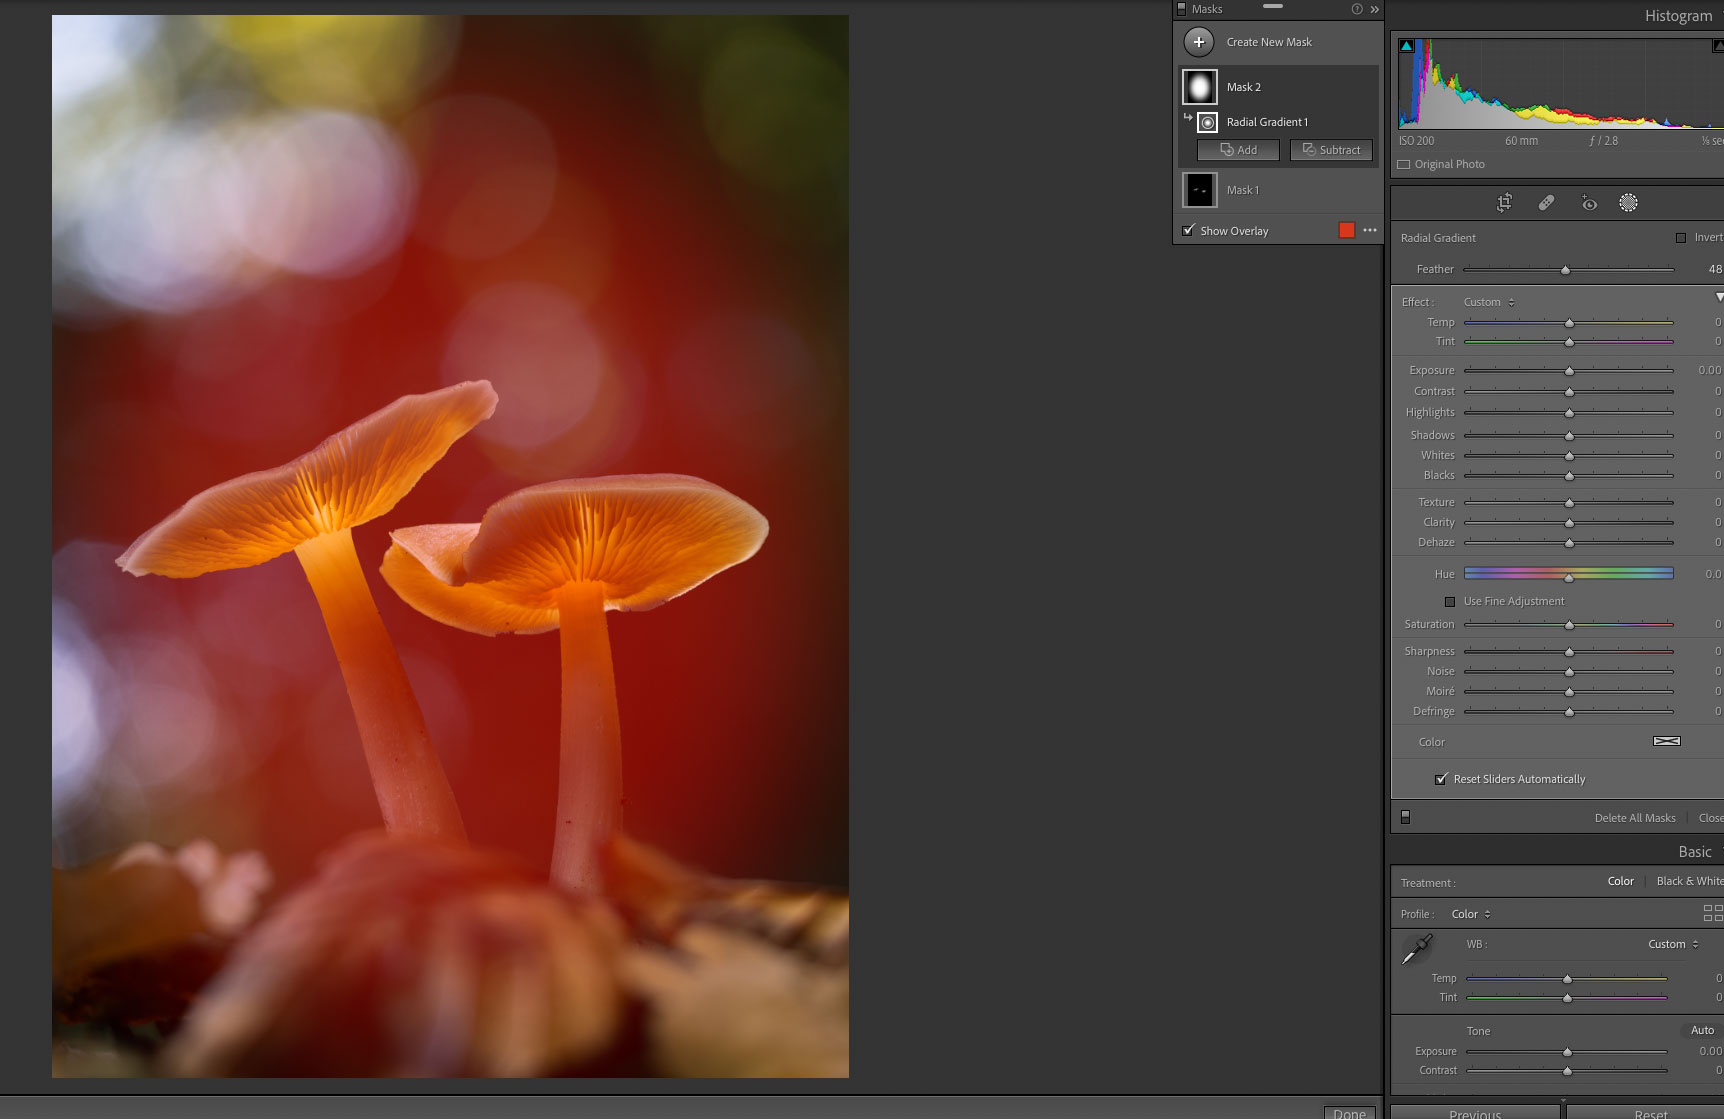
The blended image back in LR for some final edits. Here, adding a Radial Grad for a Vignette.
COMPLETE
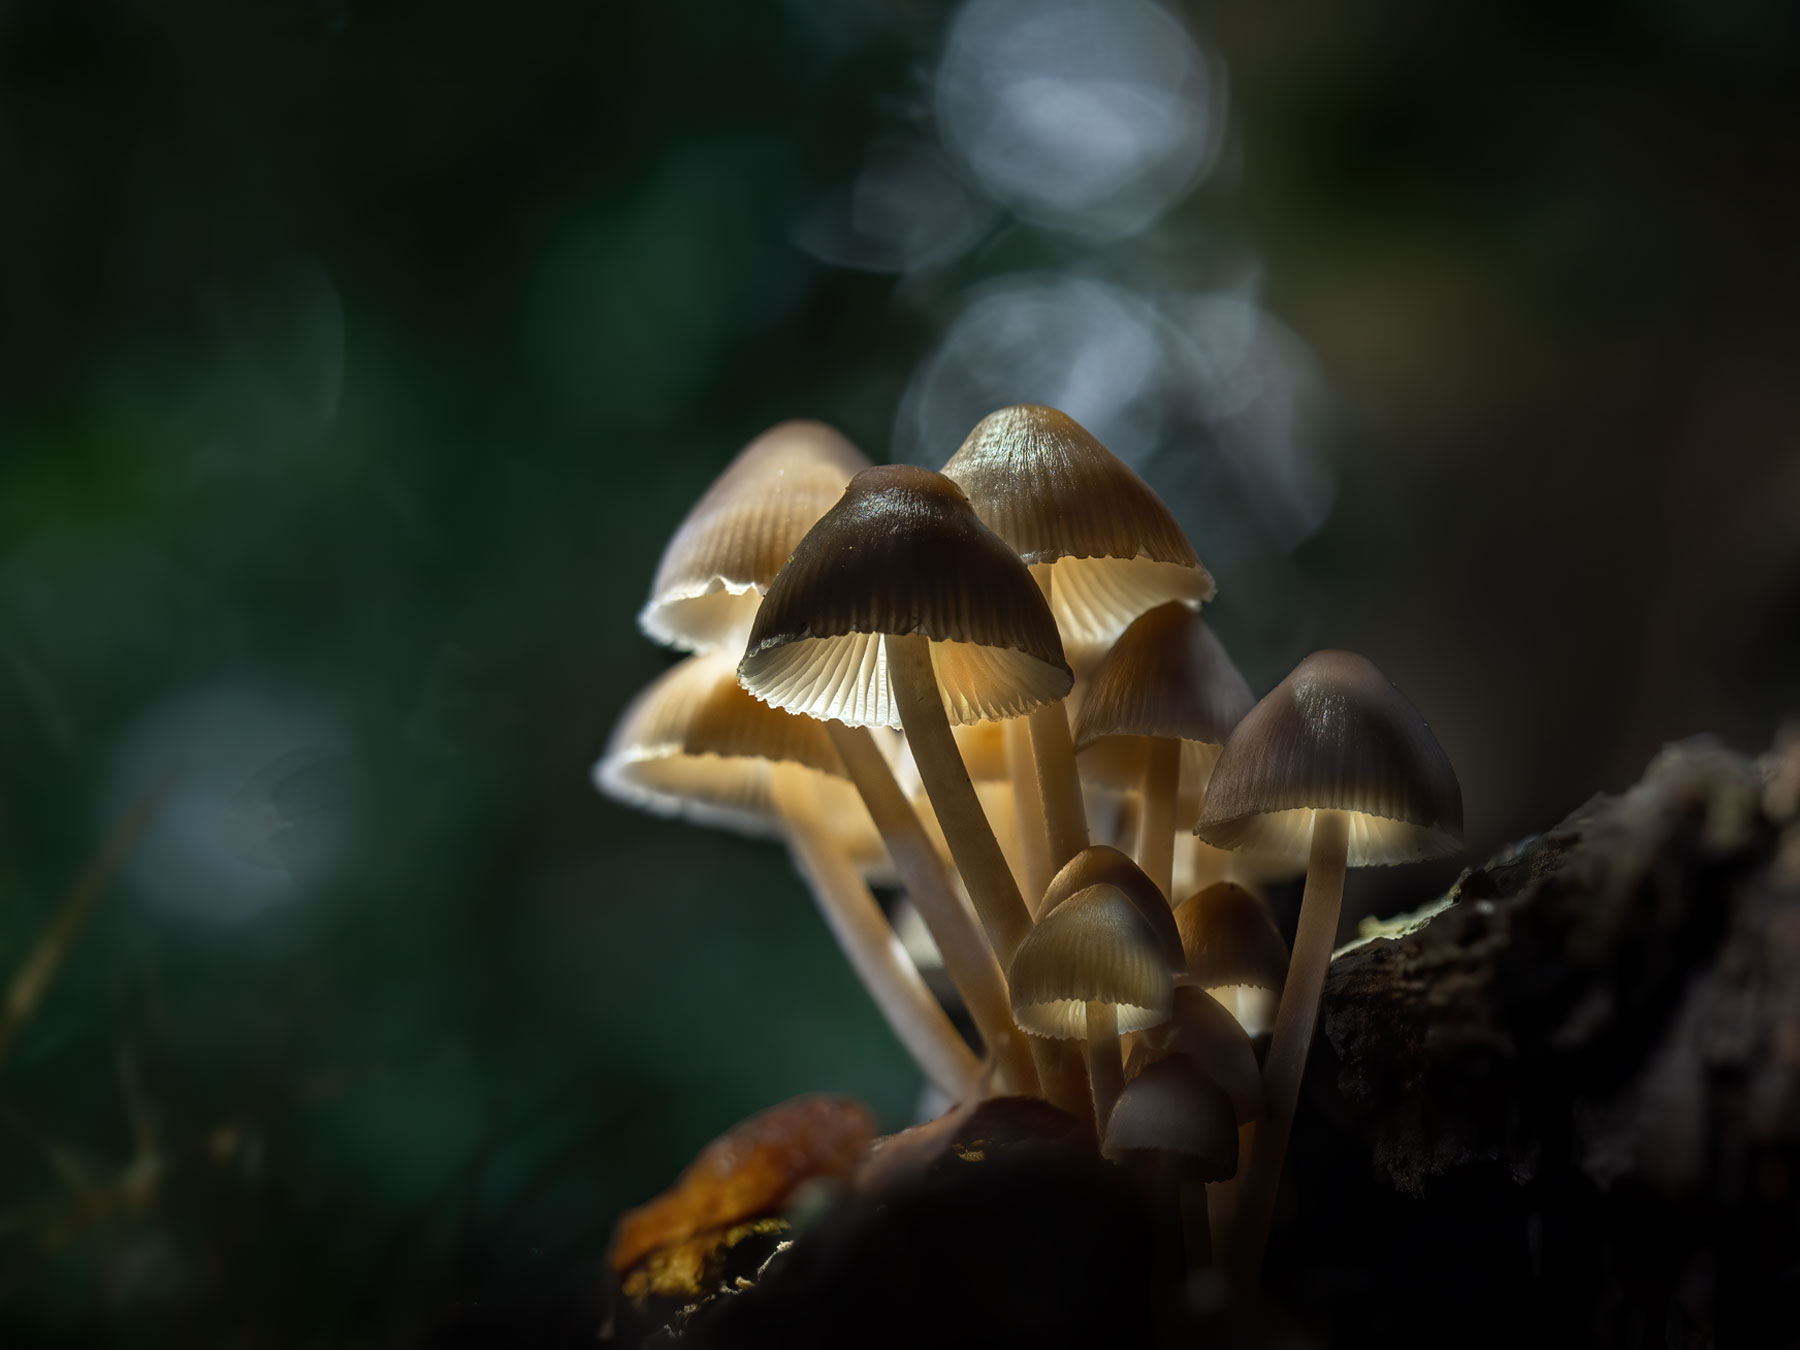
Below is the final image after making some adjustments in LR. I wanted the background a little darker and altered the colour of the illumination a fraction, and all in all I’m very happy with the result. Another thing to consider is when you are merging in the illuminated layers is to keep some of the illumination on the ground as though the shrooms are illuminating it. It’s easy to do by using the masks and the paint brush.
It may seem to be hard work with a lot of steps and there are, but once you have done it a few times many of the steps are very quick and you will speed through them.
The biggest challenge is to have a vision of what you want to achieve and try to stick to it, after all producing a ‘Glowing Shrooms’ image is creative and you should try to be creative with it. Please have a look at the ‘Inspiration’ section for a few more ideas.
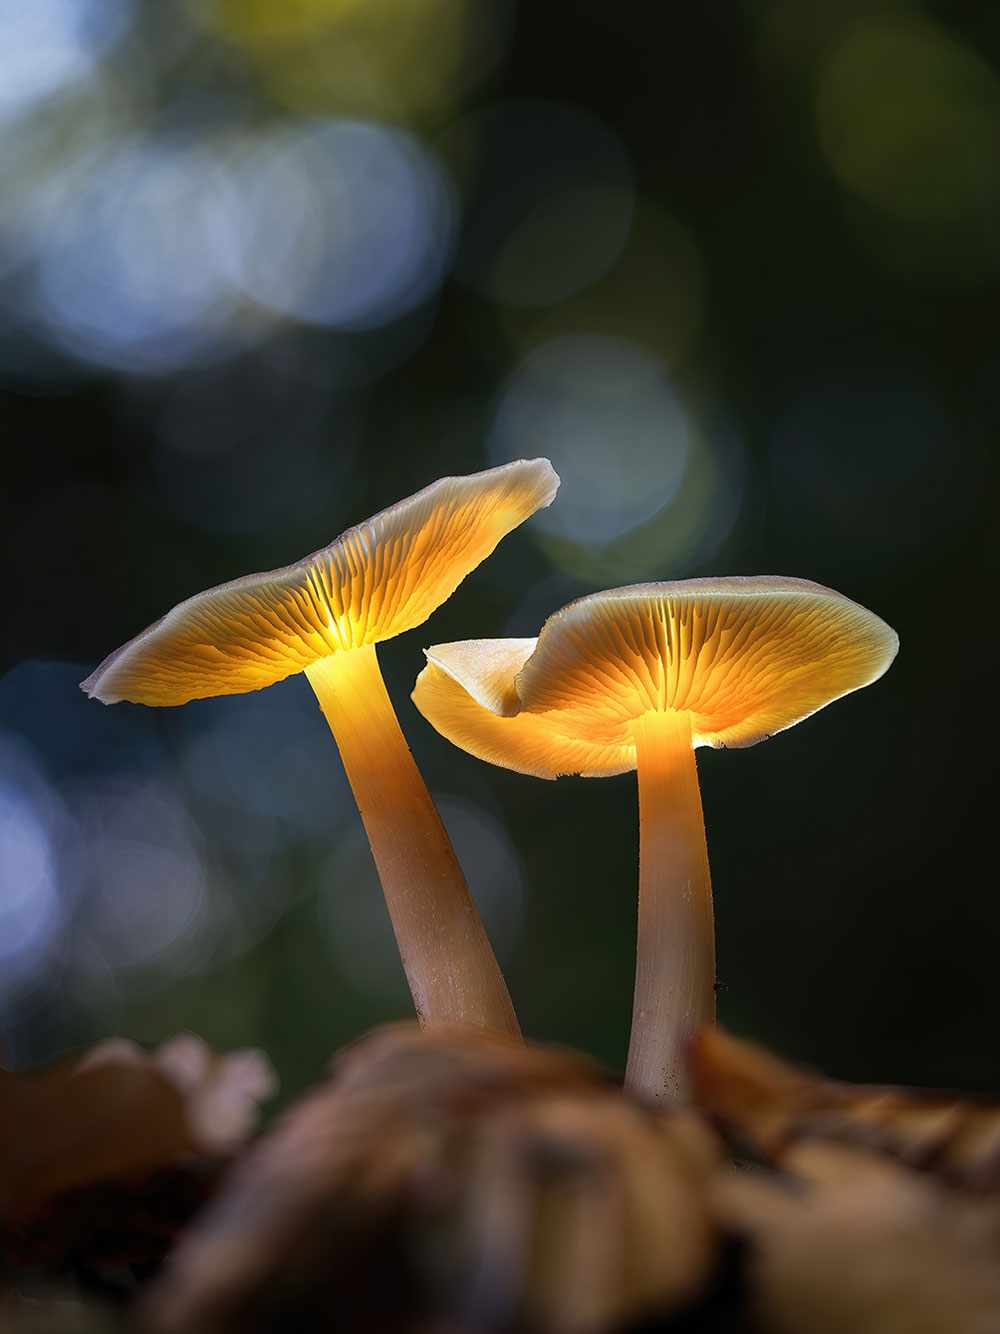
Final image
ANOTHER EXAMPLE
This image below is an example of one way to deal with multiple shrooms in one image where lighting and stacking is going to get very complicated. As there are so many in one group it would require a focus stacked standard set (non-illuminated) and then multiple sets depending on which you want to illuminate, perhaps 2,3 or even four sets, so it can quickly start to get complicated.
One way as we saw in the processing steps is to shoot the illuminated set as one image with a narrower aperture for more depth of field, but alignment will be an issue. Sections of the image could be cropped and then aligned individually to get around trying to align one main shot. In this case I decided I would illuminate it twice, thus have one non-illuminated set and two illuminated sets. This meant I didn’t have to change settings other than under-exposing the illuminated set a little. Notice the depth of field is quite narrow and doesn’t extend all the way back; this was a conscious decision, having parts of an image out of focus can actually add more visual depth and interest to an image.
“Shrooms”-Various sets of Focus Stacked images
STEP 1 – THE SHOTS
Three sets of shots were taken, the first non illuminated focus bracketed set which form the main image. Another set were taken illuminating the main shroom and some in the rear, and another set illuminating some of the smaller shrooms at the front. They are inspected, sorted into colour coded sets, any processing is applied to the first image of each set and then synchronised across each set ready to merge.
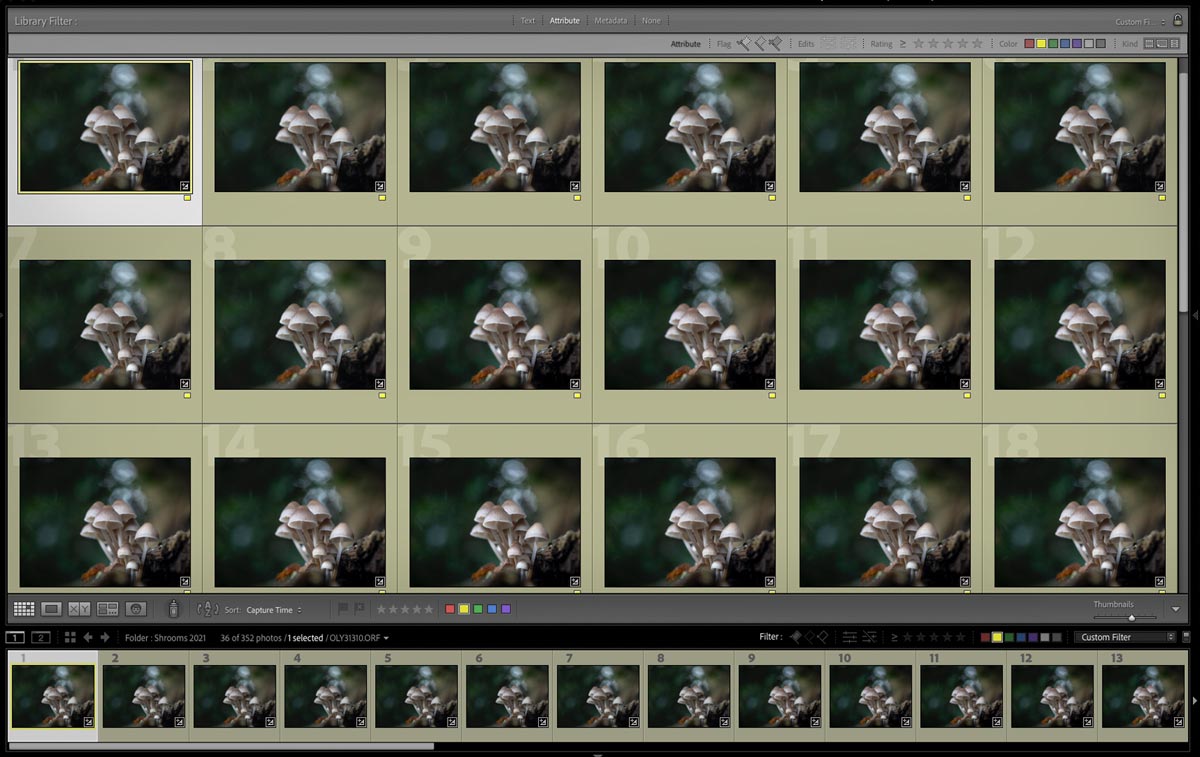
Main set taken 60mm Macro f2.8 – ideal step was Focus Offset 2
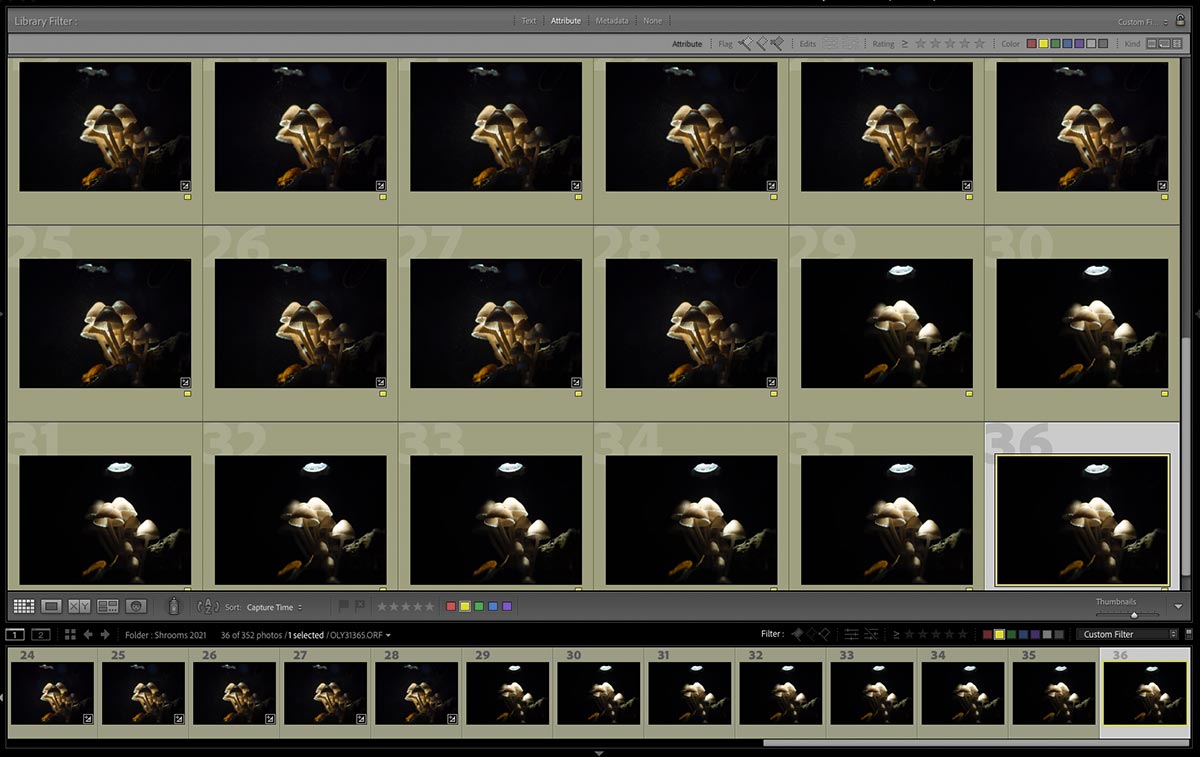
Illuminated sets with the same settings, under exposed
STEP 2 – LAYER IN PHOTOSHOP
Images are selected and sent to Photoshop as layers, right click and go to Edit In >Open as Layers in Photoshop. Duplicate the layers and group one set together.
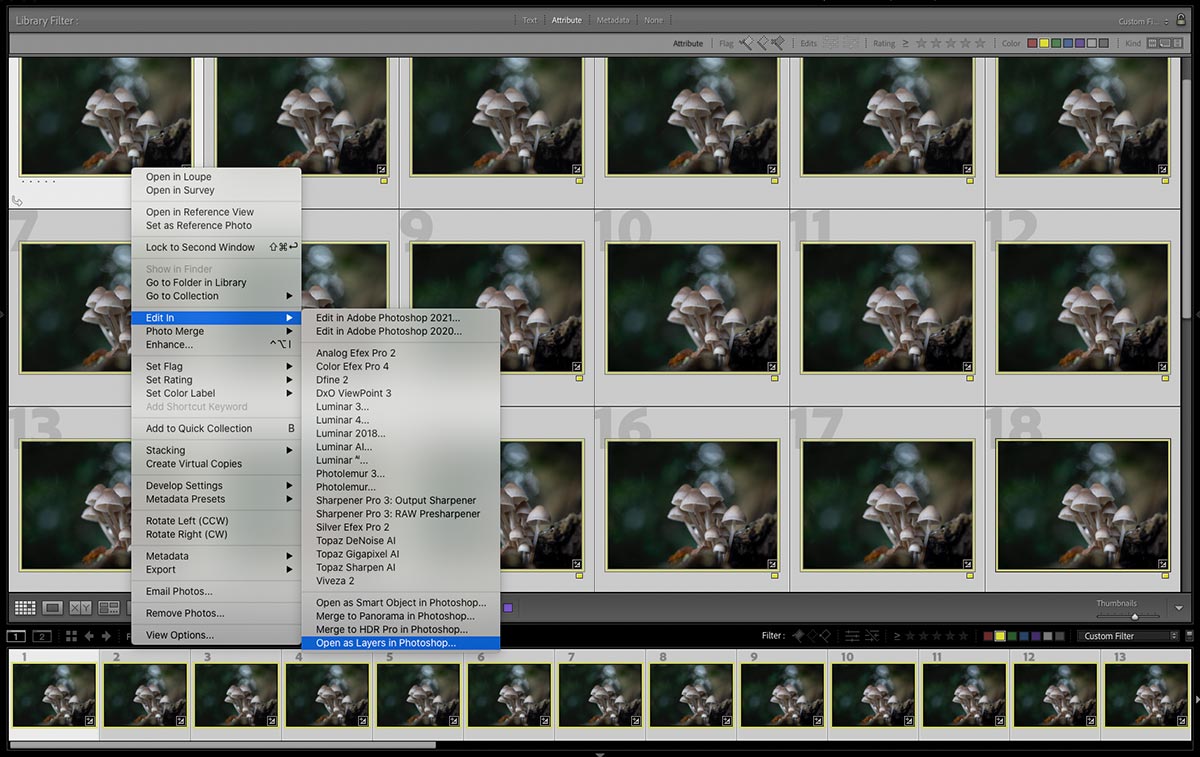
STEP 3 – AUTO ALIGN
Select the layers and align them just as previous Edit>Auto Align Layers and select Auto.
STEP 4 – AUTO BLEND
Then Auto-Blend the layers so there is one ‘merged’ image Edit>Auto Blend Layers and select Stack Images. Masks are applied to all the images.
Go through the layers and fix any issues as before.
STEP 5 – RINSE & REPEAT
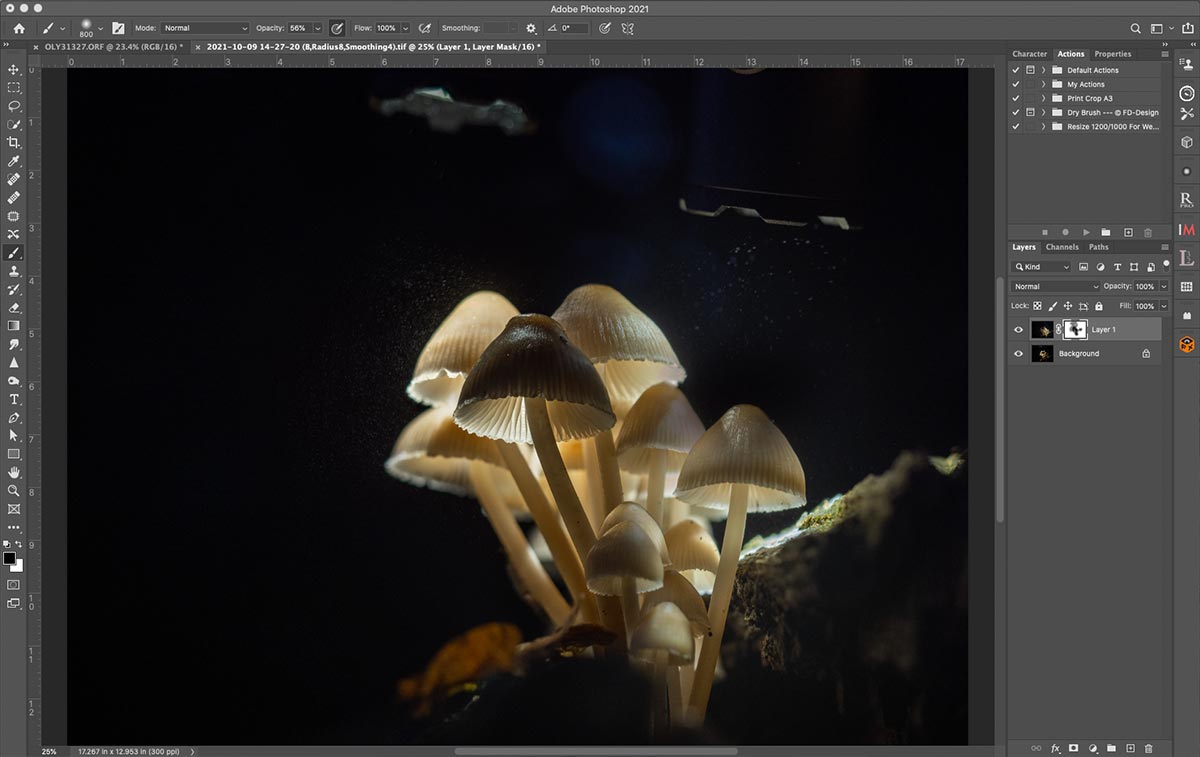
Send the illuminated set(s) to Photoshop, align and stack them, and fix any issues. In this screen shot I have taken the two illuminated sets after Auto-Blending them, placed them into one document and merged the illumination together. Notice the torch visible from two different images which I need not be concerned about removing yet.
STEP 6 – COMBINE ALL
Next the illuminated set is dragged or copied onto the standard non illuminated set, a mask is applied and I start to blend in the illumination, working on it until I am happy.
Another little trick, if you have part of the image that will not align, make a copy of it by dragging to the New Layer icon, remove the mask (right click and delete it), then position it where needed and add a new mask. From one image you can make copies and position different parts if needed.
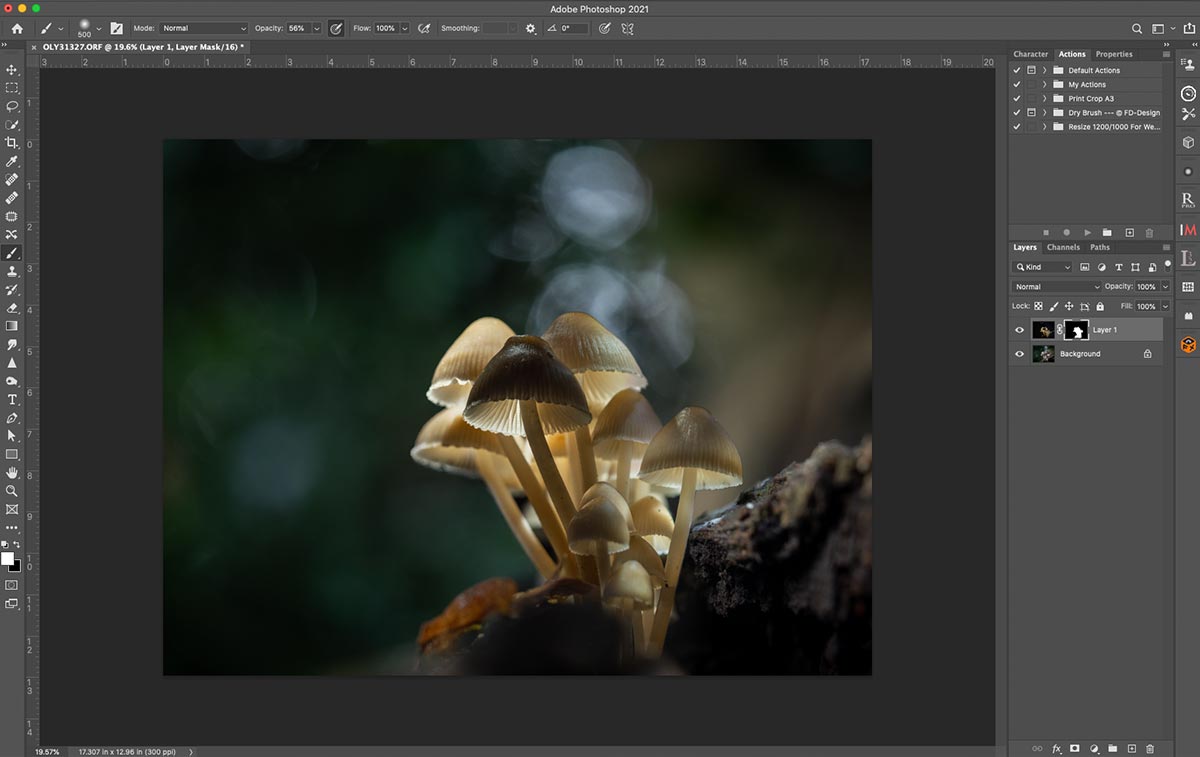
Once you are done with all the merging you can save it, take it back into Lightroom for further work if needed and work on areas you feel could be improved such as darkening the background a little or altering the colour tones.
CONCLUSION
Once you persevere with the processing aspect of producing ‘Glowing Shrooms’ you’ll find you can go through the steps quite quickly and with confidence. It is technical, but once you are comfortable with it you can then concentrate on the fun bit, getting creative with the final look.
